
Cryptography in .NET Succinctly®

CHAPTER 2
Cryptographic Signatures
Cryptographic signatures provide a method for verifying the integrity of data. By signing data with a digital signature, anyone can verify the signature that then proves that the data originated from you. It also verifies that the information has not been altered after you signed it.
Generating and verifying signatures
When generating signatures, you might be tempted to use the String.GetHashCode method. This, however, is not recommended at all. String.GetHashCode is actually intended for use in collections based on a hash table.
- Don’t serialize hash codes for storing inside a database.
- Hash codes are not suitable for use as a key for object retrieval in a keyed collection.
- Unequal objects can have identical hash codes.
- To generate cryptographically strong hashes, instead use: System.Security.Cryptography.HashAlgorithm or System.Security.Cryptography.KeyedHashAlgorithm.
To see how this works, we will create a hash using SHA256. We will then create a container that will store the public and private asymmetric keys. We will then sign and return the signed hash to the calling application.
To verify the signed message, we will specify the container to use along with the hash of the original message and the digital signature. A method called VerifySignedMessage will verify the validity of the transmitted message.
Note: SHA256 is a hash algorithm—not an encryption algorithm.
Start by creating a new console application in Visual Studio. Before you start to write any code, add the following namespaces to your console application.
Code Listing 1: Adding a New Namespace
using static System.Console; using System.Security.Cryptography; |
The System.Security.Cryptography namespace will provide the cryptographic services we need for this application. The namespace provides services such as message authentication, encoding and decoding of data, random number generation, hashing, etc. The System.Console static namespace we brought into scope allows us to type less code. As of C# 6.0, static classes can be brought directly into scope without us fully qualifying the static namespace.
Next, you need to add a class-scope property that will contain the container name. The function of the container name will be explained in more detail later.
Code Listing 2: Adding Container Name
Next, add a method called SignMessage to the Program class. This method accepts the original message as a parameter and will return the hashed value of this message via an out parameter.
Code Listing 3: Adding SignMessage Method
Inside this method, create the using statement in Code Listing 4.
Code Listing 4: SHA256Managed
As mentioned earlier, SHA256 is a hash algorithm. As the class name suggests, the hash size for SHA256 is 256 bits. SHA256 is an abstract class with SHA256Managed being the only implementation of the abstract class.

Figure 1: SHA256 Abstract Class
You will notice that the abstract class inherits from HashAlgorithm and exposes an overloaded Create() method. In fact, the inheritance chain looks like Figure 2.

Figure 2: Inheritance
Swinging back to our code example, now inside the using statement, add the code from Code Listing 5.
Code Listing 5: SignMessage Method
hashValue = sha.ComputeHash(Encoding.UTF8.GetBytes(message)); CspParameters csp = new CspParameters(); csp.KeyContainerName = ContainerName; RSACryptoServiceProvider rsa = new RSACryptoServiceProvider(csp); var formatter = new RSAPKCS1SignatureFormatter(rsa); formatter.SetHashAlgorithm("SHA256"); return formatter.CreateSignature(hashValue); |
The hash value is created by calling the ComputeHash() method, which has now cryptographically hashed the message we passed to it. The RSACryptoServiceProvider and DSACryptoServceProvider classes provide asymmetric encryption. In the previous code listing, a new public/private key pair was generated for us the moment we instantiated a new instance of the RSACryptoServiceProvider.
As a rule, asymmetric private keys must never be stored locally or in plain text on the local machine. If you must store a private key, you must use a key container. When we instantiate a new instance of the CspParameters class, we create such a key container by passing the name you want to use to the KeyContainerName field. This is where we make use of the ContainerName field created earlier.
We are now ready to create the signature using the RSAPKCS1SignatureFormatter and return that to the calling code. The message we passed to the SignMessage() method is now hashed and digitally signed. The full SignMessage() method should look like Code Listing 6.
Code Listing 6: Full SignMessage Method
private static byte[] SignMessage(string message, out byte[] hashValue) { using (SHA256 sha = SHA256Managed.Create()) { hashValue = sha.ComputeHash(Encoding.UTF8.GetBytes(message)); CspParameters csp = new CspParameters(); csp.KeyContainerName = ContainerName; RSACryptoServiceProvider rsa = new RSACryptoServiceProvider(csp);
var formatter = new RSAPKCS1SignatureFormatter(rsa); formatter.SetHashAlgorithm("SHA256"); return formatter.CreateSignature(hashValue); } } |
The hashed message can be verified by the VerifySignedMessage() method. Note that the RSAPKCS1SignatureDeformatter object does the verification of the digital signature.
Code Listing 7: Verify Digital Signature
private static bool VerifySignedMessage(byte[] hash, byte[] signature) { CspParameters csp = new CspParameters(); csp.KeyContainerName = ContainerName; using (RSACryptoServiceProvider rsa = new RSACryptoServiceProvider(csp)) { var deformatter = new RSAPKCS1SignatureDeformatter(rsa); deformatter.SetHashAlgorithm("SHA256"); return deformatter.VerifySignature(hash, signature); } } |
In order to verify the digital signature, you will need:
- The public key from the person who signed the message.
- The actual digital signature generated.
- The hash algorithm that the person used to sign the message.
- The hash value of the signed message.
In this instance, we are the signer of the message. The public key we used to sign the data is safely stored inside the container we created.
Note: We have not encrypted the message. We have only generated a hash in order to validate that the message hasn’t been tampered with between the time it was sent and the time it was received.
To implement this digital signature, let’s give our container the name of KeyContainer and get the signature for a message we generate. The code will then verify the digital signature that will obviously pass the validation.
Code Listing 8: Implementation
public static string ContainerName { get; private set; } static void Main(string[] args) { ContainerName = "KeyContainer"; string message = $"This secure message was generated on {DateTime.Now}"; byte[] signature = SignMessage(message, out byte[] hash);
if (VerifySignedMessage(hash, signature)) WriteLine($"Message '{message}' is valid"); else WriteLine($"Message '{message}' is not valid"); ReadLine(); } |
Running the application will result in the output in Figure 3.

Figure 3: Output Result
The output from the previous code is obvious. So, let’s have a look at a more practical example. In the following code, we will not go into detail regarding passing around the public key. We will simply use it in the created container.
The situation can be illustrated with the diagram in Figure 4.
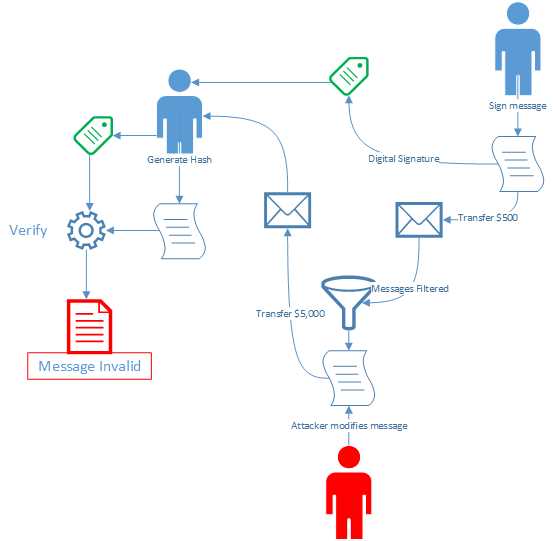
Figure 4: Signing a Message
Imagine that you are sending me a message to transfer $500 into your bank account with the provided account number. The message clearly states the amount and the account number. Before you send me the message, however, you sign it and send the message to me along with the digital signature.
Code Listing 9: Original Message Signed
// Sender string secureMessage = $"Transfer $500 into account number 029192819283 on {DateTime.Now}"; byte[] digitalSignature = SignMessage(secureMessage); |
The method used to sign the message is the same as the one we used previously. This time it only returns the digital signature.
Code Listing 10: Create Digital Signature
private static byte[] SignMessage(string message) { using (SHA256 sha = SHA256Managed.Create()) { byte[] hashValue = sha.ComputeHash(Encoding.UTF8.GetBytes(message)); CspParameters csp = new CspParameters(); csp.KeyContainerName = ContainerName; RSACryptoServiceProvider rsa = new RSACryptoServiceProvider(csp); var formatter = new RSAPKCS1SignatureFormatter(rsa); formatter.SetHashAlgorithm("SHA256"); return formatter.CreateSignature(hashValue); } } |
Unfortunately, somewhere between sending the message to me and my receipt of it, somebody has intercepted the message and changed the content. The amount is changed from $500 to $5,000, and the bank account is changed to the attacker’s bank account number.
Code Listing 11: Message Intercepted
// Message intercepted secureMessage = $"Transfer $5000 into account number 849351278435 on {DateTime.Now}"; |
When the modified message reaches me, I use the ComputeMessageHash() extension method to compute the hash for the message. Next, I pass the hash I computed to the VerifySignedMessage() method along with your digital signature to check the authenticity of the message.
Code Listing 12: Compute Hash and Verify Message
// Recipient byte[] messageHash = secureMessage.ComputeMessageHash(); if (VerifySignedMessage(messageHash, digitalSignature)) WriteLine($"Message '{secureMessage}' is valid and can be trusted."); else WriteLine($"The following message: '{secureMessage}' is not valid. DO NOT TRUST THIS MESSAGE!"); |
The ComputeMessageHash() method is not complex and simply returns the hash for the message received.
Code Listing 13: ComputeMessageHash Method
public static class ExtensionMethods { public static byte[] ComputeMessageHash(this string value) { using (SHA256 sha = SHA256.Create()) { return sha.ComputeHash(Encoding.UTF8.GetBytes(value)); } } } |
If you run the console application now, you will receive a very different message.

Figure 5: Received Message Invalid
You can see how crucial a role digital signatures can play in secure message transmission. Again, the use of digital signatures is not intended to obfuscate the message being sent but rather to verify the message’s authenticity. If your intent is to send a message so that it can’t be read by anyone intercepting it, you mush encrypt the message.
We will have a look at doing that in a later chapter.
Why you shouldn’t use String.GetHashCode()
As mentioned at the beginning of the chapter, String.GetHashCode() is not a suitable method for generating hashes. The value it returns will change, and it is platform dependent. This means that it will differ among the various versions of the .NET Framework. It will also differ between the 32-bit and 64-bit versions of the .NET Framework.
Lastly, the GetHashCode() method can return the same value for different strings. This makes it totally inefficient for the standard required to secure your data.
- 1800+ high-performance UI components.
- Includes popular controls such as Grid, Chart, Scheduler, and more.
- 24x5 unlimited support by developers.