
Cryptography in .NET Succinctly®

CHAPTER 6
Cryptographic Key Containers
We have seen how to generate a public and private key when using asymmetric encryption. While it is okay to share the public key (that’s what it is there for, after all), the private key needs to be kept safe. The private key should never be stored in plain text on the hard drive. You must always use a key container if you want to store private keys.
Note: For this code example, you must add System.ValueTuple from NuGet to your solution.
In this chapter, we will take a look at the following:
- Creating a key container
- Encrypting a message
- Decrypting a message
- Deleting a key container
- Exporting a public key
- Importing a public key
At this point, I will wager a guess that some of you are wondering where exactly key containers are stored? Windows has a cryptographic key store, and it is simply located in a folder on your hard drive. On my Windows 10 machine, this path is C:\ProgramData\Microsoft\Crypto and inside that folder, there are various other folders for each key type. In this example, we will be looking at the RSA\MachineKeys subfolders.

Figure 18: Windows 10 Cryptographic Key Store
If you navigate to this folder, you will see that there are various machine keys already created.
The other location where we can save key containers is the user profile. On my Windows 10 machine, this path is C:\Users\<USER>\AppData\Roaming\Microsoft\Crypto and inside that folder, there is an RSA subfolder with another subfolder with a GUID for a name.

Figure 19: User Profile Key Store
It is here, in one of these two key stores, that we will be storing our private keys. Let’s have a look at the key store under the user profile first.
Writing the code
Start off by creating the class-scope variables at the top of your code file, as seen in Code Listing 29.
Code Listing 29: Constants
const string KEY_STORE_NAME = "MyKeyStore"; public static CspParameters csp = new CspParameters(); public static RSACryptoServiceProvider rsa; |
Next, create a method called CreateAsmKeys() and note the flag that tells the code to create the key container in the machine key store. The code is quite easy to understand. It simply creates a container with the name MyKeyStore and then instructs the RSACryptoServiceProvider object to persist the keys in the cryptographic service provider.
Note that I am also displaying the container name as well as the unique key container name created when it is saved in the key store.
Code Listing 30: Creating the Key Container
private static void CreateAsmKeys(out string containerName, bool useMachineKeyStore) { csp.KeyContainerName = KEY_STORE_NAME; if (useMachineKeyStore) csp.Flags = CspProviderFlags.UseMachineKeyStore; rsa = new RSACryptoServiceProvider(csp); rsa.PersistKeyInCsp = true; CspKeyContainerInfo info = new CspKeyContainerInfo(csp); WriteLine($"The key container name: {info.KeyContainerName}"); containerName = info.KeyContainerName; WriteLine($"Unique key container name: {info.UniqueKeyContainerName}"); } |
The code to encrypt a message is also something we have seen before. We tell the cryptographic service provider (CspParameters object) what the container name is (I didn’t use the constant here, as I explicitly wanted to give it a container name) and encrypt the message using the RSACryptoServiceProvider. You will notice that it is here that I return a tuple.
Code Listing 31: Encrypting a Message
public static (byte[] encrBytes, string encrString) AsymmEncrypt(string message, string keyContainerName) { CspParameters cspParams = new CspParameters() { KeyContainerName = keyContainerName }; RSACryptoServiceProvider rsa = new RSACryptoServiceProvider(cspParams); byte[] encryptedAsBytes = rsa.Encrypt(Encoding.UTF8.GetBytes(message), true); string encryptedAsBase64 = Convert.ToBase64String(encryptedAsBytes); return (encryptedAsBytes, encryptedAsBase64); } |
The same logic is used in reverse. We tell the cryptographic service provider (CspParameters object) what the container name is and then use the RSACryptoServiceProvider to decrypt the message.
Code Listing 32: Decrypting a Message
public static (byte[] decrBytes, string decrString) DecryptWithCsp(byte[] encrBytes, string containerName) { CspParameters cspParams = new CspParameters() { KeyContainerName = containerName }; RSACryptoServiceProvider rsa = new RSACryptoServiceProvider(cspParams); byte[] decryptBytes = rsa.Decrypt(encrBytes, true); string secretMessage = Encoding.Default.GetString(decryptBytes); return (decryptBytes, secretMessage); } |
To test the code, add the following logic to your console application’s static void Main and run the console application. Note that the blnUseMachineKeyStore flag is set to false.
Code Listing 33: Code to Test
bool blnUseMachineKeyStore = false; CreateAsmKeys(out string containerName, blnUseMachineKeyStore); string superSecretText = "Super Secret Message"; WriteLine($"Message to encrypt: {superSecretText}"); var (encrBytes, encrString) = AsymmEncrypt(superSecretText, containerName); WriteLine($"Encrypted bytes: {Convert.ToBase64String(encrBytes)}"); WriteLine($"Encrypted string: {encrString}"); var (decrBytes, decrString) = DecryptWithCsp(encrBytes, containerName); WriteLine($"Decrypted bytes: {Convert.ToBase64String(decrBytes)}"); WriteLine($"Decrypted message: {decrString}"); |
We can see a few things from the output generated. You can see that we used a key container name of MyKeyStore, but that the unique container name is quite different.
The message to encrypt was passed to the encryption method that returned the encrypted byte array and string. We then immediately decrypted the message using the key container created earlier. This resulted in the decrypted byte array and message.

Figure 20: Saved Keystore Output
Now let’s focus for a minute on the unique key generated for the key container.

Figure 21: Unique Key Container Name
You will notice that we have a new file created in the local user profile key store. The file created matches the name of the unique key container name in the output.

Figure 22: User Profile Key Container
Opening the file, you will see that the contents are encrypted.

Figure 23: Encrypted Key Container File
Change the flag and let the code create the key store in the Windows key store. Run the application again.
Code Listing 34: Toggle Use Machine Key Store On
bool blnUseMachineKeyStore = true; |
You will notice that the file is now created in the Windows key store.

Figure 24: Windows Key Store
If we want to clear the key container, we only need to do the following, seen in Code Listing 35.
Code Listing 35: Delete the Key Container
private static void ClearContainer(string containerName, bool useMachineKeyStore) { csp = new CspParameters() { KeyContainerName = containerName }; if (useMachineKeyStore) csp.Flags = CspProviderFlags.UseMachineKeyStore; RSACryptoServiceProvider rsa = new RSACryptoServiceProvider(csp) { PersistKeyInCsp = false }; rsa.Clear(); } |
Keeping the blnUseMachineKeyStore = true will remove the key container from the Windows key store location.
Code Listing 36: Toggle Use Machine Key Store On
bool blnUseMachineKeyStore = true; ClearContainer(KEY_STORE_NAME, blnUseMachineKeyStore); |

Figure 25: Container Removed from Windows Key Store
To remove the container from the user profile key store, just set the blnUseMachineKeyStore flag to false and run the code.
Code Listing 37: Toggle Use Machine Key Store Off
bool blnUseMachineKeyStore = false; ClearContainer(KEY_STORE_NAME, blnUseMachineKeyStore); |
Exporting the public key
Exporting the public key is very easy. We’ll do this in order to give our public key to the person wanting to send us a message so that they can encrypt their message.
Add two constants to your code for the export folder and file name.
Code Listing 38: Public Key Export Location
const string EXPORT_FOLDER = @"C:\public_key\"; const string PUBLIC_KEY_FILE = @"rsaPublicKey.txt"; |
We then simply check if the directory exists and, if not, create it. We create a file in the export location, then we write the RSACryptoServiceProvider object xml to the file. This is done via the ToXmlString(false) method in which false tells the code not to include the private keys.
Code Listing 39: Export Public Keys Method
private static void ExportPublicKey() { if (!(Directory.Exists(EXPORT_FOLDER))) Directory.CreateDirectory(EXPORT_FOLDER); using (StreamWriter writer = new StreamWriter(Path.Combine(EXPORT_FOLDER, PUBLIC_KEY_FILE))) { writer.Write(rsa.ToXmlString(false)); } } |
Run the code in Code Listing 40 to test the export. First, create a container, then export the public keys.
Code Listing 40: Code to Test Export
CreateAsmKeys(out string containerName, blnUseMachineKeyStore); ExportPublicKey(); |
You will see that the file is created in the location you provided.

Figure 26: Exported Public Keys
Opening the file, you will notice that the contents are not encrypted at all. This is because the person you are sending the public key to needs to import it on their side and encrypt their message with it.
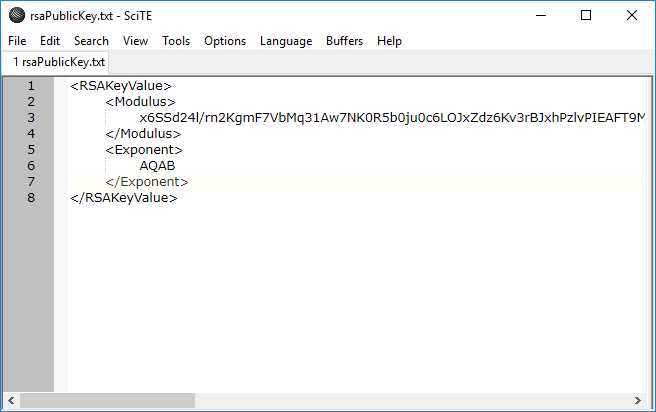
Figure 27: Exported Public Keys
If we change the code to include the private parameters, you will see a different file generated.
Code Listing 41: Include Private Parameters
writer.Write(rsa.ToXmlString(true)); |
Opening the unencrypted file will display in plain text the public and private key information. This is generally not something you will want to do.

Figure 28: Exported Private and Public Keys
Importing a public key
The person you will be sending the public key to will need to import the public key into their application. If you are exchanging encrypted messages with each other, you will probably also need a method to import their public key if you ever want to send them a message.
The method to import logic simply imports the text read from the public key file sent to you into the CspParameters object and persists it.
Code Listing 42: Importing a Public Key
private static void ImportPublicKey() { FileInfo fi = new FileInfo(Path.Combine(IMPORT_FOLDER, PUBLIC_KEY_FILE)); if (fi.Exists) { using (StreamReader reader = new StreamReader(Path.Combine(IMPORT_FOLDER, PUBLIC_KEY_FILE))) { csp.KeyContainerName = KEY_STORE_NAME; rsa = new RSACryptoServiceProvider(csp); string publicKeyText = reader.ReadToEnd(); rsa.FromXmlString(publicKeyText); rsa.PersistKeyInCsp = true; } } } |
Using Azure Key Vault
Azure Key Vault allows developers to safeguard cryptographic keys and secrets for use in applications and services. Key Vault allows you to encrypt keys and secrets by using keys protected by hardware security models. Key Vault also gives you control over the keys that access and encrypt your data. Creating keys for development is quick, and the migration to production keys is easy and seamless. Keys can also easily be revoked as required.
Consider, for example, the keys that need to be used for signing and encryption but need to be kept external to your application because the application’s users will be geographically distributed. Azure Key Vault provides a great solution here because the keys stored in the vault are invoked by a URI when needed.
Azure keeps the keys safe using industry-standard algorithms and Hardware Security Modules (HSMs). Your keys are therefore well protected without requiring you to write your own code. Best of all, they are easy to use from your applications.
There is a lot more to creating a Key Vault than illustrated here, but I want to give you an idea of what we’re doing.
Creating a Key Vault is done within a resource group. You can also create a new resource group when creating the Key Vault.

Figure 29: Create an Azure Key Vault
Once you have created your Key Vault, you will click Secrets under the Key Vault settings to add a new secret.
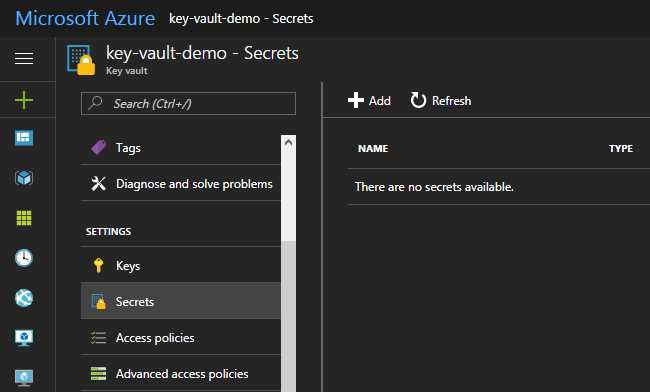
Figure 30: Store Secrets
Next, you select Manual as an upload option and give the secret a name and a value.

Figure 31: Manually Create a Secret
The value of the secret is a 100-character key. This is the value we want to retrieve from the Key Vault and use in our application.
HuyvFwwc7v&G!sh2F3xJG!89NlYRNS%6QTrmtPO34C7CoAbc^RKRBWbv80dSb$xq!txEqt2rDjpOjknBPjB%9%iuE2qlZZEIgelc
We will now simply call the Key Vault from a console application. You will need to add the following NuGet packages to the application:
- Microsoft.Azure.KeyVault
- Microsoft.IdentityModel.Clients.ActiveDirectory
After you have added these, add the following code using statements to your application.
Code Listing 43: Additional Code
using Microsoft.Azure.KeyVault; using Microsoft.IdentityModel.Clients.ActiveDirectory; |
The code we add to the console application is minimal. We are authenticating our application using the Active Directory application ID, application key, and the URL for the secret API key provided to us in Azure.
Code Listing 44: Additional Code
static void Main(string[] args) { MainAsync(args).Wait(); } public static async Task MainAsync(params string[] args) { var applicationID = "[YOUR_APPLICATION_ID]"; var vaultMasterKey = "[YOUR_APPLICATION_KEY]"; var secretIdentifier = "[SECRET_API_KEY_URL]"; var cloudVault = new KeyVaultClient(async (string authority, string resource, string scope) => { var authContext = new AuthenticationContext(authority); var credential = new ClientCredential(applicationID, vaultMasterKey); var token = await authContext.AcquireTokenAsync(resource, credential); return token.AccessToken; }); var apiKey = cloudVault.GetSecretAsync(secretIdentifier).Result.Value; } |
When the console application is run, you will see that the secret key is returned to the application in the cloudVault.GetSecretAsync(secretIdentifier).Result.Value call.

Figure 32: Secret Key Returned to Application
Server-less computing offers a very exciting landscape for developers. With Azure Functions and Azure Key Store, you can create powerful cloud services that secure your applications.
- 1800+ high-performance UI components.
- Includes popular controls such as Grid, Chart, Scheduler, and more.
- 24x5 unlimited support by developers.