
Camtasia Succinctly®

CHAPTER 7
Video Editing Basics
This chapter will explain some key points about video editing, using the elements available in the Timeline.
Separating video and audio
In Chapter 4, I explained how to make a recording using the computer screen’s output. At the end, we saved a small video tutorial about the Alarms & Clock Windows application. Later, we added this recording file to a Camtasia project named alarmstutorial.camproj.
If you open this project in the Camtasia Editor, a single track containing the screen recording is displayed in the Timeline. We can see that the Camtasia Screen Recorder puts both audio and video in a single channel when the recording is saved to disk. This seems good for practical purposes, but if we want to edit the recording, we’ll be dealing with video and audio at the same time, and there’s risk for a potential accident.
Fortunately, we can separate the audio from the video in a screen recording with a single click operation. First, we should right-click on the Timeline track that contains the recording, in order to display the Track context menu.
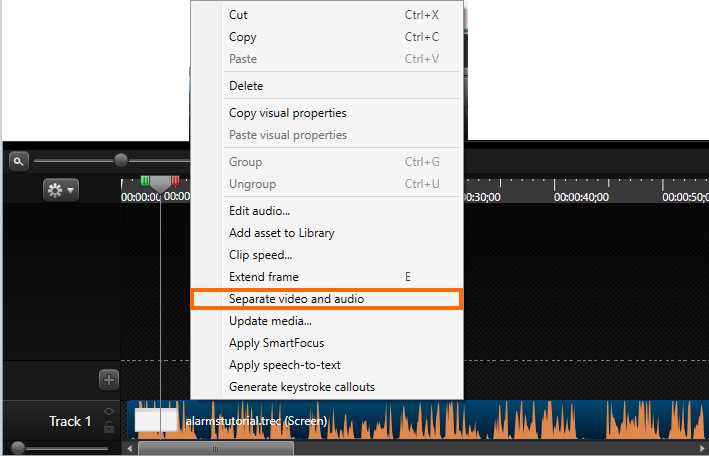
- The Track context menu
To perform video and audio separation, we need to click the Separate video and audio option located in the context menu. This option is highlighted in Figure 38.
Now, the Timeline in the Camtasia Editor should look like the following figure.
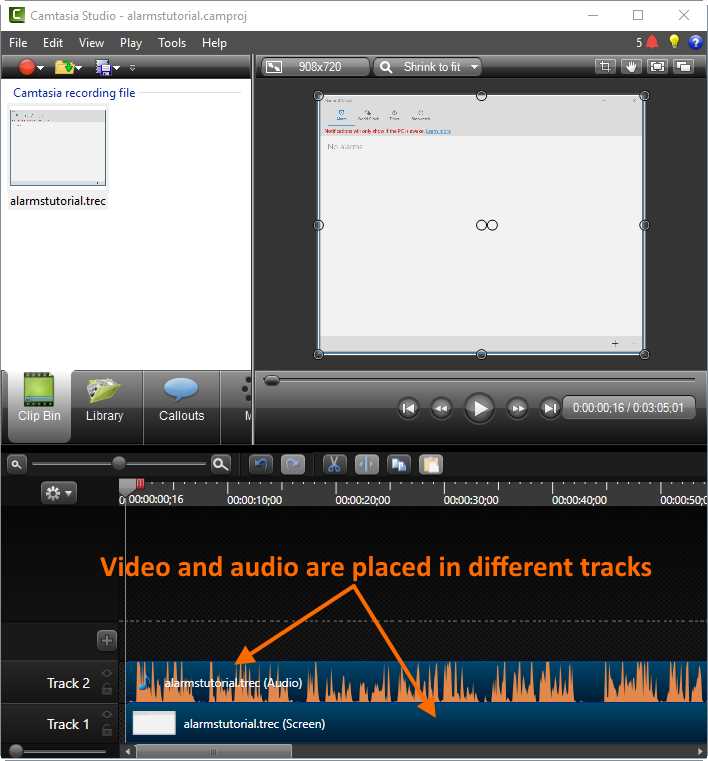
- The Timeline after screen recording video and audio were separated.
As displayed in Figure 39, the video and the audio for the screen recording are now placed in different tracks.
Using the playhead
As explained in the Timeline section of the previous chapter, the playhead is the element of the Timeline that allows us to move to a precise moment within a track. The playhead will also help us select portions of tracks’ content in order to perform editing operations.
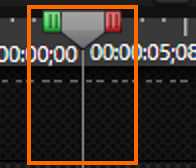
- The playhead
Figure 40 shows the playhead positioned at a particular moment within a track. There are two buttons placed at the beginning and at the end of the playhead. The green button is known as the In button, and the red one is called the Out button.
The In button allows us to select a portion of the track’s content, starting from the point where the playhead is located, and ending at a particular moment situated to the left of that position. When the playhead is located at the beginning of the Timeline, the In button is invisible.
The Out button performs the same operation as the In button, but in the opposite way. This means that the selection ends in a particular moment situated to the right of the current playhead position.
When a selection is made, the vertical gray line of the playhead splits, indicating the boundaries for the selection.
To move the playhead to a precise moment within a track, we should click on the gray button (the playhead itself) and drag it over the ruler to the desired position.
Selecting a portion of a track
First, make sure that the alarms tutorial project (alarmstutorial.camproj) is opened. Next, place the playhead in the position corresponding to 00:00:02;08 seconds (note that Camtasia separates minutes and seconds using the semicolon character). To make this easier, click Zoom in on the Timeline Control Bar.
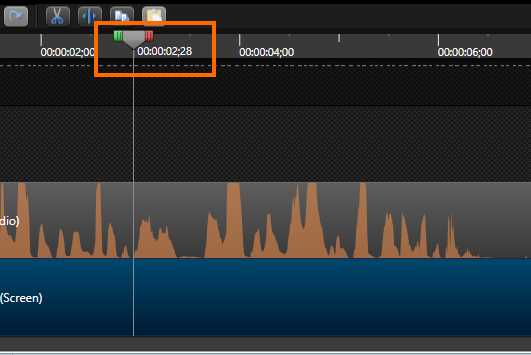
- The playhead in the 00:00:02;28 seconds position
Now, click Out and drag it up to the 00:00:03;29 position. Notice that a tooltip label appears while the button is being dragged. This tooltip label displays the end position for the selection, and the duration for that selection. To end the operation, release the mouse button. The Timeline should look like the following figure.
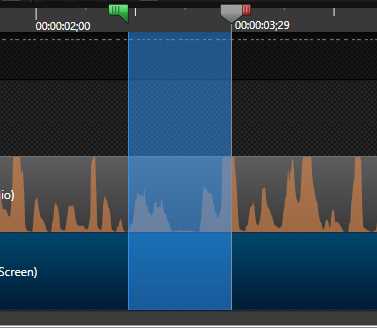
- The selection made with the playhead
The blue, transparent area of the previous figure delimits the selected portion of the tracks. The In button of the playhead indicates the starting position, and the playhead itself shows the ending position for the selected portion.
Playing the selection
There are two ways to play the selection. The first is by pressing the space bar hot key. The second is to click Play in the Canvas control bar.
Clearing a selection
The playhead can also be used to clear a selection previously made. There are two ways to accomplish this task:
- Double-click In: In this case, after clearing the selection, the playhead is placed at the starting point of the selection cleared.
- Double-click Out: In this case, after clearing the selection, the playhead remains at the end point of the selection cleared.
Note: When making portion selections, if we drag the In button to a time point after the current playhead position, both In and Out buttons are automatically arranged.
Cutting out a track portion
In this section, we’re going to cut out an unnecessary portion of a track. In this case, the portion to be deleted corresponds to Track 2, which contains the audio for the project. To accomplish this, we’re going to start with the following steps:
- Take the playhead to the 00:00:00;00 position (the beginning of the Timeline).
- Drag the Out button up to the 00:00:01;01 position.
Now the portion to be deleted is selected, as we can see in Figure 43.
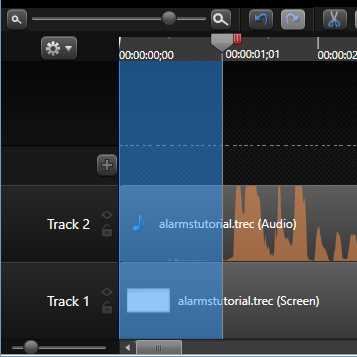
- The track portion to be deleted
At this point, it seems so easy to finish the action. Clicking Cut would delete the selected portion, but there’s a small problem.
In this moment, the selection previously made applies to all tracks in the project. So, if we click on Cut, not only will the selected portion of Track 2 be deleted, but that portion of all tracks under the selection area will be deleted as well.
Camtasia provides a mechanism to deal with this situation: track locking. Every track in the project can be protected to avoid changes to its content. To do this operation, we need to click Lock, found to the right of every track’s name.

- The Lock button
After that, we should click Cut to remove the undesired track portion. Now, the Timeline looks like the following figure.
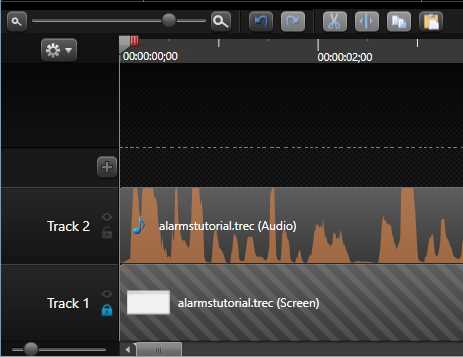
- The Timeline after cutting out the selection.
As seen in Figure 45, the selected portion of Track 2 no longer exists, and Track 1 remains the same. Also, all Track 2 content was automatically moved to the beginning of the Timeline.
Tip: To avoid accidents, it’s recommended to lock all tracks in a project except the tracks which need to be edited.
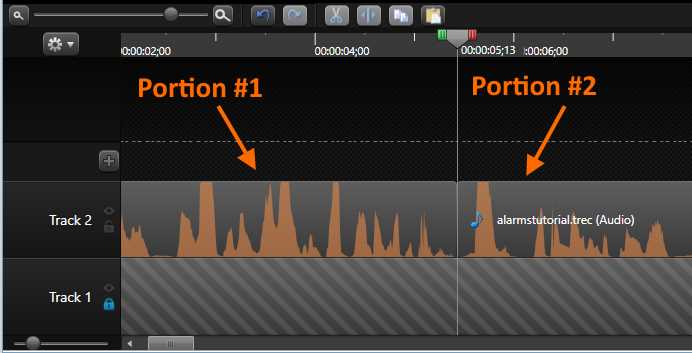
Splitting the content of a track
Sometimes, splitting the content of a track is useful in order to gain more control over the media placed there. Let’s consider the timeline portion between 00:00:05;13 and 00:00:06;21 for Track 2. This portion corresponds to a silent moment during narration. Maybe it’s better to cut this one from the track, and deal with two different narration pieces. So, we can get better results by handling these pieces separately.

- The silent moment in Track 2
To remove the silent moment in Track 2, we’re going to place the playhead at the 00:00:05;13 position. Then we will right-click on the playhead to display the playhead’s context menu. Once the menu is displayed, we will select the Split all option.
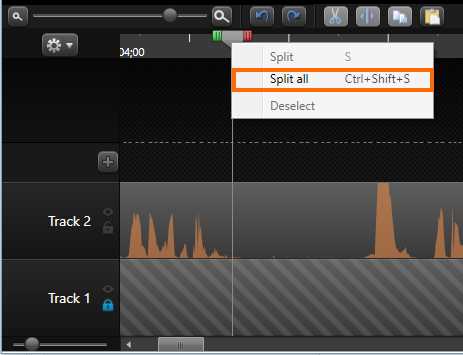
- The Split all option in the playhead’s context menu
At this moment, the audio of Track 2 is split in two separate portions. Now, we’re going to drag the playhead’s Out button up to the 00:00:06;21 position. Then, we’re going to remove the selected portion by clicking Cut. After that, click Split, located in the Timeline controls bar.
- The audio of Track 2 is split
Now, as displayed in Figure 48, the silent moment of Track 2 has been deleted and the audio has become split into two isolated portions.
Dragging elements in tracks
In the previous section we discuss how to split the content of a track. The result of this exercise was two isolated portions for the audio placed in Track 2. The purpose of this section is to work with these portions in order to explain how to drag an isolated element within a track.
To complete this exercise, we’re going to perform the following steps:
- First, the mouse pointer should be placed over the second audio portion located in Track 2.
- Now, we will click on the audio portion and drag it up to the 00:00:06;22 position.
There will be a gap between the two audio options as a result of executing the previous steps, and now this gap will create the silent moment deleted in the previous section.
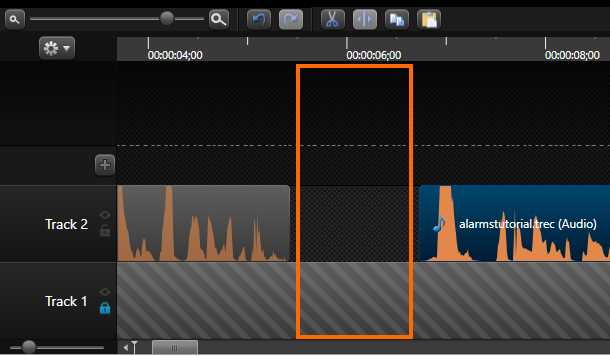
- The Timeline after dragging the audio portion
Cropping track content
Unlike cutting out a selection, when track content is cropped, Camtasia only suppresses the portion cropped when the track is being played. This means the content is not deleted.
For this exercise, we’re going to perform the following operations:
- Place the playhead at the 00:03:02;10 position in the Timeline.
- Place the mouse pointer at the end of Track 2 until the pointer becomes a horizontal resize arrow.
- Hold down the left mouse button and drag the pointer up to the playhead position.
And that’s it! The content of Track 2 was cropped.
Note: After content is cropped, we can place the mouse pointer at the edge of the result and drag it in the opposite direction. This is going to leave the content in its original form.
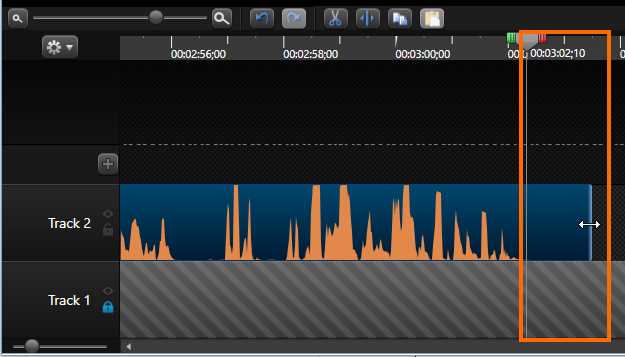
- The content to be cropped in Track 2
Adding markers
When we create the recording plan for a video project, it's a good idea to create a script file. This file contains the detailed recording plan as a series of detailed steps. As suggested in Chapter 3, these steps should be numbered in a sequence, starting with 1.
Sometimes you’re required to record video and audio separately. Camtasia allows you to add voice narrations while the project is being edited. Once a voice narration recording is started, a preview of the recorded video will be played according to its timeline. So the narrator needs a reference to know when exactly to talk. This reference can be set up in Camtasia as a series of graphic elements, placed at the top of the Timeline. These graphic elements are called markers.
To add a marker in the Timeline, we first need to show the Markers view. This can be accomplished by pressing the Ctrl + M keys combination.
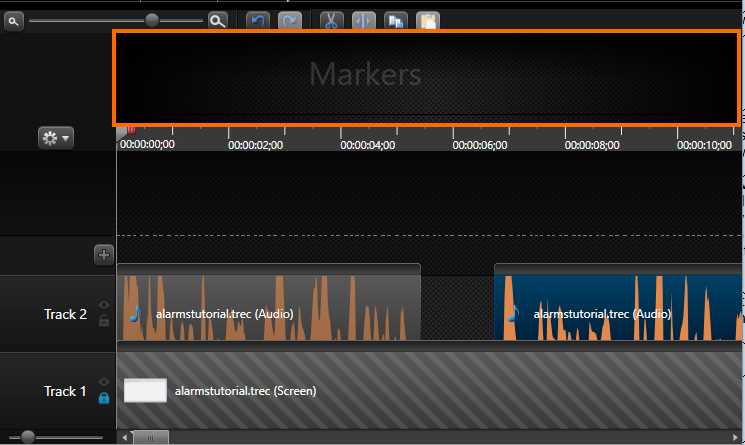
- The Timeline with the Markers view displayed
Now, we need to place the playhead in every timeline position where a marker is needed. After that, we should press the M hot key to add the marker.
Note: Every time a marker is added, a text entry is displayed in order to name it.
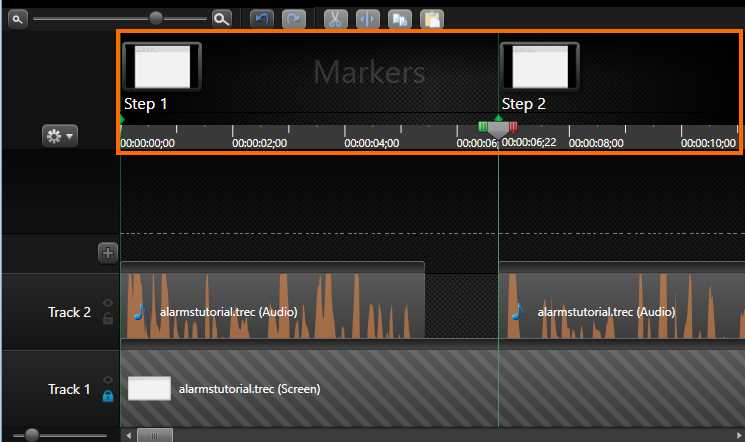
- The Timeline after adding markers
Chapter summary
This chapter explained some key points about video editing, using the elements available in the Timeline.
The first task was to separate the audio and the video for a screen recording. This separation was performed by right-clicking on the Timeline track containing the recording, and after that, selecting the Separate video and audio option from the context menu.
Then, we learned how to use the playhead. The playhead is the element of the Timeline that allows us to go to a precise moment in the tracks of a project. There are two buttons placed on either side of the playhead. The green button is the In button, and the red one is the Out button. With these buttons, we can make selections in the content of the project.
A selection affects all tracks in the project, so we need to be careful at the time of making editing operations, such as cutting out, splitting, or cropping. Any editing operation is applied to all tracks. Camtasia lets us place a locking mechanism on any track in order to avoid accidents. A locked track is not considered for editing operations.
Sometimes, video and audio need to be recorded separately. Later, while editing the project, Camtasia allows us to add audio narrations. In this case, the narrator should have a reference within the project in order to know when exactly to speak. This reference is composed of a series of graphic elements called markers. We can add markers by placing the playhead in the Timeline position where a marker needs to be positioned, and then pressing the M hot key.
- 1800+ high-performance UI components.
- Includes popular controls such as Grid, Chart, Scheduler, and more.
- 24x5 unlimited support by developers.