
Camtasia Succinctly®

CHAPTER 8
Effects and Other Editing Tricks
In this chapter we’re going to discuss adding effects to our video, and we’ll learn some other editing tricks.
Importing media to our project
At this point, I completely removed the original audio from the Alarms & Clock original screen recording (I don’t think the readers should suffer hearing my awful voice). Instead, I replaced the audio with a series of MP3 files. These files contain the audio for all narrations described in the recording script. To create these files, I used a great text-to-speech online tool located here. The only restriction for this tool is that the text can only be up to 100 characters in length. That’s the reason I split the narrations into several files.
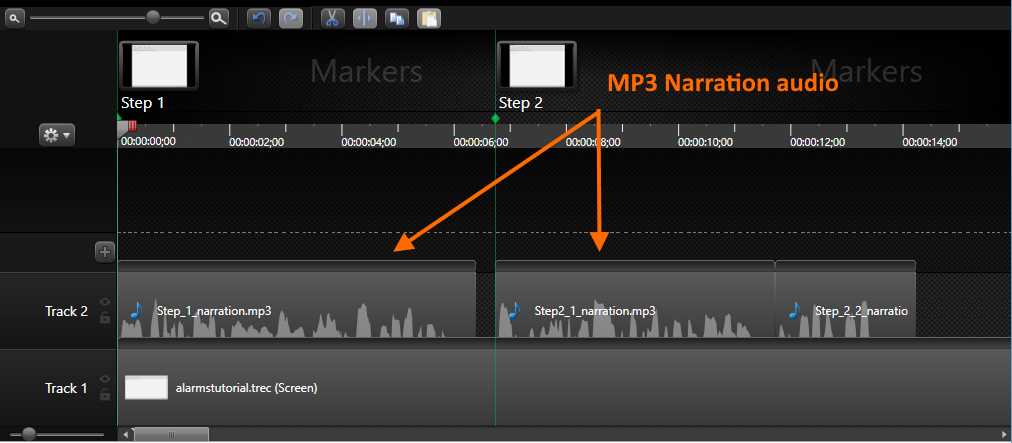
- The Timeline with MP3 files in Track 2
Figure 53 displays a general view with those MP3 files placed in Track 2. Note that there are markers pointing to each step of the recording script. These markers will help us place the audio files in the Timeline exactly where they’re needed.
Now, let’s take a look at how these files were imported into our project. This can be accomplished by using the Import media button located at the top of the Clip Bin. Clicking on this button will bring up a menu with all the importing options available.
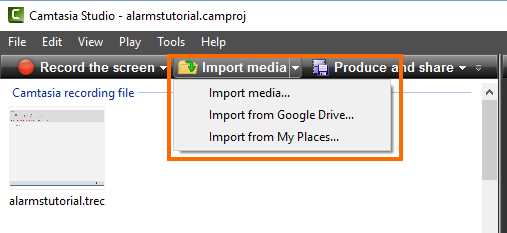
- The Import media button and its menu
As shown in Figure 54, there are three importing options in Camtasia:
- Import media: Import media files from the computer.
- Import from Google Drive: Import media files from a Google Drive folder.
- Import from My Places: Import media files from a TechSmith My Places storage account.
Importing media files from the computer
Click the Import media option in order to import media files from the computer. The Open dialog box will appear.
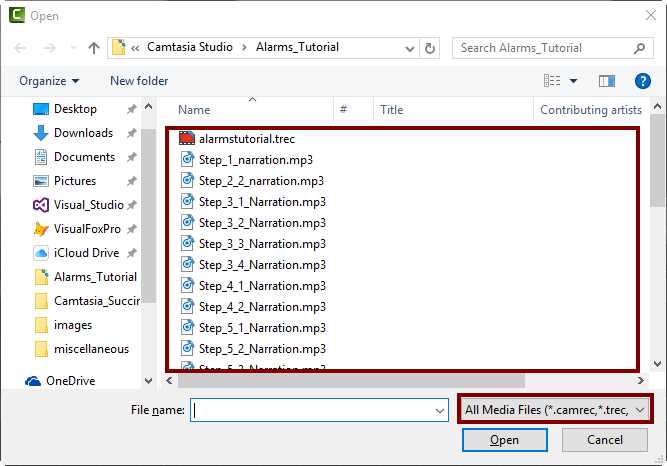
- The Open dialog box for importing media files
The Open dialog box will display media type files only, as shown in Figure 55. We can select all those files needed in the same way we do it in any Windows application. After a selection is made, click Open to import the files.
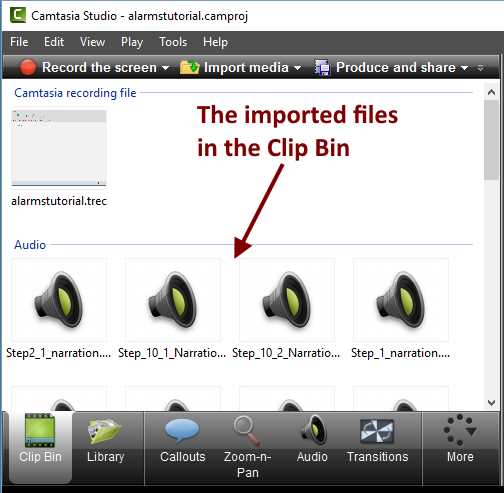
- The Clip Bin after importing media files
After importing files, they appear in the Clip Bin, as displayed in Figure 56. We can drag any of these files to a track within the Timeline.
Importing media files from Google Drive
We can also use a Google Drive account to import media files. This process resembles importing files from the computer, except that we need to log into a Google Drive account first.
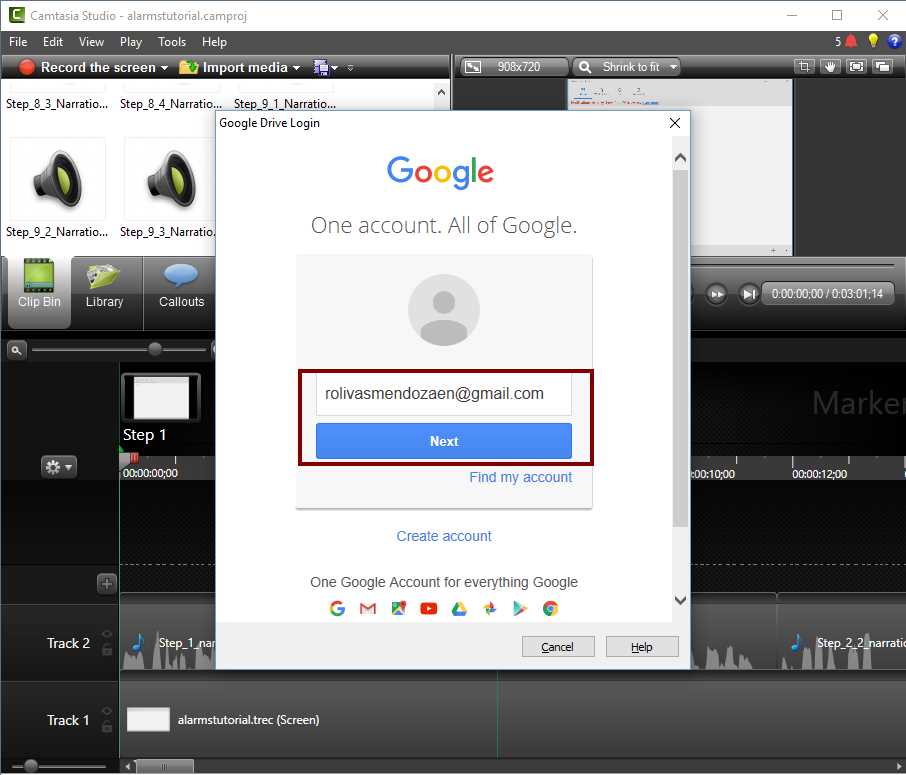
- Google Account login dialog box in Camtasia
Click on the Import from Google Drive option to bring up the Google Account Login dialog box, as displayed in Figure 57. Here, we will enter our credentials for accessing our Google Drive account. The following dialog box will appear after a successful login.
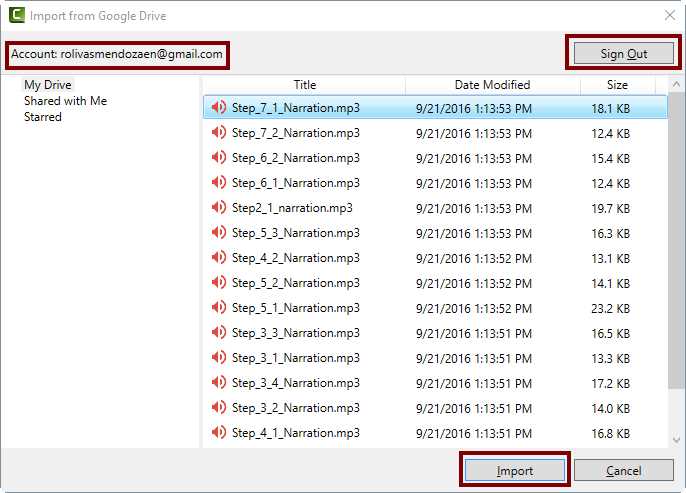
- The Import from Google Drive dialog box
As shown in Figure 58, Camtasia retrieves all content from our Google Drive account and displays it in a dialog box named Import from Google Drive. The dialog box is similar to the Open dialog box discussed in the previous section, except for the Sign Out and Import buttons.
We can select the files needed in the same way we do it in any Windows application, and after the selection is made, we should click Import to bring the files into our project.
Using callouts
Sometimes it’s important to highlight or point out important information on the screen, in order to draw the viewer’s attention. For these cases, Camtasia provides us with a special effect called a callout.
A callout is a shape object, often an arrow, that we can place in our video to point at the screen in a particular moment within the Timeline. We can customize properties for this object in order to define the kind of shape to be displayed, fill and border colors, border width, and other effects applied to it. Also, when a callout allows us to place text in it, we can define the font name, font size, and font style for that text.
Adding a callout
In this section, we’re going to add a callout pointing to the Alarms & Clock application’s toolbar, which will appear at the precise moment when the narrator mentions it. To add this callout, we should follow these steps:
- Position the playhead where you'd like the callout to appear (in this case, the 00:00:07;28 position).
- Select the Callouts tab from the Clip Bin.
- Click Add callout.

- The Callouts tab in the Clip Bin
Tip: We can add the callout most recently added to our project by pressing the C hot key.
Adjusting callouts effects
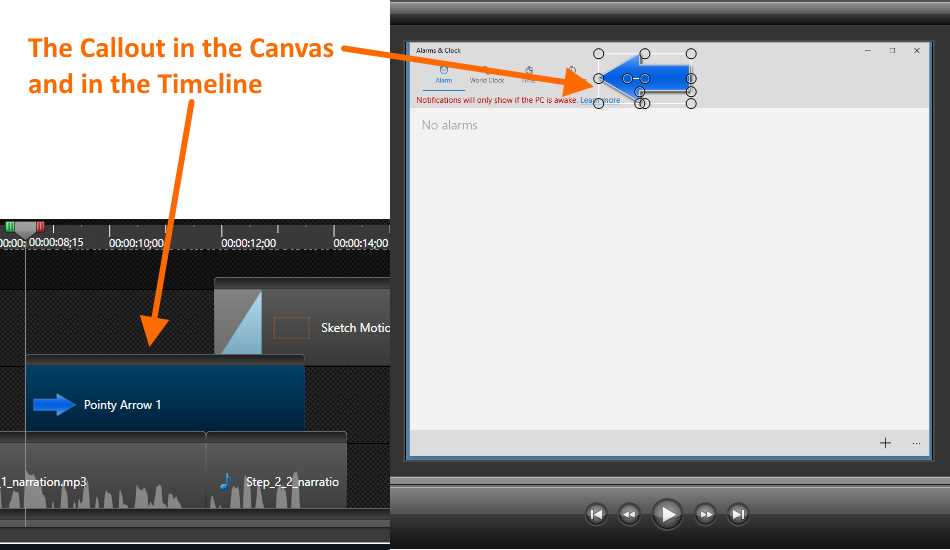
After we add a callout, it appears in its own track within the Timeline. Also, it is displayed in the Canvas.
We can adjust certain callout properties such as scale or rotation directly in the Canvas, by using the dragging points placed around when we click over it.
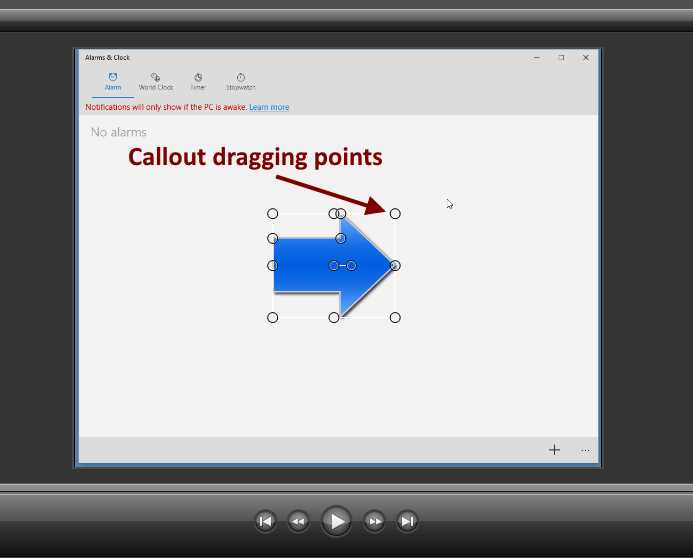
- The added callout displayed in the Canvas
For the purposes of this exercise, we are going to rotate the callout 180 degrees left, and then we’ll place it pointing to the Alarms & Clock application’s toolbar. If we want to adjust the callout properties manually, we should click over the callout in the Canvas, and then click on the Callouts tab in the Clip Bin.
The callout default properties are fine for the purposes of this exercise, but you can play around with all the choices for practice.
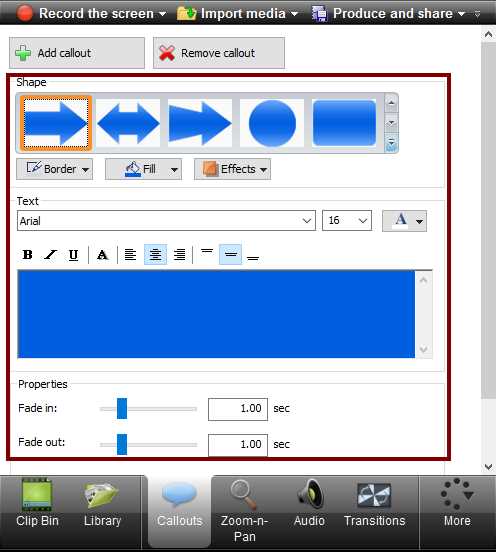
- The Callout properties in the Callouts tab of the Clip Bin
Figure 61 displays the Callout properties in the Callouts tab of the Clip Bin. These properties are displayed only if a callout object is selected in the Canvas.
Using transitions
In video editing, a transition is what we show between two shots or clips. When those clips or shots are joined, a transition occurs.
Adding a transition
We can add transitional digital effects to our project by clicking on the Transitions tab of the Clip Bin. The following steps should be performed:
- Select a video media type track, to which the transition will be applied (in this case, Track 1).
- Place the playhead in the Timeline at the precise moment when the transition will start (in this case, at the beginning of Track 1).
- Select the desired transition effect from the Clip Bin, and drag it to the video media track at the playhead position (for this exercise, we will apply the Fade through black effect).
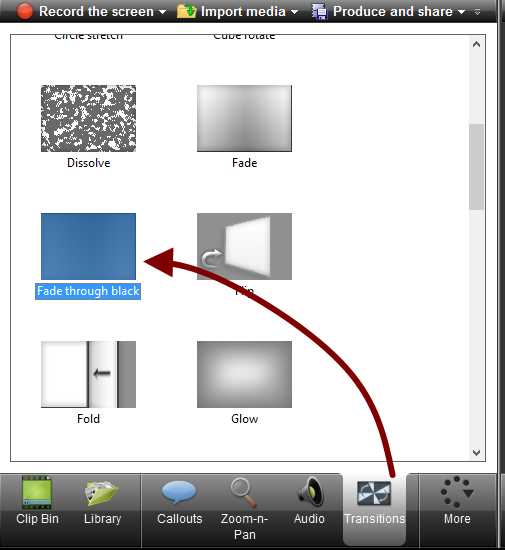
- Transition effects in the Clip Bin
Figure 62 displays the Transitions tab of the Clip Bin. Some of the available effects are shown, including the effect used in our exercise.
After the transition effect is added to the track, this appears in the form of a green rectangle with the name of the effect displayed within it.
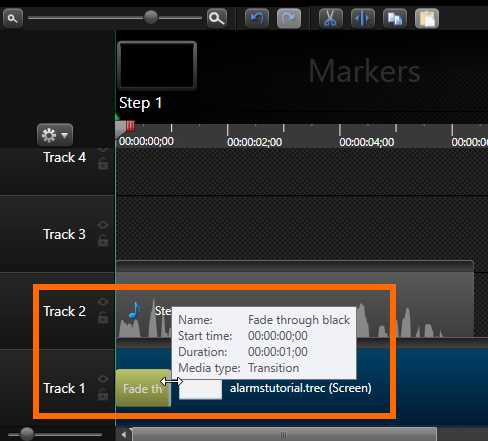
- The transition effect in the Timeline
Figure 63 displays the transition effect added to Track 1. The two-headed arrow cursor indicates that we can enlarge or reduce the duration of the transition. We can drag the cursor to the right if we desire to increase the duration time, or we can drag the cursor to the left if we wish to reduce it. Also, a tooltip label is displayed with the name of the transition effect, the effect start time, duration, and media type.
Removing a transition
We can remove a transition if we no longer want it to appear in the video. To remove the transition, we should follow these steps:
- Make the track and the position where the transition is placed visible in the Timeline.
- Right-click on the transition effect rectangle.
- Click the Delete option from the context menu.
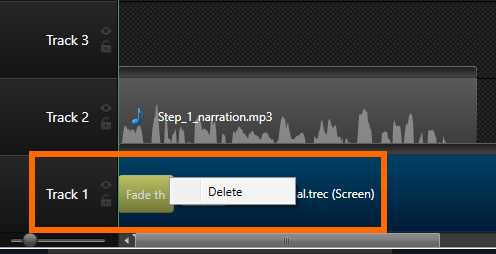
- Deleting a transition effect
Using zoom effects
When working with screen recordings, it may be necessary to show important details about what’s happening and ensure the viewers note these details.
Reviewing the video project we’ve been discussing throughout this book, there’s a moment when the narrator points to a plus sign button, located at the bottom-right side of the Alarms & Clock application. This button is used to add a new alarm configuration. We might want to draw the attention of the viewers to this button and leave out any other part of the screen from the video. The easiest way to accomplish this is employing a zoom effect.
Applying a zoom effect
The purpose of a zoom effect in our video is to scale up (or sometimes down) a certain portion of the displayed content, in a specific moment within the Timeline, and for a certain duration.
We’re going to add a zoom effect to our project performing the following steps:
- Select a video, image, or group track in the Timeline (in this case, the video placed in Track 1).
- Place the playhead in the position where we want the zoom effect to start.
- Click the Zoom-n-Pan tab in the Clip Bin.
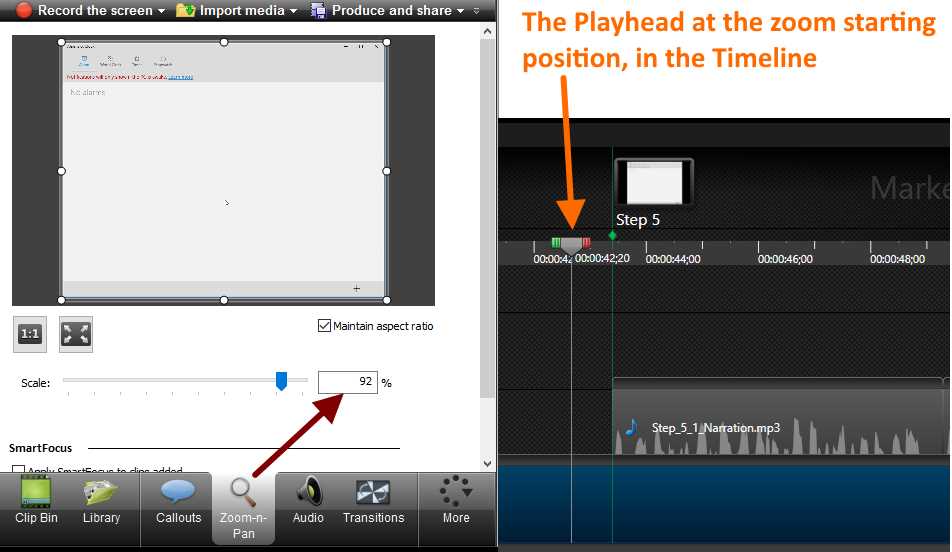
- A simultaneous view of the Zoom-n-Pan tab and the playhead in the Timeline
Now the Zoom-n-Pan tab displays a thumbnail with the frame that corresponds to the exact moment selected in the Timeline. Also, eight drag points are placed around the image.
- We’re going to drag one of these points in order to adjust the desired scale for the zoom effect (in this case, we’re going to drag the upper-left point until the rectangle covers the plus sign button only). After that, the zoom effect is applied to the video and appears as an arrow icon in the Timeline.
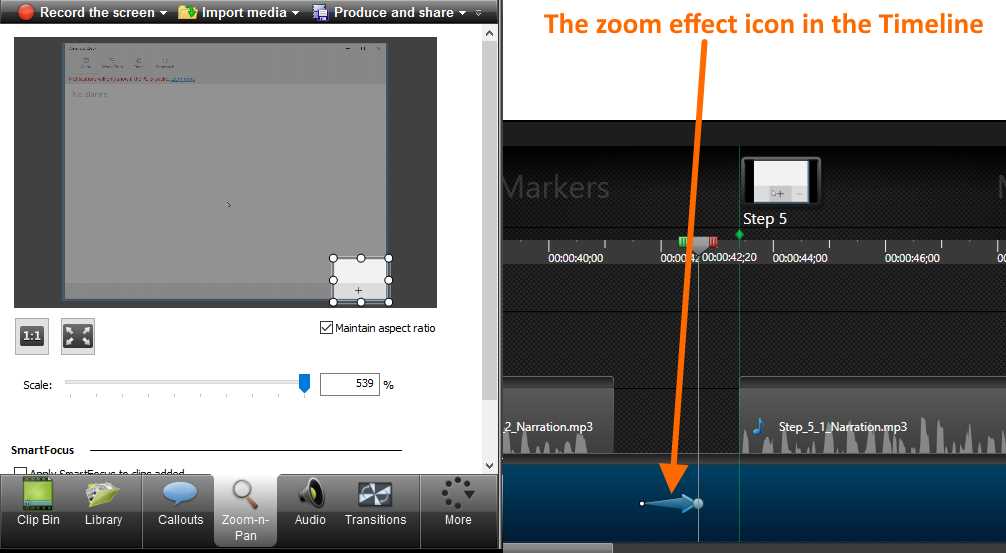
- The zoom effect in both the Clip Bin and the Timeline
- Now, we’re going to establish the point in the Timeline where we want the video be displayed back in its original scale. If we do not perform this step, the zoom effect will remain applied until the video ends. So, we’re going to place the playhead in the corresponding position in the Timeline.
- Click the Scale media to fit entire Canvas button in the Zoom-n-Pan tab.
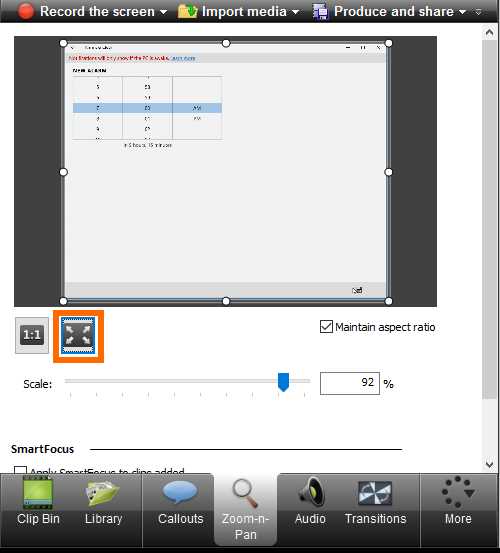
- The “Scale media to fit entire Canvas” button, in the Zoom-n-Pan tab
Removing zoom effects
To remove a zoom effect, we should locate the corresponding arrow icon in the Timeline, and then right-click over the icon. After that, we should click Delete from the displayed context menu.
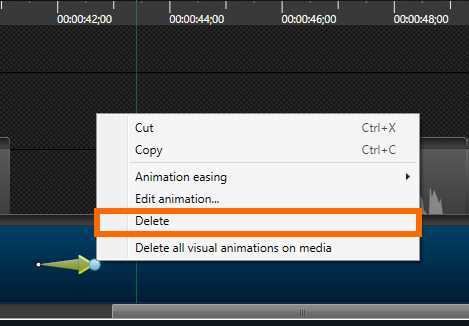
- Deleting a zoom effect
Using visual properties to create animations
We can enhance our video by adding animations. To do this, we’re going to use the Visual Properties option from the Clip Bin.
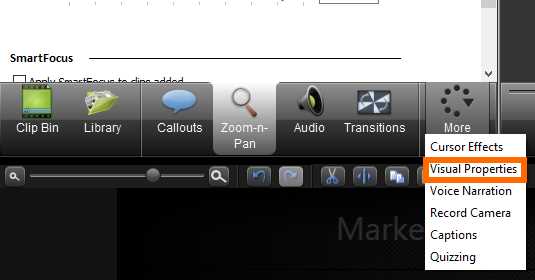
- Visual Properties option displayed in the More tab
Understanding an animation
An animation is a visual effect that can be applied to an element within the Timeline, in order to change its visual properties from one state to another, in a certain amount of time.

- The components of an animation
As displayed in the previous figure, when an animation is applied to an element, three components are created.
- A set of Visual Properties for the left side of the animation (Set A).
- A set of Visual Properties for the right side of the animation (Set B).
- An amount of time between Set A and Set B (Animation Length).
We can also notice that the Animation Length is represented with an arrow. The starting point of the arrow delimits the Visual Properties Set A, and the ending point of the arrowhead indicates the beginning of the Visual Properties Set B. The longer the arrow, the longer the time to change between Set A and Set B.
Adding an animation to callouts
We’re going to use the callout previously added to the project to create an animation. If you were playing a preview of the video as we were advancing in this book, you probably noticed that the callout has a fade-in effect to appear in the video, and a fade-out effect to disappear.
We’re going to remove these effects from the callout before applying the animation. For doing this, the playhead should be placed at the point where the callout is located.
- Selecting the callout for removing fade effects
Select the callout by clicking it in the Canvas. Now, we should select the Callouts tab in the Clip Bin. Finally, we should set the Fade in and Fade out properties to 0 seconds, as shown in Figure 72.
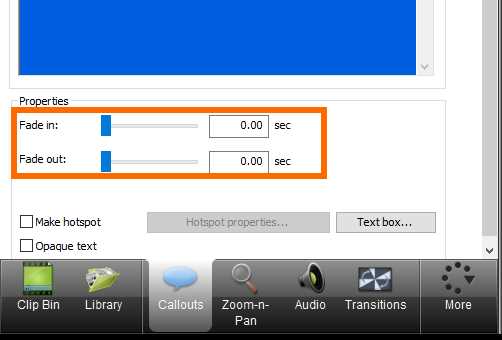
- Fade in and Fade out properties
Now, we’re going to move the playhead to the middle point of the callout to set the initial point for the animation (that is, Visual Properties Set A). After that, we’re going to drag the callout out of the Canvas to make it invisible at the beginning of the animation.
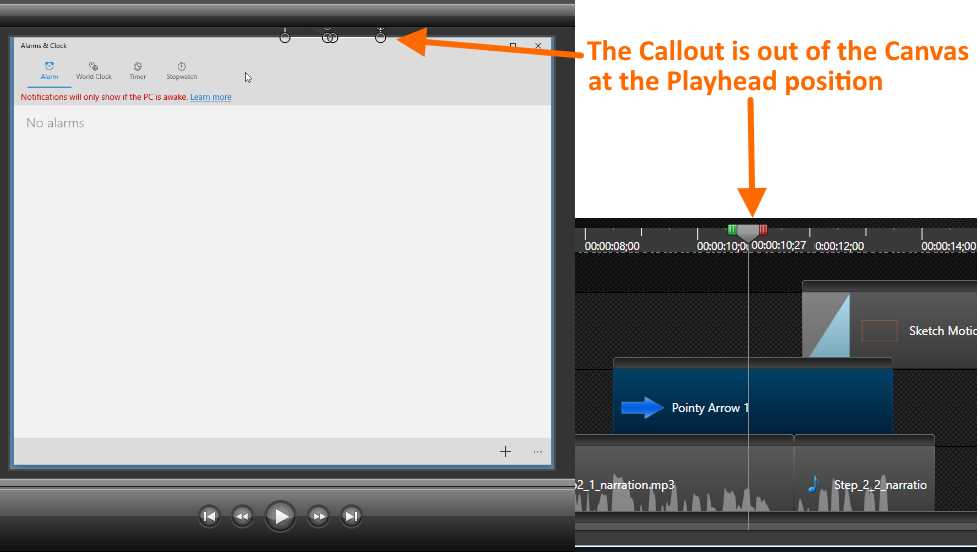
- Setting the initial point for the animation
Now, select the Visual Properties tab from the Clip Bin, and click Add Animation. After that, an arrow icon appears over the callout.
![]()
- The animation icon on the callout
The blue dot at the end of the arrowhead, as displayed in Figure 74, points to the visual effects Set B, that is, the animation finishing.
Finally, drag the callout into the Canvas and place it where we want to remain still, after the animation ends.
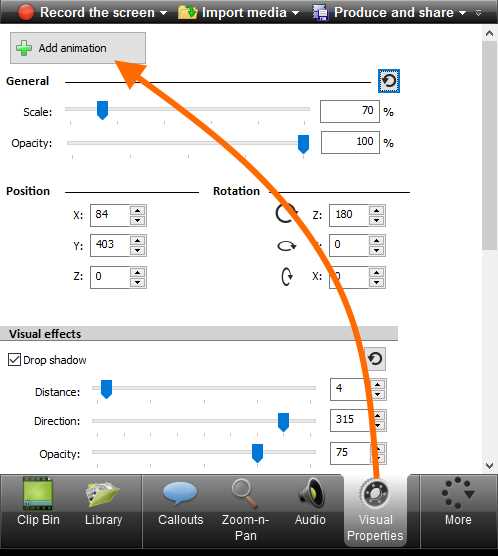
- The Add animation button in the Visual Properties tab
Removing an animation
To remove an animation from the Timeline, we should right-click on the corresponding animation icon and select Delete from the context menu.
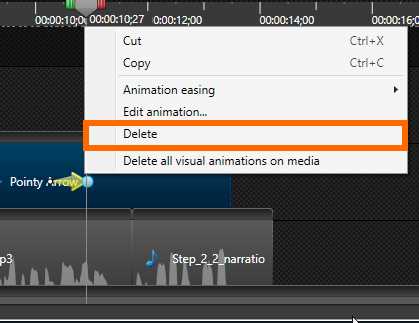
- The Animation context menu
Chapter summary
This chapter explained how to enhance our video by adding effects. The effects detailed in this chapter were callouts, transitions, zoom, and animations. We also covered the process for importing media files, either from the computer or from Google Drive.
A callout is a shape object that we can place in our video to point at the screen in a particular moment, in order to catch the viewers’ attention regarding a specific topic explained in the video. A transition is what we show between two shots or clips, using a digital effect such as a fade effect. A zoom effect in our video scales up (or sometimes down) a certain portion of the displayed content in order to cover the entire Canvas, so we draw the viewer’s attention to that portion’s content. An animation is a visual effect that changes the visual properties of an element from one state, known as Visual Properties Set A, to another, which is known as a Visual Properties Set B, in a certain amount of time known as the Animation Length.
- 1800+ high-performance UI components.
- Includes popular controls such as Grid, Chart, Scheduler, and more.
- 24x5 unlimited support by developers.