
Camtasia Succinctly®

CHAPTER 6
Camtasia Editor
This chapter will give a general explanation about the Camtasia Editor. As described in Chapter 3, the Camtasia Editor is the application’s main window and has three main areas: the Clip Bin, the Canvas, and the Timeline. The Camtasia Editor is where we’ll do the necessary work to produce our final video.
The Clip Bin
The Clip Bin is where all the recordings and other media types we plan to use in Camtasia projects are stored.
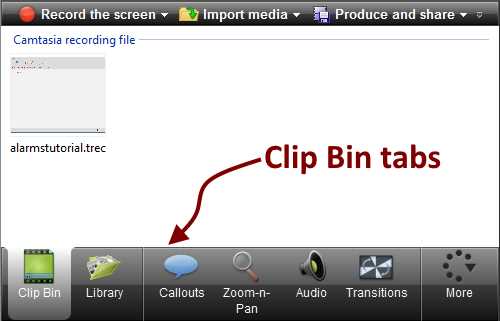
- The Clip Bin with the alarmstutorial.trec recording
Figure 32 shows the Clip Bin and points to the Clip Bin tabs. These tabs give us options to add effects or other media elements to the video project:
- Clip Bin: Points to the Clip Bin itself. When we select this tab, all files that are part of the project are displayed.
- Library: When we select this tab, the assets library elements are displayed. This library contains different media types that we can add to our project.
- Callouts: When we select this tab, we can add shapes and text to our project in order to visually communicate information about it.
- Zoom-n-Pan: We use this tab to add zoom and pan animations in order to enhance the visual experience for our project.
- Audio: We should select this tab if we want to improve the audio’s quality for the project.
- Transitions: When we select this tab, it shows a series of transition effects available to be added to our project.
- More: This tab displays a menu with additional effects that can be added to the project. When we select one of these additional effects from the menu, it is placed in the previous tab location. This is where the Transitions tab is located.
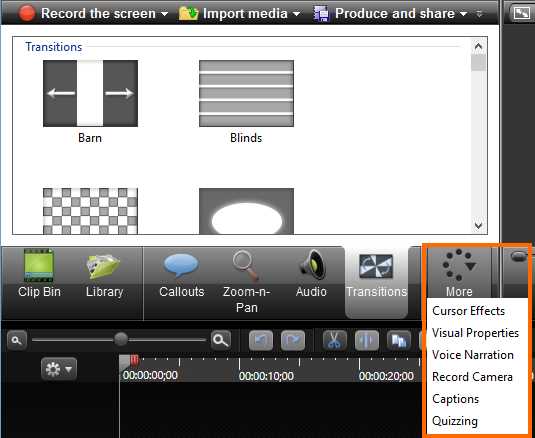
- The More tab context menu
The Canvas
The Canvas is where a visual preview of our video is placed while we’re editing. The Canvas can also be used to preview all media assets available for projects, and to arrange video project elements directly, using the mouse pointer.
A view of the Canvas while displaying the alarmstutorial.trec recording is shown in Figure 34.
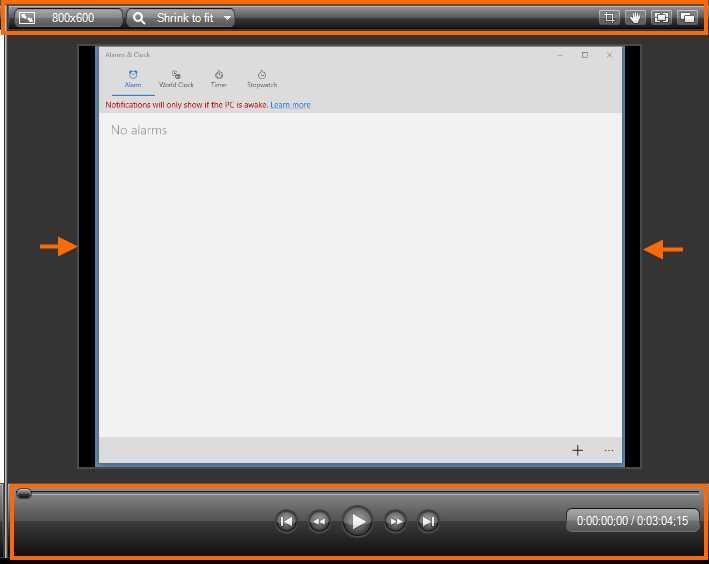
- The Canvas with a preview of alarmstutorial.trec recording file
The highlighted areas displayed in the previous figure point to the Canvas controls. These controls are used to manipulate the media currently displayed in several ways. The arrows shown point to the display boundaries marker, which is a single-line rectangle. These boundaries tell us what exactly the viewer will see when our produced video is played.
Canvas basics
Zooming in and out
We can change the zoom size of the displayed output in the Canvas by using the Zoom size combo box. As noticed in the previous figure, when the content of a media type is displayed, the Canvas automatically sets the zoom size to “Shrink to fit.” That is, the content is scaled to fit into the window.
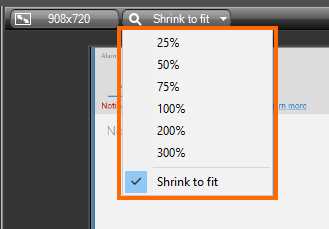
- The Canvas Zoom size combo box and its options
Figure 35 shows the options available for the Zoom size combo box. Note that the “Shrink to fit” option is checked, because this is the Canvas default behavior. Changing zoom size is easy: we just should choose the desired size option from the menu.
Tip: Zoom size can also be changed by clicking on the Canvas outside of the video boundaries marker, and scrolling the mouse wheel.
Navigation through the displayed media
We can use the control bar to move around the previewed media. There are seven elements in this bar that can help us to accomplish this task:
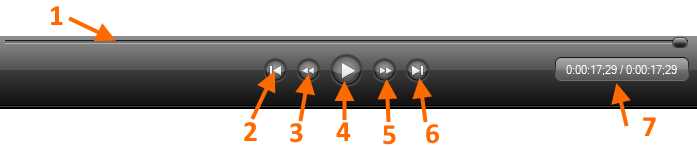
- The Canvas control bar.
- The slider: We can move along the entire content of the media previewed by using the slider button located on this bar. To do so, we should click on this button and drag it toward the end or the beginning of the bar.
- Go to beginning button: This takes us to the beginning of the media previewed.
- Backwards button: This moves us backwards as the media is previewed, with a 1/100 second precision.
- Play/Pause button: This plays or pauses the media previewed.
- Forward button: This moves us forward as the media is previewed, with a 1/100 second precision.
- Go to end button: This takes us to the end of the media previewed.
- Time scale: This shows us the position of the media previewed, in terms of time relative to the total length of the media previewed.
The Timeline
The Timeline is where the project is assembled. Here, we put all the project elements into the sequence we want them to be viewed in the produced video. Each project element is positioned within the Timeline in a separate place called Track. Every time we add a track, the Timeline names it Track n, where n is a consecutive integer number, starting with 1.
There is no limit to the number of tracks that can be placed in the Timeline. Likewise, there’s no specific media type for a track, meaning that any track can hold video, audio, images, or any other effect available. Also, there’s no restriction on the order in which the media elements for a project should be placed. However, this order defines how the media is arranged in the produced video. This behavior is known as the stacking order, and will be explained later in this book.
The Timeline shows you when the produced video will display each of one of the project elements, and how long each one of them will remain.
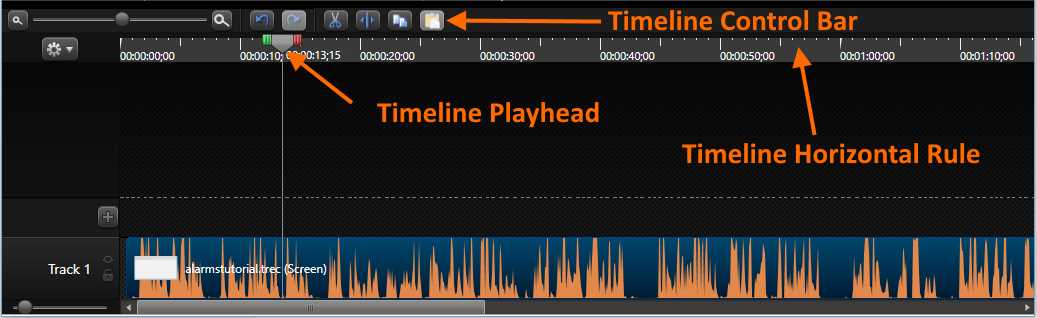
- Camtasia Editor Timeline
Figure 37 displays the Timeline with one track within it. Also, it points to some important elements for doing the job.
- Timeline Control Bar: Holds a series of interface elements that allow us to edit each track placed within. Also, a zoom control is placed in order to increase or decrease the precision of the time displayed in the rule.
- Timeline Playhead: Allows us to move into a project element up to a precise moment in time. We can also use the playhead to select pieces of an element in order to perform an operation, such as cutting or making a duplicate.
- Timeline Horizontal Rule: Displays a scale in terms of time, with a 1/100 second precision. We can drag the playhead and place it at a desired time position over the rule, and the Canvas will display the frame corresponding to that moment in the sequence of project elements.
In the next chapter, we will learn some video editing basics using the Timeline.
Chapter summary
The Camtasia Editor is the place we’ll do the necessary work to produce our final video, and has three main areas: the Clip Bin, the Canvas, and the Timeline.
The Clip Bin is where all the recordings and other media types we plan to use in Camtasia projects are stored. The Clip Bin has a series of tabs that allow us to add effects or other media elements to the video project.
The Canvas is where a visual preview of our video is placed when we’re editing. It can also be used to preview all media assets available and to arrange video project elements using the mouse pointer. The Canvas has a series of controls to perform certain operations, like zooming in or zooming out the displayed output, or moving around the previewed media.
The Timeline is where the project is assembled. All the project elements are located here in the same sequential order in which they will viewed in the produced video. Each project element is positioned in a place called Track. A track can hold any media type, like video, audio, images, or any other effect. A limitless number of tracks can be added to a project.
The Timeline shows you when the produced video will display each of one of the project elements, and how long each one of them will remain displayed.
- 1800+ high-performance UI components.
- Includes popular controls such as Grid, Chart, Scheduler, and more.
- 24x5 unlimited support by developers.