
Business Process Flow Mapping Succinctly®

CHAPTER 3
Business Process Mapping
Group process mapping
Now that the scope, detail level, and key people have been determined, and the existing documentation has been reviewed, there is enough background to begin process mapping.
To begin the initial session, assemble the group in a comfortably sized room with a large whiteboard. Plan to spend about two hours together. For those who are unfamiliar with process mapping, it will take about 10 or 20 minutes to get into the frame of mind to allow the flow to happen, so one hour will go by quickly. The process is intensive, so at about two hours, people will begin to become mentally tired of the activity.
The initial session should not be overly concerned with format or detail, but rather with encompassing the entire process idea. Since the idea of a process map is to capture each step that happens along with each decision point, it is natural that the details will fill themselves in during review in subsequent sessions. Therefore, if the team is stuck trying to figure out what happens for more than a few minutes at one step, it is best to skip it and then circle back to fill in the missing pieces at the beginning of the second session, when everyone’s mind is refreshed and they have had time to think about it.
One team member should act as the facilitator. This will be the person at the front of the room who keeps the team focused and within scope, records any parking lot items, and physically maps the process onto the whiteboard as it is discussed by the team. The facilitator could be the project manager but does not necessarily need to be. The facilitator needs to have the personality traits to support their responsibilities in order to make the most of the mapping sessions. These personality traits include organization, objectivity, and confidence. A facilitator who does not keep the group on track is setting the team up for failure.
The interactive mapping session is a messy process. There are multiple people who work with different parts of the process, and often the facilitator must go back to previous steps to add in pieces that were missed. There should not be any concern with neatness or formatting at this point— the whiteboard should just be legible enough that it can be transcribed into a document later.
There will be discussions that come up that are outside of the defined scope. It is important to stay within scope because going outside it could cause lost momentum and become overwhelming. Alternately, it would be a shame to ignore these discoveries. This is where the parking lot that was previously discussed comes in handy to hold those ideas until later.
At the end of each session, the facilitator should capture a picture of the work on the board and summarize the meeting, any points of contention, and the parking lot items for an easy and quick start to the next session. A member of the team should be assigned to create the map in a document to ensure it is neat and orderly for the next meeting.
Future state
To begin process mapping, a neat trick is to start with the end point of the ideal process and work your way backward. This reverse engineering tactic is commonly used in development, and using it during business process mapping serves two purposes:
- You will be less likely to create a process flow that mirrors the routine you are already used to.
- You will be more likely to map the easiest way without preconceived notions.
Beginning with the future state allows the team to start the project energized and to develop the possibilities by crafting an ideal business process.
The biggest obstacle to overcome while mapping the future state is the restrictive mindset and preconceived notions that the process can only be performed a certain way. This mindset may prevent the team members from creating the most-desired future state. The project manager should remind the team that this is going to be implemented in phases. There is no expectation that the current state will magically and suddenly turn into the future state. Starting at the end, at the point where the team members would most like the process to work, should help to alleviate some of those concerns.

Figure 1: Reverse Process Mapping Example
Mapping backward, the team will begin with the endpoint of their scope: whatever their last desired step is. In the example from the previous chapter of fulfilling a customer order, the end point would be the customer’s receipt of the shipment. Taken to an even larger scope, the end point could be the receipt of payment from the customer. Again, this depends on the scope of the project and size of the company.
Figure 1 shows how the team walks backward to each previous step to define the way they would ideally like their process to work.
Tip: Do not allow preconceived notions to constrain your ideas.
Current state
After the ideal future state is mapped, map the current state. Mapping the current state may take more time than the future state because there are subprocesses currently happening within the teams, and it is important that assumptions aren’t made about the way those specifics are currently handled.
For example, a customer order might come through a web-based portal, so the assumption may be that the order is routed to the team that processes the orders. I have experienced a discovery session, though, where we learned that the order was received electronically, but the individual who actually enters the orders did not have access to the location where the orders were received. In that case, a team member who received the order had to email it to the team member who enters the orders. Until we dug into those specifics, we did not know that was how the process was managed.
Unlike future state mapping, current state mapping needs to start at the beginning of the current process because there are many more details and processes that already exist that need to be accounted for. When a team has a tough time getting started with defining their current state, it is often helpful to start with a SIPOC diagram.
The SIPOC diagram
SIPOC stands for supplier, input, process, output, customer. These are written as headings on a white board in a table format, and then the process is listed below each heading. While this is extremely similar to process mapping, organizing the process into a list can make more sense to some people.
Table 1: SIPOC Diagram Example
Supplier | Input | Process | Output | Customer |
|---|---|---|---|---|
Customer | Product order | Enters order into website | Order information | Finance department |
Finance department |
| Checks to see if the customer who placed the order exists in the customer database. Enters the order information against the customer database record. | Order number with processed order information. | Operations department |
With the facilitator at the whiteboard, the group will begin with the process start point that was previously defined. The team will talk through each subsequent step as the facilitator writes each one onto the board.
Once the SIPOC diagram helps the team to develop an outline, they can move to process mapping. Split paths, such as decision points and multiple outputs, are documented. One section of the whiteboard should contain the working list of the parking lot items as they arise. The purpose of having them on the whiteboard is to keep them visible, allowing the facilitator to acknowledge an item, put it into the parking lot, and promptly move along.
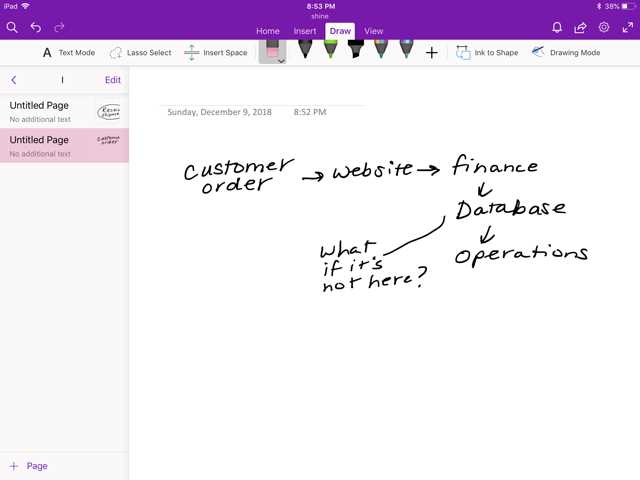
Figure 2: Process Mapping White Board Example
Depending on the size of the company and the scope of the process, mapping could take several sessions to complete, and could possibly lead to additional areas that need to be clarified. For example, during the session, the team could discover that no one in the room understands how a certain business process operates. The area should be noted, skipped, and revisited later. At the end of the session, someone will be assigned to figure out the open issues for the next session.
At this point, the project team should understand and agree on the current state process and have a basic idea of where the process contains unnecessary steps. Additionally, the parking lot probably has some ideas in it from when the current state was mapped. These should be summarized and documented for review with the project team members to see if any idea is within scope and should be addressed.
Implementation phases
When the process mapping whiteboard sessions are complete, the team then decides on the most logical way to implement the desired future state process. It is easiest to implement in phases, starting within one team and then rolling the project out to other teams. Process map documents should be created for each of the phases so that the development team can use them as design documents, and the project team has a clear picture to communicate to the stakeholders.
To decide on the phases, the project team should start with process steps that remain within the same team and then compare the current state to the future state to pick out the pieces of the process that will be the biggest changes.
Next, the project team focuses on those parts of the process to decide what steps need to happen to go from current state to future state. While the company may want the project completed as soon as possible, it is tough to complete a project with large, sudden changes. Instead, it is more effective to use tiny steps of change to reach the end goal.
- 1800+ high-performance UI components.
- Includes popular controls such as Grid, Chart, Scheduler, and more.
- 24x5 unlimited support by developers.