
Blazor Succinctly®

CHAPTER 9
Help Desk Ticket Administration
In this chapter, we will detail the steps to create screens that allow administrators to manage help desk tickets.
In the ticket administration page that we will construct, help desk tickets can be updated and deleted, but ticket details can only be added.
Create the ticket administration page
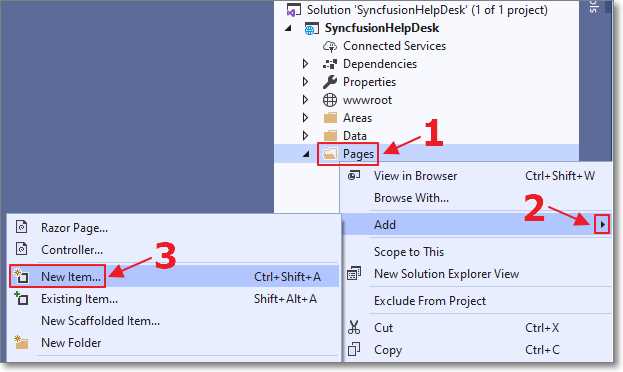
Figure 61: New item
We will now create a page that will allow all users to see their tickets, and for administrators to see all tickets.
- Add the ticket administration page to the project and name it Tickets.razor.
- Use the following code for the Razor control:
Code Listing 37: Tickets.razor
@page "/tickets" @using Microsoft.AspNetCore.Identity @using Microsoft.EntityFrameworkCore @using SyncfusionHelpDesk.Data; @using SyncfusionHelpDesk.Models @using System.Security.Claims @inject AuthenticationStateProvider AuthenticationStateProvider @inject RoleManager<IdentityRole> RoleManager @inject UserManager<ApplicationUser> UserManager @inject IDbContextFactory<SyncfusionHelpDeskContext> DbFactory @inject SyncfusionHelpDeskService SyncfusionHelpDeskService @code { #nullable disable ClaimsPrincipal CurrentUser = new ClaimsPrincipal(); private string PageTitle = "Administration"; private string ADMINISTRATION_ROLE = "Administrators"; private bool isAdmin = false; public IQueryable<HelpDeskTicket> colHelpDeskTickets { get; set; } private HelpDeskTicket SelectedTicket = new HelpDeskTicket(); public bool EditDialogVisibility { get; set; } = false; public bool DeleteRecordConfirmVisibility { get; set; } = false; } |
Add link in NavMenu.razor
Here’s how to add a link to the ticket control in the navigation menu:
- Open the NavMenu.razor control in the Shared folder and remove the code for the links to the counter, auth, and weather pages from Code Listing 38.
Code Listing 38: Remove NavMenu Code
<div class="nav-item px-3"> <NavLink class="nav-link" href="counter"> <span class="bi bi-plus-square-fill-nav-menu" aria-hidden="true"></span> Counter </NavLink> </div> <div class="nav-item px-3"> <NavLink class="nav-link" href="weather"> <span class="bi bi-list-nested-nav-menu" aria-hidden="true"></span> Weather </NavLink> </div> <div class="nav-item px-3"> <NavLink class="nav-link" href="auth"> <span class="bi bi-lock-nav-menu" aria-hidden="true"></span> Auth Required </NavLink> </div> |
- Add the code from Code Listing 39 under the <Authorized> tag.
Code Listing 39: Add NavMenu Code
<div class="nav-item px-3"> <NavLink class="nav-link" href="tickets"> <span class="bi bi-plus-square-fill-nav-menu" aria-hidden="true"></span> Tickets </NavLink> </div> |
This will display a link to the Tickets.razor page, but this link will only be displayed for users who are logged in.
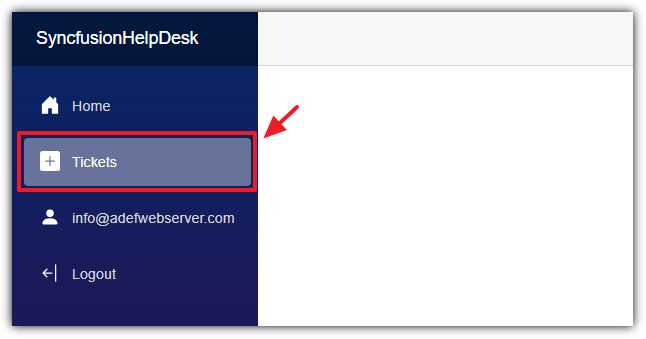
Figure 62: Tickets link
When we run the application and log in, we will see the link to the Tickets page. When we click on the link, we are brought to the Tickets page, which is currently blank.
Using the Syncfusion DataGrid
The Syncfusion DataGrid, programmatically called SfGrid, is a control that allows you to display tabular data. We will use it to display the help desk tickets. This control will allow us to page, sort, and trigger record editing.
It has a DataSource property that we will bind to a collection of the help desk tickets. It also has properties that allow for paging and sorting.
The control also allows us to define the columns, which will contain the tabular data, as well as Edit and Delete buttons. To use the Syncfusion DataGrid:
- Add the following markup to the Tickets.razor file:
Code Listing 40: DataGrid
<style> .custom-dialog .e-dialog { max-height: 90vh !important; /* Customize the max height */ } </style> <AuthorizeView> <Authorized> <h1>@PageTitle</h1> <div> <div id="target" style="height: 500px;"> <SfGrid ID="Grid" DataSource="@colHelpDeskTickets" AllowPaging="true" AllowSorting="true" AllowResizing="true" AllowReordering="true"> <GridPageSettings PageSize="5"></GridPageSettings> <GridEvents CommandClicked="OnCommandClicked" TValue="HelpDeskTicket"> </GridEvents> <GridColumns> <GridColumn HeaderText="" TextAlign="TextAlign.Left" Width="150"> <GridCommandColumns> <GridCommandColumn Type=CommandButtonType.Edit ButtonOption="@(new CommandButtonOptions() { Content = "Edit", CssClass = "e-primary" })"> </GridCommandColumn> @if (isAdmin) { <GridCommandColumn Type=CommandButtonType.Delete ButtonOption="@(new CommandButtonOptions() { Content = "Delete", CssClass = "e-danger"})"> </GridCommandColumn> } </GridCommandColumns> </GridColumn> <GridColumn IsPrimaryKey="true" Field=@nameof(HelpDeskTicket.Id) HeaderText="ID #" TextAlign="@TextAlign.Left" Width="70"> </GridColumn> <GridColumn Field=@nameof(HelpDeskTicket.TicketStatus) HeaderText="Status" TextAlign="@TextAlign.Left" Width="80"> </GridColumn> <GridColumn Field=@nameof(HelpDeskTicket.TicketDate) HeaderText="Date" TextAlign="@TextAlign.Left" Format="d" Width="80"> </GridColumn> <GridColumn Field=@nameof(HelpDeskTicket.TicketDescription) HeaderText="Description" TextAlign="@TextAlign.Left" Width="150"> </GridColumn> <GridColumn Field=@nameof(HelpDeskTicket.TicketRequesterEmail) HeaderText="Requester" TextAlign="@TextAlign.Left" Width="150"> </GridColumn> </GridColumns> </SfGrid> </div> </div> </Authorized> <NotAuthorized> <p>You are not authorized to view this page.</p> </NotAuthorized> </AuthorizeView> |
- Add the following to the @code section:
Code Listing 41: DataGrid code
protected override async Task OnInitializedAsync() { // Get the current user var authState = await AuthenticationStateProvider .GetAuthenticationStateAsync(); CurrentUser = authState.User; // Check if the current user is an Administrator if (CurrentUser.Identity?.IsAuthenticated == true) { var CurrentApplicationUser = await UserManager .FindByNameAsync(CurrentUser.Identity.Name); // See if the current user is an Administrator isAdmin = await UserManager.IsInRoleAsync( CurrentApplicationUser, ADMINISTRATION_ROLE); } // GetHelpDeskTickets returns IQueryable that the // SfGrid will use to only pull records for the // page that is currently selected colHelpDeskTickets = SyncfusionHelpDeskService .GetHelpDeskTickets( DbFactory, isAdmin, CurrentUser.Identity.Name); // Set PageTitle PageTitle = isAdmin ? "Administration" : "My Help Desk Tickets"; } public async void OnCommandClicked( CommandClickEventArgs<HelpDeskTicket> args) { // Code to be added later } |
The OnInitializedAsync method is the first method to run when the page loads. This method populates the colHelpDeskTickets collection, which is bound to the DataSource property of the DataGrid.
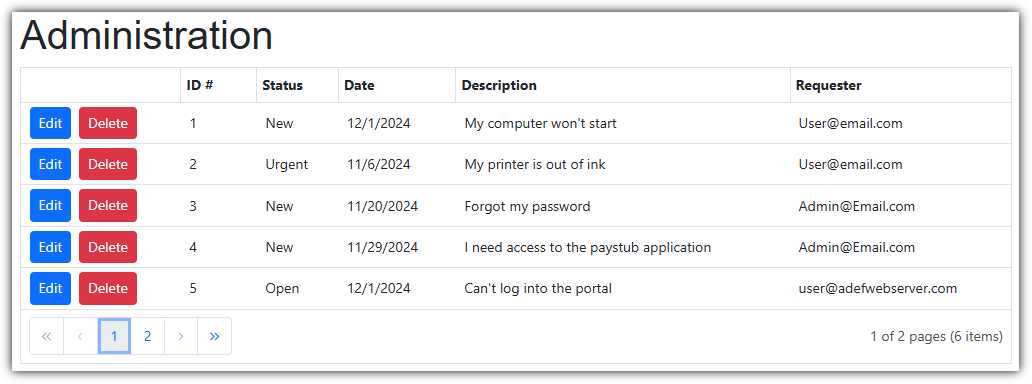
Figure 63: DataGrid control
Run the application, log in as an administrator, and navigate to the Tickets page. We will see the help desk ticket records displayed in the DataGrid.
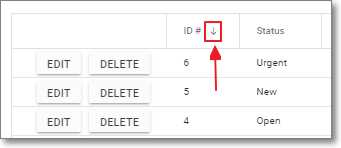
Figure 64: Sorting
Sorting is performed by clicking on the column headers.

Figure 65: Paging
The grid also enables paging.
Deleting a record
We will implement the functionality to delete a help desk ticket record. To enable this, the DataGrid allows us to create custom command buttons by using the CommandClicked property that we currently have wired up to the OnCommandClicked method.
We will use the OnCommandClicked method to display a pop-up window using the Syncfusion Dialog control, which will require the user to confirm that they want to delete the record.
Syncfusion Dialog control
The Dialog control is used to display information and accept user input. It can be displayed as a modal control that requires the user to interact with it before continuing to use any other part of the application. Here are the steps to implement it:
- Enter the code from Code Listing 42 inside the AuthorizeView control tag.
Code Listing 42: Confirm delete dialog
<SfDialog Target="#target" Width="100px" Height="120px" IsModal="true" ShowCloseIcon="false" @bind-Visible="DeleteRecordConfirmVisibility"> <DialogTemplates> <Header> DELETE RECORD ? </Header> <Content> <div class="button-container"> <SfButton CssClass="e-primary" OnClick="ConfirmDeleteYes">Yes</SfButton> <SfButton OnClick="ConfirmDeleteNo">No</SfButton> </div> </Content> </DialogTemplates> </SfDialog> |
- Change the OnCommandClicked method to the following to respond to the Delete button being selected for a help desk record. This method will open the confirmation dialog.
Code Listing 43: Open confirmation dialog
public async void OnCommandClicked( CommandClickEventArgs<HelpDeskTicket> args) { // Get the selected Help Desk Ticket SelectedTicket = await SyncfusionHelpDeskService.GetHelpDeskTicketAsync( DbFactory, args.RowData.TicketGuid); if (args.CommandColumn.ButtonOption.Content == "Delete") { // Open Delete confirmation dialog this.DeleteRecordConfirmVisibility = true; StateHasChanged(); } } |
Note: StateHasChanged, which is used in Code Listing 43, notifies a component (in this case, the Tickets page) that its state has changed and causes that component to re-render. This is usually only required when that state was changed by a JavaScript interop call. The Syncfusion Dialog control uses JavaScript interop in the underlying code to open the dialog, so StateHasChanged is required in this case.
- Add the method from Code Listing 44, which will just close the dialog if the user selects No.
Code Listing 44: Close dialog
public void ConfirmDeleteNo() { // Open the dialog // to give the user a chance // to confirm they want to delete the record this.DeleteRecordConfirmVisibility = false; } |
Using @ref to capture references to components
Adding a @ref attribute to a component allows you to programmatically access and manipulate a control or component. To implement it:
- Add the @ref attribute to a component, then define a field with the same type as the component.
- Add the property from Code Listing 45 to the SfGrid control.
Code Listing 45: DataGrid @ref
@ref="gridObj" |
- Now, add the corresponding field to the @code section from Code Listing 46.
Code Listing 46: DataGrid property
SfGrid<HelpDeskTicket> gridObj; |
- Add the method from Code Listing 47 to delete the record when the user selects Yes in the dialog. This method will refresh the DataGrid by calling gridObj.Refresh(), which uses the gridObj object defined with the @ref attribute.
Code Listing 47: Delete record
public async void ConfirmDeleteYes() { // The user selected Yes to delete the // selected Help Desk Ticket // Delete the record var result = await SyncfusionHelpDeskService.DeleteHelpDeskTicketsAsync( DbFactory, SelectedTicket); // Close the dialog this.DeleteRecordConfirmVisibility = false; // Refresh the SfGrid // so the deleted record will not show await gridObj.Refresh(); } |
When we run the application, we can click the Delete button to open the dialog.
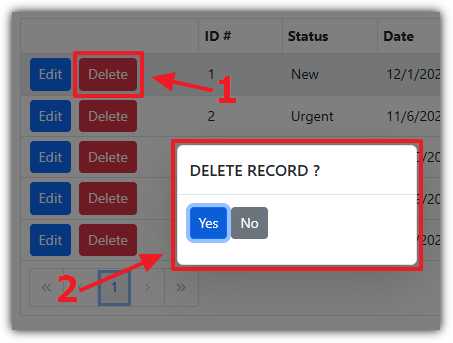
Figure 66: Delete confirmation
Selecting No will just close the dialog. Selecting Yes will delete the selected record and refresh the DataGrid.
Edit ticket control
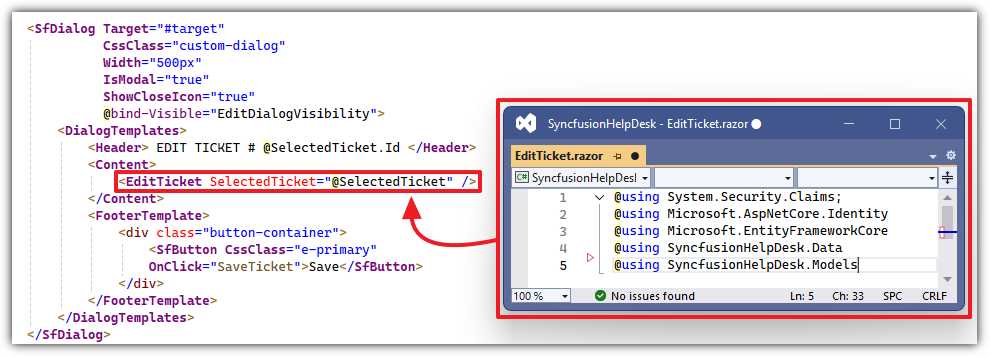
Figure 67: Edit ticket control
We will construct an EditTicket control that will be placed inside a dialog on the Tickets page, which will be displayed when you edit a help desk ticket. We do this to allow this control to be reused in the EmailTicketEdit.razor page covered in the following chapter. To construct the EditTicket control:
- In the Pages folder, create a new control called EditTicket.razor using the code from Code Listing 48.
Code Listing 48: EditTicket.razor
@using System.Security.Claims; @using Microsoft.AspNetCore.Identity @using Microsoft.EntityFrameworkCore @using SyncfusionHelpDesk.Data @using SyncfusionHelpDesk.Models @inject RoleManager<IdentityRole> RoleManager @inject UserManager<ApplicationUser> UserManager @inject AuthenticationStateProvider AuthenticationStateProvider @inject IDbContextFactory<SyncfusionHelpDeskContext> DbFactory @inject SyncfusionHelpDeskService SyncfusionHelpDeskService |
- Next, add the code from Code Listing 49 for the markup of the control.
Code Listing 49: EditTicket markup
<!-- This style will show --> <!-- the entire content of TicketDescription --> <!-- on hover over the field --> <style> .e-grid .e-rowcell { white-space: nowrap; overflow: hidden; text-overflow: ellipsis; } .e-grid .e-rowcell:hover { overflow: visible; } </style> <div> <SfDropDownList Enabled="isAdmin" TItem="HelpDeskStatus" TValue="string" PopupHeight="230px" FloatLabelType="@FloatLabelType.Always" Placeholder="Ticket Status" @bind-Value="@SelectedTicket.TicketStatus" DataSource="@HelpDeskStatusData.Statuses"> <DropDownListEvents TItem="HelpDeskStatus" TValue="string" /> <DropDownListFieldSettings Text="Text" Value="ID" /> </SfDropDownList> </div> <div> <SfDatePicker ID="TicketDate" Enabled="isAdmin" Placeholder="Ticket Date" FloatLabelType="@FloatLabelType.Always" @bind-Value="@SelectedTicket.TicketDate" Max="DateTime.Now" ShowClearButton="false"> </SfDatePicker> </div> <div> <SfTextBox Enabled="isAdmin" Placeholder="Ticket Description" FloatLabelType="@FloatLabelType.Always" @bind-Value="@SelectedTicket.TicketDescription"> </SfTextBox> </div> <div> <SfTextBox Enabled="isAdmin" Placeholder="Requester Email" FloatLabelType="@FloatLabelType.Always" @bind-Value="@SelectedTicket.TicketRequesterEmail"> </SfTextBox> </div> <br /> <SfGrid @ref="GridRef" DataSource="@SelectedTicket.HelpDeskTicketDetails"> <GridColumns> <GridColumn Field="TicketDetailDate" HeaderText="Date" Format="MM/dd/yyyy" TextAlign="TextAlign.Left" Width="150"> </GridColumn> <GridColumn Field="TicketDescription" HeaderText="Description" TextAlign="TextAlign.Left" Width="300"> </GridColumn> </GridColumns> </SfGrid> <br /> <SfTextBox Placeholder="New Help Desk Ticket Detail" @bind-Value="@NewHelpDeskTicketDetail"> </SfTextBox> <br /> <br /> <SfButton CssClass="e-small e-success" @onclick="AddHelpDeskTicketDetail"> Add Detail </SfButton> <br /> <br /> |
- Add the following code, which implements the code for the control:
Code Listing 50: EditTicket code
@code { #nullable disable [Parameter] public HelpDeskTicket SelectedTicket { get; set; } private SfGrid<HelpDeskTicketDetail> GridRef; private string ADMINISTRATION_ROLE = "Administrators"; private bool isAdmin = false; private string NewHelpDeskTicketDetail = ""; protected override async Task OnInitializedAsync() { var authState = await AuthenticationStateProvider .GetAuthenticationStateAsync(); var user = authState.User; if (user.Identity?.IsAuthenticated == true) { var CurrentUser = await UserManager.FindByNameAsync(user.Identity.Name); // If they are an Administrator // Enable editing isAdmin = await UserManager .IsInRoleAsync(CurrentUser, ADMINISTRATION_ROLE); } } private void AddHelpDeskTicketDetail() { // Create New HelpDeskTicketDetails record HelpDeskTicketDetail NewHelpDeskTicketDetails = new HelpDeskTicketDetail(); NewHelpDeskTicketDetails.HelpDeskTicketId = SelectedTicket.Id; NewHelpDeskTicketDetails.TicketDetailDate = DateTime.Now; NewHelpDeskTicketDetails.TicketDescription = NewHelpDeskTicketDetail; // Add to collection SelectedTicket.HelpDeskTicketDetails .Add(NewHelpDeskTicketDetails); // Clear the Text Box NewHelpDeskTicketDetail = ""; // Update the Grid GridRef.Refresh(); } } |
Notice that this exposes a SelectedTicket parameter (of type HelpDeskTickets) that will accept a reference of a help desk ticket record.
- In the Tickets.razor control, add the markup from Code Listing 51 to display the EditTicket.razor control in a new Dialog control.
Code Listing 51: EditTicket Dialog
<SfDialog Target="#target" CssClass="custom-dialog" Width="500px" IsModal="true" ShowCloseIcon="true" @bind-Visible="EditDialogVisibility"> <DialogTemplates> <Header> EDIT TICKET # @SelectedTicket.Id </Header> <Content> <EditTicket SelectedTicket="@SelectedTicket" /> </Content> <FooterTemplate> <div class="button-container"> <SfButton CssClass="e-primary" OnClick="SaveTicket">Save</SfButton> </div> </FooterTemplate> </DialogTemplates> </SfDialog> |
Note that this instantiates the EditTicket control (the EditTicket.razor code page) and passes a reference to the currently selected help desk ticket record (@SelectedTicket) through the SelectedTicket property.
- Add the following to the @code section to implement the functionality for the Save button in the dialog:
Code Listing 52: SaveTicket method
public async Task SaveTicket() { // Update the selected Help Desk Ticket var result = await SyncfusionHelpDeskService.UpdateTicketAsync( DbFactory, SelectedTicket); // Close the Edit dialog this.EditDialogVisibility = false; // Refresh the SfGrid // so the changes to the selected // Help Desk Ticket are reflected await gridObj.Refresh(); } |
- Add the following code to the OnCommandClicked method under the existing SelectedTicket line, to open the dialog when the Edit button is clicked on a row in the DataGrid.
Code Listing 53: Open dialog
if (args.CommandColumn.ButtonOption.Content == "Edit") { // Open the Edit dialog this.EditDialogVisibility = true; StateHasChanged(); } |
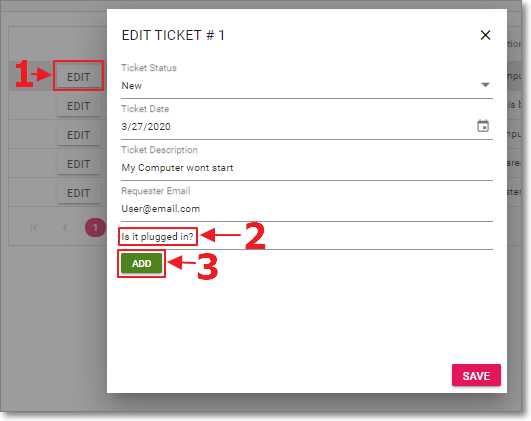
Figure 68: Edit ticket dialog
When we run the application, we can click the Edit button next to a record to open it in the dialog. The help desk ticket values at the top of the form can be edited and saved by clicking the Save button at the bottom of the dialog.
On the bottom half of the dialog, help desk ticket detail records can be added by entering text in the text box and clicking the Add Detail button.
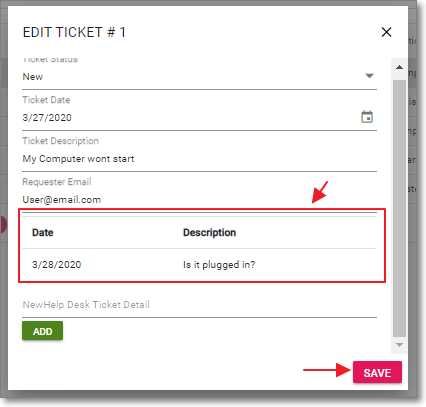
Figure 69: Edit ticket
The help desk detail record will be added, but it will not be saved until the Save button is clicked.
- 80+ high performance Blazor components.
- Lightweight and user friendly.
- Stunning Built-in themes with customization.