
Blazor Succinctly®

CHAPTER 7
Creating a Data Layer
We will now add additional tables to the database to support the custom code we plan to write. To allow our code to communicate with these tables, we require a data layer.
This data layer will also allow us to organize and reuse code efficiently.
Create the database tables
The first step is to add the database tables we will need.
- In the SQL Server Object Explorer, right-click on the database and select New Query.

Figure 41: New Query
- Enter the following script:
Code Listing 20: SQL script
SET ANSI_NULLS ON GO SET QUOTED_IDENTIFIER ON GO CREATE TABLE [dbo].[HelpDeskTicketDetails]( [Id] [int] IDENTITY(1,1) NOT NULL, [HelpDeskTicketId] [int] NOT NULL, [TicketDetailDate] [datetime] NOT NULL, [TicketDescription] [nvarchar](max) NOT NULL, CONSTRAINT [PK_HelpDeskTicketDetails] PRIMARY KEY CLUSTERED ( [Id] ASC )WITH (PAD_INDEX = OFF, STATISTICS_NORECOMPUTE = OFF, IGNORE_DUP_KEY = OFF, ALLOW_ROW_LOCKS = ON, ALLOW_PAGE_LOCKS = ON) ON [PRIMARY] ) ON [PRIMARY] TEXTIMAGE_ON [PRIMARY] GO SET ANSI_NULLS ON GO SET QUOTED_IDENTIFIER ON GO CREATE TABLE [dbo].[HelpDeskTickets]( [Id] [int] IDENTITY(1,1) NOT NULL, [TicketStatus] [nvarchar](50) NOT NULL, [TicketDate] [datetime] NOT NULL, [TicketDescription] [nvarchar](max) NOT NULL, [TicketRequesterEmail] [nvarchar](500) NOT NULL, [TicketGUID] [nvarchar](500) NOT NULL, CONSTRAINT [PK_HelpDeskTickets] PRIMARY KEY CLUSTERED ( [Id] ASC )WITH (PAD_INDEX = OFF, STATISTICS_NORECOMPUTE = OFF, IGNORE_DUP_KEY = OFF, ALLOW_ROW_LOCKS = ON, ALLOW_PAGE_LOCKS = ON) ON [PRIMARY] ) ON [PRIMARY] TEXTIMAGE_ON [PRIMARY] GO ALTER TABLE [dbo].[HelpDeskTicketDetails] WITH CHECK ADD CONSTRAINT [FK_HelpDeskTicketDetails_HelpDeskTickets] FOREIGN KEY([HelpDeskTicketId]) REFERENCES [dbo].[HelpDeskTickets] ([Id]) ON DELETE CASCADE GO ALTER TABLE [dbo].[HelpDeskTicketDetails] CHECK CONSTRAINT [FK_HelpDeskTicketDetails_HelpDeskTickets] GO |
- Select the Execute icon.

Figure 42: Click execute
- Close the window and refresh the view of the tables in the database.

Figure 43: Refresh database
You will see that the new tables have been added.

Figure 44: Database diagram
The diagram in Figure 44 shows the one-to-many relationship between the newly added tables. A HelpDeskTickets record is created first. As the issue is processed, multiple associated HelpDeskTicketDetails records are added.
Create the DataContext by using EF Core tools
We will now create the DataContext code that will allow the SyncfusionHelpDeskService, which will be created in later steps, to communicate with the database tables we just added.

Figure 45: EF Core Power Tools
To create the DataContext code:
- Install EF Core Power Tools from the following link: https://marketplace.visualstudio.com/items?itemName=ErikEJ.EFCorePowerTools.
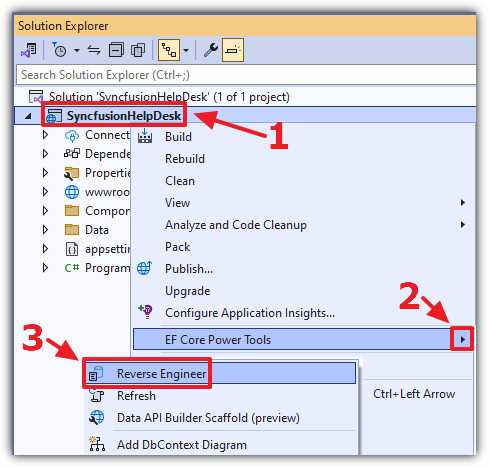
Figure 46: EF Core Power Tools
- Right-click on the project node in the Solution Explorer and select EF Core Power Tools > Reverse Engineer.
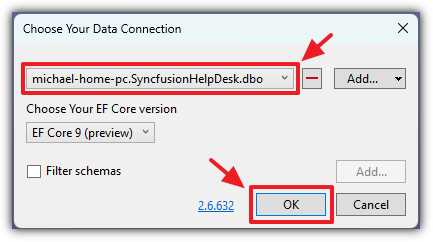
Figure 47: Create a connection
- Select Add to create a connection to the database if one does not already exist in the dropdown.
- Select the database connection in the dropdown and click OK.

Figure 48: Select tables
- Select the HelpDeskTicketDetails table and the HelpDeskTickets table. Then, select OK.

Figure 49: Configure DataContext
- Enter the following values:
- Context name: SyncfusionHelpDeskContext
- Namespace: SyncfusionHelpDesk
- EntityTypes path: Models
- Select OK.

Figure 50: DataContext created
In the Solution Explorer, you will see that the DataContext has been created.
Set the database connection
The DataContext code needs the connection to the database to be set.
- Open the Programs.cs file and add the following code to the ConfigureServices section before the var app = builder.Build(); line:
Code Listing 21: Database connection
// To access HelpDesk tables builder.Services.AddDbContextFactory<SyncfusionHelpDeskContext>(options => options.UseSqlServer(connectionString)); |
- Save the file.
- Select Build > Rebuild Solution. The application should build without any errors.
Create the SyncfusionHelpDeskService
We will now create the service that will provide all the remaining data access methods we will need for the application.
- Create a new folder called Services.
- In the Services folder, add a new file called SyncfusionHelpDeskService.cs with the following code:
Code Listing 22: SyncfusionHelpDeskService
#nullable disable using Microsoft.EntityFrameworkCore; using Microsoft.EntityFrameworkCore.Internal; using SyncfusionHelpDesk.Models; using System; using System.Collections.Generic; using System.Linq; using System.Threading.Tasks; namespace SyncfusionHelpDesk.Data { public class SyncfusionHelpDeskService : IDisposable { SyncfusionHelpDeskContext syncfusionHelpDeskContext; public SyncfusionHelpDeskService() { } public IQueryable<HelpDeskTicket> GetHelpDeskTickets( IDbContextFactory<SyncfusionHelpDeskContext> dbContextFactory, bool IsAdmin, string paramEmail) { // Return all HelpDesk Tickets as IQueryable // SfGrid will use this to only pull records // for the page that it is currently displaying // Note: AsNoTracking() is used because it is // quicker to execute and we do not need // Entity Framework change tracking at this point syncfusionHelpDeskContext = dbContextFactory.CreateDbContext(); if (IsAdmin) { // Admin User return syncfusionHelpDeskContext.HelpDeskTickets.AsNoTracking(); } else { // Regular User return syncfusionHelpDeskContext.HelpDeskTickets .Where(x => x.TicketRequesterEmail == paramEmail) .AsNoTracking(); } } public async Task<HelpDeskTicket> GetHelpDeskTicketAsync( IDbContextFactory<SyncfusionHelpDeskContext> dbContextFactory, string HelpDeskTicketGuid) { // Get the existing record syncfusionHelpDeskContext = dbContextFactory.CreateDbContext(); var ExistingTicket = await syncfusionHelpDeskContext.HelpDeskTickets .Include(x => x.HelpDeskTicketDetails) .Where(x => x.TicketGuid == HelpDeskTicketGuid) .AsNoTracking() .FirstOrDefaultAsync(); return ExistingTicket; } public Task<HelpDeskTicket> CreateTicketAsync( IDbContextFactory<SyncfusionHelpDeskContext> dbContextFactory, HelpDeskTicket newHelpDeskTickets) { // Add a new Help Desk Ticket syncfusionHelpDeskContext = dbContextFactory.CreateDbContext(); syncfusionHelpDeskContext.HelpDeskTickets.Add(newHelpDeskTickets); syncfusionHelpDeskContext.SaveChanges(); return Task.FromResult(newHelpDeskTickets); } public Task<bool> UpdateTicketAsync( IDbContextFactory<SyncfusionHelpDeskContext> dbContextFactory, HelpDeskTicket UpdatedHelpDeskTickets) { // Get the existing record syncfusionHelpDeskContext = dbContextFactory.CreateDbContext(); var ExistingTicket = syncfusionHelpDeskContext.HelpDeskTickets .Where(x => x.Id == UpdatedHelpDeskTickets.Id) .FirstOrDefault(); if (ExistingTicket != null) { ExistingTicket.TicketDate = UpdatedHelpDeskTickets.TicketDate; ExistingTicket.TicketDescription = UpdatedHelpDeskTickets.TicketDescription; ExistingTicket.TicketGuid = UpdatedHelpDeskTickets.TicketGuid; ExistingTicket.TicketRequesterEmail = UpdatedHelpDeskTickets.TicketRequesterEmail; ExistingTicket.TicketStatus = UpdatedHelpDeskTickets.TicketStatus; // Insert any new TicketDetails if (UpdatedHelpDeskTickets.HelpDeskTicketDetails != null) { foreach (var item in UpdatedHelpDeskTickets.HelpDeskTicketDetails) { if (item.Id == 0) { // Create New HelpDeskTicketDetails record HelpDeskTicketDetail newHelpDeskTicketDetails = new HelpDeskTicketDetail(); newHelpDeskTicketDetails.HelpDeskTicketId = UpdatedHelpDeskTickets.Id; newHelpDeskTicketDetails.TicketDetailDate = DateTime.Now; newHelpDeskTicketDetails.TicketDescription = item.TicketDescription; syncfusionHelpDeskContext.HelpDeskTicketDetails .Add(newHelpDeskTicketDetails); } } } syncfusionHelpDeskContext.SaveChanges(); } else { return Task.FromResult(false); } return Task.FromResult(true); } public Task<bool> DeleteHelpDeskTicketsAsync( IDbContextFactory<SyncfusionHelpDeskContext> dbContextFactory, HelpDeskTicket DeleteHelpDeskTickets) { // Get the existing record syncfusionHelpDeskContext = dbContextFactory.CreateDbContext(); var ExistingTicket = syncfusionHelpDeskContext.HelpDeskTickets .Include(x => x.HelpDeskTicketDetails) .Where(x => x.Id == DeleteHelpDeskTickets.Id) .FirstOrDefault(); if (ExistingTicket != null) { // Delete the Help Desk Ticket syncfusionHelpDeskContext.HelpDeskTickets.Remove(ExistingTicket); syncfusionHelpDeskContext.SaveChanges(); } else { return Task.FromResult(false); } return Task.FromResult(true); } // Ensures the context is disposed when the component is disposed public void Dispose() => syncfusionHelpDeskContext?.Dispose(); } } |
Register the SyncfusionHelpDeskService
Finally, we need to register this service so that we can make it available to our code pages.
Open the Program.cs file and add the following code to the ConfigureServices section (before the var app = builder.Build(); line:
Code Listing 23: SyncfusionHelpDeskService
builder.Services.AddScoped<SyncfusionHelpDeskService>(); |
We will later inject this service into our .razor code.
Create the administrator
We will now write code to programmatically create an administrator role and a button to add the current user to it.
- Add the following method to the Program class in the Program.cs file:
Code Listing 24: Role creation logic
// Role creation logic private static async Task CreateRoles( IServiceProvider serviceProvider) { using var scope = serviceProvider.CreateScope(); var roleManager = scope.ServiceProvider .GetRequiredService<RoleManager<IdentityRole>>(); // Check if the Administrator role exists, if not, create it if (!await roleManager.RoleExistsAsync("Administrators")) { var adminRole = new IdentityRole("Administrators"); await roleManager.CreateAsync(adminRole); } } |
This will create the administrator role if it does not already exist.
- To call this method in Program.cs, change the code in Code Listing 25 to the code in Code Listing 26.
Code Listing 25: Original Main method
public static void Main(string[] args) |
Code Listing 26: Updated Main method
public static async Task Main(string[] args) |
- Change the existing app.Run(); line in the Program.cs file to the following to call the new CreateRoles method and to run App.razor as async:
Code Listing 27: Call CreateRoles
// Ensure the Administrator role is created at startup await CreateRoles(app.Services); await app.RunAsync(); |
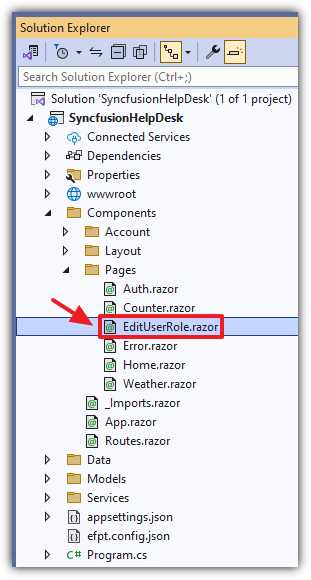
Figure 51: Create EditUserRole.razor page
We will now create a button that will allow the logged-in user to switch between being an administrator and a normal user.
- Create a new Razor control called EditUserRole.razor with the following code:
Code Listing 28: EditUserRole code
@using Microsoft.AspNetCore.Identity @using SyncfusionHelpDesk.Data @inject RoleManager<IdentityRole> RoleManager @inject UserManager<ApplicationUser> UserManager @inject AuthenticationStateProvider AuthenticationStateProvider @inject NavigationManager NavigationManager @if (isLoggedIn) { <div class="button-container"> <SfButton OnClick="@ToggleRole" CssClass="e-secondary" Content="@buttonText"> </SfButton> </div> } <br /> @code { #nullable disable [Parameter] // Expose event to parent public EventCallback<bool> OnRoleChanged { get; set; } private string ADMINISTRATION_ROLE = "Administrators"; private string buttonText = "Loading..."; private ApplicationUser currentUser; private bool isAdmin; private bool isLoggedIn; protected override async Task OnInitializedAsync() { await LoadUserAndRole(); } private async Task LoadUserAndRole() { var authState = await AuthenticationStateProvider .GetAuthenticationStateAsync(); var user = authState.User; isLoggedIn = user.Identity?.IsAuthenticated == true; if (isLoggedIn) { currentUser = await UserManager.FindByNameAsync(user.Identity.Name); isAdmin = await UserManager .IsInRoleAsync(currentUser, ADMINISTRATION_ROLE); UpdateButtonText(); } } private void UpdateButtonText() { buttonText = (isAdmin == true) ? "Make me a normal user" : "Make me an administrator"; } private async Task ToggleRole() { if (currentUser != null) { if (isAdmin) { await UserManager.RemoveFromRoleAsync( currentUser, ADMINISTRATION_ROLE); isAdmin = false; } else { await UserManager.AddToRoleAsync( currentUser, ADMINISTRATION_ROLE); isAdmin = true; } UpdateButtonText(); // Raise event to notify parent await OnRoleChanged.InvokeAsync(); } } } |
- Open the Home.razor page, which is the home page of the application, and replace all the code with the following code:
Code Listing 29: Add control to Home.razor
@page "/" @using Microsoft.EntityFrameworkCore @using SyncfusionHelpDesk.Data; @using SyncfusionHelpDesk.Models @inject IDbContextFactory<SyncfusionHelpDeskContext> DbFactory @inject SyncfusionHelpDeskService SyncfusionHelpDeskService @inject NavigationManager NavigationManager <EditUserRole OnRoleChanged="HandleRoleChange" /> @code { #nullable disable private void HandleRoleChange() { // Reload the entire page NavigationManager.NavigateTo("/", true); } } |
- Save the page and run the application. The home page of the application displays an empty page. However, we can click the login link to log in to the application.
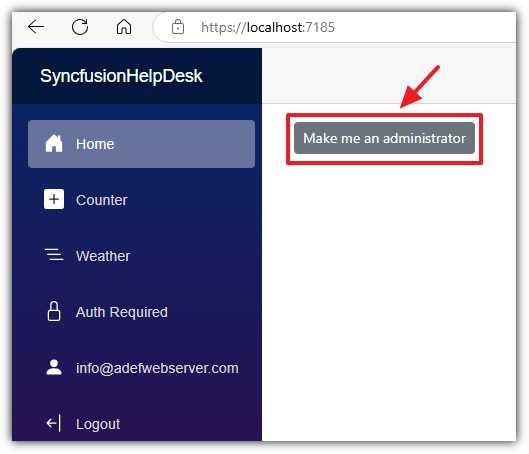
Figure 52: Button to allow the user to be an administrator
When we log in, the code on the Home.razor page runs the code that’s contained in EditUserRole.razor to display a new button, which will make the currently logged-in user an administrator.
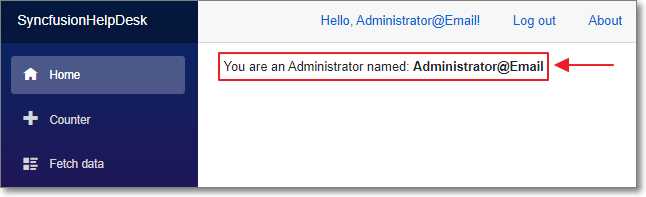
Figure 53: Administrator created
After the user has been made an administrator, the code detects this and displays a button to allow the user to change back to a normal user.


- 80+ high performance Blazor components.
- Lightweight and user friendly.
- Stunning Built-in themes with customization.