
Blazor Succinctly®

CHAPTER 6
Add Syncfusion
Syncfusion controls allow us to easily implement advanced functionality with a minimum amount of code. The Syncfusion controls are contained in NuGet packages. In this chapter, we will cover the steps to obtain the packages and configure them for our application.
Note: For the latest requirements to use Syncfusion, see the following link: https://blazor.syncfusion.com/documentation/system-requirements/.
Install NuGet packages

Figure 39: NuGet packages
- Right-click on the project node and select Manage NuGet Packages.
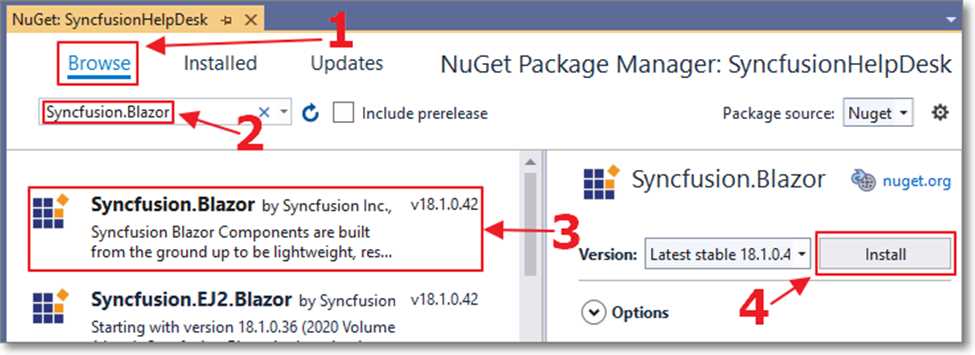
Figure 40: Install NuGet packages
- Select the Browse tab and install the following NuGet packages:
- Syncfusion.Blazor.Core
- Syncfusion.Blazor.Calendars
- Syncfusion.Blazor.DataForm
- Syncfusion.Blazor.DropDowns
- Syncfusion.Blazor.Inputs
- Syncfusion.Blazor.Notifications
- Syncfusion.Blazor.SmartComponents
- Syncfusion.Blazor.Themes
- Syncfusion.Blazor.Grid
- System.Text.Json
Additional configuration
- Open the _Imports.razor file and add the following code:
Code Listing 15: _Imports.razor
@using Syncfusion.Blazor @using Syncfusion.Blazor.Calendars @using Syncfusion.Blazor.DropDowns @using Syncfusion.Blazor.Buttons @using Syncfusion.Blazor.Inputs @using Syncfusion.Blazor.Notifications @using Syncfusion.Blazor.Popups @using Syncfusion.Blazor.Grids @using Syncfusion.Blazor.SmartComponents |
- Open the Program.cs file and add the following using statements:
Code Listing 16: Startup.cs using statement
using Syncfusion.Blazor; using Syncfusion.Blazor.SmartComponents; |
- Add the following to the ConfigureServices section, above the var app = builder.Build(); line:
Code Listing 17: Startup.cs AddSyncfusionBlazor
builder.Services.AddSyncfusionBlazor(); |
- Add the following to the <head> element of the App.razor page:
Code Listing 18: Syncfusion style link
<link href="_content/Syncfusion.Blazor.Themes/bootstrap5.css" rel="stylesheet" /> |
- Finally, add the following to the <body> element of the App.razor page:
Code Listing 19: Syncfusion JavaScript link
<script src="_content/Syncfusion.Blazor.Core/scripts/syncfusion-blazor.min.js" type="text/javascript"></script> |
Note: When you run the application, you will see a message:
This application was built using a trial version of Syncfusion Essential Studio. Please include a valid license to permanently remove this license validation message. You can also obtain a free 30-day evaluation license to temporarily remove this message during the evaluation period. Please refer to this help topic for more information.
Click the link in the message for instructions on obtaining a key to make the message go away.


- 80+ high performance Blazor components.
- Lightweight and user friendly.
- Stunning Built-in themes with customization.