
BizTalk Succinctly®

CHAPTER 5
Schemas
Introduction
A schema is a file that defines the hierarchical structure of a XML file, much as a class defines an object in object-oriented programming. These files, which have the XSD extension (XML Schema Definitions) must have a root node and any another elements and attributes as you wish. After an XSD is defined for an application, BizTalk will use it to validate any XML file that comes in through a receive port, and if it matches, that XML will be transformed and sent to any subscriber of that XSD format.
Schemas are the core basic artifacts of BizTalk because they describe and identify the type of the messages that BizTalk will process, and you must be aware that normally BizTalk only process messages that it knows. They are referenced by other artifacts like orchestrations and maps.
BizTalk Server supports the following four types of schemas:
- XML schema. An XML schema defines the structure of a class of XML instance messages. Because this type of schema uses XML Schema definition (XSD) language to define the structure of an XML instance message, and this is the intended purpose of XSD, such schemas use XSD in a straightforward way.
- Flat file schema. A flat file schema defines the structure of a class of instance messages that use a flat file format, either delimited or positional, or some combination thereof. Because the native semantic capabilities of XSD do not accommodate all of the requirements for defining the structure of flat file instance messages—such as the various types of delimiters that might be used for different records and fields within the flat file—BizTalk Server uses the annotation capabilities of XSD to store this extra information within an XSD schema. BizTalk Server defines a rich set of specific annotation tags that can be used to store all of the required additional information.
- Envelope schema. An envelope schema is a special type of XML schema. Envelope schemas are used to define the structure of XML envelopes, which are used to wrap one or more XML business documents into a single XML instance message. When you define an XML schema to be an envelope schema, a couple of additional property settings are required, depending on such factors as whether there are more than one root record defined in the envelope schema.
- Property schema. A property schema is used with one of the two mechanisms that exist within BizTalk Server for what is known as property promotion. Property promotion is the process of copying specific values from deep within an instance message to the message context. From the message context, these values are more easily accessed by various BizTalk Server components. These components use the values to perform actions such as message routing. Promoted property values can also be copied in the other direction, from the more easily accessible message context back into the depths of the instance message, just before the instance message is sent to its destination. A property schema is a simple version of a BizTalk schema that plays a role in the process of copying promoted properties back and forth between the instance message and the message context.
Besides XML files, BizTalk also uses schemas to describe flat files and any other formats. To add new schemas to your project, select the Schema option in Visual Studio, click Add, and select New Item.
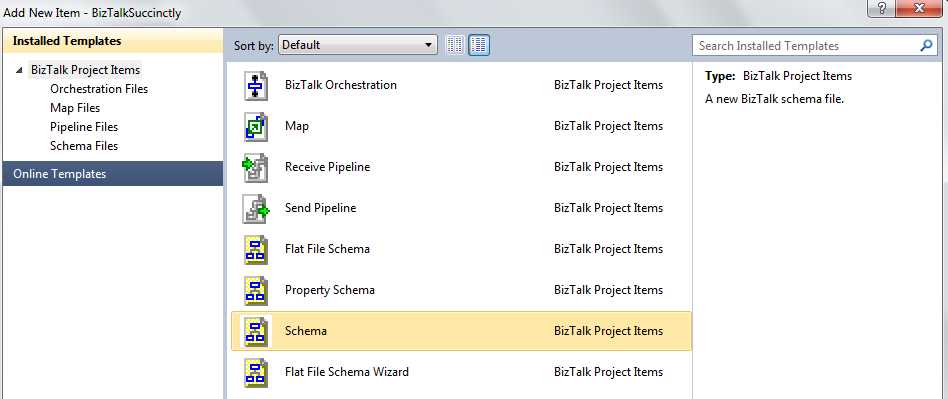
Add new Schema
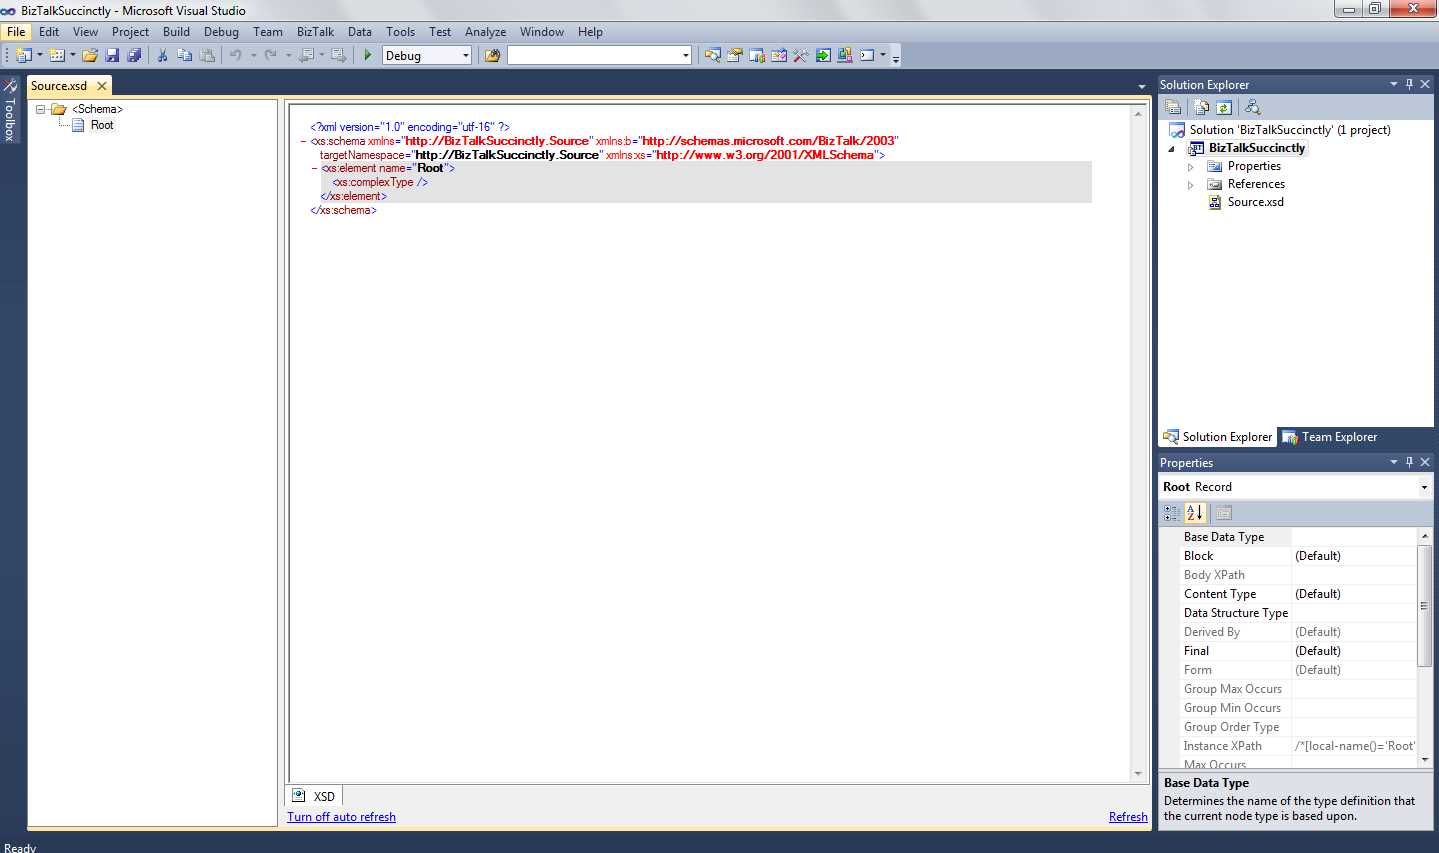
BizTalk uses a combination of namespace#rootnode to define the schema type of a message, thereby making a MessageType unique (for example: http://mynamespace.com#MyRootNode). In other words, BizTalk uses this combination to identify and resolve schemas references.
Manage Schema Nodes
After adding a new schema to the project, Visual Studio will open a configuration screen for Schemas in which you can define the nodes, records, and attributes for that XSD file. An important note is that you should always change the root name of the schema, so that BizTalk can properly identify it.
Schema creator screen
In this Visual Studio screen, you can add items (nodes) to your schema. To do so, right-click on the root node on the left side of the screen and select the correct option for your requirements.
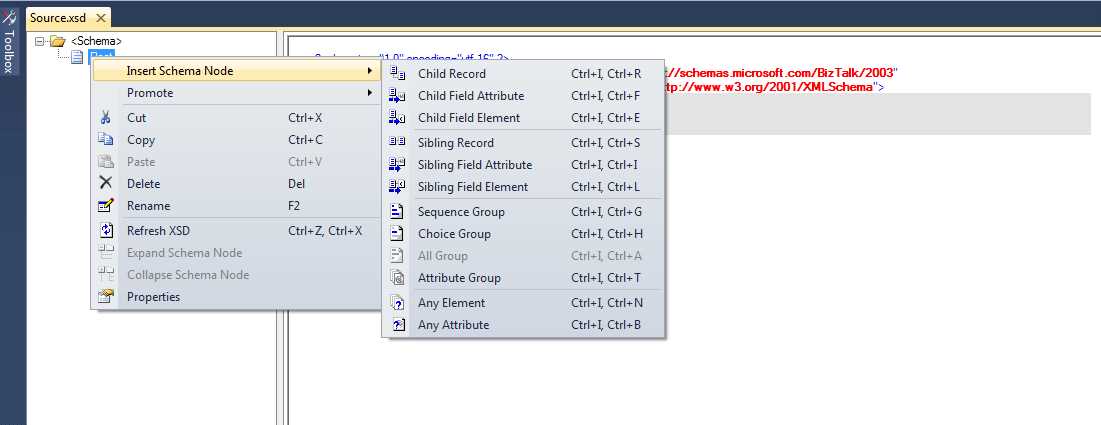
Add nodes to a schema
For this schema I will create basic employee information with name, address, country, telephone number, date of birth, and salary. The resulting schema will appear as shown in Figure 12:
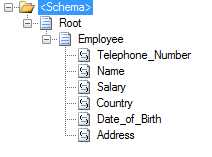
Schema for employee
Properties for Schema Nodes
Although this schema has all the nodes needed to represent our employee, BizTalk allows you to enrich your schema with more definitions, like data type, or which fields are mandatory. This way you can select a node (field elements or attributes) and use the Properties window to define all your node settings. Figure 13 shows you all the available properties after selecting a schema node.
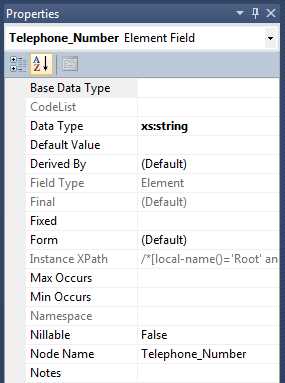
Schema node properties window
The following table describes the schema node properties in more detail:
Schema Node Properties
Property | Description |
|---|---|
Base Data Type | Determines the name of the type definition that the current node type is based upon. Use the Base Data Type property to specify the base data type value from which the data type of the selected Record, Field Element, or Field Attribute node will be derived (for example, "xs:string"). |
Code List | Specifies the reference number for the code list to use with the selected Field Element or Field Attribute node, and provides access to the CodeList dialog box. |
Data Type | The data type of the node. (The main types are Decimal, DateTime, String, Int, and Boolean, but BizTalk offers many more options.) Specifies a simple data type for the selected Field Element or Field Attribute node; for example, string, int, Boolean and so on. |
Default Value | Specifies the default value for the selected Field Element or Field Attribute node (like 0 for a quantity). |
Derived By | Indicates how the underlying Simple Type of the Field is derived from its base data type. |
Field Type | Identifies the selected node as a Field Element node or a Field Attribute node. |
Final | Specifies derivation restrictions for the data type defined for the selected Record, Field Element, or Field Attribute node. |
Fixed | Specifies a fixed value for the element(s) or attribute in an instance message that corresponds to the selected Field Element or Field Attribute node, if the data is present. |
Instance XPath | Shows you the Xpath code to access the node in the XML file. |
Max/Min Occurs | Number of maximum and minimum occurances of the node |
Namespace | Namespace of the node |
Nillable | Indicates if the value can be null (Default is False). |
Node Name | Name of the node |
Notes | Any notes regarding the node |
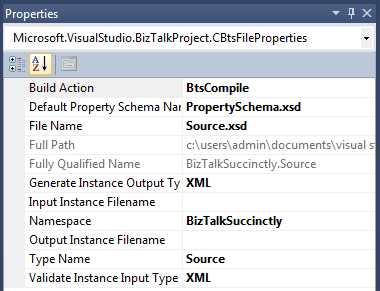
Schemas File Properties
After you manage the settings related to the Record, Field Element, or Field Attribute, BizTalk also lets you define properties for the schema itself, properties that should be always checked as they define how the schema will be identified by the BizTalk engine. To access these properties, just click on your schema file in Solution Explorer.
Properties for Schemas
After you select the schema you want to set up, Visual Studio will then display its properties in the Properties window.
Properties for Schemas definition
All the properties for your schemas are listed and explained in the following table:
Schema Properties
Property | Description |
Build Action | Specifies how the file will be processed in the application Build action. (You can specify that a schema will not compile when building a project.) |
Default Property Schema Name | Specifies the name of the file generated for promoted properties |
File Name | Name of the schema file. You can use this property to examine and set the name of the selected schema file. |
Full Path | Location of the schema file. You can use the Full Path property to examine the file system location in which the selected schema file is stored. |
Fully Qualified Name | This is a concatenation of the namespace and the type name. Together they form the fully qualified name used to uniquely identify a type in .NET framework. You must make sure that no two types in your entire BizTalk environment have the same fully qualified name, because they are used to identify incoming and outcoming messages and which messages are for which subscribers. |
Generate instance Output Type | Specify the output type for the generate instance option. |
Input Instance Filename | Input the file name for instance validation when using the validate instance input type. |
Namespace | The .NET namespace the compiled schema will belong to. |
Output Instance FileName | The file name for the generate instance option. |
Type Name | .NET type for the compiled schema. |
Validate instance Input Type | Specify the output type for the validate instance option. |
Schemas Operations inside Visual Studio
Validate Schema
BizTalk offers several options to evaluate the consistency of your schemas, telling you if they are well constructed or if there are errors. To do so, use the Validate Schema option, available when you right-click your schema file in the Solution Explorer and select Validate Schema.
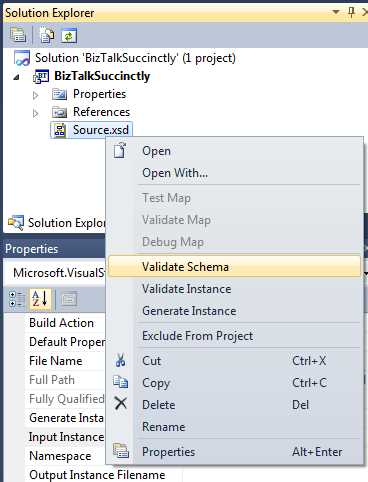
Validate Schemas
BizTalk will return a message, mentioning if the schema is well defined or not. BizTalk will also return the file name, so that you can use it for further evaluation. In the following example, the schema had no errors:
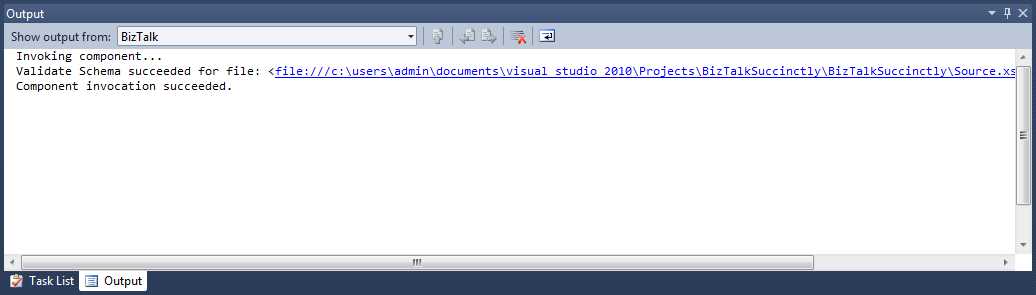
Output window for validate schema
Generate Instance
The Generate Instance feature is used to generate an instance of an XML file or native type for Flat file according to your schema previously created and validated. Although this option also validates the schema, it’s a common best practice to validate the schema and then generate the instance. This option is available in the same menu as the Validate Schema option.
Once you click on the Generate Instance option, BizTalk will generate an example XML file, with the file name defined in the Output Instance Filename property of the schema with the Generate Instance Output Type. Figure 18 shows a XML instance for our employee schema.
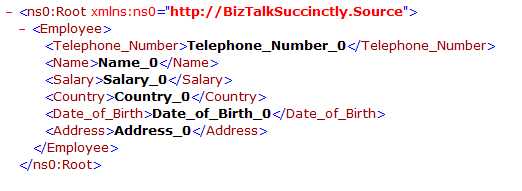
Generate instance for employee schema
This generated instance can now be used as an example to evaluate our schema using the Validate Instance option.
Validate Instance
The Validate Instance feature allows you to validate if an XML file or native type for Flat file has the structure of a schema file, and so, is of that format. This option is available in the same menu as the Validate Schema menu.
To use this option, you need to change the schema property Input Instance Filename, defining the XML file name (full path) so that the schema uses the XML file you want to validate when using this Validate Instance option. After changing the property and running the validator, BizTalk will show you the result in the output window. As you can see in Figure 19, BizTalk validated our XML file with success.

Validate Instance
Generate Schema from XML file
One nice feature of BizTalk is the capability of generating XSD files from an XML instance. This is important for BizTalk developers, as it allows them to ask their clients for a single XML example of the files being integrated, and then generate a schema to use in their maps. (This approach has some limitations and may require you to manually set some properties or elements.)
To use this option, right-click your project in the Solution Explorer panel and then select Add, Add Generated Items, and then select the option Generate Schema as shown in the following figure.
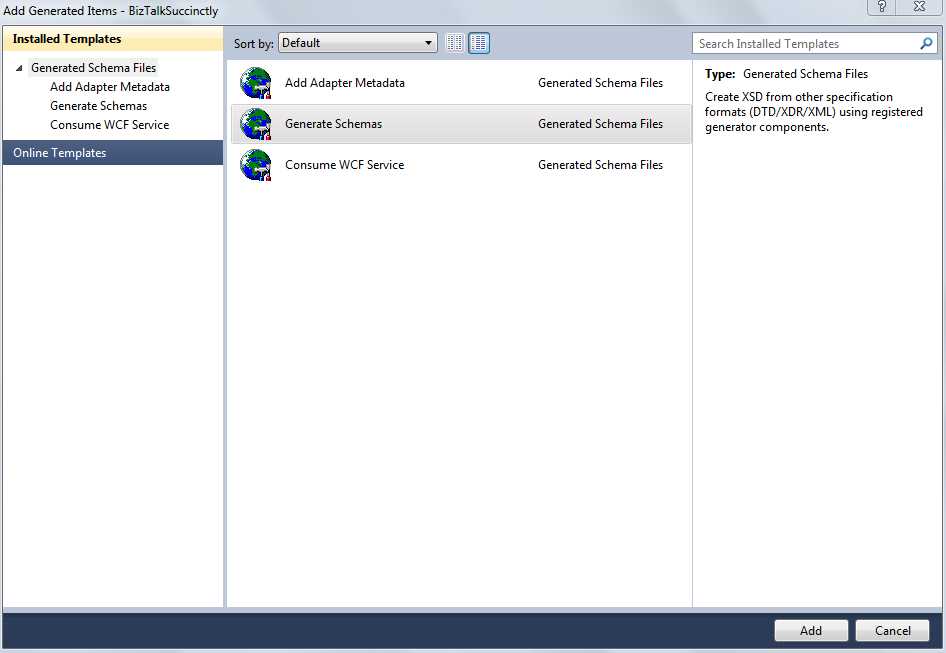
Generate Schemas
After the Generate Schema screen appears, you need to select the document format. As you are using our employee XML, we need to select Well-Formatted XML and specify the XML file path.
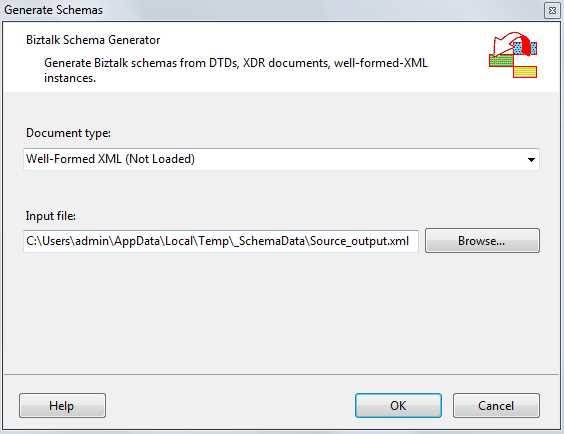
Generate Schema Specifications
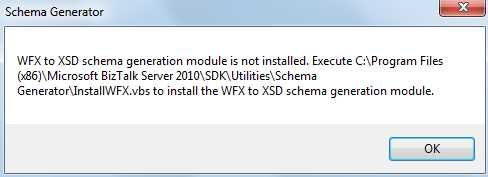
When you finish specifying the document type and the input file path, click OK, and BizTalk will generate the XSD file. If you get an error indicating that the module isn’t loaded, you need to execute the module installer on the path shown in the message box (you might need to execute it using the CMD with elevated privileges). After that, you’re ready to go.
Generate Schema error
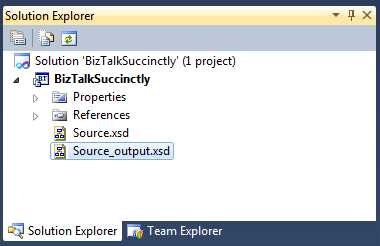
By the end of the generation, you will be able to see your brand new schema in the Solution Explorer window. In our case the name is Source_output.xsd:
New Generated Schema
Property Promotion
BizTalk provides two types of property promotions: distinguished fields and property fields.
In a simplified manner, distinguished fields can only be used within orchestration, whereas promoted property fields can be accessed through all phases of the BizTalk message processing, either in orchestrations or from custom code, routing, and pipelines.
Distinguished Fields
BizTalk Server has mechanisms that allow you to use elements in schemas to do routing or logical operations based on the values the XML instances have in those elements. The first mechanisms I want to talk about are distinguished fields.
These distinguished fields are fields from a message that have been marked as distinguished using this feature in the BizTalk schema editor. These fields, when marked as distinguished, can then be used through dot notation in orchestrations and can be used to both access the value from this specific field and to set the value of this field. They differ from promoted properties, as they are not written to the MessageBox Subscription tables for routing as the promoted properties are; instead they are essentially XPath aliases (easy pointer or an abstraction of the XPATH query), which simply point to the appropriate XML data field.
To distinguish fields, you just need to right-click the node you want to mark, select Promote, and then Show Promotions.

Show Promotions
When the Promotions screen is open, select the node you want to distinguish, select the Distinguished Fields tab, and then click Add. Figure 25 shows an example of this operation. For this example, we will be using the Salary attribute.
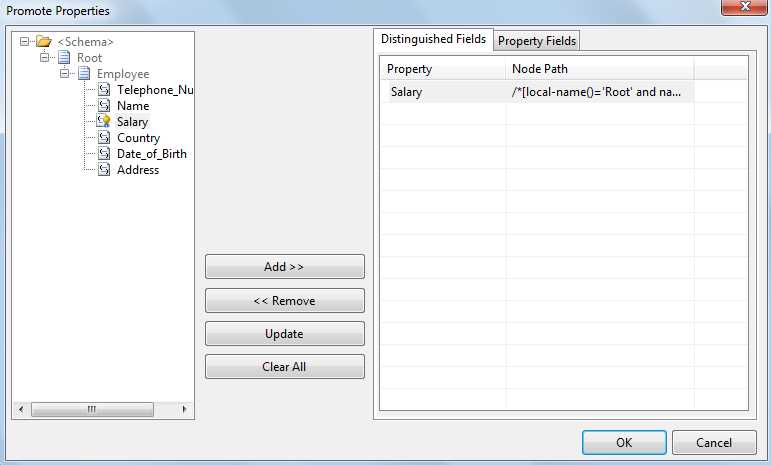
Distinguish salary node
Promoted Properties
The main difference between distinguished and promoted properties is the contexts in which they can be used. While distinguished properties are used to set or get values from messages inside orchestrations, promoted properties are used to route messages based in their values. They allow the Messaging Engine to route messages based on their value, and being in the message context allows doing so without having to look at the message payload. Promoted properties are the most common way to enable content-based routing. They are available to the pipelines, adapters, Message Bus, and orchestrations.
The best way to promote a field is to use the Quick Promotion option (in the same menu as Show Promotion). With this option, BizTalk will automatically create the promoted property in the Property Schema defined in the Default Property Schema Name of the schema property. If this is not present in our project, Visual Studio will automatically generate and add a property schema to your project.
- 1800+ high-performance UI components.
- Includes popular controls such as Grid, Chart, Scheduler, and more.
- 24x5 unlimited support by developers.