
BizTalk Succinctly®

CHAPTER 6
Mappings
Introduction
In a very simple way, a map (.BTM file) is a transformation from one Extensible Markup Language (XML) document into another XML document or more XML documents using a transformations language called XSLT. These maps are used in BizTalk in the following places:
- Receive ports
- Send ports
- Inside orchestrations
Maps are a core concept of BizTalk; they are responsible for making any necessary transformations in the message’s data, which are exchanged by the different systems you want to integrate. These maps are developed inside Visual Studio 2010 using the BizTalk Mapper tool. This tool has a developer-friendly interface, which allows you to have a tree structure view of both input and output schemas used by the map.

BizTalk Mapper Tool
Mapper Overview
The Mapper Editor is organized into seven distinct areas, each representing different behaviors and configurations for the map and schema nodes. The available areas are:
- The Functoids panel, which has all the available functoids for you to use in the map.
- The Grid panel, which is where all your mappings and transformations are represented. For a logical organization, BizTalk allows you to separate your mappings in pages, which are available in the bottom of the grid.
- The source schema structure. This represents your incoming messages for this map. Have all nodes available for you to map and transform.
- The destination schema structure. This represents your outgoing messages for this map. Have all nodes available from where you will map the transformed nodes.
- The Output panel. This is where you will see the result of your map validations and testing. This tool is a very important form of debugging, which you might already know from your .NET projects.
- The Solution Explorer. This is a common panel for all visual studio projects. It represents the solution structure for your BizTalk application.
- The Properties window. This is also a shared window for all Visual Studio projects. It shows all available properties for the selected object.

Mapper overview
Adding a Map to the Project
Adding maps to your project is very easy, as maps are SDK artifacts. To add a map, right-click your project in Solution Explorer and select Add > Add New Item and then select Map. Don’t forget to give it a descriptive name in the Add New Item screen. Once you add the new map, BizTalk will open the mapping editor without any schemas and transformations, as you can see in Figure 28.

Empty maps
After you create your empty map, it’s time to add your source and destination schema to it in order to start your mapping and transformations. It’s important to recap that both schemas should now be already created or added to your project.
Add the Schemas to the Map
As you saw in Figure 28, the empty map has links in both source and destination schema that allow you to select schemas not only from your project, but also from any other project you reference in your solution. When you click on either Open Source Schema or Open Destination Schema, you will be prompted to choose the location of your schema.

Add Schemas to project
For our example, we will add our BizTalkSuccinctly.Source schema as the source schema and the BizTalkSuccinctly.Destination as our destination schema. It is important for you to notice that we have configured our schemas with the namespace BizTalkSuccinctly, so BizTalk created two new types of messages with this namespace concatenated with the schema name, creating what is called the Fully Qualified Name of the schema. This is used to identify the type of messages subscribed by a subscriber.
Link Nodes
After adding your source and destination schema to the map, you can start implementing simple transformation rules by linking nodes from the source to the destination schema. A link is the way you associate a data item in the source schema with a data item in the destination schema. Typically, in a completed map there are many links between the source schema and the destination schema. All together the links specify how the data in the source instance messages will be transformed into semantically equivalent, but syntactically distinct, destination instance messages.
Linking nodes in BizTalk is a very simple operation, a drag and drop event that will automatically create a link between one source node and another destination node. To link nodes, click and drag the pointer of your mouse to the destination node. The following figure represents the link between two nodes in the map.

Linking nodes
BizTalk also provides you mechanisms to accelerate your mappings. In this case we are just mapping one node, but imagine you have source and destination schemas with hundreds of nodes and they all have the same names—we would lose our minds linking them all one by one. To accelerate the mapping, you can click CTRL while performing your link; when you finish the drag and drop, BizTalk will present you the following options:

Link option
These options might become your best friends in node mappings, as they will spare you a lot of time. The following table summarizes these link options.
Link Options
Name | Description |
|---|---|
Direct Link | Using this technique, the BizTalk Mapper links the record from source schema to the selected record in the destination schema. |
Link by Name | Using this technique, the BizTalk Mapper attempts to match the Record and Field nodes within the Record nodes being linked according to the names of the corresponding nodes, regardless of their structure, within the Record nodes being linked. |
Link by Structure | Using this technique, the BizTalk Mapper attempts to match the Record and Field nodes within the Record nodes being linked according to the structures of those Record nodes, regardless of names of the corresponding nodes within those structures. |
Mass Copy | The Mass Copy functoid enables your maps to use schemas that include any and anyAttribute elements. |
Let’s use the Link by Name option, for example. The following figure shows you the result of mapping just one node using this option; both nodes were linked automatically.

Links by Name
Functoids
Sometimes, direct links in a BizTalk map are not enough to respect the destination schema format, and we need to apply some data translation or transformation. It could be the concatenation or the cast of a node to a specific type, and several operations might be needed to fulfill those destination schema’s requirements.
Functoids are the response to this problem, encapsulating the transformation logics used to perform all the required processing over source node values in order to respect the expected destination node format and values. BizTalk has many functoids, which can be as simple as concatenating string to multiply values or loop through repetitive records inside an XML file.
Inside the mapper you can find all available functoids in the toolbox, which you can identify in the left side of your map editor tool. When you open the toolbox, you will find these functoids divided into categories that represent the type of operations to which that functoid responds.

Functoids categories
Once you identify the functoid you want to use, the process of adding it to your map and configuring its behavior is the same for all functoids; you just need to drag and drop the functoid into the map, link the source node/nodes to the functoid, double-click it to configure any additional settings, and link the functoid to the destination node.
In the following example, we want to concatenate the address of an employee with the country, but separate it with a semicolon and then connect it to a destination node. The first step is to add our concatenate functoid by dragging it to the center of the map, as you can see in the Figure 34.

Add concatenate functoid
After you add the concatenate functoid, BizTalk will put a warning on top of it, which indicates that the functoid has no output nodes. It is important for you to understand that a functoid might not need input nodes, but it must link to at least one output node. Now we need to link both the Address and Country nodes to the concatenate functoid, and link the functoid to the destination node. As you can see in Figure 35, the warning no longer exists.

Properly linked functoid
Lastly, you need to add the semicolon as the separator between both nodes. To do so, double-click on top of the functoid and you will see the configuration screen. Please keep in mind that all functoids have this behavior; if you need to configure any additional setting, double-click it and configure what you need. After you double-click it, you will see something like Figure 36, in which you can see that I added the semicolon between the nodes.

Setting up the concatenate functoid
This functoid not only allows you to add strings to your concatenation logics, it also allows you to reorder the nodes or even remove some nodes or strings from it.
This BizTalk functoid mechanism allows developers to maintain and develop mappings and message transformations very easily.
Available Functoids
Although the concatenate functoid is easy to use, there are others that are much more complex. The following tables will show you all available out-of-the-box functoids and their categories.
String Functoids
This category of functoid represents all available functoids for string manipulation. All of these functoids have a string as a return object, and their inputs might be an input node from the source schema or a static string, configured as an input parameter in the functoid configuration screen. In this category you have the following available functoids:
String Functoids
Shape | Name | Description |
|---|---|---|
| String Find | Returns the first found instance of the second parameter inside the first parameter. |
| String Left | Returns the number of characters specified in the second parameter from the left of the string. |
| String Right | Returns the number of characters specified in the second parameter from the right of the string. |
| Uppercase | Returns the input string in uppercase. |
| Lowercase | Returns the input string in lowercase. |
| Size | Returns an the length (int) of the input string. |
| String Extract | Takes in three parameters (string, start, and end position) and returns a substring of the first input. |
| String Concatenate | Takes in from one to 100 strings and returns the concatenation of them in the add order. |
| Left Trim | Takes in a string and trims it from the left. |
| Right Trim | Takes in a string and trims it from the right. |
Advanced Functoids
This category of functoids allows you to perform advanced operations on their input. Some of them return an output that can be used as the input for another functoid or sent directly to the destination. In this category you have the following available functoids:
Advanced Functoids
Shape | Name | Description |
|---|---|---|
| Scripting | Allows you to execute custom code. Can be C#, Inline JScript .NET, Inline Visual Basic .NET, Inline XSLT, or Inline Call Template. |
| Record Count | Returns the total occurences of a node. |
| Index | Using as first paremter a node from the source schema, and all other inputs as levels from the node, returns the value of the node indexed by the values from the other parameters. |
| Iteration | Using as first parameter a node from the source schema, returns the iteration of the node, representing the current occurence number of the node. |
| Value Mapping | Outputs its first parameter if a second one is true. |
| Assert | Allows you to make sure some conditions are always true, like assertions in normal C# code. |
| Value Mapping (Flattenning) | This functoid differs from the Value Mapping functoid in that it attempts to flatten the input into the output. |
| Looping | Using as input a node from source schema, iterates trhough its occurences. Must connect to a destination node. |
| Mass Copy | Recursively copies all nodes bellow the source node (input) to the destination node. |
| Table Looping | Builds a table in memory useful for creating records in the output that have some structure that is not present in the input. |
| Table Extractor | This functoid takes in two parameters: the first must be a Table Looping functoid, and the second is a number that indicates the column from the table to get the value from. |
| Nil Value | Allows you to return null values if the input is true. |
Conversion Functoids
This category of functoids allows you to perform conversions over input parameters and use the return output as the input for another functoid, or to be sent directly to the destination schema. In this category you have the following available functoids:
Conversion Functoids
Shape | Name | Description |
|---|---|---|
| ASCII to Charater | Returns the number converted into the character that has this number in the ASCII table |
| Character to ASCII | Returns the first character of the input parameter (string) converted into the ASCII representation |
| Hexadecimal | Returns the integer part of the input converted to an hexadecimal value. The input is assumed to be decimal. |
| Octal | Returns the integer part of the input converted to an octal value. The input is assumed to be decimal. |
Cumulative Functoids
Cumulative functoids allow you to perform operations on reoccurring nodes in the source schema and output one value based on all the occurrences of the input node. In this category you have the following available functoids:
Cumulative Functoids
Shape | Name | Description |
| Cumulative Average | Performs an average calculation over the input values, returning the result as a decimal value |
| Cumulative Concatenate | Concatenates all occurences of the string input, returning the output as one string |
| Cumulative Maximum | Returns the maximum value over the amount of input values |
| Cumulative Minimum | Returns the minimum value over the amount of input values |
| Cumulative Sum | Returns the sum of all input values |
Database Functoids
This functoid category allows you to perform lookup operations over databases in order to get stored values from it, and then adds and uses them in your mappings. In this category you have the following available functoids:
Database functoids
Shape | Name | Description |
|---|---|---|
| Database lookup | Has four inputs, a lookup value (typically an ID), a connection string, and the name of the table to look up, and the column name to find the value with that ID. BizTalk will then query the database and return the row found. |
| Error return | Using what the database lookup functoid has input, returns any error that occured while performing the query against the database. |
| Value extractor | Has two inputs, the database lookup functoid and a column name from the dataset extracted, and then returns the value for that column. |
| Format Message | Returns a formatted and localized string using argument substitution and, potentially, ID and value cross-referencing. |
| Get application ID | Retrieves an identifier for an application object. |
| Get application value | Retrieves an application value. |
| Get common ID | Retrieves an identifier for a common object. |
| Get common value | Retrieves a common value. |
| Remove application ID | Removes the identifier for an application object. |
| Set common ID | Sets and returns an identifier for a common object. |
Date/Time Functoids
These types of functoids allow you to perform date/time operations over input parameters or generate date/time object types to add to a destination node. Their output can be used as the input for another functoid or sent directly to the destination. In this category you have the following available functoids:
Date/Time functoids
Shape | Name | Description |
|---|---|---|
| Add days | Uses their two input parameters and returns a new date as a result of adding the number of days specified in the second parameter to the date specified in the first parameter. |
| Date | Returns the current date, having no input parameters. |
| Time | Returns the current time, having no input parameters. |
| Date and Time | Returns the current date and time, having no input parameters. |
Logical Functoids
This category of functoids performs logical operations on their input and returns a Boolean value that can be used later on as the input for another functoid or to instruct the compiler how to construct the generated XSLT. They are commonly used to define rules inside the mappings.
Logical functoids
Shape | Name | Description |
|---|---|---|
| Greater than | Returns true if the first parameter is greater than the second, false otherwise. |
| Greater Than Or Equal | Returns true if the first parameter is greater than or equal the second, false otherwise. |
| Less than | Returns true if the first parameter is less than the second, false otherwise. |
| Less Than Or Equal | Returns true if the first parameter is less than or equal the second, false otherwise. |
| Equal | Returns true if both parameters are equal, false otherwise. |
| Not Equal | Returns true if the parameters are not equal, false otherwise. |
| Logical String | Returns true the input parameter is a string, false otherwise. |
| Logical Date | Returns true the input parameter is a date, false otherwise. |
| Logical Numeric | Returns true the input parameter is a numeric, false otherwise. |
| Logical Or | Returns the logical OR over all input parameters. |
| Logical And | Returns the logical AND over all input parameters. |
| Logical Existence | Returns the evaluation of the node existence. |
| Logical NOT | Return the negation of a value of a Boolean. |
| IsNil | Returns true if the node is set to nil in the schema, false otherwise. |
Mathematical Functoids
These functoids are pretty much your transformation calculator; they allow you to perform mathematical operations on their input and return an output that can be used as the input for another functoid or sent directly to the destination schema. In this category you have the following available functoids:
Mathematical functoids
Shape | Name | Description |
|---|---|---|
| Absolute value | Takes in one value and it returns the absolute value of the value. |
| Integer | Takes in one parameter and returns the integer part of the value, effectively removing the decimal point and all decimals. |
| Maximum Value | Takes in a minimum of two parameters and a maximum of 100 parameters and, returns the highest of the values. |
| Minimum Value | Takes in a minimum of two parameters and a maximum of 100 parameters, and returns the lowest of the values. |
| Modulo | Returns the remainder from performing a division of one first parameter by one second parameter. |
| Round | Takes two parameters and returns the first rounded by the amount of decimal places defined by the second. |
| Square Root | Returns the square root of an input parameter. |
| Addition | Sums the parameters and returns the result. |
| Subtraction | Subtracts the parameters and returns the result. |
| Multiplication | Multiplies the parameters and returns the result. |
| Division | Divides the parameters and returns the result. |
Scientific Functoids
These functoids are used to perform scientific mathematical operations on their input, and return an output that can be used as the input for another functoid or sent directly to the destination schema. These are complements to the mathematical category functoids and they are separated because they represent advanced mathematical operations. In this category you have the following available functoids:
Scientific functoids
Shape | Name | Description |
|---|---|---|
| Arc Tangent | Returns the result of performing the arc tangent function on the parameter |
| Cosine | Returns the result of performing the cosine function on the parameter |
| X^Y | Returns the first input lifted to the power of the second input (Ex: 23^7) |
| Sine | Returns the result of performing the sine function on the parameter |
| Tangent | Returns the result of performing the tangent function on the parameter |
| Natural Exponential Function | Returns the base for the natural logarithm lifted to the power of the parameter. |
| Natural Logarithm | Returns the natural logarithm of the parameter |
| 10^n | Returns 10 lifted to the power of the parameter (Ex: 10^4) |
| Common Logarithm | Returns the 10-based logarithm of the parameter |
| Base-Specified Logarithm | Returns the base-specified logarithm function using the second parameter as base and performing the function on the first parameter |
Maps Operations inside Visual Studio
Test Map
While developing our maps, we will perform transformations to input schemas in order to respect our output schemas. This means that every XML document that will be received through our application Receive Ports or processed inside orchestrations will be transformed according to those same transformations.
As you can imagine, it would be dangerous to deploy our mappings without any previous testing, as we could be sending invalid messages to our trading partners. BizTalk provides a mechanism to simulate the execution of our map, based on an input XML or flat file document, and retrieve the expected XML or flat file inside Visual Studio. You can also check and inspect the XSLT generated by the mapper engine. It is important to understand that although BizTalk validates the XSLT structure and syntax, it’s your job as a developer to validate if the resulting XML document respects the requirements from your trading partner.
To use this tool, you just need to right-click your map in Solution Explorer and choose the Test Map option.

Test Map menu
BizTalk will then generate an output document, which you can access by clicking in the file location in the output windows.

Test Map
Although you can use this tool directly with no customization, the map properties allow you to execute tests on different conditions, such as a custom input XML to test against real sample scenarios. To do so, you can access the map properties and change the property Test Map Input to XML and then configure your test XML file path in the Test Map Input Instance property.

Custom Test Map Executions
Validate Map
Map validation is a simple operation commonly used while developing BizTalk mapping. While testing maps helps you visualize the result of a mapping transformation over an XML document, this feature validates the consistency of your transformation (for example, if there is a required node that is not linked, or if you have multiple links to the same node). To use this option, right-click your map in Solution Explorer and choose Validate Map.

Validate Map
After the execution of the map validation ends, BizTalk will generate an output indicating if there are errors or warnings, or none if it was successful, and the XSLT generated to perform the mappings. This XSLT will be provided to you either in case of success or not. Look for the line in the output window that has the path to it and you can open it:

Output of XSLT document
One you open the file, the syntax will be familiar if you have already worked with XSLT documents. It has all the nodes from the schema used as output and for each one the logics of transformation, as well as the XPath reference used to get the required node from the source schema.
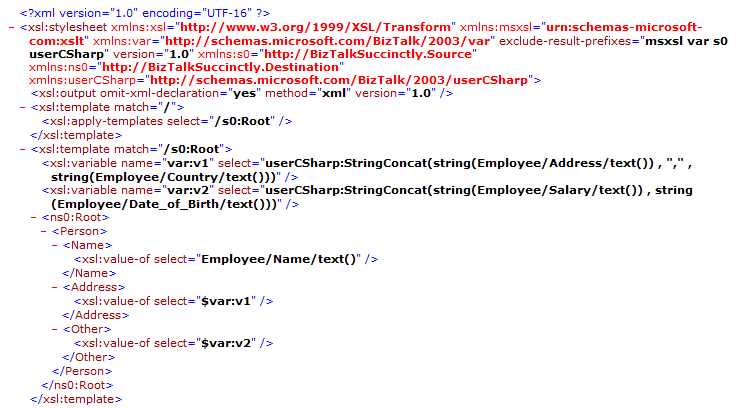
Figure 43 XSLT Generation
As BizTalk is based on the .NET framework of Microsoft for its functoids, you will also find the blocks of C# code used for any transformations or programming logics. As I only used the Concatenation functoid in this map, the XSLT code only has the C# code function to execute its logic.

Concatenate functoid C# code in XSLT
Debug Map
The debug option in the Map Editor is commonly used when validation and testing is not enough to find an error or to evaluate an output document. This way you can debug step-by-step the building of your XML document, through the execution of all mapping transformations defined in the map. This feature is pretty similar to any debug in C#/.NET application development, so if you are familiar with breakpoint, step into, and watchers, this is pretty much the same for you. To use this feature, right-click your map in the Solution Explorer and then select the Debug Map option, as you can see in Figure 44:

Debug Map
Once you click on the Debug Map option, BizTalk opens a new Window in which you can define breakpoints and watch the result of the step execution in a result panel. Figure 45 shows you this debug window.

Debug Window
The previous figure shows you two separate panels inside this Debug Window. On panel A, based on the XSLT generated for your map, you can define your breakpoints (where the debugger will stop on the next execution). On panel B, you have the resulting panel in which your XML document is being created according to the step you are in in the XSLT code execution.
- 1800+ high-performance UI components.
- Includes popular controls such as Grid, Chart, Scheduler, and more.
- 24x5 unlimited support by developers.