
Bing Maps V8 Succinctly®

CHAPTER 1
Getting Started
It’s no secret that all sorts of enterprises are generating ever-increasing amounts of data. And much of that data contains geolocation information. Any statistics related to data are doomed to be instantly obsolete, but it’s generally accepted that 80% of all information has some sort of geolocation reference.
The Bing Maps V8 library is a very large collection of JavaScript code that allows web developers to place a map on a webpage, query for data, and manipulate objects on a map. Put another way, the Bing Maps library enables you to create geo-applications.
The Bing Maps V8 library was released in June 2016. In terms of number of features and performance, the new version offers significant improvements over the version V7 library. Before V7, Bing Maps was called Virtual Earth, and some legacy code still refers to VE.
In this e-book, we’ll assume that you have basic web development knowledge, but we won’t assume you know anything about geo-applications or the Big Maps library. If you can get a web server up and running, you should be able to follow along.
We’ll cover creating web-based geo-applications but will not cover using Bing Maps V8 with WPF or Silverlight applications, and each section of this e-book will present a complete, self-contained demo web application.
Every developer I know learns how to program using a new technology by getting an example application up and running, then experimenting with the program by making changes. If you want to learn how to use the Bing Maps library in the most efficient way possible, copy the source code from a demo web application in this e-book into your favorite editor, save it on a local web server, play with the application, then fiddle with the code.
You can get all the source code and data files used in this e-book at: https://github.com/jdmccaffrey/bing-maps-v8-succinctly.
I will not present hundreds of code snippets here. That’s what documentation is for. Instead, I’ve tried to pick key techniques and combine a few of them in each demo web application. Because the Bing Maps library is constantly evolving, it’s more important to have a deep understanding of a few key techniques than it is to have tentative knowledge of hundreds of rarely used techniques.
In my opinion, the most difficult part of learning any technology is getting a first application to run. After that, it’s all just details. But getting started can be frustrating, so the purpose of this first chapter is to make sure you can get your initial geo-application working.
In section 1.1, you’ll learn how to create the simplest possible web application that uses the Bing Maps V8 library. In section 1.2, you’ll learn how to get a Bing Maps key so that you can use the Bing Maps services for free (subject to usage limitations). In section 1.3, you’ll learn how to communicate between ordinary HTML controls on a webpage and objects on a map.
Enough chit-chat already. Let’s get started.
1.1 Hello World
Often, the most difficult part of learning a new technology is simply getting over the initial hurdle and making a first example work. The goal of this section is to help you create a very simple Bing Maps V8 “Hello World” (literally) demo page.

Figure 1: Hello World Demo
The first thing you might notice in Figure 1 is the message across the center of the map that indicates “the specified credentials are invalid.” I’ll walk you through the process of getting a Bing Maps key in the next section, but for now you can ignore the error message.
As you’ll see shortly, the HTML and JavaScript code needed to place a Bing Maps map on a webpage is quite simple. The URL in the browser address bar in Figure 1 indicates the demo webpage is hosted locally—on a Windows 10 machine running the Internet Information Services (IIS) web server. The examples in this e-book contain only HTML and JavaScript and have no dependencies, which means any web server will work.
The demo web application is named HelloWorldDemo.html and is defined in a single file.
Code Listing 1: HelloWorldDemo.html
<!DOCTYPE html> <!-- HelloWorldDemo.html --> <html> <head> <title>Bing Maps 8 Hello World</title> <meta http-equiv="Content-Type" content="text/html; charset=utf-8"/> <script type='text/javascript'> var map = null; function GetMap() { var options = { credentials: "TheBingMapsKeyGoesHere", center: new Microsoft.Maps.Location(35.00, -100.00), mapTypeId: Microsoft.Maps.MapTypeId.road, zoom: 2, enableClickableLogo: false, showCopyright: false }; var mapDiv = document.getElementById("mapDiv"); // Where to place map. map = new Microsoft.Maps.Map(mapDiv, options); // Create the map. } </script> </head> <body style="background-color:aquamarine"> <h3>Bing Maps V8 Hello World</h3> <div id='mapDiv' style='width:900px; height:600px;'></div> <script type='text/javascript' </body> </html> |
If you have a web server up and running, you can copy this file, place it on your web server, and navigate to the page. Unfortunately, working with web servers can be somewhat nightmarish with regards to configuration settings. In this e-book, we’ll assume you have access to a machine with a running web service. Figure 2 shows the IIS components on the machine I’ve used throughout.
Most versions of Windows contain IIS, but IIS is not enabled by default. You can enable IIS by going to the Windows Control Panel | Programs and Features, then clicking Turn Windows features on or off in the upper-left corner. The entry marked “Internet Information Services” will be cleared by default. If you select that entry, all the subcomponents you need to run IIS and the examples in this e-book will be enabled.

Figure 2: Internet Information Services Components
After you click OK in the lower-right corner, a dialog box will appear showing you the progress made as changes are applied to your machine.
In order to make the Hello World demo webpage, I first created a directory named “Succinctly” in the C:\inetpub\wwwroot root directory. Next, I launched the Notepad program using the “Run as administrator” option so that I’d be able to save in the restricted inetpub subdirectories.
Notice that the webpage has two script sections, one in the HTML head area and one in the HTML body area. The body-area script loads the Bing Maps V8 library asynchronously:
<script type='text/javascript'
src='http://www.bing.com/api/maps/mapcontrol?callback=GetMap'
async defer>
</script>
When the library has loaded, control is transferred to a program-defined GetMap() function. Asynchronous loading is a new feature in Bing Maps V8, and it allows the HTML components of a webpage to display immediately when the library is slow to load.
You can also load the library synchronously if you’d rather. To do so, remove the script tag from the body section and replace it with a script tag in the HTML head section:
<script type='text/javascript' src='http://www.bing.com/api/maps/mapcontrol'>
Next, you modify the HTML body tag this way:
<body onload="GetMap();">
Inside the main script area, a script-global object named map is declared and initialized to null. In this example, the map object is only accessed by function GetMap(), which means the object could have been declared local to the function. The name “map” is not required, but it is by far the most common choice.
Function GetMap() begins by setting the initial display options:
function GetMap()
{
var options = {
credentials: "TheBingMapsKeyGoesHere",
center: new Microsoft.Maps.Location(35.00, -100.00),
mapTypeId: Microsoft.Maps.MapTypeId.road,
zoom: 2,
enableClickableLogo: false,
showTermsLink: false
};
. . .
Bing Maps library Location objects accept a latitude (the up-down value in degrees relative to the equator) followed by a longitude (the left-right value relative to the prime meridian), which is followed by two optional values related to altitude.
The map is displayed with these two statements:
. . .
var mapDiv = document.getElementById("mapDiv");
map = new Microsoft.Maps.Map(mapDiv, options);
}
The mapDiv object specifies where to place the map:
<div id='mapDiv' style='width:900px; height:600px;'></div>
Notice that you typically specify the size of the map in the map’s HTML div container rather than as one of the map options. You can specify the width and height of the map area using pixels, as the demo does, or by using the newer CSS viewport units, vw and vh.
Map options are divided into two categories. There are eight options that control characteristics directly related to the visual appearance of the map, and there are 21 options that control additional characteristics (some of which are visual).
Table 1 lists the eight properties of the ViewOptions object. The demo uses the center, mapTypeId, and zoom properties. The 21 additional properties are contained in the MapOptions object.
Table 1: ViewOptions Object Properties
Name | Description |
bounds | defines an area to display as a LocationRect object |
center | specifies the center of the map as a Location object |
heading | directional heading as a number where 0 = North, 90 = East, etc. |
labelOverlay | specifies labels are to be displayed as a LabelOverlay object |
mapTypeId | aerial, ordnanceSurvey (UK only), road, streetside |
padding | padding in pixels for each side of map |
pitch | angle relative to horizon |
zoom | zoom level (1-19) |
The eight visual ViewOptions properties can be set when we call the Map constructor, as the demo does, or the properties can be set programmatically after a map has been instantiated using the setView() function. For example:
map.setView({ zoom: 15 });
Some of the 21 MapOptions properties can be set only when calling the constructor, but some properties can be set programmatically using the setOptions() function. For example:
map.setOptions({ disableZooming: true });
In summary, you can load a map asynchronously (preferred) or synchronously. There are a total of 29 properties that can be set when calling the Map() constructor, categorized as ViewOptions properties and MapOptions properties.
Resources
For detailed information about the Map constructor, see:
https://msdn.microsoft.com/en-us/library/mt712547.aspx.
For detailed information about the eight ViewOptions properties, see:
https://msdn.microsoft.com/en-us/library/mt712641.aspx.
For detailed information about the 21 MapOptions properties, see:
https://msdn.microsoft.com/en-us/library/mt712646.aspx.
1.2 Creating a Bing Maps key
You can easily obtain a Bing Maps key that allows you to use Bing Maps services for free (subject to usage limitations). I’ll walk you through the process, screen by screen, so that you’ll know what to expect. Creating a Bing Maps key does not require you to submit credit card or other payment information.
You can start by opening a browser and navigating to the main Bing Maps portal site at https://bingmapsportal.com. In order to sign in and create a Bing Maps key, you’ll need a Microsoft Account (typically a hotmail.com or live.com account).

Figure 3: Bing Maps Portal Site Sign In
Click Sign In and you’ll be directed to the Microsoft Sign In page. If you don’t have a Microsoft account, you can create one on the Sign In page.
After signing in, you’ll be redirected to the Bing Maps Developer Center site. Click the My Account drop-down in the upper left and select the My Keys option.

Figure 4: Select the My Keys Option
You’ll be transferred to a page that lists your existing Bing Maps keys if you have any. Click the link labeled “Click here to create a new key.”

Figure 5: Click on the Create a New Key Link
Fill in any Application Name (in order to help you distinguish among multiple keys). For the Application URL, you can use http://localhost/Succinctly or something similar. For the Key Type, select Basic. For the Application Type, select Dev/Test. Click Create.
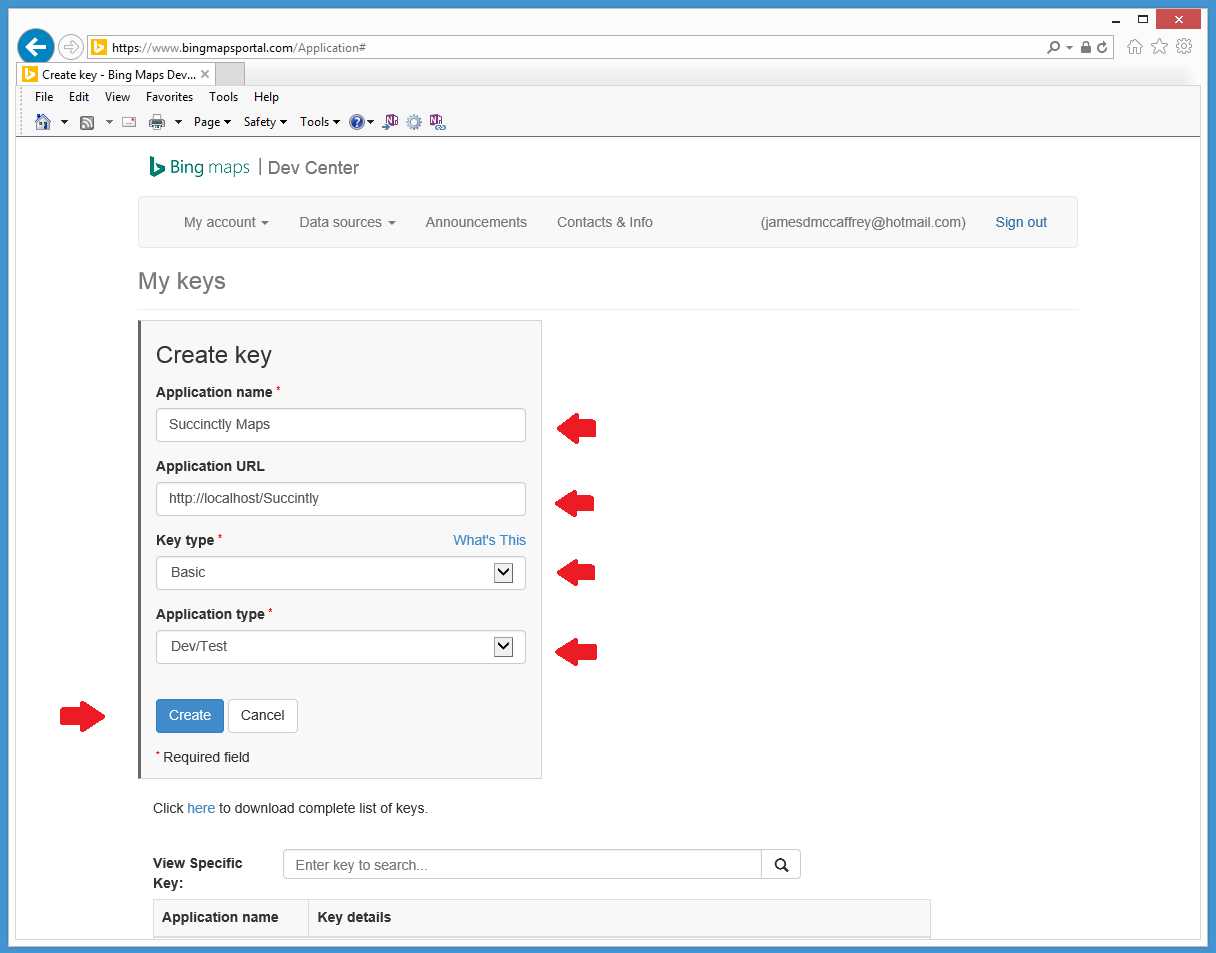
Figure 6: Supply Information for the New Key
Your new key will be created and its value displayed in the My Keys area. A key value is a long string such as “AgwlfQ-LtBJcKS77c5Bqvkpfx9aesf0X5KxXvahfcuSFdD-htUJCcFqcZ_koP2ke.”

Figure 7: New Key Created
Now that you have a Bing Maps key, you should verify that it works. Recall that the HelloWorld.html demo page of the previous section sets up map options this way:
var options = {
credentials: "TheBingMapsKeyGoesHere",
center: new Microsoft.Maps.Location(35.00, -100.00),
mapTypeId: Microsoft.Maps.MapTypeId.road,
zoom: 2,
enableClickableLogo: false,
showCopyright: false
};
Open HelloWorld.html using Notepad (or the editor of your choice) with administrative privileges, copy the key value from the Bing Maps Dev Center page, and place it as the credentials value. Save the page, then use a browser to navigate to the page and verify that the invalid credentials error message across the center of the map is no longer displayed. And, by the way, the showCopyright property is undocumented—you should set it to false only during development or experimentation.
The Bing Maps portal site has a nice page that allows you to monitor usage:

Figure 8: Bing Maps Usage Information
In summary, getting a free Bing Maps key for limited, noncommercial use is relatively simple. The process does not require you to submit credit card or other payment information. Go to https://www.bingmapsportal.com and sign in using a Microsoft account (which you can create on the fly), then follow the simple instructions.
1.3 User input and output
When working with a Bing Maps geo-application, user input is typically fired from a click on an HTML control on the container page or on the map (or an object on the map). Output is usually sent to a control on the container page, to a JavaScript alert box, or as an instruction to perform some action on the map.
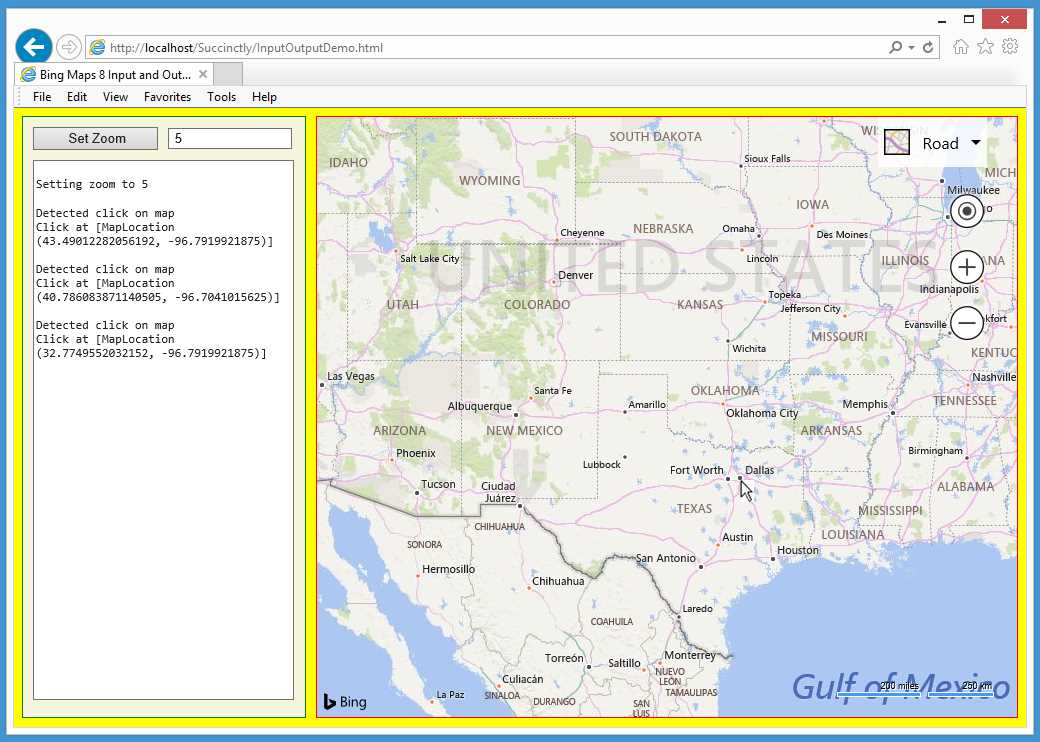
Figure 9: User Input and Output Demo
The demo web application in Figure 9 shows some basic examples of user input and output with a Bing Maps V8 map. The demo initially loads a map centered at (35.00, -100.00) with a zoom level of 2 (showing most of the world). Here, the user clicked the HTML button control labeled “Set Zoom” and control was transferred to a JavaScript function that fetched the value in the HTML input text box control (5) and programmatically set the map zoom level to that value.
Next, the user moved the mouse to Sioux Falls, South Dakota, and clicked the map. The application caught the click event, determined where the event occurred, and displayed the location in an HTML <textarea> tag. The user next clicked Lincoln, Nebraska, then Dallas, Texas. Notice the latitude values decreased from approximately 43 to 40 to 32.
The demo web application is named InputOutputDemo.html and is defined in a single file.
Code Listing 2: InputOutputDemo.html
<!DOCTYPE html> <!-- InputOutputDemo.html --> <html> <head> <title>Bing Maps 8 Input and Output</title> <meta http-equiv="Content-Type" content="text/html; charset=utf-8"/> <script type='text/javascript'> var map = null; function GetMap() { var options = { credentials: "Anw _ _ _ 3xt", center: new Microsoft.Maps.Location(35.00, -100.00), mapTypeId: Microsoft.Maps.MapTypeId.road, zoom: 2, enableClickableLogo: false, showCopyright: false }; var mapDiv = document.getElementById("mapDiv"); map = new Microsoft.Maps.Map(mapDiv, options); Microsoft.Maps.Events.addHandler(map, 'click', MapClicked); } function WriteLn(txt) { var existing = msgArea.value; msgArea.value = existing + txt + "\n"; } function Button1_Click() { var z = parseInt(textbox1.value); WriteLn("\nSetting zoom to " + z); map.setView({ zoom: z }); } function MapClicked(e) { var tt = e.targetType; WriteLn("\nDetected click on " + tt.toString()); var loc = e.location; WriteLn("Click at " + loc); } </script> </head> <body style="background-color:yellow"> <div id='controlPanel' style="float:left; width:262px; height:580px; border:1px solid green; padding:10px; background-color: beige"> <input id="button1" type='button' style="width:125px;" value=' Set Zoom' onclick="Button1_Click();"></input> <div style="width:2px; display:inline-block"></div> <input id="textbox1" type='text' size='15' value=' 5'> </input><br/> <span style="display:block; height:10px"></span> <textarea id='msgArea' rows="38" cols="36" style="font-family:Consolas; font-size:12px"></textarea> </div> <div style="float:left; width:10px; height:600px"></div> <div id='mapDiv' style="float:left; width:700px; height:600px; border:1px solid red;"></div> <br style="clear: left;" /> <script type='text/javascript' </body> </html> |
The demo application sets up an HTML page that consists of three main <div> sections—an area for normal HTML controls, a dummy spacer, and the map. This is a crude structure, but it does point out that you can place a Bing Maps map anywhere on a webpage.
The three main <div> sections are decorated with a annotation, which means that the map area will move if the user makes the width of the webpage small. The somewhat cryptic <br tag keeps the three <div> areas on the same row if the webpage is wide enough.
The left-most <div> section contains a button control, a textbox control, and a <textarea> control. As you’ll see shortly, you can use any HTML controls to provide user input to a map. The <textarea> element is used to display output messages. There are many alternatives you can use, including <div> elements and <pre> elements and their innerHTML property.
The demo displays messages using a program-defined WriteLn() function defined as:
function WriteLn(txt)
{
var existing = msgArea.value;
msgArea.value = existing + txt + "\n";
}
This technique of grabbing the existing text and appending new text is simple and effective so long as the amount of text doesn’t get too large.
The demo creates the map with function GetMap(). Note that I often capitalize the names of my program-defined functions in order to distinguish them from the library and built-in JavaScript functions.
var map = null; // script-global map object
function GetMap()
{
var options = {
credentials: "Anw (etc) 3xt",
center: new Microsoft.Maps.Location(35.00, -100.00),
mapTypeId: Microsoft.Maps.MapTypeId.road,
zoom: 2,
enableClickableLogo: false,
showCopyright: false
};
var mapDiv = document.getElementById("mapDiv");
map = new Microsoft.Maps.Map(mapDiv, options);
Microsoft.Maps.Events.addHandler(map, 'click', MapClicked);
}
Recall that the Map constructor accepts an options object that can contain both ViewOptions and MapOptions properties. Here the initial zoom level is arbitrarily set to 2.
After the Map constructor is called, the handler for the click event is modified using the Events.addHandler() function so that when a user clicks anywhere on the map object, control will be transferred to a function named MapClicked(). Alternatively, code can be supplied directly using an anonymous function this way:
Microsoft.Maps.Events.addHandler(map, 'click',
function () { alert('Ouch!'); });
Function MapClicked() is defined as:
function MapClicked(e)
{
var tt = e.targetType;
WriteLn("\nDetected click on " + tt.toString());
var loc = e.location;
WriteLn("Click at " + loc);
}
The e object represents the click sender. In this example, the targetType property isn’t needed because the only object that passes control to the MapClicked() function is the map. But when multiple objects transfer control to a single function, you can write code such as:
if (e.targetType == "map") {
// do something
}
else if (e.targetType == "pushpin") {
// something else
In Bing Maps V8, you can get a click lat-lon location using the e.location property. This is a nice new feature—in previous versions you were required to get the page pixel position of the click and convert that position to a Location object with code this way:
var pt = new Microsoft.Maps.Point(e.pageX, e.pageY,
Microsoft.Maps.PixelReference.page);
var loc = e.target.tryPixelToLocation(pt,
Microsoft.Maps.PixelReference.page);
WriteLn("\nMouse click at: " + loc);
By the way, the Internet is littered with incorrect code that resembles this:
var point = new Microsoft.Maps.Point(e.getX(), e.getY()); // Wrong
var loc = e.target.tryPixelToLocation(point);
This code gives an incorrect lat-lon position and also gives a different result each time the map is panned.
When a user clicks the button labeled Set Zoom, control is transferred to function Button1_Click(), which is defined this way:
function Button1_Click()
{
var z = parseInt(textbox1.value); // get new zoom value as integer
WriteLn("\nSetting zoom to " + z);
map.setView({ zoom: z });
}
In summary, user input and information can be easily exchanged between a Bing Maps map and HTML controls. In fact, previous versions of Bing Maps referred to the entire library as the Bing Maps Control because, conceptually, a map is a large, custom HTML control. You can modify event handlers on a map or objects on a map using the Microsoft.Maps.Events.addHandler() function.
Resources
Many of the examples in this book are extensions of those in the interactive SDK at:
http://www.bing.com/api/maps/sdk/mapcontrol/isdk#overview.
For detailed information about the Events class, see:
https://msdn.microsoft.com/en-us/library/mt750279.aspx.
- 1800+ high-performance UI components.
- Includes popular controls such as Grid, Chart, Scheduler, and more.
- 24x5 unlimited support by developers.