
Azure Serverless Succinctly®

CHAPTER 4
Service Bus
In Chapter 3, we looked at logic apps. Both logic apps and functions can be triggered by Service Bus messages, and have built-in support for putting messages on a Service Bus. In this chapter we’re going to take a closer look at queues and topics with Service Bus. The Azure Service Bus is your go-to cloud messaging service in Azure, also called messaging as a service (MaaS).
Asynchronous processing
A lot of modern applications use some form of queueing. Queueing is a technology that allows for the asynchronous processing of data. For example, you place an order in a web shop. Once you click the order button, a message is put on a queue. Another process picks up this message and updates the stock for this item, places the item in your history, and sends out an email that your order is being processed. You could argue that this should be done immediately, but if a business receives lots of orders at the same time, the customer may have to wait for the processing, and you don’t want to keep customers waiting. Queueing scales a lot better. Just put an order on a queue so it can process it in the next minute or so, and show the customer a message that the order is being processed.
Using a queue has another advantage, especially in a microservices environment. Consider for a moment that the processing fails and throws an exception. Normally, you’d log the error and show the user that something went wrong, and that they should try again. Service Bus, and queues in general, have retry mechanisms that allow you to retry the processing a few times (with a delay) so that it may be processed after all, without any intervention. But let’s assume the data can’t be processed at all, due to a bug. Messages that cannot be processed can be placed on a so-called “dead letter” queue. This allows you to send out a notification when something goes wrong, but it also makes it very easy to retry the process, because you still have the original message. Once you’ve fixed the bug, you can simply put the message back on the queue, and it will be processed just as it normally would.
This also means that you can decouple processes and applications. For example, to stay with the web shop example, you can keep your web shop online while updating your processing logic. New orders will simply be placed on the queue and are processed once the processing application is started again. This also means you get load balancing, as you can have multiple listeners for the same queue.
With queues, messages are processed one-to-one using the FIFO (first in, first out) principle. Next to queues, Service Bus offers topics. This is a broadcasting, or publish/subscribe pattern, which offers one-to-many messaging. An application places a message on a topic, and the topic notifies all subscribers of the topic. We’ll go into topics in greater detail in the next sections.
Creating a Service Bus namespace
Let’s create a Service Bus namespace first. The namespace is where your queues and topics live. We already created one in Chapter 2, but we can now look at it in more detail. In the Azure portal, find all services and search for Service Bus. Click Add, and the Create namespace blade appears. The name for your Service Bus namespace has to be unique across Azure. The subscription, resource group, and location are self-explanatory. Select the Basic pricing tier and create the namespace.
The pricing tier needs some explanation. There are three tiers: Basic, Standard, and Premium. As you can see, the price goes up quickly. The Standard tier is 20 times more expensive than the Basic tier, and the Premium tier is almost 67 times more expensive than the Standard tier, and 13,360 times more expensive than the Basic tier! Those are some serious differences.
The Standard tier offers more operations per month than the Basic tier, but the biggest difference is that it allows topics, whereas the Basic tier only allows for queues. So, if you need a publish/subscribe pattern, you need at least the Standard tier. With Premium you get dedicated infrastructure, instead of sharing with complete strangers. Furthermore, you get unlimited operations per month. It also allows for bigger messages to be put on your queues and topics. Where the Basic and Standard tiers allow for messages of up to 256 KB, the Premium tier allows messages of up to 1024 KB. Not mentioned on the pricing blade is that the Standard and Premium tiers offer transactions, de-duplication, sessions, and forward to/send via. The Premium tier also offers geo-disaster recovery. The Premium tier is recommended for production workloads, but the Standard tier will suffice for most small and medium-sized companies.
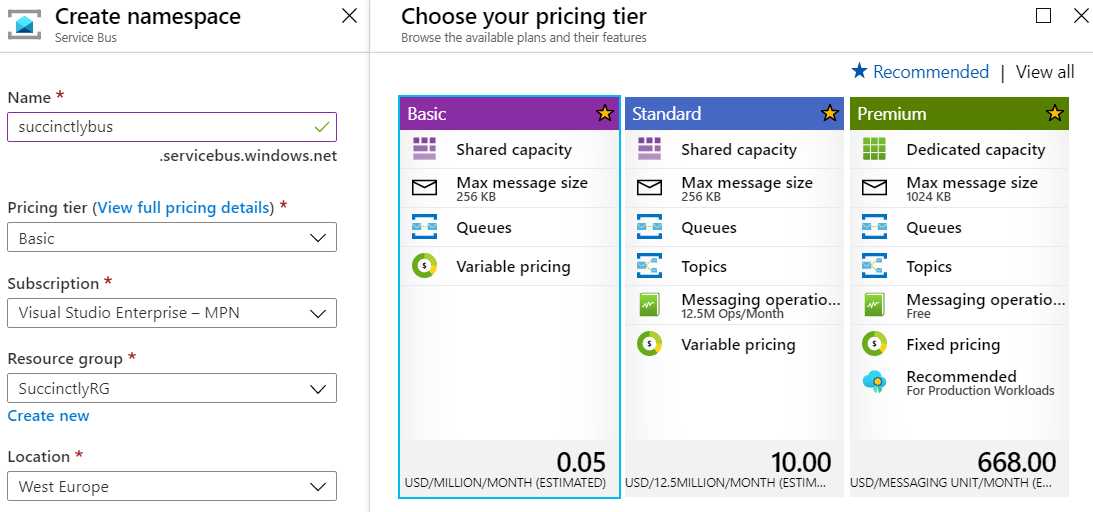
Figure 23: Creating a Service Bus Namespace
The actual pricing for each tier is calculated differently. With the Basic tier, you pay €0.043 per million operations, so that’s roughly five cents per million operations. The reason that the price goes up for the next tiers is because you pay per hour. That means that the Basic tier is the only true serverless Service Bus solution. The €10.00 includes 12.5 million free operations, and after that you start paying per million operations. The price per million operations differs though; you pay €0.169 from 13M to 87M operations, but €0.675 per million for 87M to 100M. If you need that many operations, I suggest you read the Service Bus pricing documentation. The Premium tier has a fixed price, so you just pay €668.00 a month.
Creating a queue
Creating a queue is very easy. Just go over to your Service Bus namespace, find Queues in the menu, and click + Queue. Enter a name and click Create.
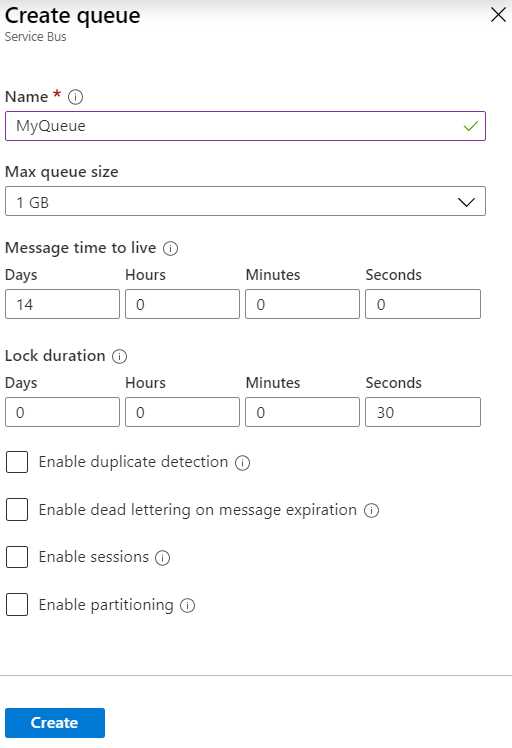
Figure 24: Creating a Queue
You can enable some extra options, which are explained in the information circles. As for the size of the queue, one GB is 1,024 MB, or 1,048,576 KB. A single message can be up to 256 KB. So, a queue of 1 GB can have at least 1,048,576 / 256 = 4,096 messages, which is more than enough for our test case.
Messages are kept in the queue for 14 days, so if it isn’t picked up after 14 days, it’s discarded. Instead of discarding, you can check Enable dead lettering on message expiration. A dead-letter queue is a special queue where all messages go that can’t be processed. So, if your software throws an exception during message processing, the message is sent to the dead-letter queue. There, you can inspect it and either delete it, or move it back to the queue so it’s re-processed.
Consuming a queue
We’ve seen how a queue works with functions, but you can use a queue from regular .NET Core projects as well. Open Visual Studio and start a new .NET Core console application. Using NuGet, install the packages Microsoft.Azure.ServiceBus and Newtonsoft.Json. Next, you need a couple of using statements.
Code Listing 25
using Microsoft.Azure.ServiceBus; using Newtonsoft.Json; using System; using System.Text; using System.Threading; using System.Threading.Tasks; |
Next, we’re going to create a little helper method to create a QueueClient. We need a connection string for this. You can get this in the Shared access policies of the namespace in the Azure portal. The root access key is already created, but you can create new keys with separate access for managing, sending, and listening for messages. You get two keys and connection strings so that if one is compromised, you can switch to the second one before refreshing the first one. For this example, we can get any of the two root connection strings.
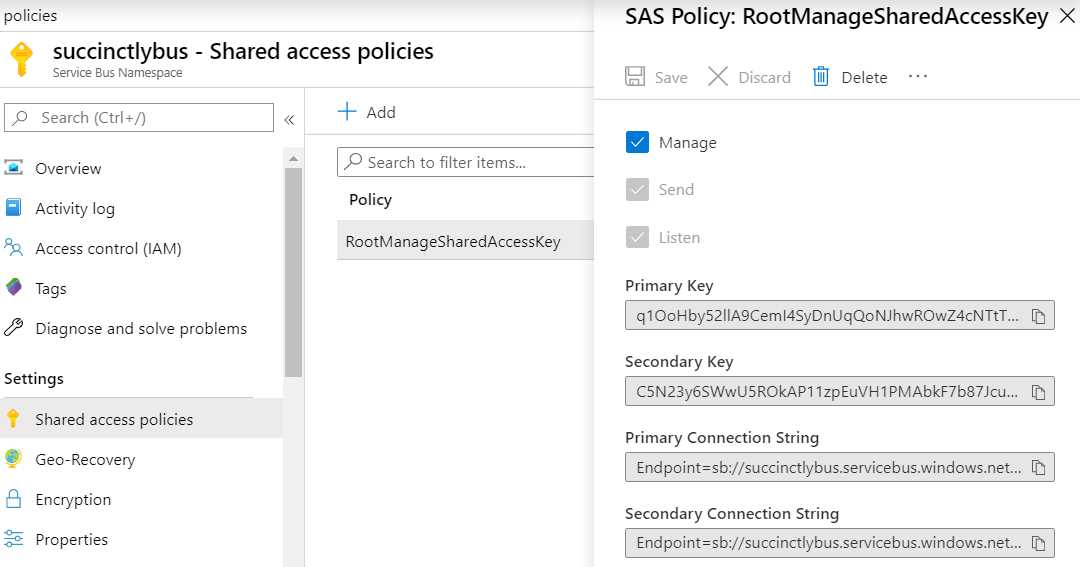
Figure 25: Shared Access Policies
In code, we can use the QueueClient and pass in the connection string and the name of the queue you want to connect to.
Code Listing 26
static IQueueClient CreateQueueClient() { return new QueueClient("[ConnectionString]", "MyQueue"); } |
Next, we need two small helper methods. In order to put something on the queue, you need a byte array. A generic method of putting anything on the queue is by serializing any object to JSON and using an encoding to get the byte representation. For the reverse, turning bytes into an object, you can use the encoding to get the string from the bytes and then deserialize the JSON into an object. We can use the Newtonsoft library for the serialization of JSON.
Code Listing 27
static byte[] ObjectToBytes(object obj) { string content = JsonConvert.SerializeObject(obj); return Encoding.UTF8.GetBytes(content); } static T BytesToObject<T>(byte[] bytes) { string content = Encoding.UTF8.GetString(bytes); return JsonConvert.DeserializeObject<T>(content); } |
Next, we can create two clients: one for putting new messages on the queue, and one for listening to new messages. In theory, this can be the same QueueClient, but in practice this probably isn’t the case. Let’s start with putting messages on the queue. We’re going to put Person objects on the queue, but you can use this method for any object. The Person class is simple.
Code Listing 28
class Person { public string FirstName { get; set; } public string LastName { get; set; } } |
Next, in the Main method of your console application, create a new client, create a person, convert it to bytes, put it in a Message object, and send it to the queue.
Code Listing 29
static async Task Main() { // Send messages. var client = CreateQueueClient(); Person bill = new Person { FirstName = "Bill", LastName = "Gates" }; byte[] billBytes = ObjectToBytes(bill); Message billMsg = new Message(billBytes); await client.SendAsync(billMsg); Console.WriteLine("Press any key to exit."); Console.ReadKey(); } |
You can repeat this code at your own leisure. I copied it, so it also adds Satya Nadella on the queue as well. To see if it worked, go to the Azure portal, look at your queues, and click the myqueue queue. This opens the queue overview where you can see how many messages are in the queue or in the dead-letter queue, how much of your queue’s size is used up, and some other statistics.
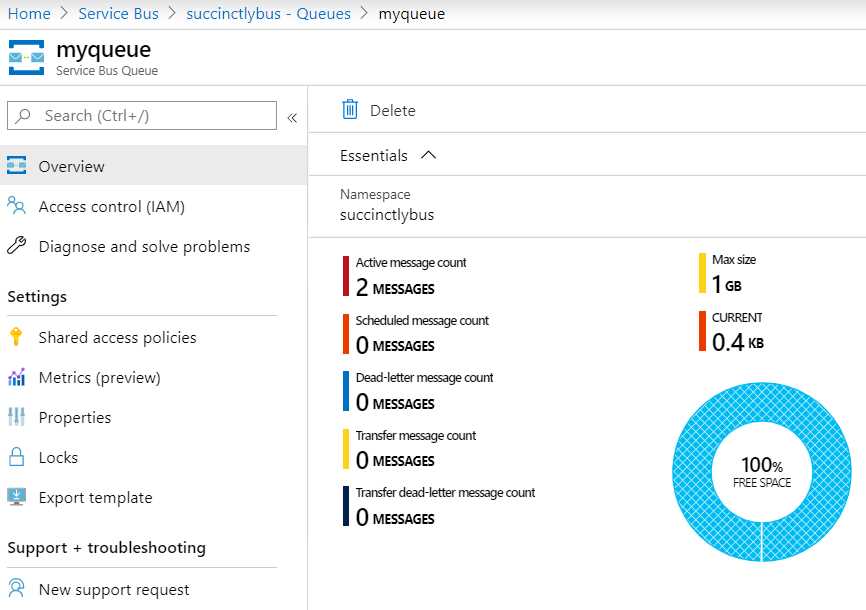
Figure 26: Queue Overview
Next, we need a listener. A listener needs two methods: a method that handles the received message, and a method that handles any exceptions. In the handler, we get the body, a byte array, from the received message. We can use the BytesToObject method to convert the bytes to a Person object. Since the console is thread safe, we can simply use Console.WriteLine and write the FirstName and LastName to the console.
Code Listing 30
static async Task Main() { // Receive messages. var receivingClient = CreateQueueClient(); receivingClient.RegisterMessageHandler(HandleMessage, ExceptionReceived); // [...] Console.WriteLine("Press any key to exit."); Console.ReadKey(); } static Task HandleMessage(Message message, CancellationToken token) { Person person = BytesToObject<Person>(message.Body); Console.WriteLine($"Received {person.FirstName} {person.LastName}."); return Task.CompletedTask; } static Task ExceptionReceived(ExceptionReceivedEventArgs e) { Console.WriteLine($"Exception occurred: {e.Exception.Message}"); return Task.CompletedTask; } |
When you run this, you should see Bill Gates (and in my case, Satya Nadella), printed to the console. One thing to notice, is that Press any key to exit may be printed before any person in the queue. This is because the messages are received on separate threads, and there’s probably a slight delay in receiving them. Another thing to note is that you can create a second receivingClient, but any person will only be printed once because queues have one-to-one communication, meaning that if one client receives the message, any other clients will not receive it anymore.
Creating a topic
Next, we are going to create a topic. If you followed my example, you’ve chosen the Basic pricing tier, but topics can only be created in the Standard or Premium tiers. Go to your namespace overview and click on the pricing tier. Here, you can switch to Standard tier. You can’t change to the Premium tier because that has a different infrastructure. If you want to go to Premium, you can select the Migrate to premium menu item. When you switch to the Standard tier, you need to refresh the page. You’ll now see Topics in the menu. Click Topics and add a topic. The blade for a topic is pretty much the same as for a queue, but even simpler. So, type a name and create the topic.
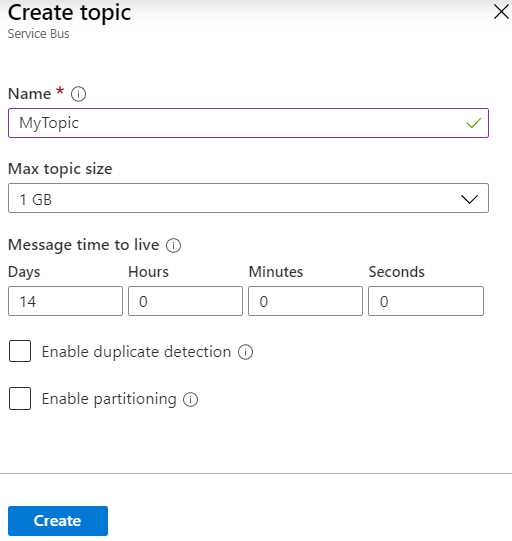
Figure 27: Creating a Topic
A topic alone does nothing. Additionally, we need to create a subscription. This is where a topic differs from a queue. Just like with a queue, messages are sent to a topic. However, where listeners receive messages directly from a queue, a topic sends them to subscriptions, which then notify listeners. A topic can have more than one subscription. Messages are sent to specific subscriptions through filters. Topics can then apply further filters to messages. Unfortunately, the Azure portal has very little tooling for managing Service Bus, and managing subscriptions and filters is currently not possible.
We’re first going to create two subscriptions, and then we’re going to add and remove some filters using the Azure CLI. In the next section, we’ll use the Service Bus Explorer to manage Service Bus resources. For now, go to the Service Bus namespace in the portal and browse to the topic we just created. There, click + Subscription and enter a name. For this example, create two subscriptions named National and International.
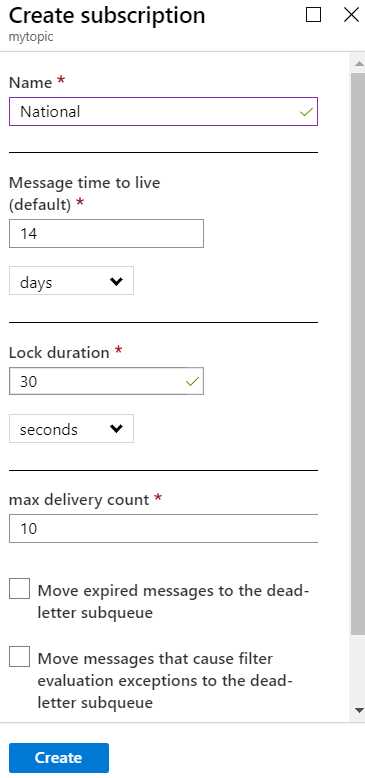
Figure 28: Creating a Subscription
Once the two subscriptions are created, we can add some filters. We’re going to send orders to the topic; orders with a country NL (the Netherlands) are national, while orders with any other country are international. So, open the Azure CLI in the portal. If you’re using a different subscription you need to select that first, using your subscription ID.
Code Listing 31
az account set --subscription xxxxxxxx-xxxx-xxxx-xxxx-xxxxxxxxxxx |
After that, you can create the rules for your subscriptions. The filter syntax is SQL-like and Country is a property of your topic message, as we’ll see in the code sample. Be sure to substitute any names you’ve changed.
Code Listing 32
az servicebus topic subscription rule create --name CountryNL --namespace-name succinctlybus --resource-group SuccinctlyRG --subscription-name National --topic-name MyTopic --filter-sql-expression "Country = 'NL'" az servicebus topic subscription rule create --name CountryNotNL --namespace-name succinctlybus --resource-group SuccinctlyRG --subscription-name International --topic-name MyTopic --filter-sql-expression "Country != 'NL'" |
As for the code, we can reuse some code from the queue example, like ExceptionReceived, ObjectToBytes, and BytesToObject. Other than that, the code looks very similar, but we’re using some different classes. Instead of Person, we’re going to use Order.
Code Listing 33
class Order { public string Country { get; set; } public decimal Amount { get; set; } } |
Since the client for sending and receiving messages is different for topics and subscriptions, I’ve put the connection string and topic name in a string constant that we can reuse.
Code Listing 34
The code is almost the same as for the queue, except of course the TopicClient instead of QueueClient. The most important difference is the UserProperties.Add. Remember that the message you send to the queue or topic is just a byte array—it’s not necessarily an object with properties. So, for a subscription to evaluate a filter, it needs user properties. By adding the country to the user properties, the message can be filtered. You could see if it worked by going to your topic in the Azure portal. If it worked, your International subscription has a message while your National subscription is empty.

Figure 29: View Subscriptions
Now for the handler part. This is almost the same as the queue example. We need a SubscriptionClient to which we can register a message handler. These are somehow registered in the application, so having multiple handlers for the same subscription in the same application will not work. Instead, you’ll need to create a second application, run that first, and then start this one, and you’ll see that the message is handled by both applications. Of course, we’ll need to change HandleMessage as well, because it now needs to handle orders instead of persons.
Code Listing 35
|
{ // Receive messages. var subClient = new SubscriptionClient(ConnString, Topic, "International"); subClient.RegisterMessageHandler(HandleMessage, ExceptionReceived); // Send messages. // [...] Console.WriteLine("Press any key to exit."); Console.ReadKey(); } static Task HandleMessage(Message message, CancellationToken token) { Order order = BytesToObject<Order>(message.Body); Console.WriteLine($"Received {order.Country} {order.Amount}."); return Task.CompletedTask; } |
Try to add a national order as well to see if that works, and if it’s not handled by the national subscription handler. The downside to subscriptions is that if you have a message that absolutely has to be handled by two applications, and one of the applications is not running at the time of publishing, the message is only handled by one application—and after that, it’s gone. Any other rules, like dead-letter queues, still hold true for subscriptions.
Consuming subscriptions in functions
In the first chapter of this book, we looked at functions and used the Service Bus trigger to read messages from a queue and send output as a message to a queue. This is also possible for topics and subscriptions, but it looks a little different.
Code Listing 36
[FunctionName("ReadTopic")] public void DoWork([ServiceBusTrigger("mytopic", "International", Connection = "BusConnString")]string message, ILogger log) { var order = JsonConvert.DeserializeObject<Order>(message); log.LogInformation($"Received {order.Country} {order.Amount}."); } |
You can still use the ServiceBusTrigger that we also used for queues. Instead of the queue name, you use the topic name and, additionally, you have to specify the subscription name. The message you receive can be bound to a string, so you don’t have to convert byte arrays, but we covered that in Chapter 1. The return attribute doesn’t change because messages are sent to a queue or topic in the same way.
Service Bus Explorer
Unfortunately, the Azure portal offers little in ways of working with queues and topics. For something as fundamental as filters on topics, we had to resort to the Azure CLI. Luckily, there’s a tool that can make working with Service Bus a lot easier. It allows you to peek at messages; remove messages; work with the dead-letter queue; re-queue messages; add and remove filters; create and remove queues, topics, and subscriptions; and directly place messages on queues and topics. To do any serious work with Service Bus, I really recommend getting the Service Bus Explorer.
Service Bus Explorer is an open-source tool that was developed using GitHub, so that’s where you can find the code, the documentation, and the releases. Get the latest release as a .zip file from the releases page and unzip it somewhere on your computer. You can then simply start the .exe file. In the application, go to File > Connect. Get a connection string from the portal and enter it in the connection string field. You can save the connection for easy future access or connect one time.
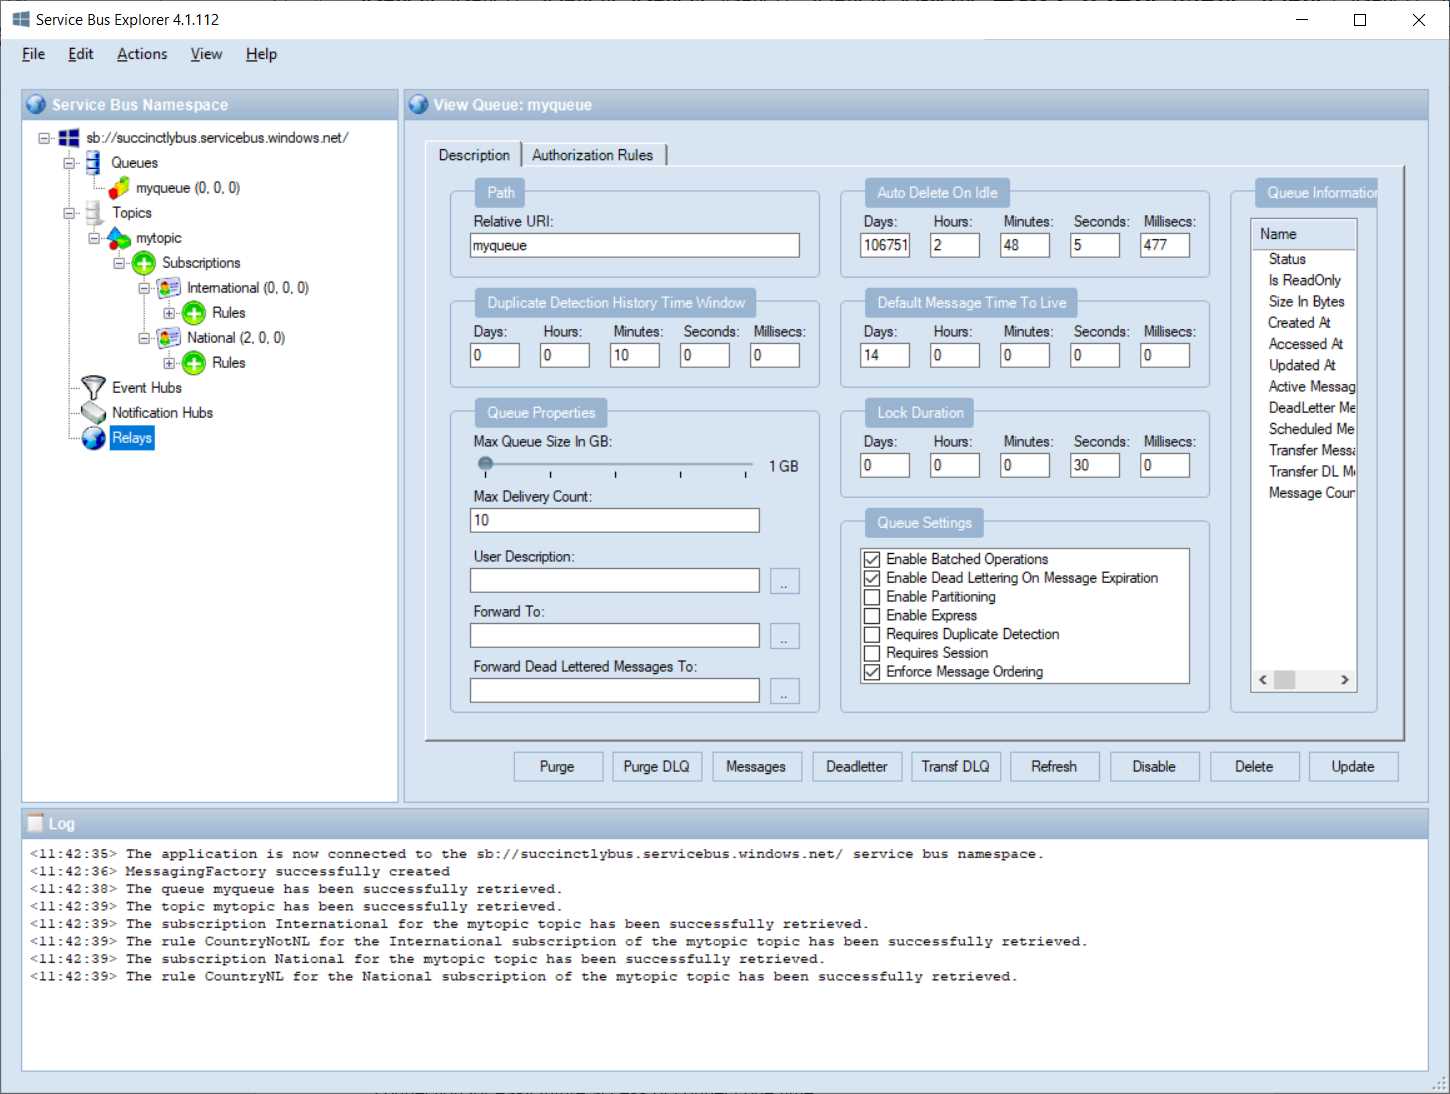
Figure 30: Service Bus Explorer
As you can see, the tree view on the left side of the Explorer makes it easy to see your queues, topics, and subscriptions, and how many messages are on the queues and dead-letter queues. Right-clicking on a queue, topic, or subscription opens a context menu that lets you delete, disable, rename, export, send, receive, and purge.
Choose Send Messages on your queue. A new window opens, and you can now enter some text to send to the queue. Since we don’t have a listener now, it doesn’t really matter what you enter. Just enter some text and click Start. It’s not directly evident, but this puts a message on the queue. Close the window and refresh your queue, and you’ll see a message in the queue. You can remove it from the queue by purging it or by receiving messages. Click Receive Messages, and another window opens. You can now enter the number of messages you want to receive, but the default is 10. You can also select Peek or Receive and Delete. With Peek, you can read the messages, but they won’t be removed from the queue. Receive and Delete lets you read the messages and removes them from the queue, but you can resubmit them if you like.
For topics, you can send messages and create subscriptions. For this, we had a user property that decided whether a message was sent to the National or International subscription. Next to the message text field are message properties. The properties MachineName and UserName are added by default, but you can add properties however you see fit. So, add Country with the value NL (for national order), or whatever other value for international orders. Click Start, and you’ll see the message added to the proper subscription. If you right-click the subscription, you can also add rules. You can’t change existing rules, only delete and add again. If you click a rule, you can read the filter expression. With actions, you can set additional properties on a message, for example SET MyProperty = ‘MyValue’. Unfortunately, these features aren’t very well documented by Microsoft. Other than that, you can receive messages on a subscription just like you could with a queue.
The Service Bus Explorer really is an indispensable tool when working with the Azure Service Bus. It has some tooling for Event Hubs, Notification Hubs, and Azure Relays as well, but they are not within the scope of this book. Remember that you can create all resources, including subscriptions and filters, using ARM templates as well. For manually reading, deleting, and sending messages, you’re stuck with the Service Bus Explorer.
Summary
Azure Service Bus is a great tool to have in your arsenal. It allows you to decouple logic and applications and adds scaling to your applications. Queues are great for FIFO applications, while topics and subscriptions are great for publisher/subscriber patterns. Service Bus integrates well with Azure Functions, but the SDK allows you to work with it from any sort of application. With the Service Bus Explorer, you have all the tools you need to build and maintain your Azure Service Bus solutions.
- 1800+ high-performance UI components.
- Includes popular controls such as Grid, Chart, Scheduler, and more.
- 24x5 unlimited support by developers.