
Azure Serverless Succinctly®

CHAPTER 3
Logic Apps
In the previous chapter, we explored Azure Functions in depth. We wrote functions using the Azure portal and using Visual Studio. We also deployed them using Visual Studio and Azure DevOps. While Azure functions are a great way to run some code on specific triggers, there is an easier way to create workflows. Azure Logic Apps provides a sort of no-code version of functions. Logic apps are serverless and are initiated using various triggers, just like functions. Logic apps can also trigger functions and other logic apps using HTTP. In this chapter we’re going to build logic apps using the Azure portal.
Creating a logic app
To create a logic app, go to Create a resource or All services in the Azure portal, and search for Logic App. Click Create and fill out the blade that appears. You need a name, subscription, resource group, and location. Leave Log Analytics set to Off.
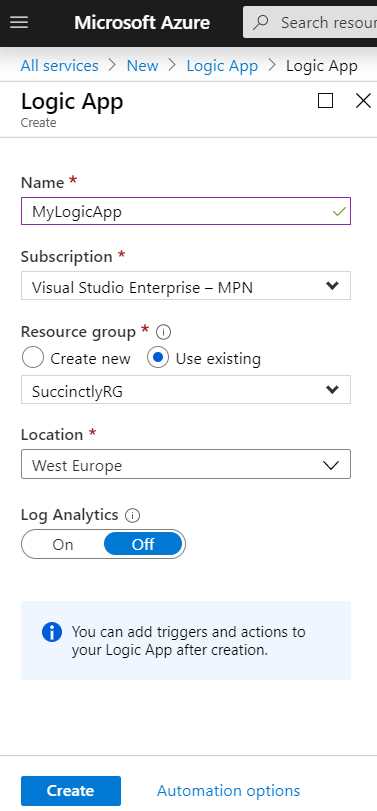
Figure 16: Creating a Logic App
Once the logic app is created, go to the resource, and Azure will suggest some common triggers and templates, as well as an introduction video. You’ll see some triggers that can also be used with functions, like when a message is received in a Service Bus queue, recurrence (timer), and when an HTTP request is received. You’ll also see some new triggers, like when a new tweet is posted on Twitter, when a new email is received in Outlook.com, and when a new file is created on OneDrive. Since a logic app can trigger functions, this effectively allows you to use some new triggers for your functions. You’ll also see some templates that contain entire workflows, like deleting old Azure blobs, daily email reminders, and even some advanced ones, like posting to Slack if a new tweet matches with some hashtag, and when a new member is added to a MailChimp list, asking me if I also want to add them to a SharePoint list. It’s also possible to react to events from Azure DevOps, but they’re not visible in the common triggers and templates.
For this demo we are going to use some triggers and actions that aren’t available for functions. Pick a blank Logic App from the templates. This allows you to pick your own triggers in the Logic App designer. In the form that opens you’ll see the designer. First, you’ll need to pick a trigger. The default selection is For You, but you probably haven’t used any triggers yet, and so you don’t get any recommendations either. Select All instead, and marvel at the many triggers. This is where the Azure DevOps triggers are, as well as Gmail, Dropbox, Dynamics 365, Ethereum Blockchain, GitHub, Instagram, Jira, Salesforce, Trello, YouTube, and many others. We’re a bit limited in options because I can’t assume my readers have any of those services. We’re going to use a SQL Server trigger, but before we can do that, we first have to create an Azure SQL Server instance.
Creating a SQL database
- In All services, search for SQL database and choose SQL databases.
- In the SQL database creation blade, pick a resource group and enter a database name.
- Create a new server, which needs a name that is unique across Azure.
- Enter a server admin login name (for example, your first name) and a password (for example Welcome1!). It’s just a temporary server, so it doesn’t matter too much. Just be sure you remember both your username and password.
- Under Compute + storage, choose the Basic tier.
- Click Review + create and then Create to create the database.
- Find the server in your Azure resources, go to Firewalls and virtual networks in the menu on the left, click Add client IP, and enable Allow Azure services and resources to access this server.
- Click Save.
Note: If you’re having trouble creating a database, skip to Chapter 6 where databases are explained in more detail. You may opt for a serverless database, but this demo was created using the Basic tier instead of Serverless.
Next, we need to create a table in the database. You can do this from either SQL Server Management Studio (SSMS) or from the query editor in Azure. You can find the query editor in the menu of the SQL database. Log in using [myserver].database.windows.net (when using SSMS) and your username and password. Then, create the table by running the following query.
Code Listing 18
CREATE TABLE [dbo].[Person]( [Id] [int] IDENTITY(1,1) NOT NULL, [Name] [varchar](50) NOT NULL, CONSTRAINT [PK_Person] PRIMARY KEY CLUSTERED ( [Id] ASC )WITH (STATISTICS_NORECOMPUTE = OFF, IGNORE_DUP_KEY = OFF) ON [PRIMARY] ) ON [PRIMARY] GO |
Next, we can go back to our logic app and add a trigger.
Building a logic app with SQL Server
Go back to the logic app and choose a blank template. In the designer, search for the SQL Server trigger and then select When an item is created (V2). Next, you can specify your server, database, and table. Select the server, database, and table that we just created, and set the interval to 1.
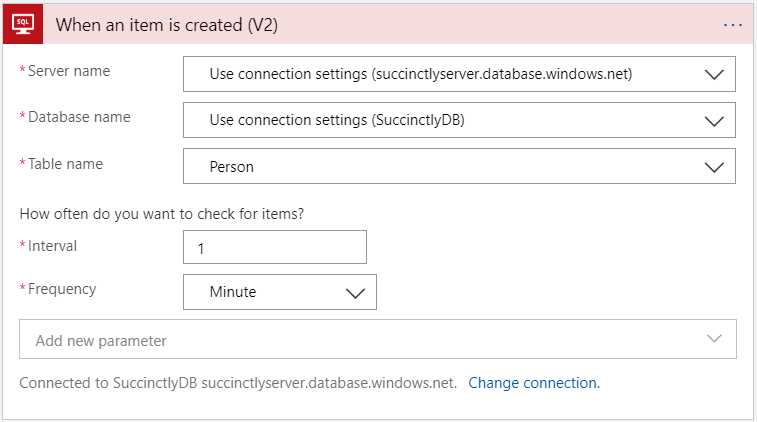
Figure 17: Creating a SQL Trigger
After that, you can add a follow-up action. For this, we are going to select Send an email from Outlook.com. Alternatively, you can pick Gmail or one of the other email alternatives (Send Email from SMTP for a generic mail client). When you choose the Outlook.com option, you need to sign in, and after that you can simply add a To, a Subject, and a Body. You can use dynamic content from the previous actions, in our case the trigger. We can use this to get the inserted ID and name from the Person table.
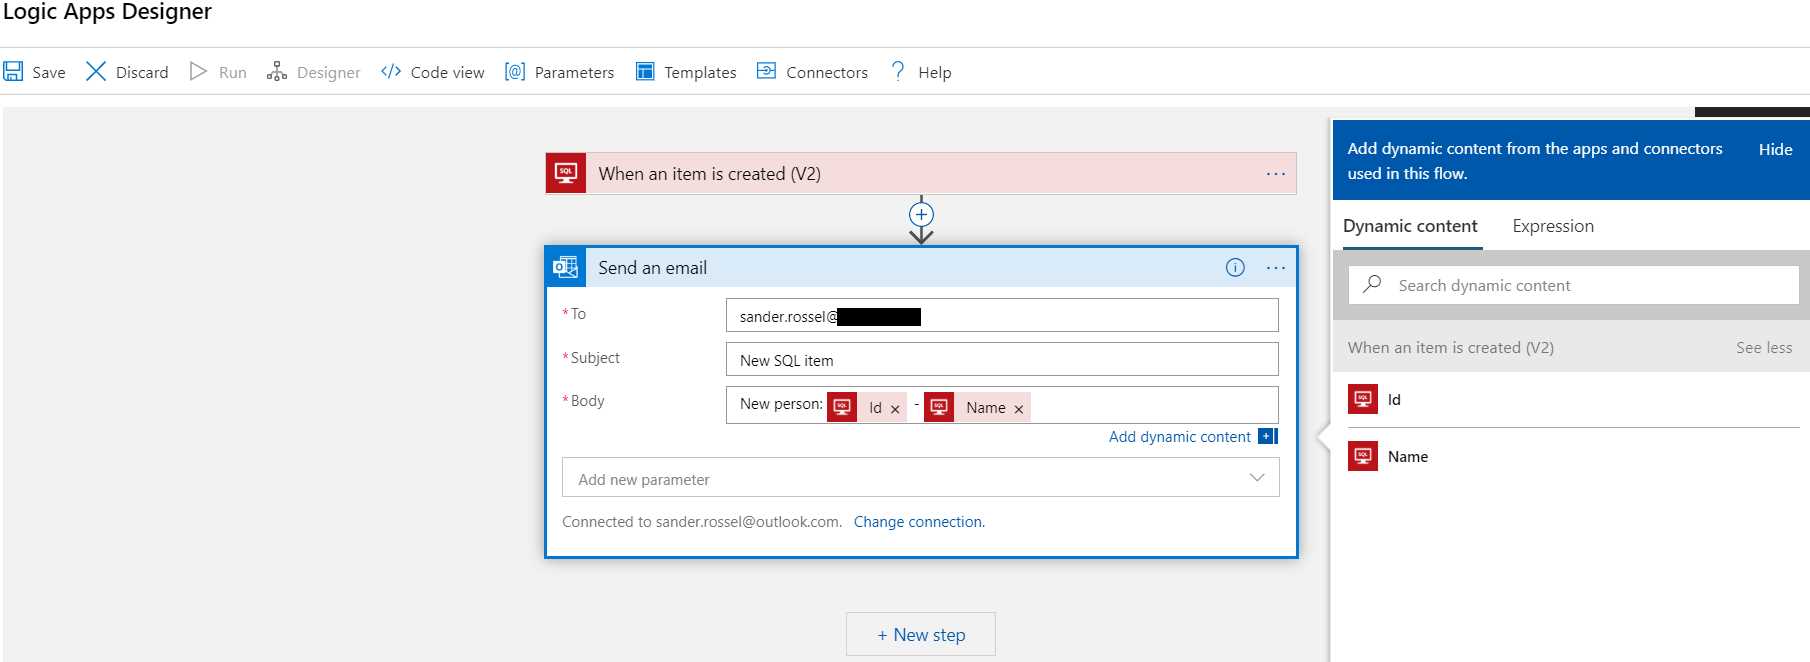
Figure 18: Configuring a Logic App
When the SQL trigger and the email action are configured, click Save in the upper-left corner to save the logic app.
After that, it’s time to test the logic app. Go to SSMS or to the query editor in Azure and insert some names.
Code Listing 19
INSERT INTO Person ([Name]) VALUES ('Bill'), ('Steve'), ('Satya') |
Wait a minute, and check if you get three emails with the inserted IDs and names.
Note: The logic app we just created makes use of two external connections: the database connection, and the Outlook connection. These are stored as separate resources called API connections, and can be found under All services if you search for API connections. API connections can be reused in other logic apps.
Monitoring logic apps
You can monitor your logic apps in the Overview tab of the resource. This shows the type of trigger, the frequency, and how often it was triggered, along with the status of each run.
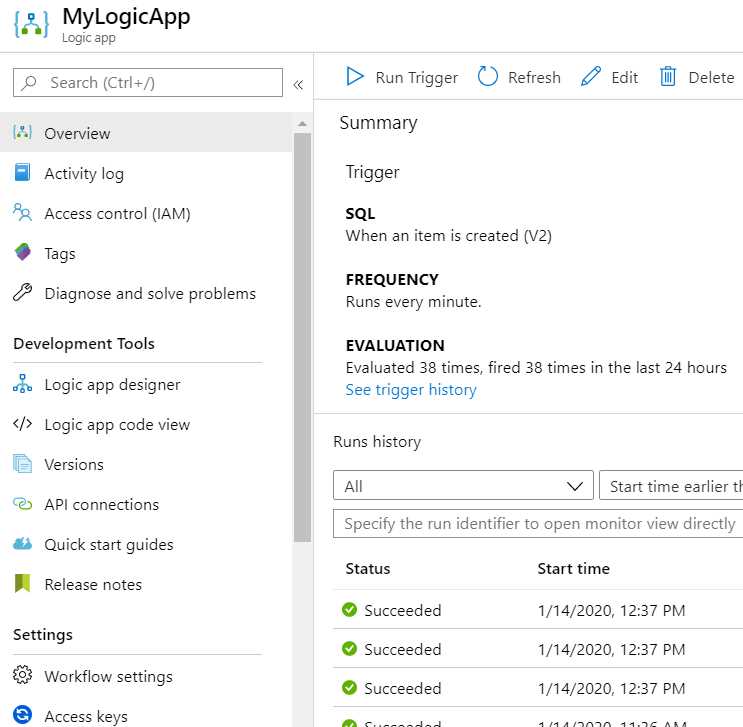
Figure 19: Logic App Overview
It’s possible to drill down on a run and see detailed logging. You can see the input and output of each step and whether the step succeeded. Even when you’re using a ForEach step, you can see the status for each individual iteration. You can also resubmit specific runs here.
It is possible to be notified when a run fails, for example through email. This can be done through the Alerts function in the logic app menu. This works the same as for your other Azure resources.
Flow in logic apps
Let’s create another logic app to see some other steps that you can use. In the example, we’re going to create an HTTP trigger. Unfortunately, it’s not straightforward to get query parameters from your URL, so we’re going to create a POST request with a JSON body as input. To do this, create a new logic app and choose the When a HTTP request is received template.
In the request, you can specify a request body JSON schema. I strongly suggest you do this, because it allows you to directly use any values from the body in your next steps in the logic app. Click Use sample payload to generate schema and enter the following JSON.
Code Listing 20
{ "firstName": "Sander", "lastName": "Rossel" } |
This will create the schema with firstName and lastName as strings in an object.
Note: If you really want to make GET requests, that’s possible. In your HTTP trigger, click Add new parameter > Method > GET. To access parameters from your URL query, use @triggerOutputs()['queries']['firstName'], where you can now simply put in firstName, and do the same for lastName.
For the next action, we’re going to work with a variable. Add an action and look for the Variables action, and then choose Initialize variable. This action requires a name and a type, so enter returnValue and String, respectively. We’ll leave the (initial) value blank.
Add another action and look for Control. These are your standard programming control statements, such as if and foreach. Pick Condition, which is a standard if statement. This is where things get interesting. You’ll get three new boxes, a condition, an “If true,” and an “If false.” What we’re going to do is check for the value of lastName, and if it’s not set, we’re going to set the variable we declared in the previous step to Hello, [firstName] [lastName]!, but if it is, we’re going to use the firstName only. So, in the condition part, set [lastName] [is equal to] [leave blank] (just don’t type anything there). When you enter one of the fields, a pop-up menu allows you to choose some predefined values and functions. In our case we should see Body, Path Parameters, and Queries, which are added by our HTTP trigger, as well as the firstName and lastName values, which also come from the trigger because we added them. The returnValue can also be selected here. You can also click on the three dots in the upper-right corner of any action and rename your action. So instead of Set variable and Set variable 2, you can rename them to Set firstName only and Set firstName and lastName, for example. You can also set some additional settings here, but you probably won’t need them a lot.
Then in both the true and false conditions, we can add a Set variable action. These are simple. The variable we want to set is returnValue and the value we want to give it is either Hello, [firstName]! or Hello, [firstName] [lastName]!.
Both the true and false conditions can have multiple actions, which can form a complete workflow on its own. We need to break out of the if statement though, so we can just add another action at the bottom. Here, we’ll pick the Response action. The status code is 200, and the body is [returnValue].
If you save the logic app, your trigger will generate a URL that you can copy.
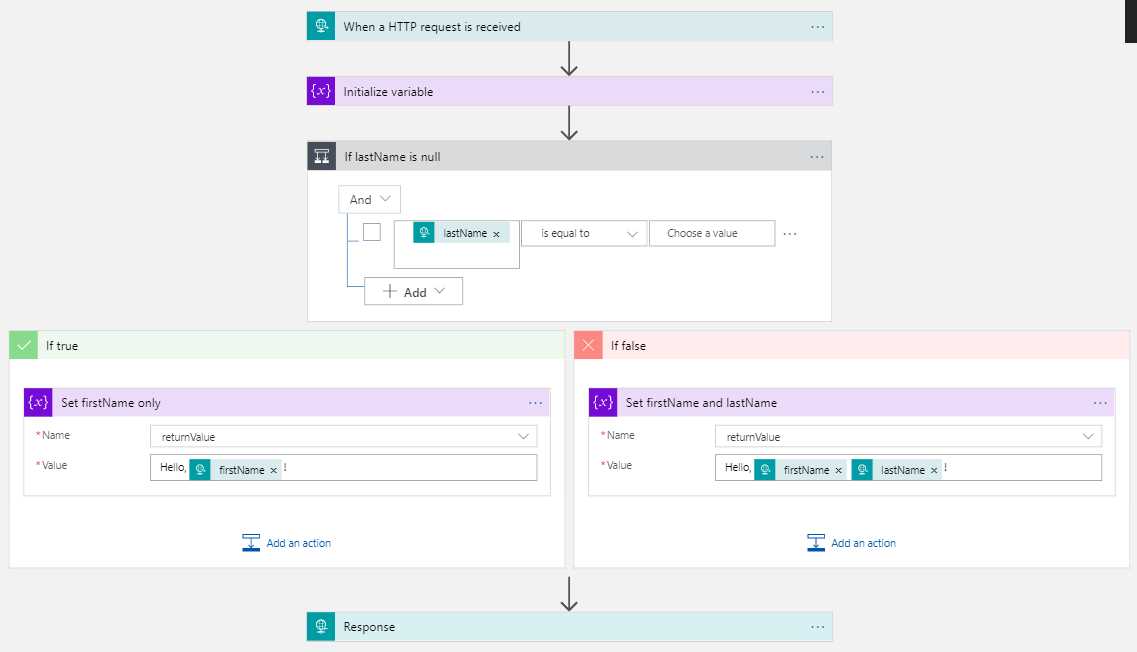
Figure 20: Logic App Condition
To test this, we need an application that can test POST requests. For this, you can use Postman. Postman is fairly straightforward for simple stuff. Simply copy the URL from your trigger, set the method to POST, and in the Body tab, set the type to raw and JSON. For the body, specify a JSON with a firstName and a lastName, and click Send. The request should now show Hello, [firstName]! or Hello, [firstName] [lastName]!, depending on whether you set a lastName.
Deploying logic apps
The strongest point of Azure Logic Apps—having a relatively easy designer that less technical people can work with—is also its weakest point. To build a logic app, you’re basically just doing a lot of button clicks. That’s hard to automate. So, whenever you’re building a logic app in a test environment, and you want to bring it to a staging environment and then a production environment, you’re going to have a bit of a challenge.
There are some options: an easy manual method, and a more complicated automated method. Unfortunately, neither work well with changes. Let’s take our first example that works with an Azure SQL database and an Outlook account, specifically because I want to point out some things there.
Cloning logic apps
The first way to move a logic app to the next environment is by cloning it. On the Overview page of your logic app, there’s a Clone button in the top menu. You can specify a new name for the cloned logic app, as well as whether it should be enabled or disabled. Add something like Staging or Prod to the name, and clone it in the disabled state. It should take a few seconds to clone. Once it’s cloned, go to the logic app’s Overview page and change the Resource group of the logic app. This may take a while.
Once the logic app has moved to the new resource group, there are a few problems you have to solve. Once you check the designer, you’ll notice some errors. Your connections have become invalid. That’s because the connections are stored as API connections, which you can find in the menu on the left, or by going to All Azure resources and searching for API connections. Because API connections are separate resources, they are still shared with the original logic app, and they are also still in the original resource group. So, you’ll have to create a new connection for both your database and your Outlook account.
Be aware that you have to completely refresh the page for the API connections tab to correctly remove the old connections. This is a bit of a hassle, but since this is another environment, you probably needed to create new connections anyway—the production database instead of the test database, for example. Once the manual changes are done, you can enable the logic app on the Overview page. So, this method has some problems, but it’s relatively easy, and someone who is not technical could still do this.
ARM templates
The other option for deploying logic apps is using Azure Resource Manager (ARM) templates. Almost all Azure resources can be deployed using ARM templates, which are declarative JSON documents that describe the resources you want to deploy. An ARM template can be deployed more than once, and always gives the same result. ARM templates can contain more than one resource, and they can be deployed using the Azure portal, PowerShell, Azure CLI, or Azure DevOps. The exact structure and syntax of ARM or JSON is not within the scope of this book, but I want to look at some logic app-specific “gotchas.”
In the portal, go to MyLogicApp and select Logic app code view in the menu. This is where you can view the definition of the logic app in code. Be aware that this is only the part you created in the designer; the code to deploy the logic app itself is not included.
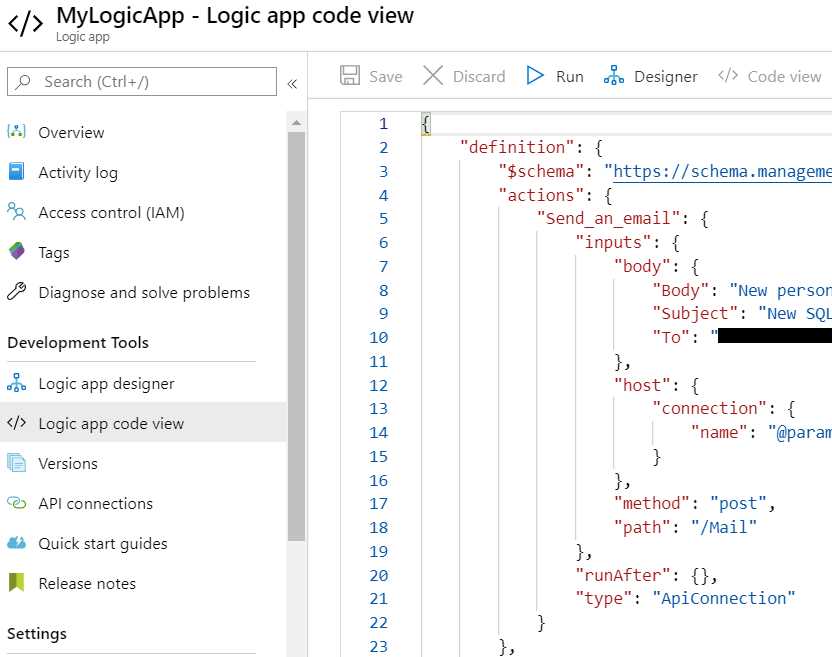
Figure 21: Logic App Code View
Microsoft has a couple of examples of logic app ARM templates on its GitHub account for Azure. The easiest is the one with a simple timer trigger that checks a URL every hour. A slimmed-down version looks as follows.
Code Listing 21
|
"$schema": "https://schema.management.azure.com/schemas/2015-01-01/deploymentTemplate.json#", "contentVersion": "1.0.0.0", "parameters": { "logicAppName": { "type": "string", "metadata": { "description": "The name of the logic app to create." } } }, "variables": {}, "resources": [{ "type": "Microsoft.Logic/workflows", "apiVersion": "2019-05-01", "name": "[parameters('logicAppName')]", "location": "[resourceGroup().location]", "tags": {}, "properties": { "definition": {} } }], "outputs": {} } |
The definition part should be replaced with the code view from the logic app. However, this poses some problems. For example, the parameters section contains hard-coded references to the Outlook and SQL connections.
Code Listing 22
"parameters": { "$connections": { "value": { "outlook": { "connectionId": "/subscriptions/[subscription ID]/resourceGroups/[resource group]/providers/Microsoft.Web/connections/outlook", "connectionName": "outlook", "id": "/subscriptions/[subscription ID]/providers/Microsoft.Web/locations/westeurope/managedApis/outlook" }, "sql": { "connectionId": "/subscriptions/[subscription ID]/resourceGroups/[resource group]/providers/Microsoft.Web/connections/sql", "connectionName": "sql", "id": "/subscriptions/[subscription ID]/providers/Microsoft.Web/locations/westeurope/managedApis/sql" } } } } |
You can fix this by using the subscription().id function instead of the actual subscription ID, and possibly using resourceGroup().name or passing in the subscription ID and/or resource group name as parameters to the template. You can also pass in the API connection name as a parameter.
To create the API connections using ARM, you can view them in the portal and select Export template from the menu. The email API connection template, for example, looks as follows.
Code Listing 23
{ "type": "Microsoft.Web/connections", "apiVersion": "2016-06-01", "name": "[parameters('connections_outlook_name')]", "location": "westeurope", "properties": { "displayName": "[concat('[email]@', parameters('connections_outlook_name'), '.com')]", "customParameterValues": {}, "api": { "id": "[concat('/subscriptions/d777ca79-3991-4e0b-a7b0-271ed6a3f69c/providers/Microsoft.Web/locations/westeurope/managedApis/', parameters('connections_outlook_name'))]" } } } |
Also, you’ll probably want to parameterize some other values in the logic app template, like the email address and subject, which are also hard coded.
Code Listing 24
"actions": { "Send_an_email": { "inputs": { "body": { "Body": "New person: @{triggerBody()?['Id']} - @{triggerBody()?['Name']}", "Subject": "New SQL item", "To": "[email]@[domain].com" }, |
Once you have the complete ARM template, which can take some puzzling out to get right, you can deploy it using PowerShell, Azure CLI, the Azure portal, or Azure DevOps. To deploy your ARM template using the portal, go to + Create a resource and look for Template deployment (deploy using custom templates), and then chose Build your own template in the editor. Here you can simply copy and paste your ARM template, click Save, fill out the settings, and then click Purchase. In Azure DevOps, you can use the Azure resource group deployment task.
You can also change a logic app in the logic app code view directly. Instead of making changes in the designer, you can write them here and click Save at the top. For example, change the mail subject and see how it changes in the designer as well.
Versioning
When you keep your ARM templates in source control, you can always restore a previous version of your ARM template and redeploy it. On top of that, logic apps keep track of their own changes. In the menu, go to Versions and see all the various versions of the logic app. Every time you make a change using the designer, the code view, or an ARM template, a new version is added here. By clicking on a version, you can see the logic app as it was at that date and time. You can look in the designer or in the code view, but you can’t make changes. You can also “promote” this version, which overwrites the current version with this version. Of course, you can always go back to the current version by promoting that.
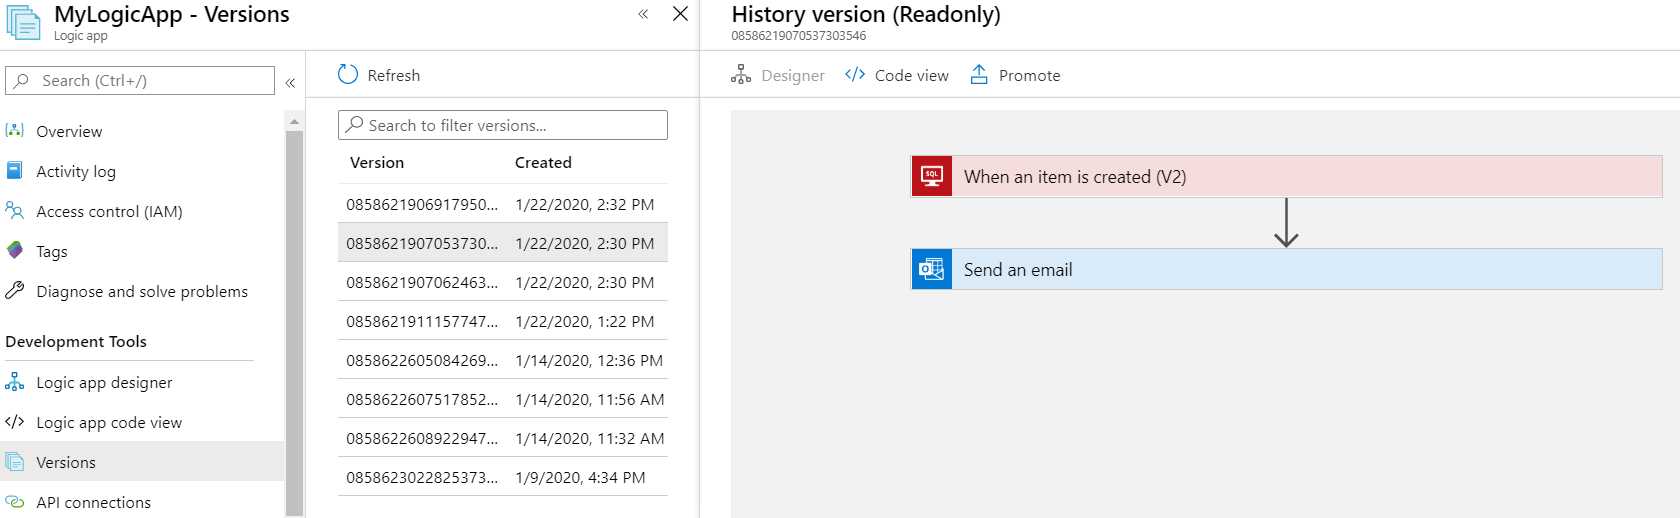
Figure 22: Logic App Versioning
All in all, logic apps have various methods of development and deployment, some more technical than others. Depending on what you do with it, your manager can play around in the designer, which may be enough, or you can use ARM templates in source control to deploy to various environments automatically.
Summary
Logic apps make it easy to click together workflows. Even your non-technical manager can create automatic tasks when they receive a new email or tweet. There are lots of triggers, endpoints, and control statements to create advanced workflows. With cloning, versioning, and code view, you get the tools to deploy your logic apps to different environments with relative ease.
- 1800+ high-performance UI components.
- Includes popular controls such as Grid, Chart, Scheduler, and more.
- 24x5 unlimited support by developers.