
Azure Serverless Succinctly®

CHAPTER 6
Azure SQL
In the previous chapters, we’ve seen functions, logic apps, Service Bus, and Event Grid, which are all services that provide some sort of event-based computing or messaging. When you think of serverless, you’re probably not thinking of any sort of database, yet Azure SQL has a serverless offering. In Chapter 2, we briefly used Azure SQL with Azure Logic Apps. In this chapter, we’re going to further explore Azure SQL and its serverless offering.
Azure SQL tiers
Before we go and create a serverless SQL database, let’s talk about the different tiers and how they’re different from serverless. Creating a serverless Azure SQL instance works the same as creating a regular Azure SQL instance, except for the service tier. Understanding the different tiers is key to understanding serverless SQL. The default tiers when creating a new database used to be the Basic, Standard, and Premium tiers, which work with Database Transaction Units (DTUs). The default tiers are now based on vCores. One of these vCore offerings is serverless.
A DTU is a combination of CPU, memory, and IO resources. That means having more DTUs makes your database perform faster. Having more DTUs also means you can store more data. In DTU terms, a database with 20 DTUs is about twice as fast as a database with 10 DTUs.
A vCore, or virtual core, on the other hand, is just CPU, and lets you pick other characteristics of the hardware independently; although currently, the Gen5 configuration seems to be the only option for general workloads. The FSv2 series is compute optimized and offers 72 vCores, but less memory, at a better price than Gen5. There’s also the M series, which offers massive memory, but also at a price. Whether you choose the general workload, compute optimized, or memory optimized, you can always pick your number of vCores independently.
Other than the difference in maximum number of DTUs or vCores, the different tiers offer other features, such as longer backup retention and high availability options. A single vCore is equal to 100 DTUs for the Basic and Standard tiers, and 125 DTUs for the Premium tier.
Let’s get back to serverless, which is a vCore solution. Since serverless services are supposed to autoscale, you don’t configure a number of vCores, but a minimum and a maximum. This is also linked to your minimum and maximum amount of memory, which is three times the minimum and maximum number of cores. Compare that to DTUs, which have CPU, memory, and IO resources in one, and you’ll see why that would be hard to scale—your entire performance would drop like a brick.
With vCores, your computing power scales up and down, but your memory doesn’t. When your serverless Azure SQL instance is idle for a specified amount of time, the database is paused, your resources are reclaimed, and you stop paying for your vCores and other infrastructure. The database is resumed after a small startup delay, when activity on the database occurs. Some actions and options, like geo-replication and long-term backup retention, prevent the database from auto-pausing.
The use case scenario for a serverless database is when you have a database that is accessed infrequently, or when usage is unpredictable for short periods of time. When your database is accessed constantly throughout the day, I’d recommend a regular tier, such as Standard or General Purpose Provisioned (or one of the high-availability tiers if you need that).
Billing
The serverless tier is billed by the maximum of CPU and memory used each second. If the used resources are less than the provisioned amount, then the provisioned amount is billed. So, let’s say you have a database with a minimum of 0.75 vCores and a maximum of 3, and it’s running a query using 1 to 2 vCores (let’s say an average of 1.5 per second) for a minute straight. After that it goes idle for an hour, and the next 23 hours it’s paused. You now pay for (60 * 1.5) + (3600 * 0.75) = 2790 vCore seconds. The price per second is €0.000134, so that’s €0.37386 in total for the vCores that day.
Now, let’s say the memory used in that minute is 6 GB on average. GBs are normalized into units of vCore by dividing them by 3. In that case, the maximum vCore usage would not be 1.5, but 6 / 3 = 2. The price would then be (60 * 2) + (3600 * 0.75) = 2820, so €0.37788. If this is the exact daily usage for a month you pay about €11.71 for that month.
As you can see, it’s cheaper to use the database three times in an hour, have the hour of inactivity, and then pause for 22 hours, than it is to use the database three times throughout the day and have three hours of inactivity. It’s possible to stretch the time before your database goes to auto-pause, but the minimum inactivity time is an hour.
Creating a serverless Azure SQL instance
Now that that’s clear, let’s create a serverless Azure SQL database and connect to it using SQL Server Management Studio. In the portal, go to SQL databases and click + Add. Pick a subscription and resource group, and enter a database name. You may reuse the server we created in Chapter 2, or you may create a new one. If you create a new one, pick a server name that’s unique across Azure. The server admin login can be your own name. The password needs to be at least eight characters and has some additional rules, which are explained when you enter the field. For our use case, Welcome1! is a good enough password (and easy to remember).
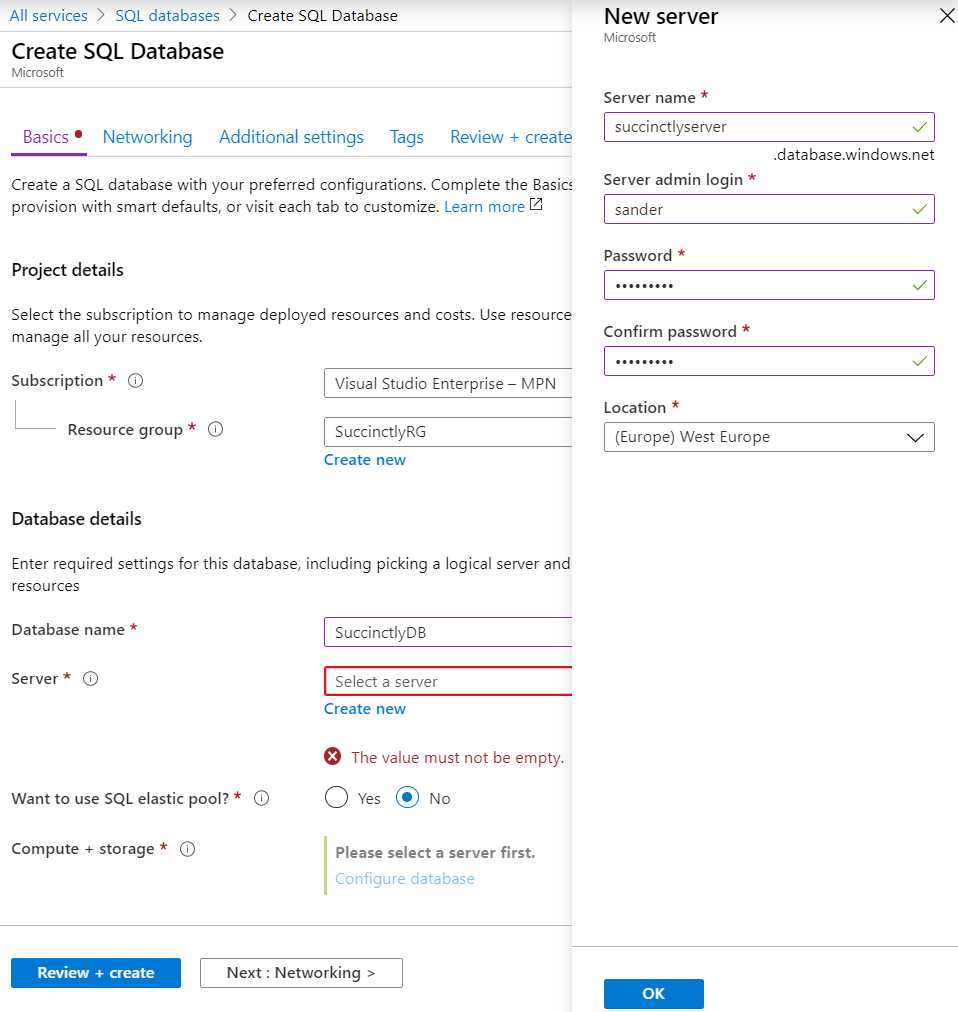
Figure 36: Creating a New Azure SQL Database and Server
After you fill out all the fields and create the server, it’s time to pick our serverless tier by clicking Configure database next to Compute + storage. The blade that opens has all the pricing tiers I discussed earlier. Select the Serverless compute tier and choose a minimum and maximum amount of vCores. Set the max vCores to 2 and leave all the other settings on the default value.
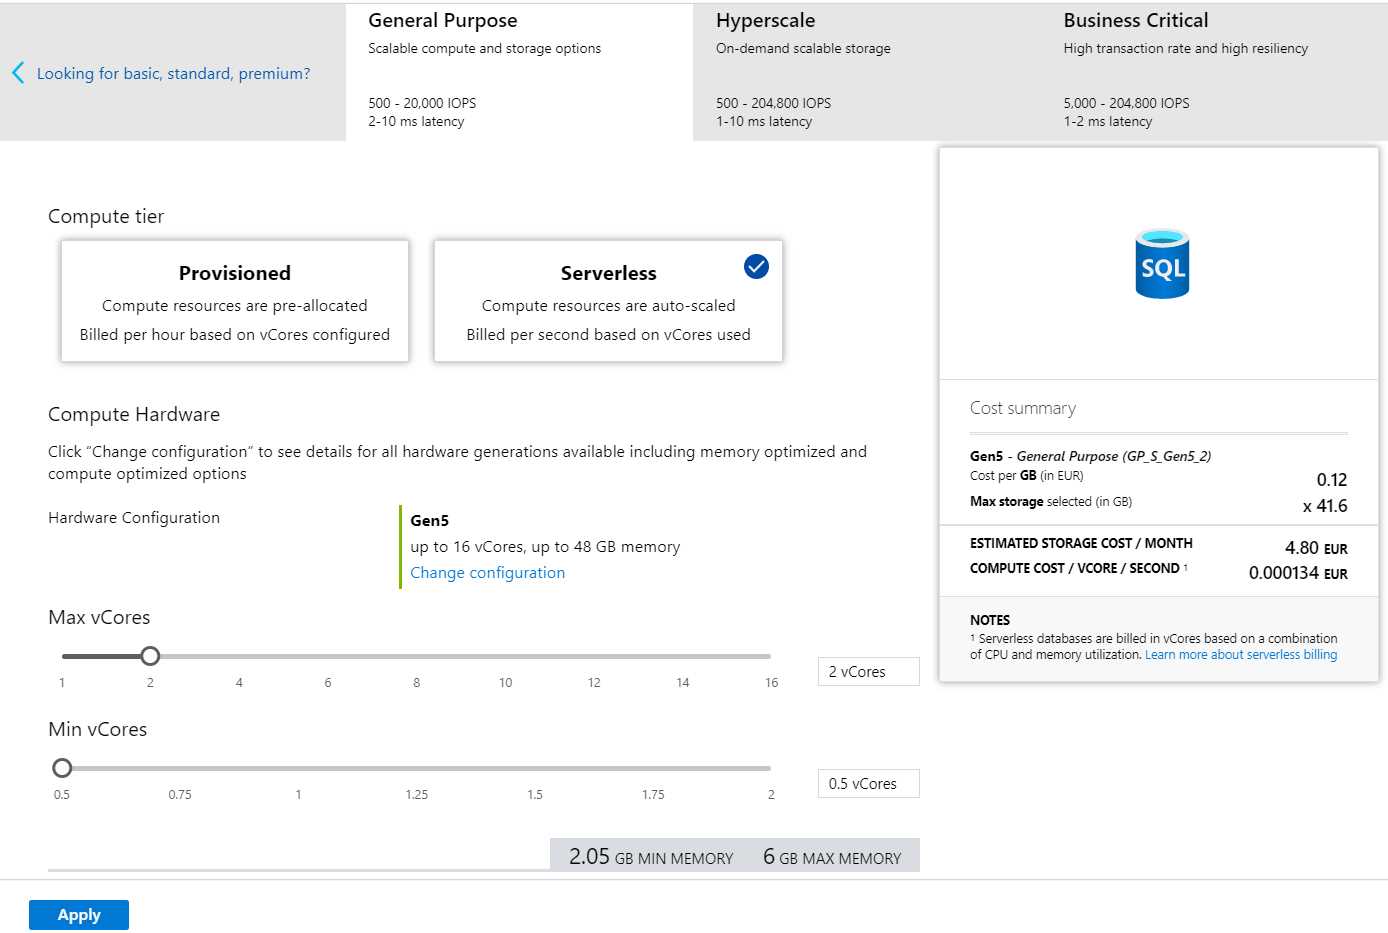
Figure 37: Azure SQL Pricing Tiers
I couldn’t fit the auto-pause delay and data max size on the screenshot in Figure 37, but they’re under the minimum vCores, so don’t forget to scroll to check them out. Then, click Apply.
Back in the SQL database creation blade, click Next : Networking > Next : Additional settings. Set Enable advanced data security to Not now. Then, click Review + Create and create the SQL database. The creation may take a few minutes.
Connecting to your database
Once the creation is complete, head over to your SQL Server (not your SQL database, which is a different resource). Then go to Firewalls and virtual networks. At the top of the blade, click Add client IP (never do this on a public wireless network). The IP address you’re currently on is added to the list of allowed IP addresses, which means you can now access the SQL Server, and with that, the SQL database. Be sure to change the added rule name to something meaningful, like Home or Office. Save the changes.
Now that your IP address is whitelisted, you can access your database using SQL Server Management Studio. When you are prompted to connect to a server, use [myserver].database.windows.net with SQL Server Authentication and your username and password (in my example, that’s sander and Welcome1!). You can find the server name on the Overview blade of your SQL database in the Azure portal. Under the Connection strings blade, you can find the connection string for the database, with only the password missing. If you forgot your password, you can go to the SQL Server in Azure and click Reset password on the Overview blade. Alternatively, you can set an Active Directory Admin. From here on, everything for your serverless database works exactly the same as for your regular Azure SQL database.
Tip: If you don’t want to get SQL Server Management Studio, or if you have to look up something quick, you can use the Query Editor from the SQL database in the Azure portal. It’s very limited in functionality, but you can run any query in it.
Summary
Serverless Azure SQL isn’t for everyone, but when you have a database that’s doing nothing most of the time, serverless is probably a cheap alternative for your database. Especially in the world of microservices, where each service can have its own database, this is an interesting alternative. Other than the pricing plan and the billing strategy, serverless Azure SQL works the same way as your regular Azure SQL databases.
- 1800+ high-performance UI components.
- Includes popular controls such as Grid, Chart, Scheduler, and more.
- 24x5 unlimited support by developers.