
Azure Serverless Succinctly®

CHAPTER 7
API Management
In the previous chapter, we saw serverless Azure SQL, a bit of an odd one out in the serverless Azure offerings. In this chapter we’re going to have a look at API management, which may also not be your first thought when you think of serverless. However, as we’ll see, serverless API management makes a lot of sense. As an added bonus, whether you use the serverless or the regular pricing tier, API Management has native support for your serverless APIs.
What is API Management?
Like the name implies, API Management enables you to manage APIs. It lets you track usage and configure access and rules, subscriptions, and products. So, let’s say you have three APIs: an API for managing master data, an API for managing sales orders, and an API for managing stock. In your API Management service, you can now define products. A product is a logically grouped set of APIs.
So, say you have two products: one product for managing sales orders (which also includes the master data API, because that contains information on products and customers) and the stock API so you know what to sell. There’s also the light version of the product, which only lets you keep track of the stock, but also requires the master data API. The following illustration hopefully makes this clear. The arrows have a “serving” relationship, so the master data API is serving the stock API.
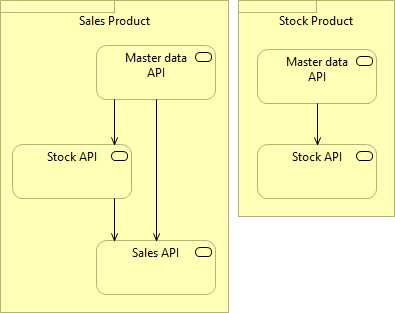
Figure 38: Two Products with the Same APIs
You now want to make these products available for customers. Let’s say you have two customers. Contoso wants the sales product, while ACME wants the stock product. You can create two subscriptions and associate the products with the subscriptions. The subscription offers two keys that you can send to your customers, who can then access the product the subscription is associated with. While subscriptions are normally scoped to products, you can scope a subscription to an API or to all APIs. Of course, you should be very careful with allowing access to all APIs.
In terms of serverless and microservices (and even SOA), API Management can have another function. Back in the day you had your one monolith that had everything you needed, but now you have lots of endpoints, all with different URLs. API Management can act as a gateway to allow uniform access to all your APIs.
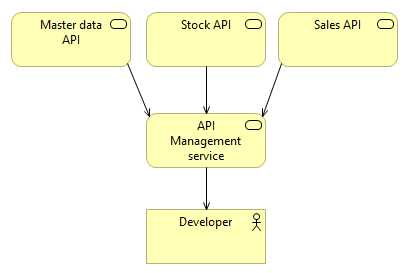
Figure 39: API Management as Gateway
Instead of having to manage three different endpoints (which are tens to hundreds in real-life scenarios), you now only have to worry about one.
The serverless API Management offering is a bit more limited in functionality than the other tiers. User management and identities were removed from the serverless tier. In the other tiers you can add users to groups and give groups access to products and subscriptions. Also, serverless doesn’t have settings for notifications. A very important change in the serverless tier is that it doesn’t support the developer portal. With this, users could log in to a (customized) portal generated by your API Management service, which would let them browse your APIs and try them out. Despite the limitations of the serverless tier, it still offers plenty of functionality and at a good price.
Creating an API Management service
We’re now going to create an API Management service. In the Azure portal, go to all resources and find the API Management services, then click Add. The API Management creation blade has some fields that we haven’t seen before, your organization name and administrator email. You can put anything in organization name, so I’m putting in my own company, JUUN Software. The administrator email should be your own email address.
Creating an API Management service can take up to an hour, and when it’s deployed an email is sent to your email address. Other API Management notifications will also be sent to this email address. The company name is used in the developer portal and in email notifications. Other than that, enter a name that’s unique across Azure, select a subscription, pick a resource group, and set a location. Optionally, you can enable Application Insights. While I’d recommend it in production environments, leave it off for this demo unless you want to do some exploring on your own. Set the pricing tier to Consumption, which is the serverless offering.
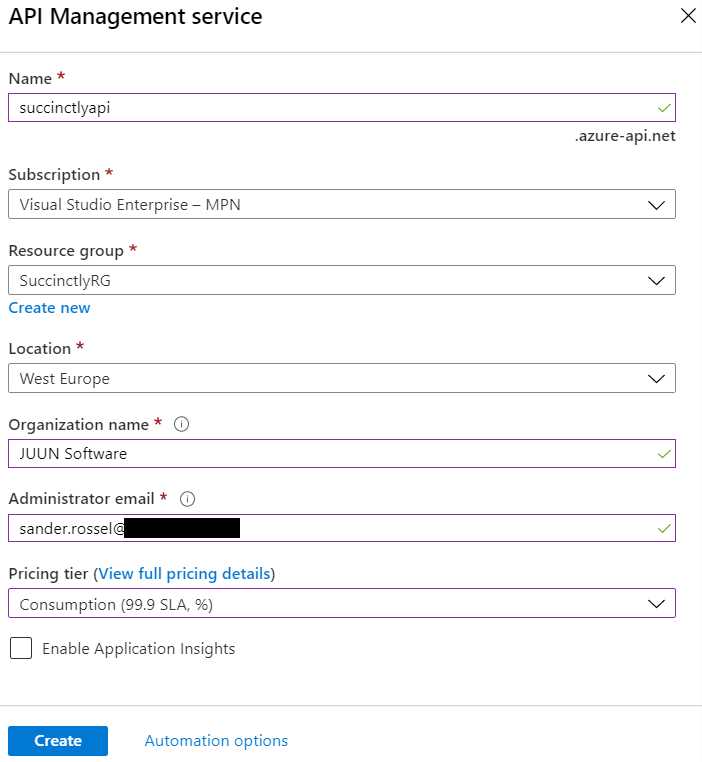
Figure 40: Creating a New API Management Service
After you’ve filled all the fields, click Create, and your API Management service is deployed. Since that may take a while (I once waited one and a half hours), we’ll look at the pricing tiers while the service is being deployed.
Pricing tiers
The pricing for the API Management service differs greatly per tier and, unfortunately, none are cheap. The Developer, Basic, Standard, and Premium tiers are charged hourly, while the Consumption tier is the serverless offering that’s charged by usage.
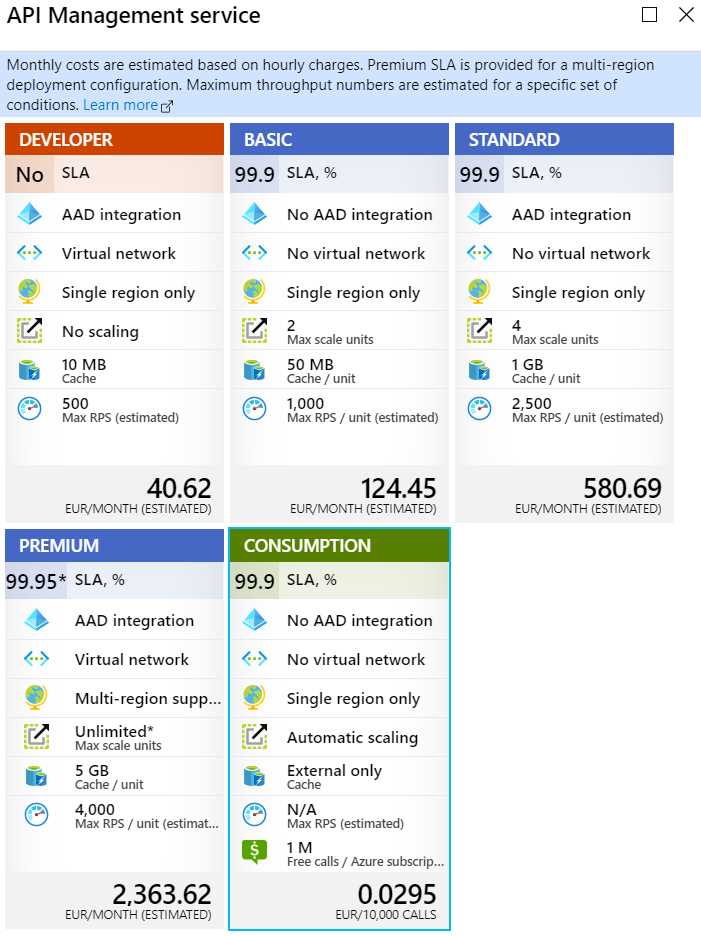
Figure 41: API Management Service Pricing Tiers
The Developer tier is awesome, and has all features for the relatively low estimated price of €40.62, which already isn’t cheap. Unfortunately, this tier isn’t meant to be used in production, if only because it has no SLA (meaning no uptime guarantees). The Basic tier can handle more requests than the Developer tier, and supports some scaling and extra caching, but has no Azure Active Directory (AAD) integration and cannot be placed inside virtual networks. From this tier up, an uptime of 99.9% is guaranteed, which means the service can have an expected downtime of a little under nine hours a year (or about a minute and a half a day). This costs you about €80 a month compared to the Developer tier, though.
The Standard tier has even more scaling and caching options, as well as a higher throughput, and adds AAD integration, but it still can’t be placed inside virtual networks. The price increase from the Developer tier is a whopping €460, or almost four times more expensive. The price doesn’t get much better with Premium, which adds the ability to place your API management in your virtual network, allows it to connect to your on-premises network, and adds support for multiregion deployment, as well as more scaling and throughput, and an even higher SLA (if you deploy to multiple regions). But the price is an estimated €2,363.62 a month—not for smaller businesses or casual students. Needless to say, if you offer various APIs to a multitude of enterprise customers worldwide, the Premium tier is the one you want.
The Consumption tier, the serverless offering, has the 99.9% SLA, no AAD integration, and no virtual network, and can only be deployed in a single region. In this respect it’s equal to the Basic tier. However, because the service scales automatically, when it comes to throughput, it virtually has no limits. The Consumption tier has no built-in caching, but every tier supports external Redis-compatible caches. This tier only supports external caching, which can make it a little more expensive if you want caching. The service itself has a million free calls per Azure subscription, and after that you pay €0.029516 per 10,000 calls. When an API Management service instance scales down to zero, billing stops until an instance is needed again. When the API Management is scaled down to zero, there’s the usual startup delay when you make a new request. So, once again, check your usage and decide for yourself if this is the tier for you.
Configuring API Management
Let’s configure API Management to get a basic understanding of the service. First, start by making three function apps through the portal and name them something like succinctlymasterdata, succinctlystock, and succinctlysalesorders. Next, create an HTTP function in each app. I’ve named them CreateCustomer, GetStock, and GetSalesOrders, respectively. Leave the default implementation.
Now, head back to your API Management service and go to APIs. As you can see right away, there’s built-in support for Azure Logic Apps and function apps. OpenAPI, WADL, WSDL, and App Services are also supported. API discovery is supported through Swagger definitions. Click Function App and add your apps one by one.
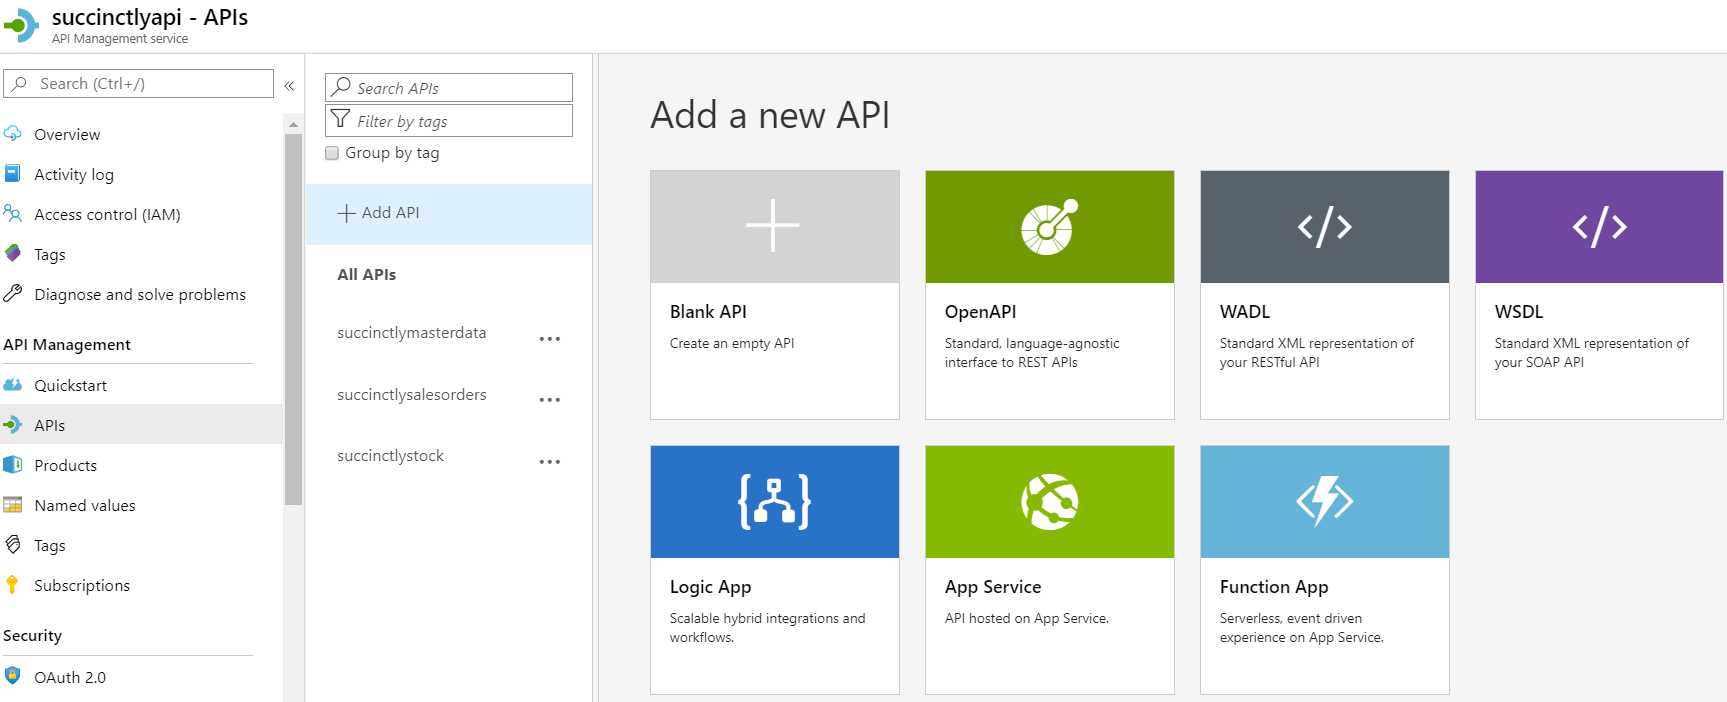
Figure 42: Add API
Now that your APIs are added, you can access them using your browser. Your API settings pages contain a base URL for the API. Normally, this would be https://[myapimanagement].azure-api.net/[myapi], so in this example, it’s https://succinctlyapi.azure-api.net/succinctlymasterdata. We need to add the function name to that, so for example CreateCustomer. Of course, the default function implementation needs a name parameter, so use ?name=APIManagement. On top of that, API Management needs a subscription key. Go to the Subscriptions blade in the portal, find the Built-in all-access subscription, click on the three dots, and click Show/hide keys. Copy the primary or secondary key and add it to the URL, like &subscription-key=[your key]. The complete URL is now https://succinctlyapi.azure-api.net/succinctlymasterdata/CreateCustomer?name=APIManagement&subscription-key=[key]. When you put this in a browser window, you should see Hello, APIManagement.
Because we don’t want to give our customers access to all our APIs, we’re going to create a subscription with a product. First, create a new product. Go to the Products blade and click + Add. Name the new product Stock. The ID will fill automatically. Provide a description, something like APIs for managing stock. Set the state of the product to Published. Click Select API, and then select the master data API and the stock API.
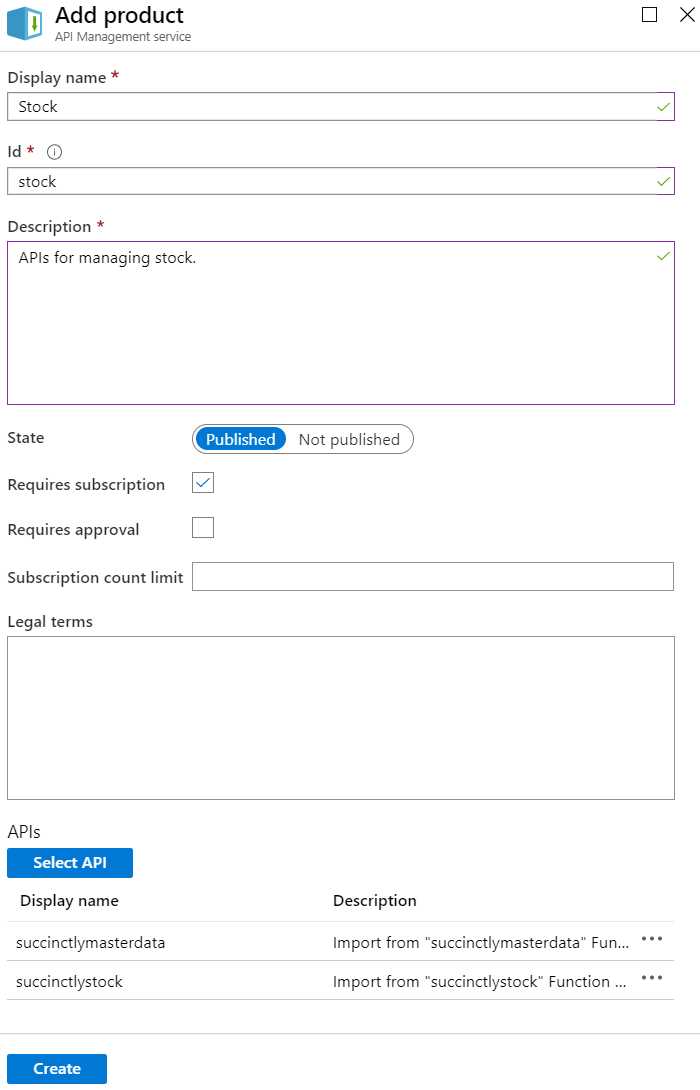
Figure 43: Creating a Product
Next, create a subscription. Enter acmesubscription as the name and ACME Subscription as the display name. Choose Project for the Scope field, and choose Stock for the Product field.

Figure 44: Creating a Subscription
To test if it works, use the same URL that we just used, but replace the key with the key of the ACME subscription. Now try to access the sales orders API by replacing succinctlymasterdata with succinctlysalesorders and CreateCustomer with GetOrders in the URL. You should get a 401, Unauthorized.
Code Listing 41
{ "statusCode": 401, "message": "Access denied due to invalid subscription key. Make sure to provide a valid key for an active subscription." } |
Unfortunately, it’s not possible to switch products on a subscription once the subscription is created. Let’s assume ACME wanted the sales orders API after all. Go back to your product and click + Add API, and add the sales orders API. Wait a few seconds so the product can update, and then try the sales orders URL again. Instead of the 401 you should now get Hello, APIManagement. Obviously, you’ve now added the sales orders API to the stock product, which means everyone with that product can now access the sales orders API. You have two options to prevent this. One option is to create a new subscription, give ACME the new key, and don’t delete the current subscription until they’ve updated all of their services with the new key (if you delete the subscription before that time, they won’t be able to access your APIs at all). You can also cancel or suspend a subscription so you can activate it again later. The other option is to create a product per subscription, so you can always change the product without affecting other customers.
Note: I’ve mentioned that not all resources can be deployed using ARM templates. The API Management service can be deployed using ARM, but APIs, products, and subscriptions cannot. You can create some of these using PowerShell or the Azure CLI, but I haven’t found a way to programmatically import your functions into API Management. However, since we’re talking about securing APIs and managing access, which can change quite often, it may be best to manage this manually.
Summary
API Management is useful for grouping your APIs and managing access. With the serverless offering, you get a stripped-down version of the API Management service, but it still offers plenty of functionality for configuring access to your APIs through products and subscriptions.
- 1800+ high-performance UI components.
- Includes popular controls such as Grid, Chart, Scheduler, and more.
- 24x5 unlimited support by developers.