
Azure Pipelines Succinctly®

CHAPTER 4
Deploy the Libraries
Chapter 2 gave you an overview of how you can create a build pipeline using both the visual designer and the YAML pipeline. Starting from this chapter, you are going to reuse and improve that knowledge by creating a release pipeline for the libraries available in the GalaxyHotel project. The purpose is to explain which strategies you can use to deploy the packages used in other projects, and to apply a reliable versioning scheme to avoid dependency hell.
Build the GalaxyHotel libraries solution
The first step to building the libraries is to add a new YAML pipeline in Azure Pipelines. As explained in the previous chapter, the solution is GalaxyHotel.Libraries.sln. The steps to create a new pipeline are similar to those used in Chapter 2: go to the Azure Pipelines section in Azure DevOps, then go to the Pipeline section. Click Create Pipeline (Figure 4.1).
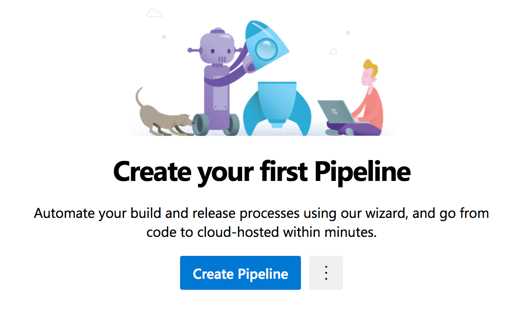
Figure 4.1: Create a new pipeline for libraries solution
Now, you have to choose which repository is the source of the pipeline. Select Azure Repos Git, and then select the Libraries repository (Figure 4.2).
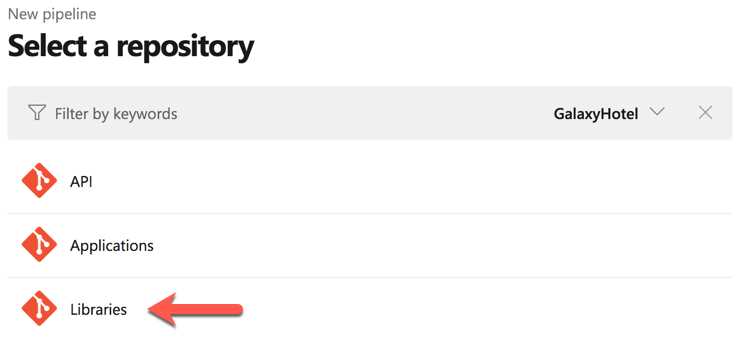
Figure 4.2: Selecting the source repository for a build
In the next step, choose the ASP.NET Core template from the list. The YAML created contains just the build task, but to create the NuGet packages, you need to replace it with the implementation in Code Listing 4.1.
trigger: - master pool: vmImage: 'ubuntu-latest' variables: buildConfiguration: 'Release' steps: - task: DotNetCoreCLI@2 displayName: Build libraries inputs: command: 'build' - task: DotNetCoreCLI@2 displayName: Test libraries inputs: command: 'test' - task: DotNetCoreCLI@2 displayName: Pack libraries inputs: command: 'pack' packagesToPack: '**/*.csproj' versioningScheme: 'off' - task: PublishBuildArtifacts@1 inputs: PathtoPublish: '$(Build.ArtifactStagingDirectory)' ArtifactName: 'drop' publishLocation: 'Container' |
This new workflow has four tasks: build, test, pack, and publish artifacts. The first two steps are pretty obvious. The third step creates a NuGet package for each library project using the nuget pack command and stores them in the Build.ArtifactStagingDirectory folder (which is the default folder for a build artifact). A predefined variable is set to identify this folder, and it points to a specific folder on the machine where the agent that executes the build process is hosted. Azure Pipelines has many predefined variables; you can find the full list here.
The last step in the YAML definition uses the same folder to expose the artifacts to the UI, or other pipelines or services. In this context, an artifact is the output of a build process.
Note: For historical reasons, the artifact folder contains a subfolder named drop. It is possible to rename it according to your needs.
Let’s save and start the pipeline. Click Save & Run on the top of the page, which will open a side window as in Figure 4.3.
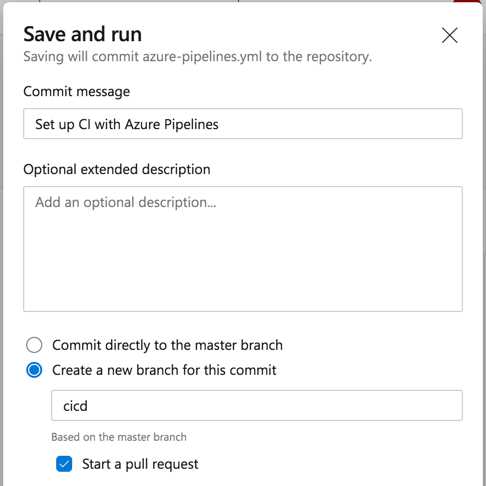
Figure 4.3: Save and run settings
Here you can define the details related to your run, add a new branch (which I always prefer), and create a new pull request. Click Save & Run at the bottom. The build starts executing all the steps defined in the YAML. Once the build is completed, the NuGet packages are available for use (Figure 4.4).
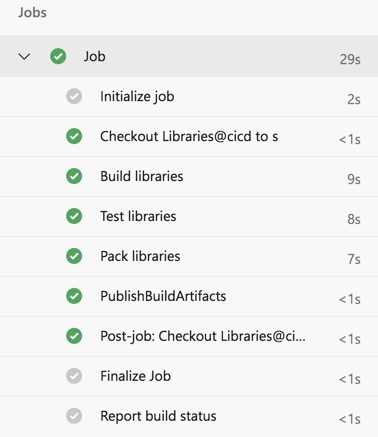
Figure 4.4: Build steps
In the build summary, more specifically in the Related section, there is a link that points to the published artifact (Figure 4.5).
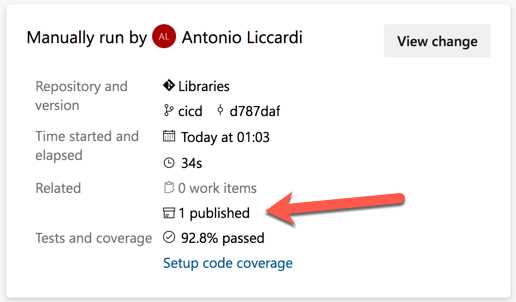
Figure 4.5: The build summary
Click it to open the drop folder, which contains the NuGet packages (Figure 4.6).
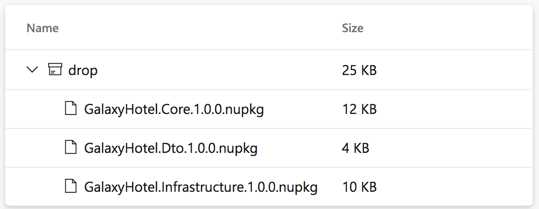
Figure 4.6: The Drop folder
The packages are ready to be deployed.
Deploy a NuGet package
Now that the packages are created, you are ready to deploy them. As explained in Chapter 1, Azure Artifacts allows you to host packages of multiple sources, and makes them available for developers or build pipelines.
Create a package feed
In the Azure Artifacts section, it is possible to create new feeds, depending on what you need to host. By default, a first feed is created during the project creation and has its name.
To create a new feed, click Create Feed and provide the following settings:
- Name.
- Visibility, allowing any member of your organization or just specific users.
- Upstream sources, including packages from common public sources.
- Scope, setting the scope to the current project or the entire organization.
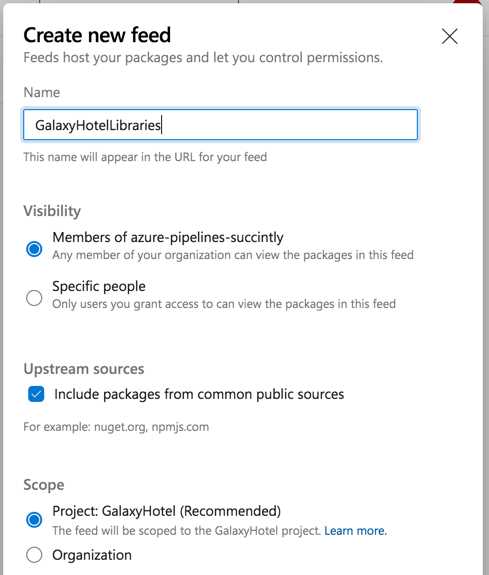
Figure 4.7: Create a new package feed
These settings can also be changed using the Settings wheel on the right side (![]() ), where you can specify the following (Figure 4.8):
), where you can specify the following (Figure 4.8):
- Name
- Description
- Deleted packages options
- Package sharing
- Retention policies
- Permissions
- Views
- Upstream sources
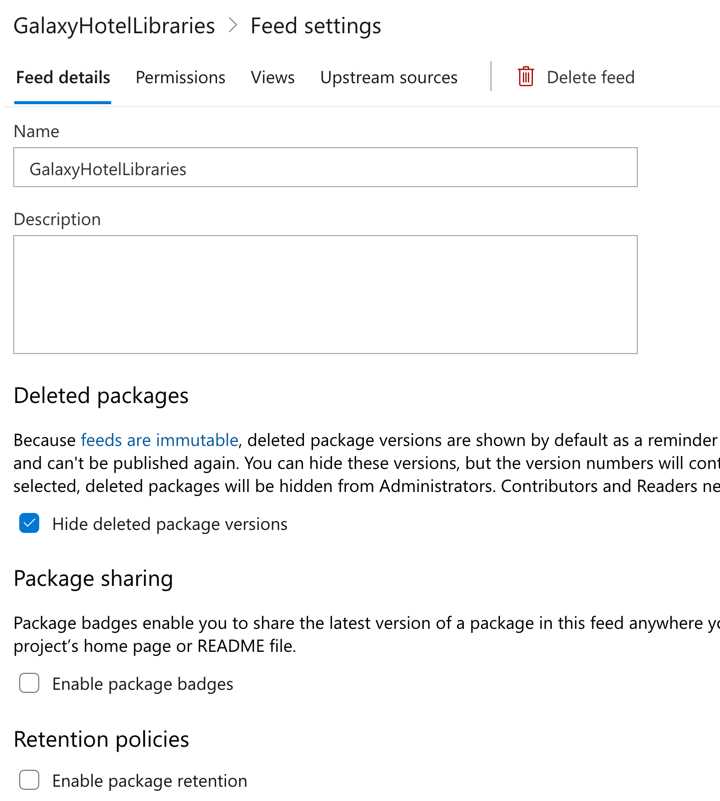
Figure 4.8: Feed settings
Tip: Instead of creating a new feed as explained here, you can also choose to rename the default feed with the name you prefer.
To use the feed, you can follow the instructions in the Connect to feed section, which are very detailed, and are articulated by the tool you are using (Figure 4.9).
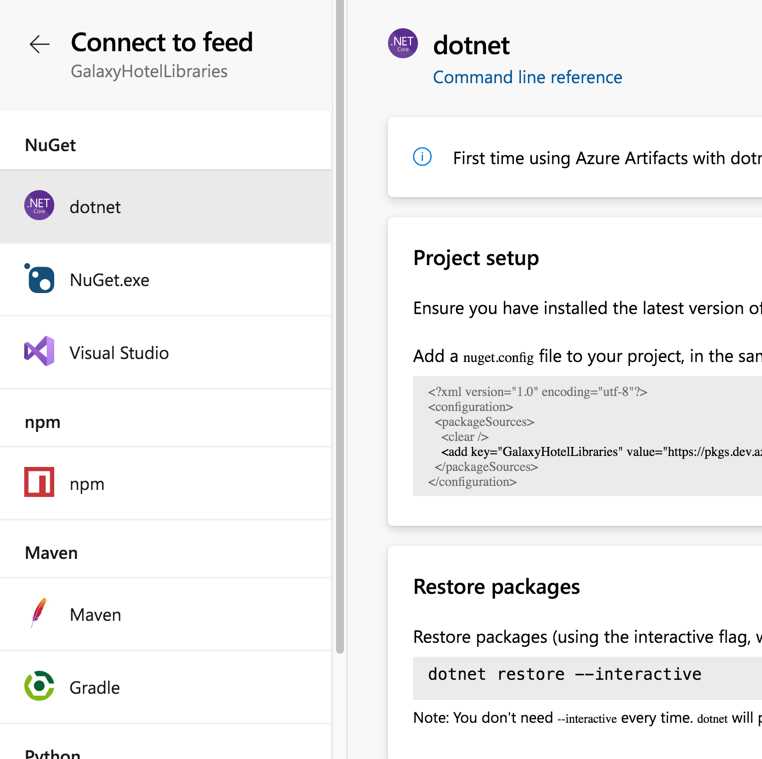
Figure 4.9: Connect to the feed
Deploy the package to the feed
Once the feed is created, you can update your YAML pipeline to deploy the packages. First, remove the Publish build artifacts task in the YAML, because it is not needed anymore. At the same position, with the help of the assistant, add a new .NET Core CLI task, assigning nuget push in the command field. In the Target feed field, select the feed created in the previous step. The task should appear as it does in Figure 4.10.
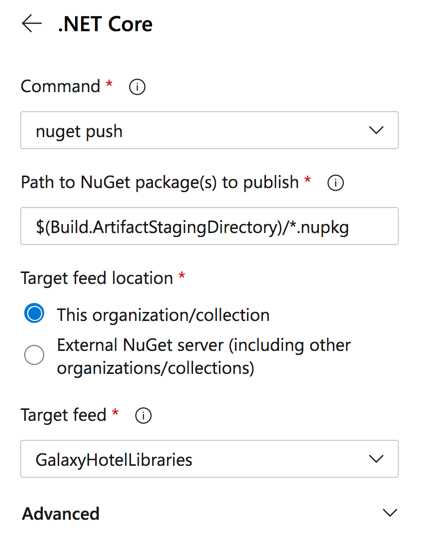
Figure 4.10: Adding the NuGet push task
Click Add, and Azure Pipelines generates the following YAML snippet:
Code Listing 4.2
- task: DotNetCoreCLI@2 displayName: Push libraries inputs: command: 'push' packagesToPush: '$(Build.ArtifactStagingDirectory)/*.nupkg' nuGetFeedType: 'internal' publishVstsFeed: '<feed_guid>' |
Save the pipeline definition and run the build. At completion, check the package deployed on the new feed (Figure 4.11).
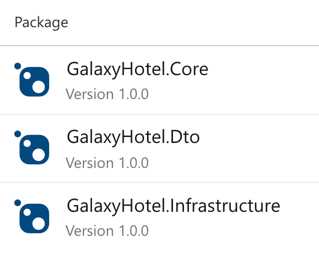
Figure 4.11: Packages deployed during pipeline execution
Now the branch cicd (continuous integration/continuous delivery) has completed its scope and is ready to be merged back on the master branch using the pull request created previously in the Pull Requests section of Azure Repos.
Once the PR is opened, click Complete > Complete Merge.
Versioning NuGet packages manually
You may have noticed that each deployed package has the version number 1.0.0. Where does this number come from? When you create a new package, the nuget pack command will assign a default version number if one is not specified. If you download one of the packages created in the previous paragraph and change the extension from .nupkg to .zip, you should see a .nuspec file that contains all the information related to the package, including the version number.
In many cases though, you need to use a different versioning scheme than the one assigned by default by NuGet. In my experience, the first challenge is defining a versioning strategy. As a matter of fact, without a well-defined strategy, developers could arbitrarily choose a new version number, which usually doesn’t follow the rules. And this can lead to problems!
This is important because it can lead to package immutability and dependency hell. Also, having a well-defined version scheme helps identify releases for bug fixing.
Package immutability
Some package management systems, such as Azure Artifacts, have a strict policy about version numbers: once a package is uploaded, the release number becomes permanently reserved. Immutability is a core concept for packages: it ensures that a specific version of a library stays the same despite the time.
The main problem with updating a package with the same version is the cache. For example, when you retrieve multiple versions of the same package from NuGet, a local cache on your machine speeds up the process of downloading it, but it can use the cached version of the library. Also, consider that the same problem could arise during build execution. You can find more info about this topic here and here.
Dependency hell
The term “dependency hell” identifies a situation where you have multiple versions of a dependency in your code referenced by various projects or dependencies. Figure 4.12 shows an example of how different projects reference different versions of GalaxyHotel.Dto. In the worst-case scenario, your application could not compile or generate an exception during runtime.
Figure 4.12: Dependency hell example
One way to overcome this problem in the .NET platform is the binding redirect feature, where you specify which version your application should use. Another approach consists of using the version ranges feature, where you specify which versions of your dependency are allowed, narrowing problems during compilation or runtime execution. These are some techniques that help solve these problems, but the important thing is to have a process.
Introducing SemVer
SemVer is a set of rules that help version your software. Practically, it is based on an ordered three-number version scheme where each number should be incremented depending on what changes you make in your code. The versioning scheme is based on the pattern MAJOR.MINOR.PATCH, and each number is changed based on these rules:
- Major: Breaking change with the past.
- Minor: Additional features that are compatible with the past.
- Patch: Bug fixes that are compatible with the past.
SemVer also includes a suffix that serves as pre-release and builds metadata. Here’s an example of SemVer version 2.0.0-rc.1+542, where:
- 2.0.0 is the version number.
- rc.1 is the pre-release part.
- 542 is the build metadata.
The second and third bullets are beneficial to handling the dependency hell problem. Indeed, these numbers serve as intermediate versions dedicated to the testing phase of new features. In case of problems, you can change the pre-release and the build metadata part without changing the main version number. SemVer also works well with version ranges, where you can specify which versions of a dependency you want to reference despite being upgraded. All the rules related to the order of the numbers can be found here.
Due to its simplicity, SemVer is wildly adopted to version APIs, components, and software in general, and it’s essential to understand that it is an arrangement between developers (not customers!) defining a standard process to version software.
Assign a version number using the .NET Framework
Both the .NET platform and Azure Pipelines provide many ways to assign a version number.
If you are using the using the .NET Framework (full, not Core), the AssemblyInfo.cs file is the first place to use. This class supplies three attributes to set:
Code Listing 4.3
// Version information for an assembly consists of the following four // values: // // Major Version // Minor Version // Build Number // Revision // // You can specify all the values or you can default the Build and Revision Numbers // by using the '*' as shown below: [assembly: AssemblyVersion("1.0.1.0")] [assembly: AssemblyFileVersion("1.0.1.0")] // Use AssemblyInformationalVersion when you need to specify more info about the version such as the build number, the date, or even the git commit hash: [assembly: AssemblyInformationalVersion("1.0.1.0-efae3b7")] |
As shown in the code listing, there are three possibilities:
- AssemblyVersion: Defines the version of the assembly.
- AssemblyFileVersion: Defines the version for the Win32 file used by the operating system. It is optional, and can be different from the first one (more info available here).
- AssemblyInformationalVersion: Also optional, and can be used to specify a version not only consisting of numbers, but also suffixes, which include metadata such as the build number, the date, or even the git commit hash.
If you are using .NET Core, you can take advantage of the following properties in the project file:
- VersionPrefix (major.minor.patch[.build])
- VersionSuffix (alphanumeric [0-9A-Za-z-]*)
- Version (major.minor.patch[.build][-prerelease])
VersionPrefix and VersionSuffix are usually used together, and let you specify a pair of base version and metadata, such as 0.1.0-beta-2, where the prefix is 0.1.0, and the suffix is beta-2. If the Version field is set in the project file, the prefix and suffix are not considered.
It is also possible to specify the version using the .NET CLI, as in the following snippet:
Code Listing 4.4
// Setting the package version during build dotnet build --configuration Release -p:Version=0.1.0-beta2 // Setting the package version during pack dotnet pack -p:PackageVersion=0.1.0-beta2 // Setting the package version prefix during pack dotnet pack --version-suffix "0.1.0" // Setting the package version suffix during pack dotnet pack --version-suffix "beta-2" |
Visual Studio also provides in the project properties a simple way to manage the version in the Package section (Figure 4.13).
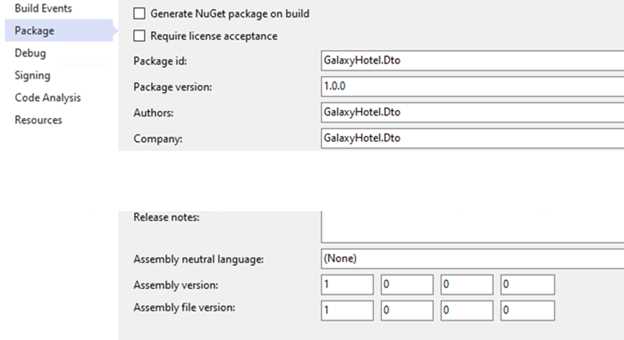
Figure 4.13: Package settings in Visual Studio
Assign a version number using NuGet
Using NuGet, you can assign a version number using the .nuspec file or the NuGet CLI (downloadable here). In the first case, you need to generate a .nuspec file for your project by running the command nuget spec. The result is similar to the following listing, where you can assign a new version value as well as all the package-related info, including the referenced assemblies.
Code Listing 4.5
<?xml version="1.0"?> <package > <metadata> <id>$id$</id> <version>$version$</version> <title>$title$</title> <authors>$author$</authors> <owners>$author$</owners> <licenseUrl>http://LICENSE_URL_HERE_OR_DELETE_THIS_LINE</licenseUrl> <projectUrl>http://PROJECT_URL_HERE_OR_DELETE_THIS_LINE</projectUrl> <iconUrl>http://ICON_URL_HERE_OR_DELETE_THIS_LINE</iconUrl> <requireLicenseAcceptance>false</requireLicenseAcceptance> <description>$description$</description> <releaseNotes>Summary of changes made in this release of the package.</releaseNotes> <copyright>Copyright 2020</copyright> <tags>Tag1 Tag2</tags> <dependencies> <!-- An example of dependency package with a version range --> <dependency id="ExamplePackage" version="[1.4.5,1.6)" /> </dependencies> </metadata> </package> |
Then using the NuGet CLI, you can pass the nuspec as input to create your package: nuget pack <project-name>.nuspec [-IncludeReferencedProjects].
The switch IncludeReferencedProjects will automatically include the referenced assemblies as part of the package.
Assigning a version number with the NuGet CLI is simple, as shown in the following command: nuget pack <project-name>.nuspec -Version 0.1.0
Assign a version number using Azure Pipelines
As you can see in Code Listing 4.1, the pack task contains a property named versioningScheme, which allows you to specify a version number for your package. The available options are:
- Off.
- Use the date and time.
- Use an environmental variable.
- Use the build number.
The third option requires an environmental variable in the build execution (more about this topic in the next chapter). The fourth option requires you to specify the value of the name setting in the YAML pipeline, as shown in Code Listing 4.6.
Code Listing 4.6
# Setting the build number (more info available here) name: $(TeamProject)_$(Build.DefinitionName)_$(SourceBranchName)_$(Date:yyyyMMdd)$(Rev:.r) steps: - script: echo hello world |
In the same task, it is possible to define the specific number using the additional build properties (buildProperties), as seen in Code Listing 4.7.
Code Listing 4.7
# azure-pipelines.yml build definition - task: DotNetCoreCLI@2 displayName: Pack libraries inputs: command: 'pack' packagesToPack: '**/*.csproj' versioningScheme: 'off' buildProperties: 'Version=0.1.0-beta2' |
Versioning NuGet packages during build
As discussed previously, having a versioning strategy helps both during the development and usage of a library. But very often, a versioning scheme is paired with a branching strategy, especially if you are using Git. Having both mechanisms in place helps you to achieve a fully automated build and release process, thanks to a well-defined process. One positive note is that Azure DevOps already includes features and extensions to achieve automation, especially if using SemVer.
Git branching strategies
Branching in Git is a relatively simple process, and for this reason, you can easily apply a workflow in it using branches. In this section, I’m going to explain three common strategies: feature branching, GitFlow, and forking.
Feature branching, sometimes referred to as trunk-based or GitHub flow, is an approach in which all new development is done using a new branch defined as a feature branch. All feature branches start from the main branch, usually the master, and will merge back on it at the end of the feature development. The merging process is based on a pull request (PR) mechanism, in which a developer opens a PR and allows other developers to review the code, give feedback, and suggest changes. The deployment can happen before the merge, helping the test phase, or after the merge, bringing the feature online. It’s sometimes helpful to have a feature toggle mechanism in place, letting users choose when a new feature is enabled. When using this strategy, you can quickly achieve continuous delivery by choosing the right time to deploy or enable a feature, delivering value to the users. You can find a good explanation of GitHub flow here.
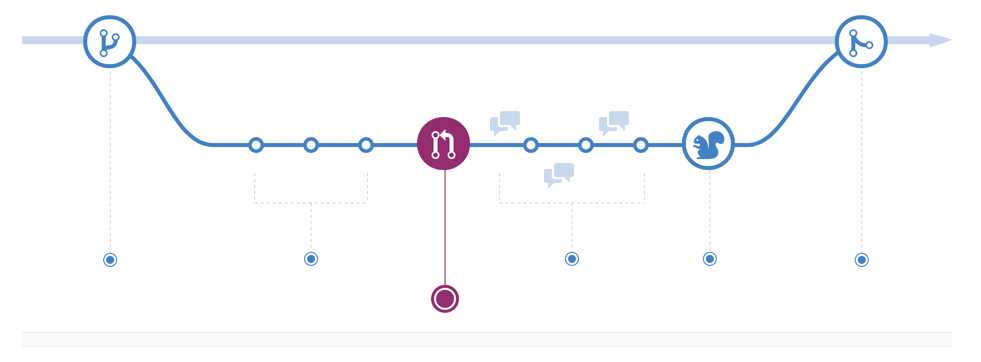
Figure 4.14: GitHub flow workflow
GitFlow is a workflow originally created by Vincent Driessen. It is mainly focused on the concept of release, and it is well suited for collaboration on large projects with release cycles. It shares the feature approach with the previous branching strategy, but increases the number of branches used, giving them meaning.
Development starts from the develop branch, which contains all the new features for the next software release. Feature branches are created from this branch, usually using the feature prefix. When ready to release, a new release branch is opened, and after testing, you can go to production, merging the release branch onto the master branch. But GitFlow also includes branches to manage bugs and hotfixes. These are all types of branches:
- develop
- feature/<feature_branch_name>
- release/<release_branch_name>
- master
- bugfix/<bugfix_branch_name>
- hotfix/<hotfix_branch_name>
- support/<support_branch_name>
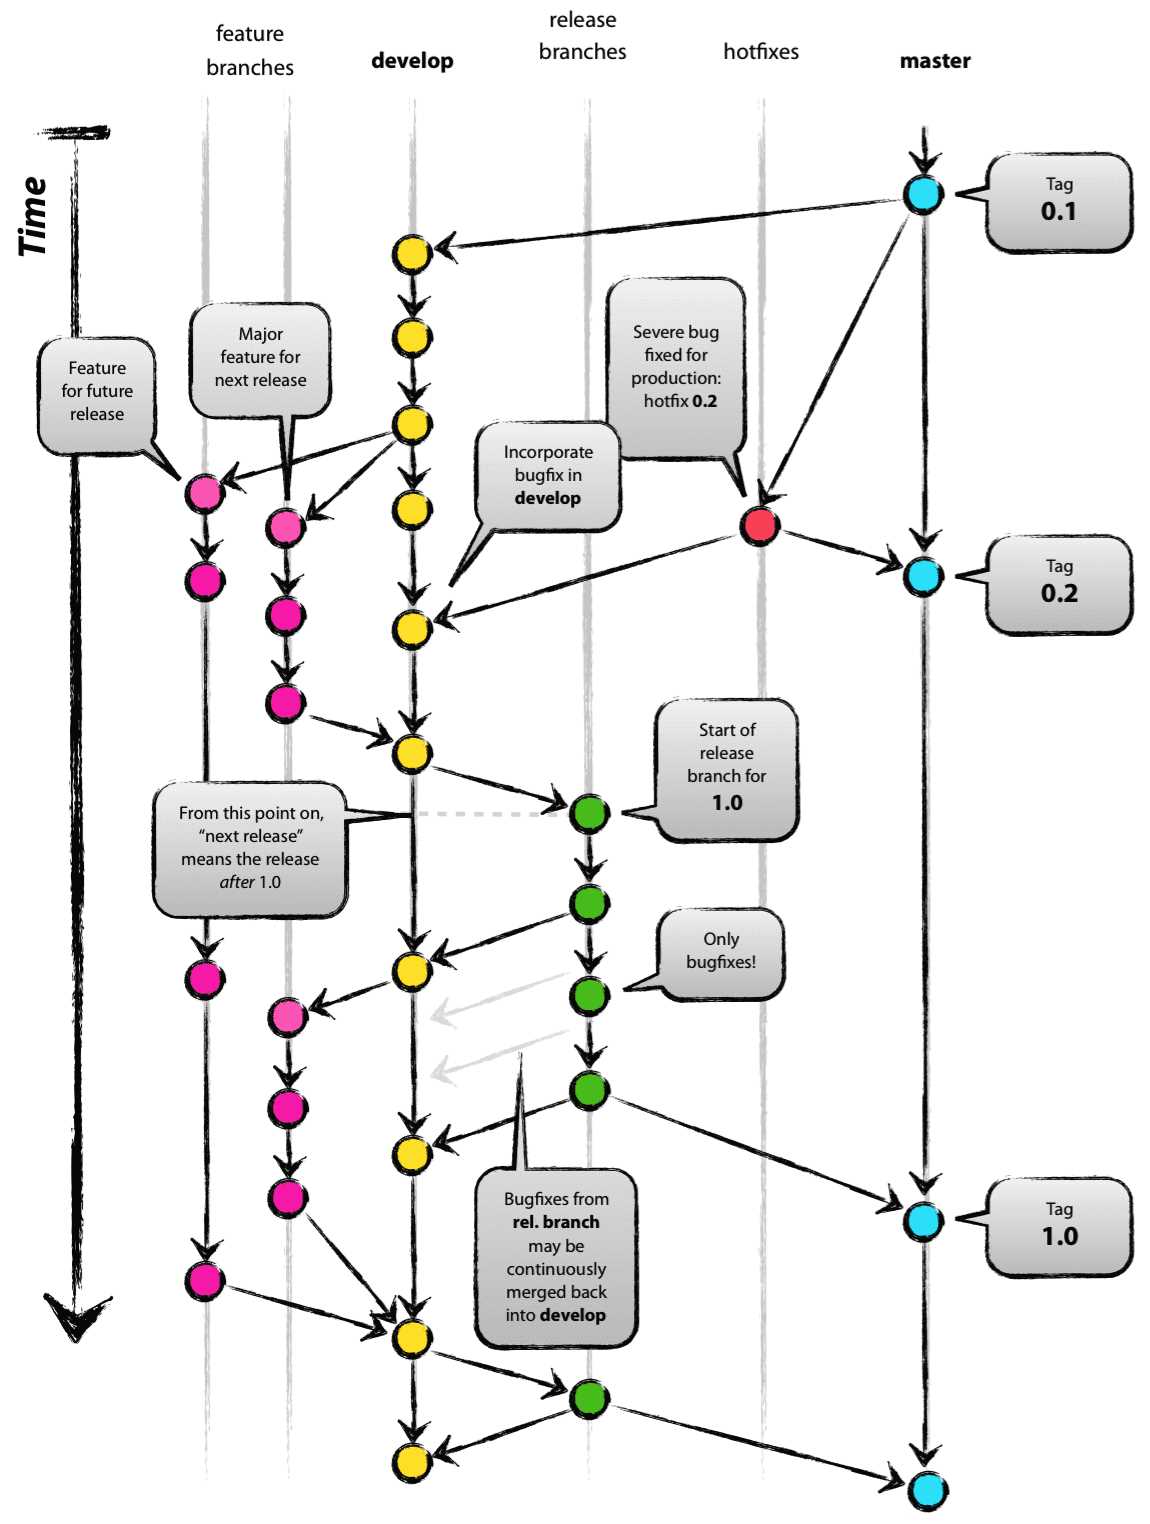
Figure 4.15: GitFlow branching overview
(Source: https://nvie.com/posts/a-successful-git-branching-model/)
Pull requests can also be used in this workflow strategy to review and validate code before merging on the develop or master branch. What is interesting is the git-flow CLI that comes with GitFlow, which helps create and manage (with branching and merging) all the branches listed before. An example of how to use it is available in the next section, and you can find a detailed reference here.
Finally, forking branching is mostly used in open-source projects or in organizations that promote the inner source approach. Developers make a copy of a Git repository they want to contribute to, and all changes are applied to their own repository. At the end of the development, they usually propose to promote their changes to the original repository using a pull request. In Azure Repos, you can fork a repository using the Fork button in the repo page, located in the three-dot menu near the clone button (Figure 4.16).

Figure 4.16: The Fork button
Using git-flow
As explained before, GitFlow provides a toolset to help developers managing branches. Usually, if you have Git for Windows or Visual Studio, there is a good chance that you already have git-flow. You can check by opening a command-line interface (cmd); go to your Libraries repo folder, and type git flow.
Tip: If you are not familiar with the command-line interface, you can download a visual editor such as SourceTree, the GitFlow for Visual Studio extension, or one of the available GitFlow extensions for Visual Studio Code.
Note: In a previous section, you merged the cicd branch to master using a PR. Remember to switch to the master branch locally and pull the new changes from the remote. Also, delete the local cicd branch, as explained here.
The following output should appear:
Code Listing 4.8
C:\azure-pipelines-succinctly\Libraries>git flow usage: git flow <subcommand> Available subcommands are: init Initialize a new git repo with support for the branching model. feature Manage your feature branches. bugfix Manage your bugfix branches. release Manage your release branches. hotfix Manage your hotfix branches. support Manage your support branches. version Show version information. config Manage your git-flow configuration. log Show log deviating from base branch. Try 'git flow <subcommand> help' for details. |
Typing git flow init will start the configuration wizard of GitFlow, asking questions related to the branch naming convention to use.
Code Listing 4.9
C:\azure-pipelines-succinctly\Libraries>git flow init Branch name for "next release" development: [develop] How to name your supporting branch prefixes? Feature branches? [feature/] Bugfix branches? [bugfix/] Release branches? [release/] Hotfix branches? [hotfix/] Support branches? [support/] Version tag prefix? [] Hooks and filters directory? [C:/azure-pipelines-succinctly/Libraries/.git/hooks] |
In this case, I choose default values for my configuration. git-flow saves the newly created configuration in the config file inside the .git folder of your repository.
Note: git-flow configuration is stored on the local machine, and it is not pushed to the remote repository. Each developer should execute the init command to have the same configuration. To share the configuration, you can use a .gitflow file, as explained here.
To create a new feature, you can use the git flow feature start <feature_name> command.
Code Listing 4.10
C:\azure-pipelines-succinctly\Libraries>git flow feature start add-cart-page Switched to a new branch 'feature/add-cart-page' Summary of actions: - A new branch 'feature/add-cart-page' was created, based on 'develop' - You are now on branch 'feature/add-cart-page' Now, start committing on your feature. When done, use: git flow feature finish add-cart-page C:\azure-pipelines-succinctly\Libraries>git branch develop * feature/add-cart-page master |
As shown in the code listing, git-flow creates a new branch with a feature prefix. You are ready to work, and at the end of the feature, the command git flow feature finish will merge the branch back on the develop branch.
Code Listing 4.11
C:\azure-pipelines-succinctly\Libraries>git flow feature finish Switched to branch 'develop' Already up to date. Deleted branch feature/add-cart-page (was 16fafc7). Summary of actions: - The feature branch 'feature/add-cart-page' was merged into 'develop' - Feature branch 'feature/add-cart-page' has been locally deleted - You are now on branch 'develop' |
To create a new release, type the git flow release start 1.0.0 command: here, you are defining the next version number for your product (Code Listing 4.12). Using SemVer, you can easily apply a few rules to determine this number based on which types of features you are using. One question could be: Am I breaking anything with the past, or am I just adding a new feature?
Code Listing 4.12
C:\azure-pipelines-succinctly\Libraries>git flow release start 1.0.0 Switched to a new branch 'release/1.0.0' Summary of actions: - A new branch 'release/1.0.0' was created, based on 'develop' - You are now on branch 'release/1.0.0' Follow-up actions: - Bump the version number now! - Start committing last-minute fixes in preparing your release - When done, run: git flow release finish '1.0.0' |
After completing the testing part, you can close the release and merge on the master branch using the command git flow release finish ‘1.0.0’, and git-flow will save you from doing all the steps in the Summary of actions section:
Code Listing 4.13
Switched to branch 'develop' Already up to date! Merge made by the 'recursive' strategy. Deleted branch release/1.0.0 (was 1f1b758). Summary of actions: - Release branch 'release/1.0.0' has been merged into 'master' - The release was tagged '1.0.0' - Release tag '1.0.0' has been back-merged into 'develop' - Release branch 'release/1.0.0' has been locally deleted - You are now on branch 'develop' |
Note: During the command, you will be asked to add a git tag message.
After the first release is created, you can start opening new features and repeating the cycle again.
In conclusion, having a standard naming convention for branches and giving them a functional meaning provide a significant advantage in terms of automation and versioning, as explained in the next paragraphs.
Using GitVersion
Embracing a standard workflow like GitFlow allows you to leverage GitVersion, a command-line tool that generates a compatible SemVer number for the next release.
GitVersion can be installed on many operating systems and using many options, as explained here. I usually install it using chocolatey, but it depends on the situation.
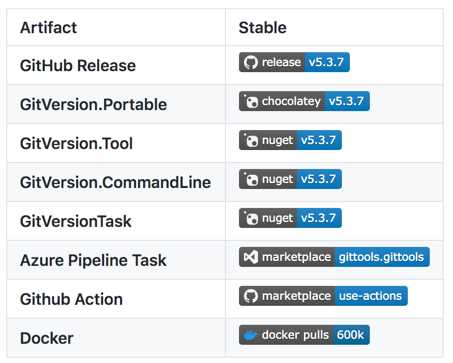
Figure 4.17: GitVersion installation options
Once installed, open the command-line interface, go to the repository folder, and type gitversion. The output should return a JSON payload similar to this:
Code Listing 4.14
C:\azure-pipelines-succinctly\Libraries>gitversion { "Major":1, "Minor":1, "Patch":0, "PreReleaseTag":"alpha.5", "PreReleaseTagWithDash":"-alpha.5", "PreReleaseLabel":"alpha", "PreReleaseNumber":5, "WeightedPreReleaseNumber":5, "BuildMetaData":"", "BuildMetaDataPadded":"", "FullBuildMetaData":"Branch.develop.Sha.09d4a7e4e0a5bcb739adddad84f0cf2b390a63eb", "MajorMinorPatch":"1.1.0", "SemVer":"1.1.0-alpha.5", "LegacySemVer":"1.1.0-alpha5", "LegacySemVerPadded":"1.1.0-alpha0005", "AssemblySemVer":"1.1.0.0", "AssemblySemFileVer":"1.1.0.0", "FullSemVer":"1.1.0-alpha.5", "InformationalVersion":"1.1.0-alpha.5+Branch.develop.Sha.09d4a7e4e0a5bcb739adddad84f0cf2b390a63eb", "BranchName":"develop", "EscapedBranchName":"develop", "Sha":"09d4a7e4e0a5bcb739adddad84f0cf2b390a63eb", "ShortSha":"09d4a7e", "NuGetVersionV2":"1.1.0-alpha0005", "NuGetVersion":"1.1.0-alpha0005", "NuGetPreReleaseTagV2":"alpha0005", "NuGetPreReleaseTag":"alpha0005", "VersionSourceSha":"8ac38e72c45a82fc72092c9c7c5ab7f9c86cb6c5", "CommitsSinceVersionSource":5, "CommitsSinceVersionSourcePadded":"0005", "CommitDate":"2020-07-11" } |
Within this payload, the major, minor, and patch version numbers are available, as well as a fully compatible SemVer value, which you can use to set the next release version of your software. GitVersion also provides a large number of key-value pairs, depending on what number you need to select (such as AssemblyVersion, AssemblyFileVersion, and so on). For example, a NuGetVersion is already available to assign the version number to a NuGet package.
As you may have noticed, I ran the GitVersion command on the develop branch: for this reason, the SemVer value includes the alpha0003 pre-release part. By default, GitVersion generates a specific pre-release part based on which branch the command is executed. Also, the string 0003 is based on the number of commits on the develop branch. These default settings are configurable using the command gitversion init, which starts a wizard that lets you choose which workflow and strategy to use.
Code Listing 4.15
C:\azure-pipelines-succinctly\Libraries>gitversion init GitVersion init will guide you through setting GitVersion up to work for you Which would you like to change? 0) Save changes and exit 1) Exit without saving 2) Run getting started wizard 3) Set next version number 4) Branch specific configuration 5) Branch Increment mode (per commit/after tag) (Current: ) 6) Assembly versioning scheme (Current: ) 7) Setup build scripts > |
Among the options you have:
- A wizard (2) where you can opt to select GitFlow or GitHubFlow workflow, and which increment mode you prefer (continuous delivery or continuous deployment).
- Set next version number (3).
- Configurations related to the branches (4 and 5).
Select option 2 to start the wizard and follow the instructions as seen in Code Listing 4.16.
Code Listing 4.16
The way you will use GitVersion will change a lot based on your branching strategy. What branching strategy will you be using: 1) GitFlow (or similar) 2) GitHubFlow 3) Unsure, tell me more > 1 By default, GitVersion will only increment the version of the 'develop' branch every commit; all other branches will increment when tagged. What do you want the default increment mode to be (can be overridden per branch): 1) Follow SemVer and only increment when a release has been tagged (continuous delivery mode) 2) Increment based on branch config every commit (continuous deployment mode) 3) Each merged branch against master will increment the version (mainline mode) 4) Skip > 1 Questions are all done, you can now edit GitVersion's configuration further |
Back in the main wizard page, you can use option 4 to change the pre-release tag of a specific branch (for example, rc instead of beta for release branches). At the end, option 0 saves the configuration in the GitVersion.yml file, as seen in Code Listing 4.17.
Code Listing 4.17
mode: ContinuousDelivery branches: develop: {} release: tag: rc ignore: sha: [] merge-message-formats: {} |
Commit the file and push it to the remote repository.
Generate version number with GitVersion
Once the configuration is in place, it is possible to integrate GitVersion into the release pipeline created at the beginning of this chapter. GitVersion is available in Azure Pipelines thanks to the community contribution through extensions on the Marketplace.
Going back to Azure DevOps, you need to install the GitTools extension to use GitVersion in Azure Pipelines. Click Get it free to choose the organization, and then click Install. In the end, go to your pipeline and open the editor to edit it and make sure you are on the develop branch, as shown in Figure 4.18.

Figure 4.18: Select the branch that includes the GitVersion.yml file
In the assistant, type GitVersion. You should see two tasks as in Figure 4.19 (if not, the extension is not installed correctly).
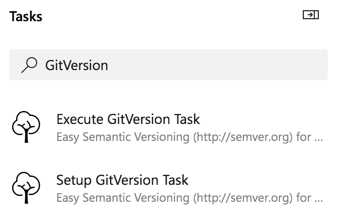
Figure 4.19: GitVersion tasks
Put the cursor just after the steps keyword and before the build task. Select Setup GitVersion Task, set the version as 5.x, and click Add. This task will install GitVersion on the agent that executes the build.
Next, select Execute GitVersion Task, enable the Specify Configuration file flag, and enter GitVersion.yml in the Configuration file box. This task will:
- Generate a new compatible SemVer version number.
- Change the build name with the latest version number.
- Store all key-value pairs of GitVersion JSON payload as variables in the execution context of Azure Pipelines.
There are two additional changes to apply to the pipeline:
- Add the trigger for the develop branch.
- Configure the pack libraries task, setting a versioning scheme linked to the variable GitVersion.NuGetVersion.
Code Listing 4.18 shows the full updated YAML pipeline.
Code Listing 4.18
trigger: - master - develop variables: buildConfiguration: 'Release' steps: - task: gitversion/setup@0 displayName: Install GitVersion inputs: versionSpec: '5.x' - task: gitversion/execute@0 displayName: Generate a new version number inputs: useConfigFile: true configFilePath: 'GitVersion.yml' - task: DotNetCoreCLI@2 displayName: Build libraries inputs: command: 'build' - task: DotNetCoreCLI@2 displayName: Test libraries inputs: command: 'test' - task: DotNetCoreCLI@2 displayName: Pack libraries inputs: command: 'pack' packagesToPack: '**/*.csproj' versioningScheme: 'byEnvVar' versionEnvVar: 'GitVersion.NugetVersion' - task: DotNetCoreCLI@2 displayName: Push libraries inputs: command: 'push' packagesToPush: '$(Build.ArtifactStagingDirectory)/*.nupkg' nuGetFeedType: 'internal' publishVstsFeed: '834230a0-50c2-4971-954a-75eb9e3d47dd/dcb14a3c-e6ab-48df-ac52-3ae79a5055f7' |
Run the pipeline selecting the develop branch, and when it completes, you should see new packages with the version number created by GitVersion (Figure 4.20).
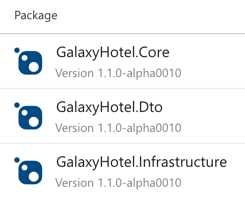
Figure 4.20: GitVersion applied to NuGet packages
With this mechanism in place, Azure Pipelines can directly version our software without us worrying about what the next version number will be. It is a reliable process and mitigates problems related to software versioning.
Feed views in Azure Artifacts
Feed views are a feature of Azure Artifacts that allow you to create release channels for your packages. By default, you have three views:
- @local
- @prerelease
- @release
The @local view is the default, and it contains all packages pushed to the main feed URL, as in the previous paragraphs. @prerelease and @release are two customizable views that can be used to promote packages based on quality. In this case, The @prerelease view is usually used when a package has a pre-release label in its version number. The package is then promoted to the @release view only after its validation, giving it an official release number (for example, 1.0.0 with no pre-release label).
Feed views management is available in the settings of an Azure Artifacts feed, where you can set the name and specify which users can access a specific view. Each view has its own feed URL according to this template:
https://pkgs.dev.azure.com/{yourteamproject}/_packaging/{feedname}@{Viewname}/nuget/v3/index.json
You can promote the package from one view to another, as explained here.
- 1800+ high-performance UI components.
- Includes popular controls such as Grid, Chart, Scheduler, and more.
- 24x5 unlimited support by developers.