
Azure Pipelines Succinctly®

CHAPTER 5
Deploy the GalaxyHotel Website
This chapter explains how to build and deploy the GalaxyHotel website. The website is built using ASP.NET Core and uses the libraries released in the previous chapter on the NuGet feed. The source code is hosted on a separate repository than the libraries' project, and the branching workflow used is feature branching.
The application is hosted on Azure App Service on multiple instances: Dev, QA, and Prod. For this reason, the deployment uses the multistage pipeline approach, which is based on YAML, and promotes new features to different staging environments. It is also possible to control the flow using triggers, conditions, and approvals among stages.
Note: To complete the examples in this chapter, you need an active Azure subscription. You can start for free with limited credit on this page.
Build the GalaxyHotel website solution
To build the application, you have to create a new build pipeline. The steps are similar to the build process designed in the previous chapter. In the Pipeline section, click New Pipelines, select the Azure Repos Git (YAML) option, and provide the repository. From the list of templates, select ASP.NET Core, which opens the editor where you can remove the build task already present. To compile the application correctly, follow the next steps.
Using the assistant, add a dotnet task as the first task of the pipeline to restore the solution packages. In the Command option, select restore. Then, in the Use packages from this Azure Artifacts/TFS feed option, select the GalaxyHotelLibraries feed, as seen in Figure 5.1, to restore all the libraries (NuGet.org and yours).
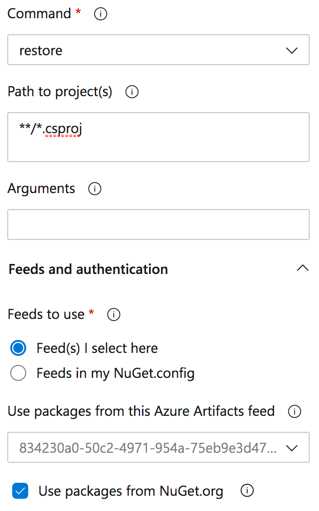
Figure 5.1: Restore packages from an Azure Artifacts feed
Then, add three more dotnet tasks: build, test, and publish. These are configured in the following Code Listing (5.1).
Code Listing 5.1
trigger: - master pool: vmImage: 'windows-latest' variables: buildConfiguration: 'Release' steps: - task: DotNetCoreCLI@2 displayName: Restore packages inputs: command: 'restore' feedsToUse: 'select' vstsFeed: '834230a0-50c2-4971-954a-75eb9e3d47dd/dcb14a3c-e6ab-48df-ac52-3ae79a5055f7' - task: DotNetCoreCLI@2 displayName: Build the website inputs: command: 'build' projects: '**/*.csproj' - task: DotNetCoreCLI@2 displayName: Run tests inputs: command: 'test' projects: 'tests/**/*.csproj;!tests/**/*UITests*.csproj' - task: DotNetCoreCLI@2 displayName: Publish the website inputs: command: 'publish' publishWebProjects: true arguments: '--output $(Build.ArtifactStagingDirectory)' |
Save the pipeline in a proper branch, run it, and check that everything works fine.
YAML template
Sometimes it is useful to have a snippet of YAML pipeline ready to use. Templates allow you to create reusable YAML code that can be referenced into a pipeline. More specifically, Azure Pipelines has two types of templates:
- template reference (also named includes): Includes external YAML content in the pipeline, easing the reusability.
- extends: Controls the flow in a pipeline, permitting only specific tasks or operations.
The syntax for both templates is shown in the following code listing.
Code Listing 5.2
# includes steps: [ templateReference ] parameters: key: value # extends extends: template: [ templateReference ] parameters: key: value |
Code Listing 5.3 shows how to secure your pipeline using extends, allowing any task except the script one.
# template.yml parameters: - name: pipelineSteps type: stepList default: [] steps: - ${{ each pipelineStep in parameters.pipelineSteps }}: - ${{ each pair in pipelineStep }}: ${{ if ne(pair.key, 'script') }}: ${{ pair.key }}: ${{ pair.value }} # azure-pipelines.yml extends: template: template.yml parameters: pipelineSteps: - task: FirstTask@1 - script: this task will be skipped! - task: SecondTask@2 |
Tip: More information about securing a pipeline using extends is available here.
If you want to reuse the logic to build, test, and publish a web application in many pipelines, the GalaxyHotel website pipeline can be modified using a template reference. In large companies, templates are usually stored in a dedicated repository to version all templates. For simplicity, in this book, templates are stored in the application repository and eventually duplicated where they are needed.
Code Listing 5.4 shows the template for the build process.
# build-website.yml parameters: - name: librariesFeed displayName: 'Restore from Libraries NuGet feed' type: boolean default: true - name: enablePublish displayName: 'Enable publish' type: boolean default: true - name: publishArgs displayName: 'Publish Arguments' type: string default: '' steps: - ${{ if eq(parameters.librariesFeed, true) }}: - task: DotNetCoreCLI@2 displayName: Restore packages inputs: command: 'restore' feedsToUse: 'select' vstsFeed: '834230a0-50c2-4971-954a-75eb9e3d47dd/dcb14a3c-e6ab-48df-ac52-3ae79a5055f7' - task: DotNetCoreCLI@2 displayName: Build the website inputs: command: 'build' projects: '**/*.csproj' - task: DotNetCoreCLI@2 displayName: Run tests inputs: command: 'test' projects: 'tests/**/*.csproj;!tests/**/*UITests*.csproj' - ${{ if eq(parameters.enablePublish, true) }}: - task: DotNetCoreCLI@2 displayName: Publish the website inputs: command: 'publish' publishWebProjects: true arguments: ${{ parameters.publishArgs }} |
The parameters section allows the template to receive values from the pipeline in which it is used. In this scenario, the template can be used when you want to build and test the application, or when you want to publish it.
Finally, Code Listing 5.5 shows how to reference and pass parameters to the template.
Code Listing 5.5
# azure-pipelines.yml trigger: - master pool: vmImage: 'windows-latest' variables: buildConfiguration: 'Release' steps: - template: build-website.yml parameters: publishArgs: '--output $(Build.ArtifactStagingDirectory)' |
Run the build and check that everything works correctly using the template.
Deploy to the dev environment
At the beginning of this chapter, I mentioned that a multistage pipeline helps deploy an application to multiple environments. Although this feature has only recently been included in Azure Pipelines, it is becoming the primary choice when you want to deploy an application to various stages. It even includes features like approvals, checks, deployment strategies, and detailed history information for auditing. Plus, you can write the entire release pipeline in YAML, containing both build and deploy for specific environments. The pipeline can be versioned in the same repository as your application, and thanks to templates, you can also create reusable components for your deployments.
To deploy the artifact created in the previous section using the multistage pipeline, the build process in azure-pipeline.yml must change. Indeed, instead of defining steps, you should define stages. A stage is just a group of jobs that have the same target, such as Build or Deploy, and has the following syntax:
Code Listing 5.6
stages: - stage: Build jobs: - job: BuildJob steps: - script: echo this is the build stage. - stage: Deploy jobs: - job: DeployJob steps: - script: echo this is the deploy stage. |
You can check out the full stage syntax here. Azure Pipelines also provides a special type of job named Deployment Job, which can be used when deploying an artifact. It offers a few benefits, such as:
- Deployment history: A detailed history of the pipelines for auditing.
- Deployment strategy: The way the artifact is deployed. At the time of writing, the available strategies are runOnce, rolling, and canary.
Deployment strategies are useful for facilitating the deployment phase, exposing the following lifecycle hooks: predeploy, deploy, routeTraffic, postRouteTraffic, on failure, and on success. The different strategies work as follows:
- runOnce executes hooks once.
- rolling updates the software version, replacing the current version with a newer one on a rolling set (a set of machines). It performs hooks on each machine where you can check if any deployment has failed, stopping deployment and starting a rollback phase using failure or success.
- canary lets you gradually deploy your changes to a small subset of resources based on the increment value. You can only use the canary deployment strategy for Kubernetes resources.
An example of deployment strategy syntax is available here.
Back to the GalaxyHotel project: the artifact will be deployed on an Azure App Service, and the YAML in Code Listing 5.3 should be modified to introduce stages. But before seeing the code, a target environment must be created.
Environments
Recently, Azure Pipelines introduced the concept of environment, which is a set of resources to use as a target for your deployment. At the time of writing, only two resources are available: Kubernetes clusters and virtual machines. An environment can be defined using the appropriate entry in the sidebar (Figure 5.2) and the New Environment button.
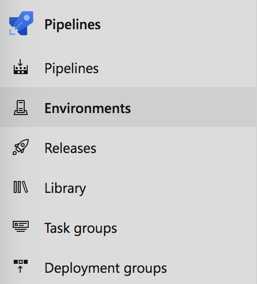
Figure 5.2: Environments section
A few advantages of environments are:
- Detailed history including information from multiple pipelines for related deployment (such as in microservices scenarios).
- Commits and work items deployed.
- Users and pipelines permissions to access a specific environment.
- Approvals and checks.
- Health information about resources.
To create a new environment, click New Environment and specify the following information (Figure 5.3):
- Name
- Description
- Resource Type (None, Kubernetes, or Virtual machines)
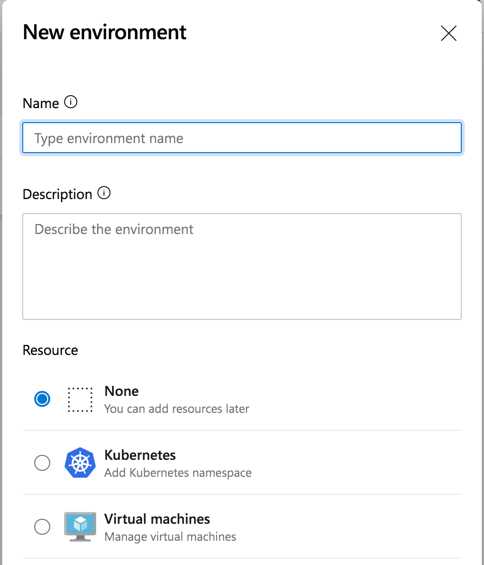
Figure 5.3: New environment creation popup
A fascinating concept is the none value: an environment can have no resources associated, but you can leverage the advantages listed earlier.
The GalaxyHotel application is deployed to three different environments: GalaxyHotel-Dev, GalaxyHotel-QA, and GalaxyHotel-Prod. These are not linked to a resource, and you can create them before changing the YAML pipeline (Figure 5.4).
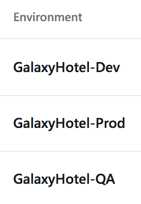
Figure 5.4: GalaxyHotel environments
Note: If an environment with a specified name is not found when a pipeline is run, the environment is automatically created.
It’s time to update the YAML code.
Using stages in a YAML pipeline
The following shows a modified version of the YAML pipeline introduced in Code Listing 5.4, now with stages and environments.
Code Listing 5.7
# azure-pipelines.yml trigger: - master pool: vmImage: 'windows-latest' variables: buildConfiguration: 'Release' stages: - stage: build displayName: Build jobs: - job: Build steps: - template: build-website.yml parameters: publishArgs: '--output $(Build.ArtifactStagingDirectory)' - task: PublishPipelineArtifact@1 inputs: targetPath: '$(Build.ArtifactStagingDirectory)' artifact: 'web' publishLocation: 'pipeline' - stage: deployDev displayName: Deploy to Dev jobs: - deployment: deployDev displayName: Deploy To Dev environment: 'GalaxyHotel-Dev' strategy: runOnce: deploy: steps: - task: AzureRmWebAppDeployment@4 inputs: ConnectionType: 'AzureRM' azureSubscription: 'Microsoft Azure Sponsorship' appType: 'webApp' WebAppName: 'galaxyhotel-dev' packageForLinux: '$(Pipeline.Workspace)/web/**/*.zip' |
There are two stages in the pipeline: build and deployDev. The build section is similar to Code Listing 5.3, but now it is included in a stage. The deployment part is a deployment job with a runOnce strategy, and it is linked to the environment created earlier. The artifact is retrieved using the Pipeline.Workspace variable, and it is deployed using an Azure App Service deploy (AzureRmWebAppDeployment@4) task on an Azure App Service.
To create a web app in an Azure App Service in a previously activated Azure subscription, you can follow this guide. If the account used for the Azure subscription is the same in Azure DevOps, there is a good chance that the subscription is already listed in the Azure App Service deploy task (Figure 5.5).

Figure 5.5: Azure App Service deploy settings
If it’s not visible, you should use these steps to create a service connection, which is the way Azure DevOps connects to external services such as Microsoft Azure. Once connected, you can use it in your pipeline.
After that, you can save and run the pipeline. The first difference is visible in the Run Pipeline popup page, where the Advanced options contain two more settings: Stage to run and Resource. These help you override default settings at runtime. Also, when the pipeline starts, the summary page is different from the one seen in Figure 2.6: it shows both stages and jobs, as you can see in Figure 5.6.
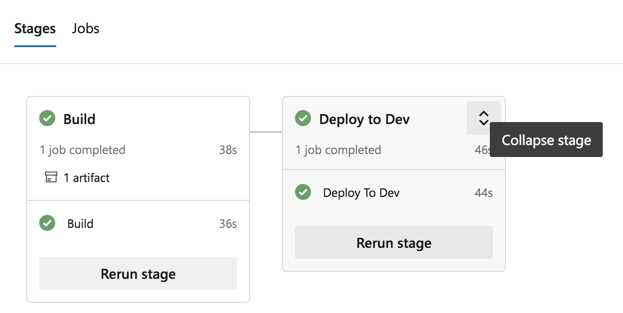
Figure 5.6: Multistage pipeline summary page
Each box in the figure is related to a stage, and by clicking Expand stage or Collapse stage, you can show or hide information regarding the artifact (build stage) or all the jobs executed. Clicking the boxes opens the jobs detail page, where all steps and logs are collected (Figure 5.7).

Figure 5.7: Multistage pipeline jobs details
As explained before, environments provide a set of information regarding pipeline execution. If you open the section, it shows details about the last execution (Figure 5.8).
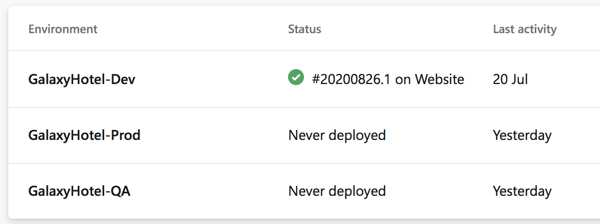
Figure 5.8: Pipeline execution in Environment page
Entering the environment details gives you the list of deployments (Figure 5.9). By clicking on each deployment, you can get insight into jobs, changes (or commits), and related work items (Figure 5.10).
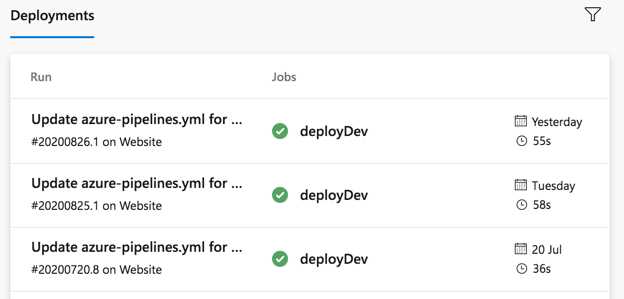
Figure 5.9: Deployments of an environment
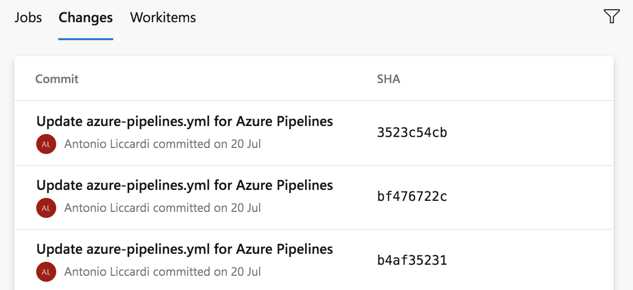
Figure 5.10: Changes in an environment deployment
Deploy to the QA environment
When ready, the artifact can be deployed to the QA environment with the same development process. In contrast to this environment, QA usually involves a manual or automatic testing phase. The manual testing can be done by testers using test plans and test cases. In this context, Azure Test Plans comes to our aid with a central place to trace everything (an example can be found here).
Automatic testing has lots of advantages because tests are repeatable and (often) faster than humans. But they have to be planned and implemented before integrating them in a pipeline, strongly depending on the type of tests to execute (UI, contract, and so on).
In either case, when deploying to QA, hosting environments should be prepared. For example, databases need to be filled with sample data or resources to be cleaned. Also, in this case, Azure Pipelines comes in handy thanks to a collection of tasks to achieve this scope.
Publish SQL script and UI tests artifacts
The GalaxyHotel solution includes a SQL script in the db folder to seed the database to execute the test in the QA environment. Moreover, UI tests written using Selenium are also available in a project of the same solution and must be copied on a VM provisioned to execute these tests. To make these components available in the QA stage, you should add in the build stage of the pipeline two more artifacts, as in the following code listing.
Code Listing 5.8
# azure-pipelines.yml ... - job: Build steps: - template: build-website.yml parameters: publishArgs: '--output $(Build.ArtifactStagingDirectory)' - task: PublishPipelineArtifact@1 displayName: Publish UI Tests artifacts inputs: targetPath: '$(Build.Repository.LocalPath)/tests/GalaxyHotel.UITests' artifact: 'UITests' publishLocation: 'pipeline' - task: PublishPipelineArtifact@1 displayName: Publish db artifacts inputs: targetPath: '$(Build.Repository.LocalPath)/db' artifact: 'db' publishLocation: 'pipeline' - task: PublishPipelineArtifact@1 inputs: targetPath: '$(Build.ArtifactStagingDirectory)' artifact: 'web' publishLocation: 'pipeline' ... |
After the build stage execution, there should be three artifacts (Figure 5.11).
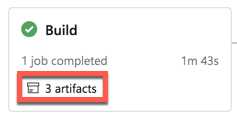
Figure 5.11: Multiple artifacts as build output
Prepare the GalaxyHotel-QA environment
Selenium is a robust framework for creating repeatable UI tests. It has drivers related to most common browsers and even a tool, the Selenium IDE, to record tests using a user interface.
The GalaxyHotel.UITests project contains UI tests based on Selenium to check GalaxyHotel website features. Thanks to the Selenium.WebDriver NuGet package, it is possible to reproduce a user’s steps during their navigation on the website. It is straightforward to use, and the documentation provided is thorough. Code Listing 5.9 shows an example of a UI test written in C# using the Selenium driver.
Code Listing 5.9
[TestMethod] [TestCategory("Chrome")] public void BookARoomAndCheckForConfirmationTest() { webDriver.Navigate().GoToUrl(baseUrl); webDriver.FindElement(By.LinkText("Book")).Click(); var bookingConfirmationText = webDriver .FindElement(By.XPath("//h1")).Text; Assert.AreEqual("Room booked!", bookingConfirmationText); } |
In this example, a browser is opened to navigate to the GalaxyHotel page, find the Book button, click it, and then check if the booking confirmation page is opened.
During the QA stage, these tests have a few requirements that the Azure Pipelines agents cannot satisfy: they need to be executed on an agent that has a Chrome browser and the dotnet framework installed.
Note: There are a few experiments done by the dev community using Docker and Chrome in headless mode, such as the one found here.
To run the UI tests, you should add a virtual machine with the requirements listed earlier to the GalaxyHotel-QA environment. Go to the environment section in Azure Pipelines, click Add Resource, and select Virtual Machine as the resource type (Figure 5.12).
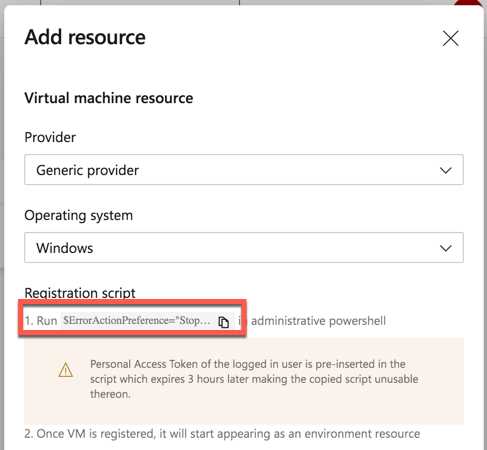
Figure 5.12: Adding a virtual machine
The Add resource popup contains the registration script for the provider and the operating system chosen. This script should be executed on the target virtual machine using an administrative PowerShell console, which asks for information such as the user account for the agent service and a list of tags (such as qa). After the execution, the environment page shows the linked resource (Figure 5.13).
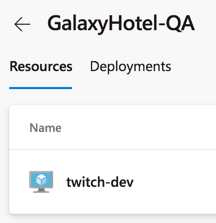
Figure 5.13: A resource linked to an environment
The environment is ready to execute automated tests.
Deploy to the QA environment and run tests
The QA stage is a bit different from the dev one. The YAML pipeline in Code Listing 5.10 is organized to:
- Clean and fill the SQL Azure database.
- Deploy the website on the Azure App Service designed for QA.
- Run the automated UI tests from the VM linked to the environment.
Code Listing 5.10
- stage: deployQA displayName: Deploy to QA jobs: - deployment: deployQAWebsite displayName: Deploy Website to QA environment: 'GalaxyHotel-QA' strategy: runOnce: deploy: steps: - task: SqlAzureDacpacDeployment@1 displayName: Prepare the database inputs: azureSubscription: 'Microsoft Azure Sponsorship' AuthenticationType: 'server' ServerName: 'succinctly.database.windows.net' DatabaseName: 'galaxyhotel-qa' SqlUsername: '$(sqlAdmin)' SqlPassword: '$(sqlPassword)' deployType: 'SqlTask' SqlFile: '$(Pipeline.Workspace)/db/SeedGalaxyHotelDbScript.sql' IpDetectionMethod: 'AutoDetect' - task: AzureRmWebAppDeployment@4 displayName: Deploy website inputs: ConnectionType: 'AzureRM' azureSubscription: 'Microsoft Azure Sponsorship' appType: 'webApp' WebAppName: 'galaxyhotel-qa' packageForLinux: '$(Pipeline.Workspace)/web/**/*.zip' - deployment: runQATests displayName: Run QA Tests dependsOn: deployQAWebsite environment: name: 'GalaxyHotel-QA' resourceType: VirtualMachine tags: qa strategy: runOnce: deploy: steps: - task: PowerShell@2 displayName: Override TestRunParameters inputs: targetType: 'inline' script: | [xml]$doc = Get-Content $(Pipeline.Workspace)/UITests/GalaxyHotelTests.runsettings $doc.RunSettings.TestRunParameters.ChildNodes.Item(0).value = '$(qaBaseUrl)' $doc.Save("$(Pipeline.Workspace)/UITests/GalaxyHotelTests.runsettings") - task: DotNetCoreCLI@2 displayName: Execute UI Tests with Selenium inputs: command: 'test' projects: '$(Pipeline.Workspace)/UITests/**/*.csproj' arguments: '--settings $(Pipeline.Workspace)/UITests/GalaxyHotelTests.runsettings' |
The stage has two deployment jobs: one to prepare the database and the website, and one to execute tests on the VM, which depends on the first one (dependsOn).
In the Prepare the database step, the db artifact published earlier is used to retrieve the SQL script to fill the database. The script is executed using a SqlAzureDacpacDeployment@1 task, which requires the database info and the location of the script. Because the username and the password are sensitive information, you should not include them in a pipeline, especially if it is versioned into a repository (this is one of the main principles of the DevSecOps culture).
For this reason, the pipeline has two variables: $(sqlAdmin) and $(sqlPassword), created using the Variables button on top of the pipeline editor (Figure 5.14). Variables can be marked as secret to avoid security problems during pipeline management or execution.
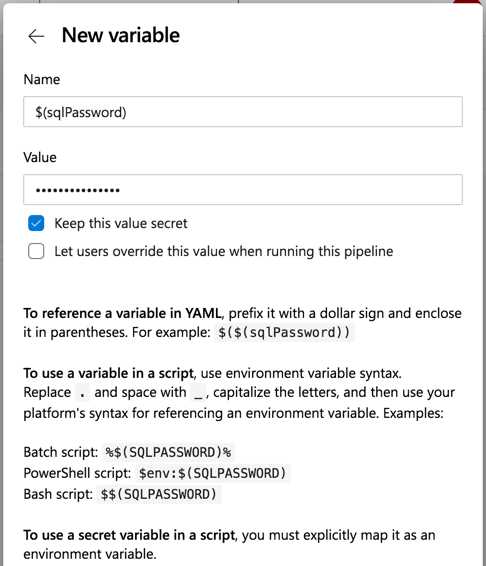
Figure 5.14: Creating a secret variable for the pipeline
The runQATests deployment job is linked to the GalaxyHotel-QA environment and uses the VM prepared for the tests by specifying:
- The resourceType parameter, set as VirtualMachine.
- The tags parameter, set as qa.
With these parameters in place, all the steps in the job are executed on the VM. During the execution, the UITests artifact is copied to the VM in the folder assigned to the agent in the provisioning phase (the PowerShell script executed earlier). In my case, the agent folder is located at C:\azagent\A4, and it has a few subfolders, such as _work, which contains the artifact during the pipeline execution (Figure 5.15). These folders have different scopes: for example, a is the Build.ArtifactStagingDirectory, and s is the Build.SourcesDirectory.
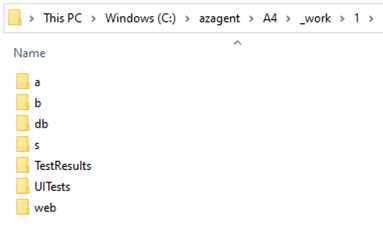
Figure 5.15: An Azure DevOps agent folder
In this folder, you can also see all three artifacts published by the build steps. If you don’t want to download them all, you can opt to add in the YAML a download: none step, and then use a Download Pipeline Artifact task to retrieve the artifact for the current stage (Code Listing 5.11).
Code Listing 5.11
# azure-pipelines.yml ... steps: - download: none - task: DownloadPipelineArtifact@2 inputs: buildType: 'current' artifactName: 'UITests' targetPath: '$(Pipeline.Workspace)' - task: PowerShell@2 ... |
Now, there are three steps in the deployQA stage:
- Download UITests artifact, which was explained earlier.
- Override TestRunParameters, which is a PowerShell script that overrides the configuration in the GalaxyHotelTests.runsettings file. The runsettings file is a common way in the .NET Framework to pass parameters during test execution. The script will read the content of the file, and using an XPath expression, will replace the value of the baseUrl.
- Execute UI Tests with Selenium, which takes the GalaxyHotelTests.runsettings file as input and executes UI tests using the dotnet test command (tests are written using Selenium).
During the pipeline execution, the GalaxyHotelTests.runsettings file will contain the baseUrl of the QA website (Code Listing 5.12).
Code Listing 5.12
<?xml version="1.0" encoding="utf-8"?> <RunSettings> <TestRunParameters> <Parameter name="baseUrl" value="https://galaxyhotel-qa.azurewebsites.net" /> </TestRunParameters> </RunSettings> |
Save the pipeline to start it, and you can observe what happens in the detail page (Figure 5.16).
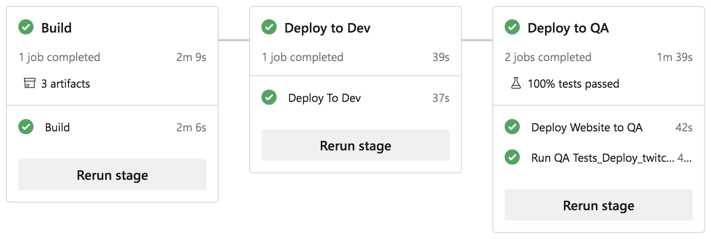
Figure 5.16: Run tests in the QA environment
The Tests tab on this page provides insight into the test run (Figure 5.17).
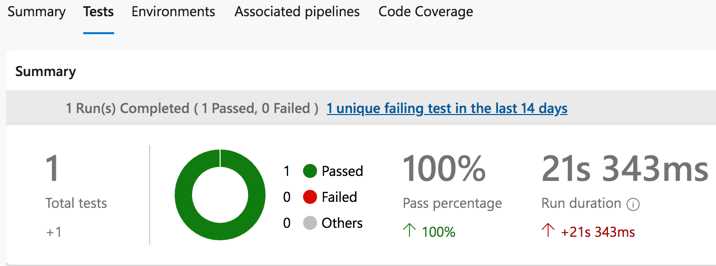
Figure 5.17: UI test run detail
Also, the logs of the test execution are available in the Jobs detail page.
Note: During the UI test execution on the virtual machine, a real instance of the Chrome browser opens and simulates the user steps.
The Environments tab shows pipeline details divided into stages (Figure 5.18).
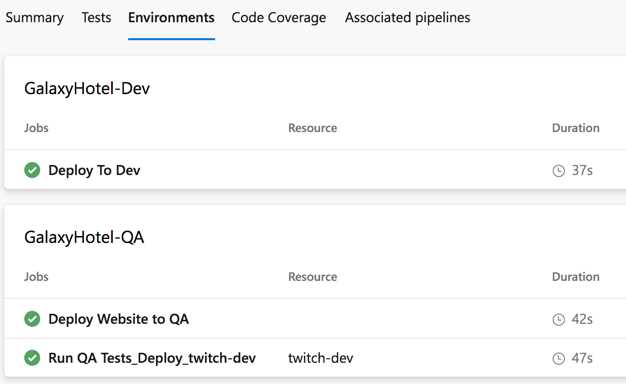
Figure 5.18: Environments impacted by the pipeline execution
It is interesting that in the QA stage, two different agents are used to deploy and test the software. Indeed, the concepts explored in this section can be applied to a lot of scenarios involving multiple deploys or actions in the same environment stage.
Enable approvals for QA environment
There is just one problem in the pipeline: deployment to the QA environment starts right after the dev one. But in the real world, QA deployment is usually done after developers have tested and approved their changes in the environment. For this reason, the deployment should be approved before being executed using Approvals and checks.
To enable them, open the GalaxyHotel-QA environment page, click the More actions button (![]() ), and select the Approvals and checks option. Click the plus button, and a popup window opens, which contains all the types of checks you can apply to an environment (Figure 5.19).
), and select the Approvals and checks option. Click the plus button, and a popup window opens, which contains all the types of checks you can apply to an environment (Figure 5.19).
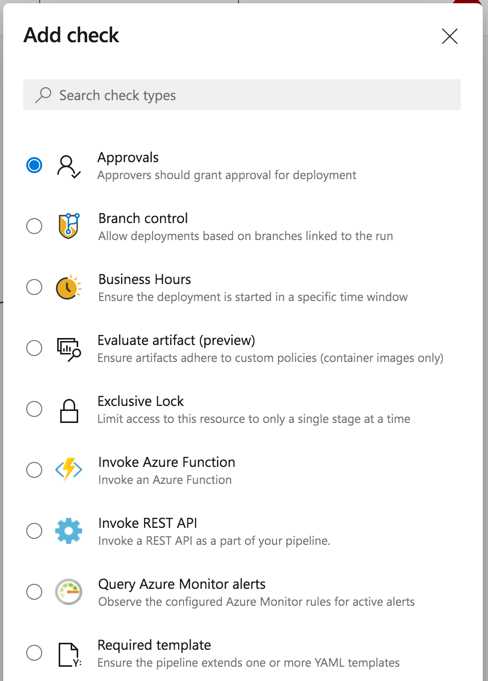
Figure 5.19: Approvals and checks list
The list provides a good number of items for the most common scenarios. For example, you can check for the branch related to the pipeline, the time of the deployment, or an alert on a monitoring system such as Azure Monitor. You can even invoke an Azure Function or a REST API. The result of the check controls the deployment started in a specific environment.
To add an approval for the GalaxyHotel-QA environment, select the first item and click Next. The popup lets you choose the approvers and set a few options as in Figure 5.20.
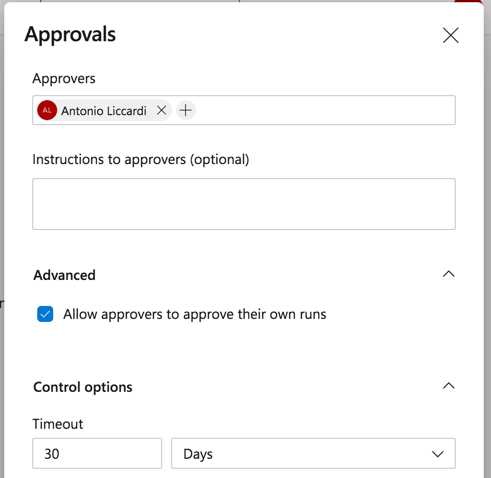
Figure 5.20: Adding an approver to an environment
Now, when you run the pipeline, an approver must approve the deployment. This is pointed out in the details page related to a run where the approval for a stage is marked with the Waiting label (Figure 5.21). To approve or reject the deployment, click Review, and then click Approve or Reject (Figure 5.22).
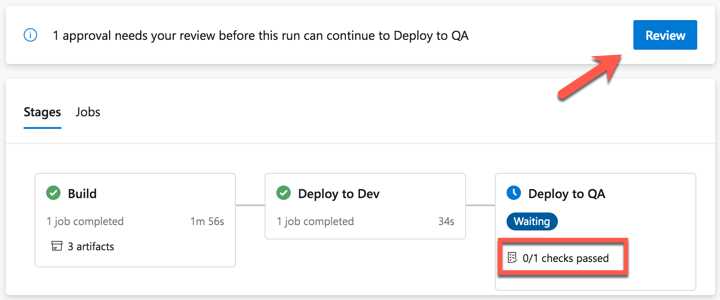
Figure 5.21: Deployment waiting for an environment approval
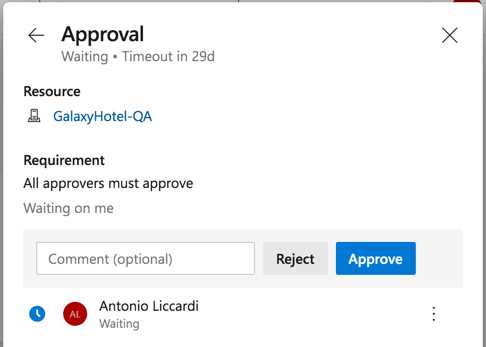
Figure 5.22: Environment approval page
Once approved, the deployment continues.
Note: If you start multiple runs of the same pipeline containing an approval, the newer one will wait for the approval or rejection of the first one.
Deploy to production environment
The last step to complete the pipeline is the deployment to the production environment. The YAML is similar to the deployDev stage. An approval is also set for the GalaxyHotel-Prod environment to decide when the software goes to production.
For the sake of completeness, Code Listing 5.13 presents the full pipeline for the GalaxyHotel website, including the production environment.
Code Listing 5.13
trigger: - master pool: vmImage: 'windows-latest' variables: buildConfiguration: 'Release' stages: - stage: build displayName: Build jobs: - job: Build steps: - template: build-website.yml parameters: publishArgs: '--output $(Build.ArtifactStagingDirectory)' - task: PublishPipelineArtifact@1 displayName: Publish UI Tests artifacts inputs: targetPath: '$(Build.Repository.LocalPath)/tests/GalaxyHotel.UITests' artifact: 'UITests' publishLocation: 'pipeline' - task: PublishPipelineArtifact@1 displayName: Publish db artifacts inputs: targetPath: '$(Build.Repository.LocalPath)/db' artifact: 'db' publishLocation: 'pipeline' - task: PublishPipelineArtifact@1 displayName: Publish web artifacts inputs: targetPath: '$(Build.ArtifactStagingDirectory)' artifact: 'web' publishLocation: 'pipeline' - stage: deployDev displayName: Deploy to Dev jobs: - deployment: deployDev displayName: Deploy To Dev environment: 'GalaxyHotel-Dev' strategy: runOnce: deploy: steps: - task: AzureRmWebAppDeployment@4 inputs: ConnectionType: 'AzureRM' azureSubscription: 'Microsoft Azure Sponsorship' appType: 'webApp' WebAppName: 'galaxyhotel-dev' packageForLinux: '$(Pipeline.Workspace)/web/**/*.zip' - stage: deployQA displayName: Deploy to QA jobs: - deployment: deployQAWebsite displayName: Deploy Website to QA environment: 'GalaxyHotel-QA' strategy: runOnce: deploy: steps: - task: SqlAzureDacpacDeployment@1 displayName: Prepare the database inputs: azureSubscription: 'Microsoft Azure Sponsorship' AuthenticationType: 'server' ServerName: 'succinctly.database.windows.net' DatabaseName: 'galaxyhotel-qa' SqlUsername: '$(sqlAdmin)' SqlPassword: '$(sqlPassword)' deployType: 'SqlTask' SqlFile: '$(Pipeline.Workspace)/db/SeedGalaxyHotelDbScript.sql' IpDetectionMethod: 'AutoDetect' - task: AzureRmWebAppDeployment@4 displayName: Deploy website inputs: ConnectionType: 'AzureRM' azureSubscription: 'Microsoft Azure Sponsorship' appType: 'webApp' WebAppName: 'galaxyhotel-qa' packageForLinux: '$(Pipeline.Workspace)/web/**/*.zip' - deployment: runQATests displayName: Run QA Tests dependsOn: deployQAWebsite environment: name: 'GalaxyHotel-QA' resourceType: VirtualMachine tags: qa strategy: runOnce: deploy: steps: - download: none - task: DownloadPipelineArtifact@2 displayName: Download UITests artifact inputs: buildType: 'current' artifactName: 'UITests' targetPath: '$(Pipeline.Workspace)/UITests' - task: PowerShell@2 displayName: Override TestRunParameters inputs: targetType: 'inline' script: | [xml]$doc = Get-Content $(Pipeline.Workspace)/UITests/GalaxyHotelTests.runsettings $doc.RunSettings.TestRunParameters.ChildNodes.Item(0).value = '$(qaBaseUrl)' $doc.Save("$(Pipeline.Workspace)/UITests/GalaxyHotelTests.runsettings") - task: DotNetCoreCLI@2 displayName: Execute UI Tests with Selenium inputs: command: 'test' projects: '$(Pipeline.Workspace)/UITests/**/*.csproj' arguments: '--settings $(Pipeline.Workspace)/UITests/GalaxyHotelTests.runsettings' - stage: deployProd displayName: Deploy to Production jobs: - deployment: deployProd displayName: Deploy To Production environment: 'GalaxyHotel-Prod' strategy: runOnce: deploy: steps: - task: AzureRmWebAppDeployment@4 inputs: ConnectionType: 'AzureRM' azureSubscription: 'Microsoft Azure Sponsorship' appType: 'webApp' WebAppName: 'galaxyhotel' packageForLinux: '$(Pipeline.Workspace)/web/**/*.zip' |
Figure 5.23 shows a complete run from development to production:
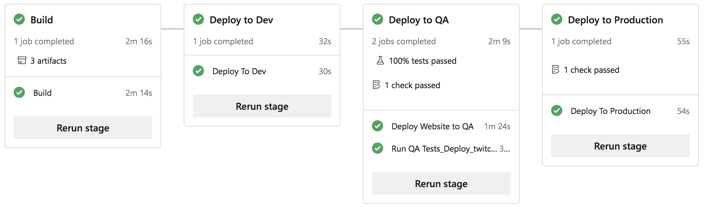
Figure 5.23: A full pipeline run, from dev to production
Figure 5.24 shows how it is pretty straightforward to understand which pipeline makes it to production on the runs list page.
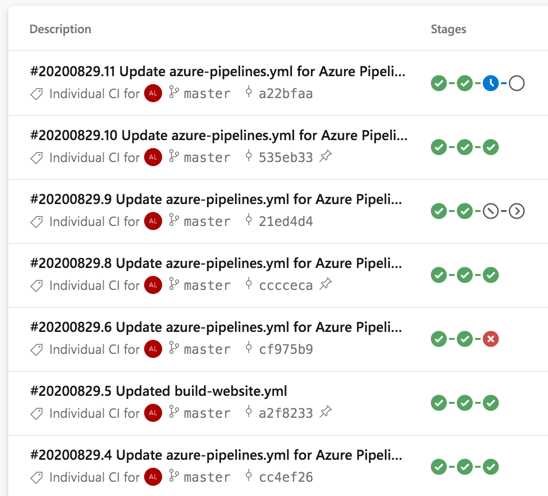
Figure 5.24: A list of runs including details regarding stages
- 1800+ high-performance UI components.
- Includes popular controls such as Grid, Chart, Scheduler, and more.
- 24x5 unlimited support by developers.