
Azure Pipelines Succinctly®

CHAPTER 6
Deploy the GalaxyHotel HelpDesk
In this last chapter of the book, I’ll explain how to build and deploy the GalaxyHotel HelpDesk project using the classic editor and the Release section of Azure Pipelines. Back in the day, Azure DevOps included just these options to build and deploy your projects; the YAML pipeline was introduced only in the last few years. Some features, such as the release part, are not implemented yet in the pipeline as a code approach.
The GalaxyHotel HelpDesk project is similar to the website (it is an ASP.NET Core web application). Because it should be used at the reception desk of the hotel, the application will be deployed on a simulated environment composed of:
- One virtual machine for the test environment.
- Two virtual machines for the production environment.
Both deployments are based on deployment groups.
Build the GalaxyHotel HelpDesk
To build the project, you can reproduce the same steps explained in Chapter 2. Open the Pipelines section, click New Pipeline, select Use the classic editor at the bottom of the page, and then set the repository properties as shown in Figure 6.1.
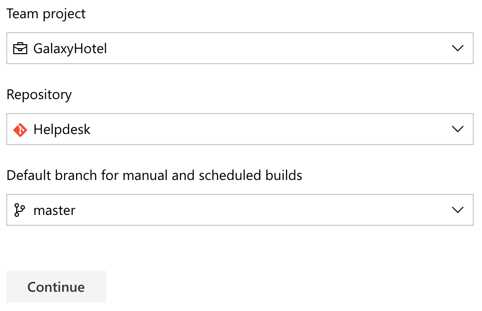
Figure 6.1: Pipeline repository settings for GalaxyHotel HelpDesk project
Azure Pipelines opens the build details page, showing a list of tasks that will be executed during the build run. Two settings need to be modified:
- The name of the pipeline should be changed to HelpDesk.
- The restore task should retrieve packages from the GalaxyHotelLibraries feed created in Chapter 4 (Figure 6.2).
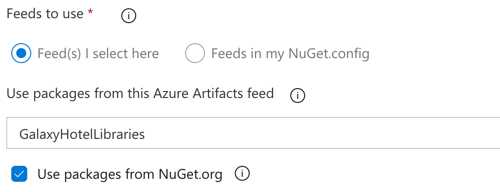
Figure 6.2: Feed settings for the build
You can click Save & Queue and check that the build executes correctly.
Build settings
The classic editor displays a list of tabs collecting all the settings related to the build.
Variables let you define custom variables to use during the build execution. A variable has a name and a value, and can be a secret (hiding its value). The syntax to get the value is the same as in the previous chapter: $(variable_name). Variables can be grouped using the Variable Groups feature in the Library section and then linked to the build (Figure 6.3).
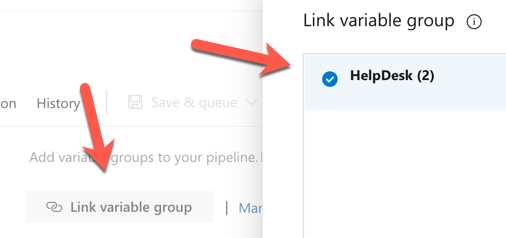
Figure 6.3: Link a variable group to the build
Triggers define when the build should start. The available options are:
- Continuous integration: The build starts right after a commit is applied to the repository.
- Scheduled: The build starts according to the date and time.
- Build completion: The build starts right after another build.
For each option, a branch filter can be applied, which helps when you want to start your build only for a specific branch. The branch name also supports wildcards, which are very useful for GitFlow (Figure 6.4).
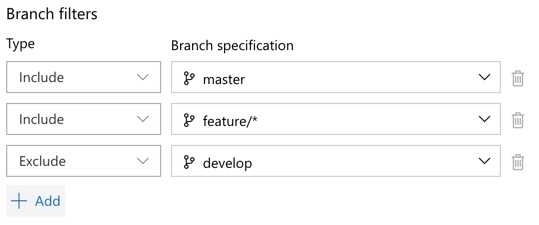
Figure 6.4: Branch filters
In the GalaxyHotel HelpDesk build, enable this option with a branch filter set only to master, and save the definition.
The continuous integration section also includes path filters, letting you specify which path should be observed or not to trigger the build (Figure 6.5).
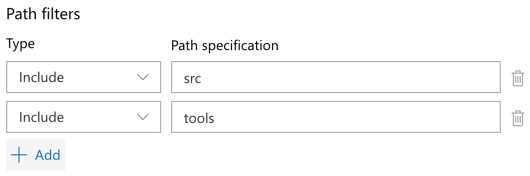
Figure 6.5: Path filters
The options tab provides lots of settings such as description, number format, link to a work item, enabling, status badge, scope, timeouts, and demands. Demands allow you to provide a required agent pool capability (more on this later). In the retention page, you can define how long artifacts, attachments, and build runs should be kept. Last, history lists all the changes applied to the build definition (including differences).
Agent pool and specification
In the Tasks tab, the build definition contains a section named Agent job 1, where the job tasks are listed. These are executed by an agent assigned to the build.
If you click the Pipeline bar on the right side, a section that includes details about the agent appears. As explained earlier, an agent is a process that executes the build, and an agent pool is a group of agents.
Azure Pipelines provides two types of agent pools:
- Hosted (Azure Pipelines): Provided and managed by Microsoft. They are free of charge until you reach 1,800 minutes of build run, or if you want multiple parallel jobs.
- Private (Default): Created and managed by the users. Usually, they are configured in on-premises infrastructure.
Hosted pools also have a list of specifications representing the operating system of the agent. Depending on your build requirements, these are the specifications available at the time of writing:
- macOS-10.14
- macOS-10.15
- ubuntu-16.04
- ubuntu-18.04
- ubuntu-20.04
- ws2017-win2016
- windows-2019
The full list of capabilities and included software related to each specification is available here. You can add new capabilities in the project settings page under the Agent Pools section.
Private pools are useful for on-premises scenarios using a self-hosted agent or when a hosted agent does not satisfy your requirements. Plus, a self-hosted agent does not have limitations.
Adding a new private agent is a relatively simple operation: in the Agent Pools section of your project settings, select Default > New Agent. A popup opens, giving you the instruction to download and install an agent on a machine (Figure 6.6).
Note: To install the agent, you must generate an authentication token, as explained here. Tokens allow external services to authenticate with Azure DevOps correctly. Each token has an associated list of permissions.
After the installation, the agent is listed in the Default pool page (Figure 6.7), where each agent can be updated (in case a new version is available) or deleted.
The agent detail page shows both jobs and capabilities (divided into user-defined and system). In this case, the capabilities are related to the software installed on the agent machine, as in Figure 6.8.
Capabilities play a fundamental role in Azure DevOps: they guide how an agent is chosen for a build. Indeed, the concept of demands explained earlier can be exploited to make sure that an agent has the requirements needed for a build.
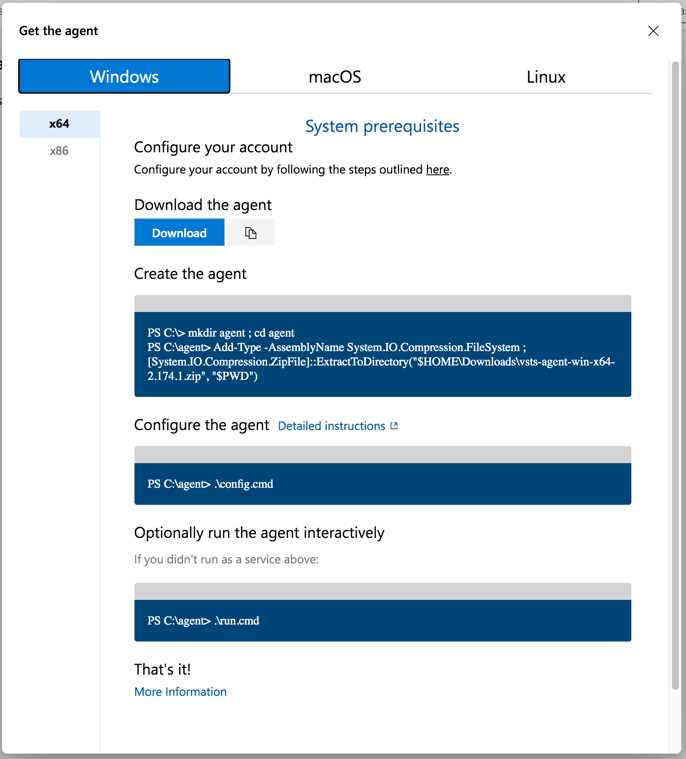
Figure 6.6: Create a new agent
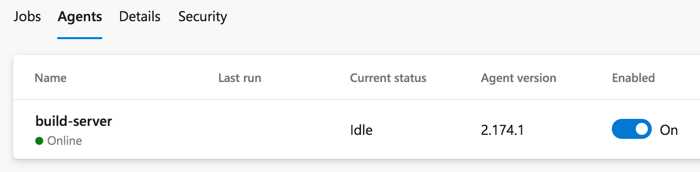
Figure 6.7: Private agents section
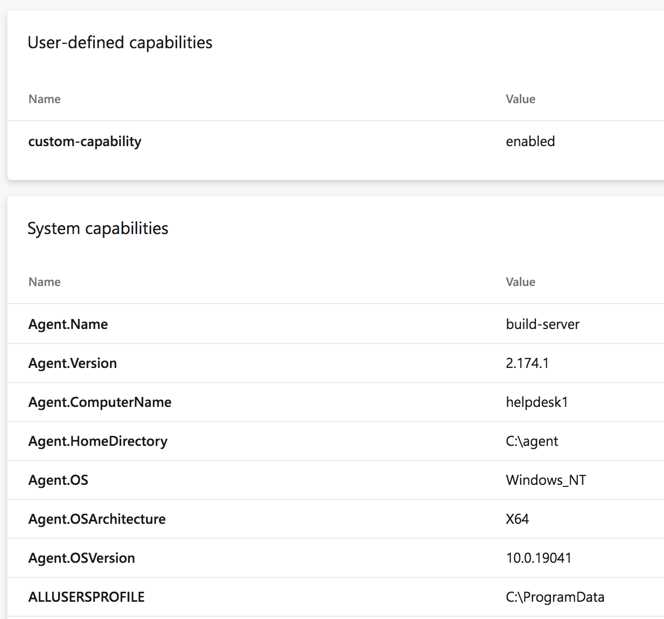
Figure 6.8: Capabilities of a private agent
Deploy the GalaxyHotel HelpDesk
This section will demonstrate how to provision the target machines and release the HelpDesk website.
Deployment groups
As explained before, the HelpDesk website will be deployed on three virtual machines. In this case, to make them reachable in Azure DevOps, you can leverage a deployment group, which is a group of related machines with an agent installed. These machines can be considered as a target for a release using a deployment group job.
You can provision a machine by going to the related section in Azure Pipelines and selecting Add a deployment group. Provide a name such as HelpDesk-Test, and click Create. A page with a PowerShell script opens. Select Use a personal access token in the script for authentication, click Copy script to the clipboard, and execute the script on the virtual machine created to host the HelpDesk website.
The script asks a few questions regarding the user account and tags (which are useful to distinguish machines based on capabilities). After the execution, the machine is listed in the Targets section of the deployment group page. The group just created will be considered as a test environment for the HelpDesk website. You should repeat the same steps for the HelpDesk-Prod deployment group, adding two more virtual machines for the production environment (Figure 6.9).
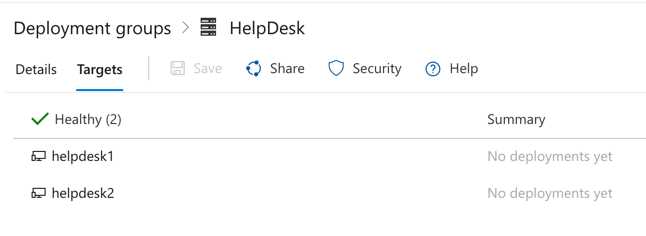
Figure 6.9: Targets in a deployment group
This page provides some insights about the status of the machines, tags, and related deployments. Deployment groups can also be shared with other projects.
Prepare the release
Once the deployment group is in place, you can target the virtual machines in the release.
Go to the release page in Azure Pipelines and click New Pipeline. In the popup, search for the term IIS website deployment, select Apply, and provide HelpDesk-Test as the name of the stage (Figure 6.10).
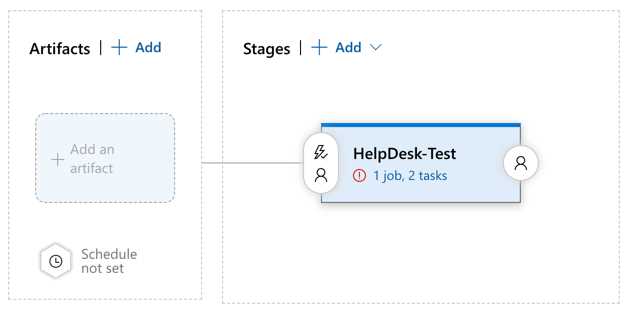
Figure 6.10: A release pipeline
Click Add an artifact and add the latest version of the build artifact created by the build definition HelpDesk (Figure 6.11).
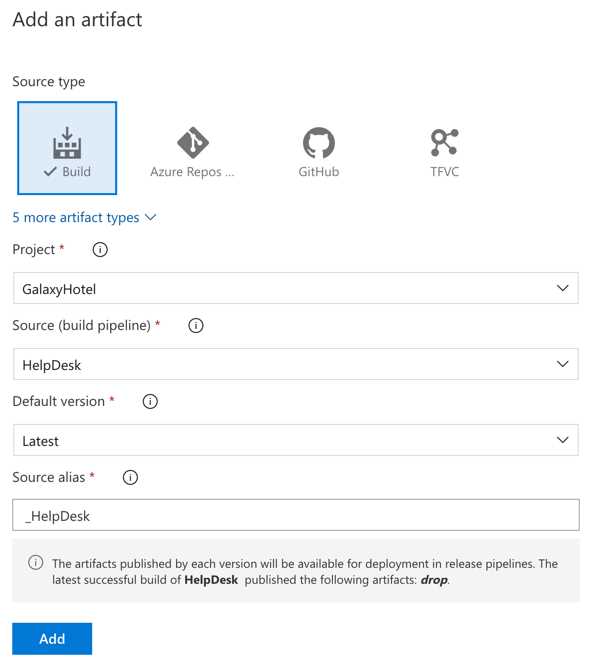
Figure 6.11: Release artifact popup
As you can see from the figure, releases support multiple types of artifacts such as Build, Azure Repos, GitHub, TFVC, and so on. The artifact can be originated from a different project or repository, and if necessary, select a specific version.
Once added, the Continuous Deployment trigger (lightning bolt icon) button appears. Select and enable the feature. In this case, a branch filter can also be applied (Figure 6.12). When you enable this flag, the release starts each time a new artifact is available.

Figure 6.12: Enabling the continuous deployment trigger
Move the mouse over the HelpDesk-Test stage to reveal the Add and Clone stage buttons. Select Clone to create a new stage similar to the current one, and rename it HelpDesk-Prod. The new stage will appear on the right of the test stage, meaning that the production stage will start only after the previous one.
But what if two stages need to start together? And how can a user approve a release before deploying it? For these scenarios, Azure Pipelines makes available the Pre-deployment and Post-deployment conditions, which are configurable using the buttons at both sides of a stage (Figure 6.13). These options are one of the main differences from the multistage approach explained in the previous chapter. These conditions give you full control of what should be checked or approved before or after a release.
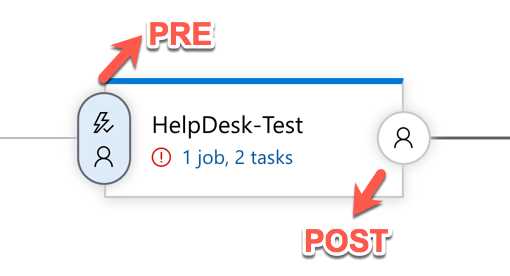
Figure 6.13: Pre-deployment and post-deployment buttons
For example, some possible scenarios are:
- Manually approve a release (pre).
- Make sure all bugs have been fixed before a stage (pre).
- Check a monitoring system to validate the release (post).
The list can go on and on, depending on your needs.
If you click the Pre-deployment conditions button on the Test stage, a popup opens with the following options:
- Triggers: Set what will start the release on this stage. Possible values are a release, another stage in the same release, or a manual release.
- Artifact filters: Manage multiple artifacts in the same release, and you want to start a stage depending only on a specific artifact.
- Schedule: Schedule a release, such as a nightly release.
- Pull request deployment: Start release-related artifacts derived from PRs.
- Pre-deployment approvals: Select an approver for the release.
- Gates: A powerful mechanism allowing checks on using external resources such as Azure Policy, Azure Monitor, Work Items (Query), Azure Functions, or REST API.
- Deployment queue settings: Define deployments’ parallelism.
Post-deployment conditions are:
- Post-deployment approvals: Select an approver for the release.
- Gates: Similar to the pre-deployment conditions.
- Auto-redeploy trigger: Redeploy the release in case of failure, or when a new target is available in a deployment group.
For the HelpDesk website, you have to set the following conditions:
- Pre-deployment: Pre-deployment approval before the production stage (Figure 6.14).
- Post-deployment: Auto-redeploy when a new target is available (Figure 6.15).
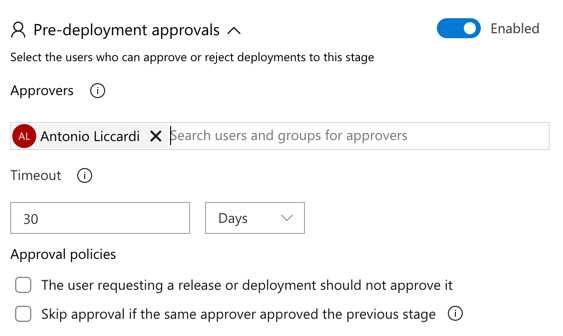
Figure 6.14: Setting approvers for a release
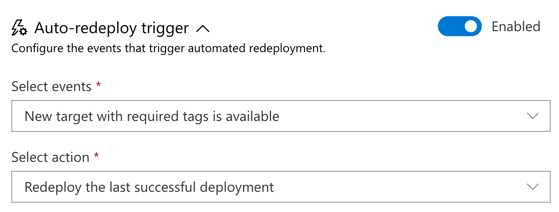
Figure 6.15: Setting a redeploy trigger
Before running the release, each stage should be modified to deploy the website. A warning icon advises that there is something not configured correctly. You can click on the task number link to open the stage details where a list of tasks is available. The editor is similar to the build definition, where each task has a specific pane with parameters (Figure 6.16).
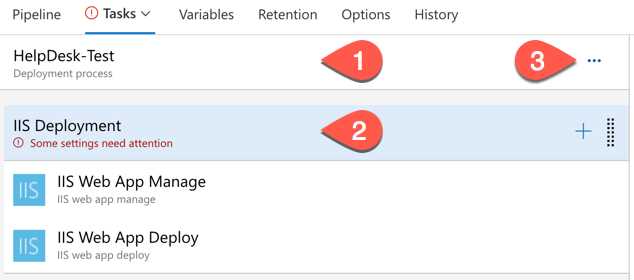
Figure 6.16: Stage details
The deployment process bar (1) lets you specify the stage name and a few settings linked to fields in the tasks. The IIS Deployment bar (2) represents a deployment group job, which executes a set of tasks on a deployment group. In this section, you can define the deployment group, a list of tags related to a specific machine (such as web or db), and whether the deployment should be applied in parallel or to one target at a time. Also, a release can have different phases by adding other types of jobs (3).
Tip: Among the types of jobs available, the agentless job is useful when you need manual intervention during a release.
Here is a list of changes we’ll apply to the release:
- In the IIS Deployment settings (2), select for each stage the related deployment group. Change the release name at the top of the page.
- In each stage, the website will connect to a related database on Microsoft Azure. You should add a variable containing the connection strings for both environments. Azure Pipelines allows you to declare the same variable with different scopes. Go to the Variables tab, add two variables with the name ConnectionStrings.DefaultConnection, selecting a different scope for each (Figure 6.17). The variable name corresponds to the JSON path used in the next step.
- Each deployment group job has two tasks: select the IIS Web App Deploy task, go to the section File Transforms & Variable Substitution Options, and type appsettings.json in the JSON variable substitution box. The option will replace the value of the connection string in the appsettings.json file with the one created in step 2.
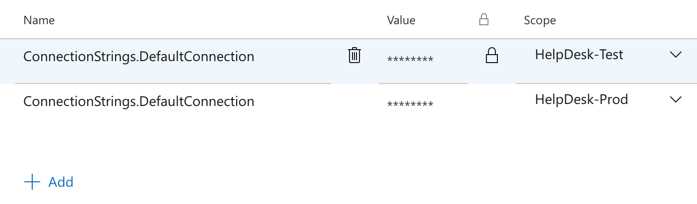
Figure 6.17: The same release variable with different scopes
Save the release and click Create Release.
Azure Pipelines will provide real-time updates on the release page, where you can select the stage to see the logs. At the end of the HelpDesk stage, the release stops, waiting for approval (Figure 6.18).
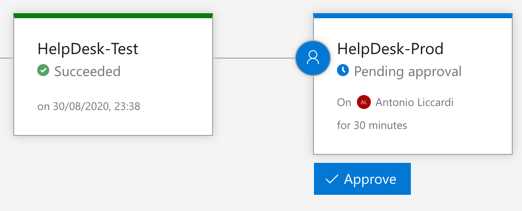
Figure 6.18: Waiting for release approval
After you approve it, the deployment on the production environment starts. If everything works correctly, the website is deployed on both machines. If you want to keep the release artifacts despite the retention policy, select Retain indefinitely from the release options (Figure 6.19).
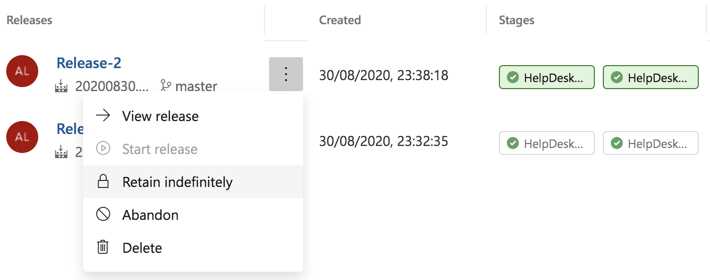
Figure 6.19: Retain a release indefinitely
- 1800+ high-performance UI components.
- Includes popular controls such as Grid, Chart, Scheduler, and more.
- 24x5 unlimited support by developers.