
Azure Functions Succinctly®

CHAPTER 3
Metadata, Blob, and Timer Triggers
Quick intro
At this point, we know how to create an Azure function application that uses various functions that can share code and can be either manually triggered or triggered when a new item arrives in an Azure queue.
There are though extra parameters that are quite useful when working with queues, such as ExpirationTime, InsertionTime, NextVisibleItem, DequeueCount, and QueueTrigger. This type of information is known as metadata.
In this chapter, we’ll dig a little bit into metadata and explore how we can use blob storage and timers as triggers for Azure functions.
Building upon the Azure function application we previously created, we are going to learn how we can take the input from a blob container by using a blob trigger that will automatically know when a new blob is written.
We’ll also learn how to execute a function on a specified schedule using a timer trigger. Shortly after reviewing the basics of metadata, we’ll start off by creating a blob-triggered function in the Azure Portal and access the blob’s metadata.
In the body of the blob-triggered function, we’ll perform some processing, which will include writing out to another blob container.
An interesting aspect about blob triggers is that we can also specify different paths. This means that we could trigger a function only if a new blob is added with a specified extension.
Finally, we’ll create a new type of function which will be timer-based. We’ll learn how to specify how often the function executes by using CRON expressions. Timer-triggered functions are a great way to do some housekeeping, so we’ll use them to delete blobs in the blob storage that are older than a specified time range.
Let’s get started.
Queue metadata
Let’s head over to the Integrate option of our QueueTrigger function so we can explore the type of metadata we have available.
By default, the metadata information is not visible, so to see it we must click the Documentation link that appears on the Integrate page.
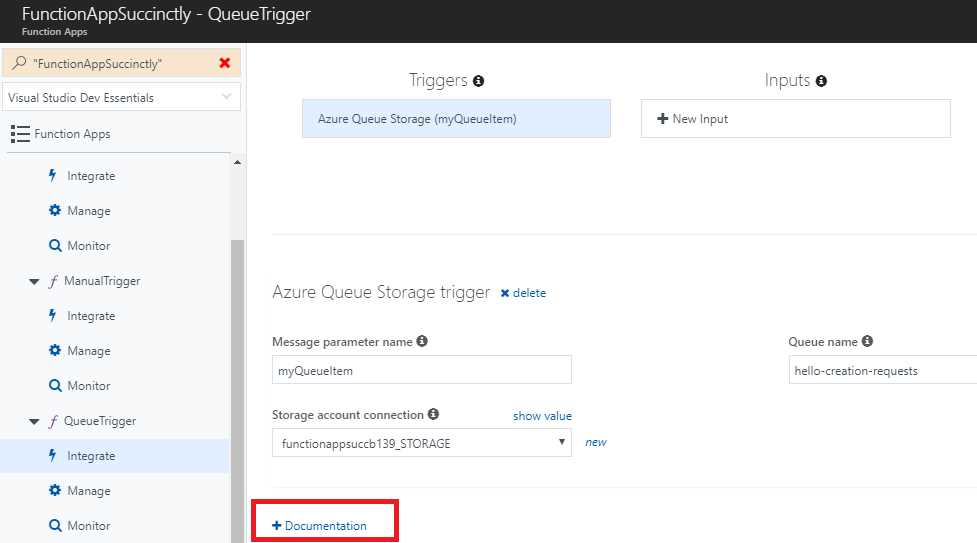
Figure 3-a: The Documentation Link under the Integrate View
Once you have clicked the Documentation link, you’ll probably have to scroll down a bit to find the metadata details we are looking for. An example follows.
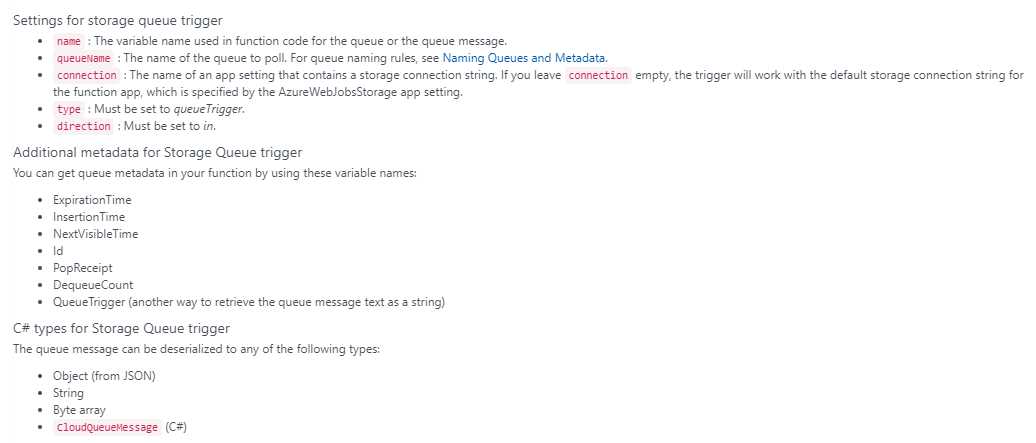
Figure 3-b: Metadata Documentation
Metadata details can be added as new parameters to the Run method with their specific names.
Let’s see how we can modify the Run method of the QueueTrigger function to add some new parameters, such as the InsertionTime and Id of a queue item.
To do this, click the QueueTrigger item so that the code for the Run method opens.

Figure 3-c: The QueueTrigger Run Method
From this code, we can start to add new parameters after the outputBlob variable.
The first parameter I’m going to add is called insertionTime, of type DateTimeOffset. The second parameter that I’ll be adding is called id, and it is of type string.
The modified code of the Run method follows, with the additional parameters highlighted in bold.
Listing 3-a: The Updated run.csx for QueueTrigger
#load "..\SharedCode\CreateHelloRequest.csx" #load "..\SharedCode\HelloRequest.csx" #r "Newtonsoft.Json" using System; using Newtonsoft.Json; public static void Run (CreateHelloRequest myQueueItem, TraceWriter log, out string outputBlob, DateTimeOffset insertionTime, string id) { log.Info( $"C# Queue trigger function processed: {myQueueItem}"); log.Info($"InsertionTime: {insertionTime}"); log.Info($"Id: {id}"); var helloRequest = new HelloRequest { Number = myQueueItem.Number, Message = GenerateHello(myQueueItem.FirstName) };
outputBlob = JsonConvert.SerializeObject(helloRequest); } private static string GenerateHello (string firstName) { string hello; int hourOfTheDay = DateTime.Now.Hour; if (hourOfTheDay <= 12) hello = "The Morning..."; else if (hourOfTheDay <= 18) hello = "The Afternoon..."; else hello = "The Evening..."; return $"{hello} {firstName}"; } |
Now when this trigger executes, it’s going to give us additional information about the message that triggered this function. What we’ll do with this information is output it as log messages to the Azure Portal console.
Once the changes have been entered, click Save to save the changes and make sure that there are no compilation errors.
As you can see, it’s very easy to add metadata parameters to the Run method, as it might be useful to have extra details about the operation being performed.
A blob-triggered function
Let’s go back to the Azure Portal and create a new function by clicking the + button. This time, let’s select the Blob trigger option with C#, as shown in the following figure.
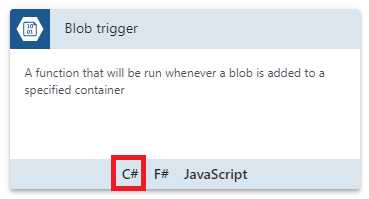
Figure 3-d: The Blob trigger Option with C#
Once we’ve selected that option, we’ll be asked to enter some details for our blob-triggered function. We can see these in the following screenshot.

Figure 3-e: Blob-triggered Function Details
Notice that the function name has been set to BlobTrigger, the path points to the hello-requests blob we previously created, and the Storage account connection has been set accordingly.
You might have noticed that the name of the Storage account connection looks slightly different than it did in previous screenshots. This is because when doing my own tests, I removed the previous connection and created a new one, which is perfectly valid. However, you might not have had the need to do that, so you’ll probably have the same Storage account connection you were previously using.
Notice the format of the Azure Blob Storage trigger path—it is set to hello-requests/{name}. The name element inside the curly braces will give us the name of the blob that triggered this function. This name element is also bound to a string parameter in our function’s input.
With all the details entered, click Create to finalize the creation of the blob-triggered function.
Once created, we’ll be presented with the default code of run.csx as follows.
Listing 3-b: The Default run.csx for BlobTrigger
public static void Run(Stream myBlob, string name, TraceWriter log) { log.Info($"C# Blob .. function Processed blob\Name: {name} .."); } |
Notice how the second parameter of the Run method is called name and it represents the name element that was specified in the Azure Blob Storage trigger path.
With this done, let’s go over to the Integrate option of our BlobTrigger function and click New Output. Select the Azure Blob Storage option.
We’ll leave the Blob parameter name as is and change the name of the blob container in Path to receipts/{rand-guid}, which is the name of a blob container we previously created (and have not used yet).
Make sure to select the correct Storage account connection as well. We can see these changes as follows.
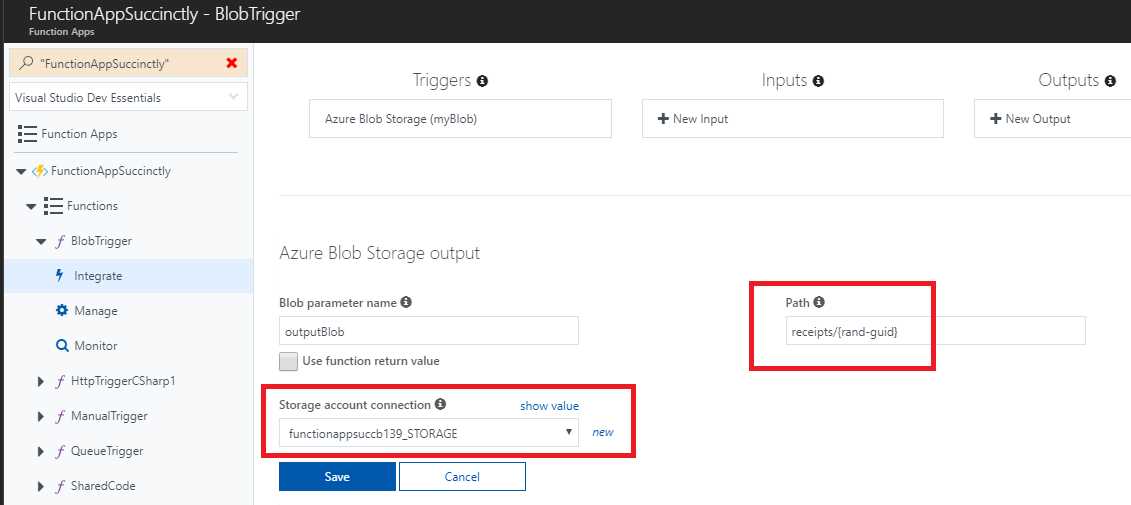
Figure 3-f: Creating a Blob Storage Output
Notice that we’re using the {rand-guid} syntax, which means that we’ll get a random GUID assigned to the file name.
With this done, let’s head back to our default run.csx code and add the output blob parameter. We can do this as follows.
Listing 3-c: The Updated run.csx for BlobTrigger
public static void Run(Stream myBlob, string name, TraceWriter log, Stream outputBlob) { log.Info($"C# Blob .. function Processed blob\Name: {name} .."); } |
If we want to get additional metadata about the input blob, we can change the type from Stream to CloudBlockBlob.
In order to have access to this CloudBlockBlob type, we’ll need to add a reference to the Microsoft.WindowsAzure.Storage assembly, and also add a using statement.
We’ll use JSON as well, so we’ll need to add a reference to Newtonsoft.Json and add the corresponding using directive.
We’re also going to be making use of a couple of classes within the SharedCode function we previously wrote. We can add these with the load directive. I’ll remove the log line, as we won’t need it.
So, let’s update the run.csx code to reflect these changes, as follows.
Listing 3-d: Updated run.csx
#load "..\SharedCode\HelloRequest.csx" #load "..\SharedCode\MsgSentConfirmation.csx" #r "Newtonsoft.Json" #r "Microsoft.WindowsAzure.Storage" using Newtonsoft.Json; using Microsoft.WindowsAzure.Storage.Blob; public static void Run(CloudBlockBlob myBlob, string name, TraceWriter log, Stream outputBlob) { } |
Because we’ve changed the incoming blob to type CloudBlockBlob, we can get additional metadata information.
Let’s make use of this metadata. We can do this by simply printing to the log. We can access various metadata properties, such as the Name of the blob, the StorageUri of the incoming blob, and even the blob’s container metadata.
The job that this blob-triggered function is going to perform can be split into three parts. The first part will be to download the blob content from the blob storage.
To do that, we are going to invoke a method called GetHelloRequest and pass it CloudBlockBlob. Then, we’ll simply write the message returned by GetHelloRequest.
So, let’s update run.csx to reflect these changes.
Listing 3-e: Updated run.csx
#load "..\SharedCode\HelloRequest.csx" #load "..\SharedCode\MsgSentConfirmation.csx" #r "Newtonsoft.Json" #r "Microsoft.WindowsAzure.Storage" using Newtonsoft.Json; using Microsoft.WindowsAzure.Storage.Blob; public static void Run(CloudBlockBlob myBlob, string name, TraceWriter log, Stream outputBlob) { log.Info($"Metadata Name: {myBlob.Name}"); log.Info($"Metadata StorageUri: {myBlob.StorageUri}"); log.Info($"Metadata Container: {myBlob.Container.Name}"); HelloRequest helloRequest = GetHelloRequest(myBlob); log.Info($"Hello Request: {helloRequest}"); } |
Notice that if you click Save, the previous code will fail to compile because the GetHelloRequest method is invoked but it doesn’t actually exist yet.
Now let’s create the GetHelloRequest method, which is going to download the blob into a memory stream and use the Newtonsoft.Json assembly to deserialize the content into a HelloRequest object, which is returned to the caller.
This is how the code of run.csx looks with the GetHelloRequest method added.
Listing 3-f: Updated run.csx
#load "..\SharedCode\HelloRequest.csx" #load "..\SharedCode\MsgSentConfirmation.csx" #r "Newtonsoft.Json" #r "Microsoft.WindowsAzure.Storage" using Newtonsoft.Json; using Microsoft.WindowsAzure.Storage.Blob; public static void Run(CloudBlockBlob myBlob, string name, TraceWriter log, Stream outputBlob) { log.Info($"Metadata Name: {myBlob.Name}"); log.Info($"Metadata StorageUri: {myBlob.StorageUri}"); log.Info($"Metadata Container: {myBlob.Container.Name}"); HelloRequest helloRequest = GetHelloRequest(myBlob); log.Info($"Hello Request: {helloRequest}"); } public static HelloRequest GetHelloRequest(CloudBlockBlob blob) { HelloRequest helloRequest;
using (var ms = new MemoryStream()) { blob.DownloadToStream(ms); ms.Position = 0; using (var res = new StreamReader(ms)) { using (var jtr = new JsonTextReader(res)) { var s = new JsonSerializer(); helloRequest = s.Deserialize<HelloRequest>(jtr); } } } return helloRequest; } |
I mentioned before that this blob-triggered function is going to perform a job that can be split into three parts. We’ve just done the first part, which is to call and execute the GetHelloRequest method.
The second part is to send a text message using the returned helloRequest object. To do this, we are going to call a method named SendMessage, which will return a Guid from a simulated messaging gateway. We’ll need to pass the helloRequest object as a parameter.
Let’s create the SendMessage method—the following listing is the updated run.csx code.
Listing 3-g: Updated run.csx
#load "..\SharedCode\HelloRequest.csx" #load "..\SharedCode\MsgSentConfirmation.csx" #r "Newtonsoft.Json" #r "Microsoft.WindowsAzure.Storage" using Newtonsoft.Json; using Microsoft.WindowsAzure.Storage.Blob; public static void Run(CloudBlockBlob myBlob, string name, TraceWriter log, Stream outputBlob) { log.Info($"Metadata Name: {myBlob.Name}"); log.Info($"Metadata StorageUri: {myBlob.StorageUri}"); log.Info($"Metadata Container: {myBlob.Container.Name}"); HelloRequest helloRequest = GetHelloRequest(myBlob); log.Info($"Hello Request: {helloRequest}"); string id = SendMessage(helloRequest); } public static string SendMessage(HelloRequest req) { // We simulate sending SMS with req and returning a unique GUID return Guid.NewGuid().ToString(); } public static HelloRequest GetHelloRequest(CloudBlockBlob blob) { HelloRequest helloRequest;
using (var ms = new MemoryStream()) { blob.DownloadToStream(ms); ms.Position = 0; using (var res = new StreamReader(ms)) { using (var jtr = new JsonTextReader(res)) { var s = new JsonSerializer(); helloRequest = s.Deserialize<HelloRequest>(jtr); } } } return helloRequest; } |
We now have two parts finished, and we are just missing the last stage. Finally, let’s create a message confirmation and write it to the blob storage.
To do that, let’s create an instance of the MsgSentConfirmation class from the SharedCode function.
We’ll need to set the ReceiptId property to the value received from the simulated messaging gateway and set the Number and Message properties from the information we’ll read from the blob storage.
Finally, we want to upload this MsgSentConfirmation object to the blob storage.
We can do this by creating a new method called UploadMsg that is going to use JSON.NET to serialize the MsgSentConfirmation object and write it to the blob storage.
Let’s go ahead and add this code to run.csx. These changes are indicated in bold in the following listing.
Listing 3-h: Updated run.csx
#load "..\SharedCode\HelloRequest.csx" #load "..\SharedCode\MsgSentConfirmation.csx" #r "Newtonsoft.Json" #r "Microsoft.WindowsAzure.Storage" using Newtonsoft.Json; using Microsoft.WindowsAzure.Storage.Blob; public static void Run(CloudBlockBlob myBlob, string name, TraceWriter log, Stream outputBlob) { log.Info($"Metadata Name: {myBlob.Name}"); log.Info($"Metadata StorageUri: {myBlob.StorageUri}"); log.Info($"Metadata Container: {myBlob.Container.Name}"); HelloRequest helloRequest = GetHelloRequest(myBlob); log.Info($"Hello Request: {helloRequest}"); string id = SendMessage(helloRequest); var confirm = new MsgSentConfirmation { ReceiptId = id, Number = helloRequest.Number, Message = helloRequest.Message }; UploadMsg(confirm, outputBlob); } public static void UploadMsg(MsgSentConfirmation confirm, Stream outputBlob) { using (var w = new StreamWriter(outputBlob)) { using (var jw = new JsonTextWriter(w)) { JsonSerializer s = new JsonSerializer(); s.Serialize(jw, confirm); jw.Flush(); } } } public static string SendMessage(HelloRequest req) { // We simulate sending SMS with req and returning a unique GUID return Guid.NewGuid().ToString(); } public static HelloRequest GetHelloRequest(CloudBlockBlob blob) { HelloRequest helloRequest;
using (var ms = new MemoryStream()) { blob.DownloadToStream(ms); ms.Position = 0; using (var res = new StreamReader(ms)) { using (var jtr = new JsonTextReader(res)) { var s = new JsonSerializer(); helloRequest = s.Deserialize<HelloRequest>(jtr); } } } return helloRequest; } |
As you can see, it’s not complicated at all. After adding the code to the Azure Portal, click Save so that all changes are saved, and check if there are any compilation errors.
In order to test this, let’s go back to the ManualTrigger function. Change the input test data and then click Run to execute it.

Figure 3-g: Running the ManualTrigger Function
When this executes, it is going to go through a series of functions. When writing to the queue, our queue trigger will pick up the message and write it to the blob storage. Then, the blob trigger should receive this and the BlobTrigger function should execute. The final result should be available on the receipts blob container.
Go to the Azure Storage Explorer to verify the result.
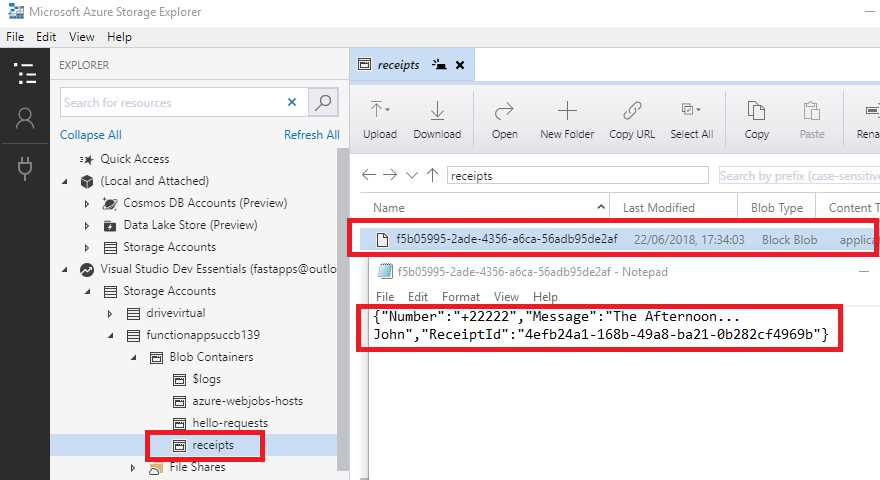
Figure 3-h: The Resultant Receipts Blob
Now we have a working solution made up of several Azure functions that work together by communicating through queues and blobs.
If we keep executing the manually triggered function, we might end up with a lot of items in the blobs we are using, so it would be handy to have a function to clean them up after a given period of time. This can be achieved by using a function that executes periodically and removes older blobs.
Understanding CRON expressions
Before we create a timer-triggered function, it’s important to understand how CRON expressions work. When creating a timer-triggered function, we’ll need to specify a CRON expression, which determines how often or when the trigger will execute.
With Azure Functions, specifying a CRON expression consists of six parts, as shown in the following figure.

Figure 3-i: Parts of a CRON Expression
A CRON expression consists of the second, minute, hour, day, month, and the day of the week that indicate when the task will execute.
In addition to each of these values, there are a number of special characters that we can use inside the expression.
If we have a list of values, we can use a comma (,). If we want to create step values—something that reoccurs periodically—we can use a forward slash (/).
An asterisk (*), which is similar to a wildcard character, indicates that there can be any value. A hyphen (-) indicates a range of values.
Let’s have a look at an example of a CRON expression.

Figure 3-j: Example of a CRON Expression
In this example, the CRON expression will execute at 9:28 pm at 35 seconds, every first day of every month, independently of the day of the week that day is.
Imagine that instead, we want to execute this task every day in March (note that the month is zero-based), and not only on the first day of the month. We could do this as follows.

Figure 3-k: Another Example of a CRON Expression
We can also create schedules that reoccur by using step values. The following is an example that indicates the task will be triggered once every 28 minutes, every day—instead of specifically on minute 28.

Figure 3-l: Another Example of a CRON Expression
We can also indicate specific days, months, or days of the week to limit the execution of this task to those specific dates. We can do this as follows.

Figure 3-m: Another Example of a CRON Expression
In this example, the task will be executed every 28 minutes, on second 35 of every hour, but only on day 6 and 9 of every month, independently of the day of the week it is.
If you would like to limit this task to execute on specific days of the week, say on Saturdays and Sundays, when users are not in the office, it could be done as follows.

Figure 3-n: Another Example of a CRON Expression
In the previous example, the value 0 of day_of_the_week represents Sundays, and 6 indicates Saturdays. As you might have guessed, 1 indicates Monday, 2 indicates Tuesday, and so on.
It’s also possible to specify ranges. A range from Monday to Wednesday inclusive would be as follows.

Figure 3-o: Another Example of a CRON Expression
As you can see, the possibilities are endless. Now that we understand how CRON expressions work, let’s go back to the Azure Portal and create a new function that uses a time trigger.
A timer-triggered function
Just like we’ve seen previously in the Azure Portal, click the + button next to Functions to create a new Azure function.
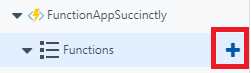
Figure 3-p: The + Button to Add a New Azure Function
When prompted, choose the Timer trigger template with C#.

Figure 3-q: The Timer trigger Template
After clicking the C# option, a dialog box will appear where we can indicate the Name of the Azure function and the execution Schedule.
By default, the CRON expression is set to run every five minutes, but we can modify it to run at a different schedule. In my case, I’ve set it to execute every 10 minutes instead. We can see this as follows.
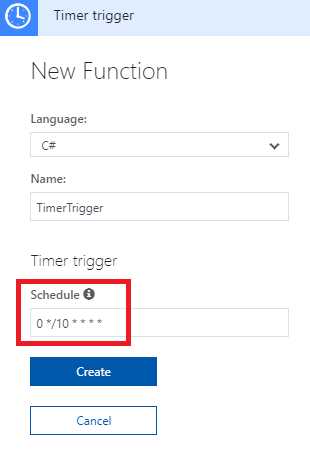
Figure 3-r: Creating the Timer trigger Function
Once the Name of the function and the Schedule have been specified, click Create to finish the creation of the function.
With the timer-triggered function created, notice how in the run.csx code the first parameter is set to use the TimerInfo object. You can see this in the following listing.
Listing 3-i: run.csx for the Timer-Triggered Function
using System; public static void Run(TimerInfo myTimer, TraceWriter log) { log.Info($"C# Timer triggered function executed at: {DateTime.Now}"); } |
By using the TimerInfo object, we can access information about the timer that’s executing this function.
In order to see some of these timer details, let’s add some additional log information to our Run method. We can see this on the listing that follows.
Listing 3-j: The Modified run.csx for the Timer-Triggered Function
using System; public static void Run(TimerInfo myTimer, TraceWriter log) { log.Info($"C# Timer triggered function executed at: {DateTime.Now}");
log.Info($"Timer schedule: {myTimer.Schedule}"); log.Info($"Timer last execution: {myTimer.ScheduleStatus.Last}"); log.Info($"Timer last execution: {myTimer.ScheduleStatus.Next}"); } |
Notice how I’ve added the details of the Last and Next schedule execution to the output. If you actually execute the function by clicking Run, you’ll be able to see the following results on the logger.
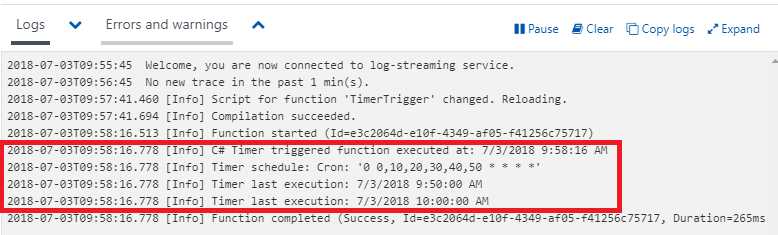
Figure 3-s: The Results of Executing the Timer-Triggered Function
Given that this is a timer-triggered function, the execution of the function will be done automatically, but since I was a bit impatient to sit around and wait for 10 minutes to let the function execute on its own, I clicked the Run button to show you these results.
Notice that as part of the results, we can see the long form of the CRON expression, which specifies how this function will automatically execute.
In the background, while I have been busy writing this, the timer has already executed automatically, and the results can be seen in the following screenshot.
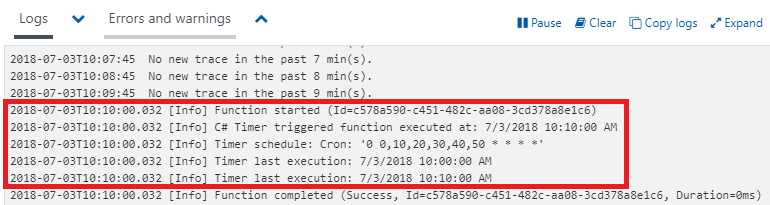
Figure 3-t: Automatic Execution of the Timer-Triggered Function
Now that we’ve seen how this function works, let’s go ahead and make it more interesting. So, let’s modify the run.csx code and add a reference to the WindowsAzure.Storage and System.Configuration assemblies with their respective namespaces.
Listing 3-k: The Modified run.csx for the Timer-Triggered Function
#r "Microsoft.WindowsAzure.Storage" #r "System.Configuration" using Microsoft.WindowsAzure.Storage.Blob; using Microsoft.WindowsAzure.Storage; using System.Configuration; using System; public static void Run(TimerInfo myTimer, TraceWriter log) { log.Info($"C# Timer triggered function executed at: {DateTime.Now}");
log.Info($"Timer schedule: {myTimer.Schedule}"); log.Info($"Timer last execution: {myTimer.ScheduleStatus.Last}"); log.Info($"Timer last execution: {myTimer.ScheduleStatus.Next}"); } |
Next, we want to get access to the connection string to our storage account. To get this, we need to read it out from the app settings.
You’ll notice that in the code that follows, I’ll reference the string functionappsuccb139_STORAGE, which is the same connection that we’ve used in the blob and queue triggers.
Once that’s been done, we need to get access to our receipts blob container so that we can check for any blobs that are over a specified age.
Let’s update run.csx to reflect this.
Listing 3-l: The Modified run.csx for the Timer-Triggered Function
#r "Microsoft.WindowsAzure.Storage" #r "System.Configuration" using Microsoft.WindowsAzure.Storage.Blob; using Microsoft.WindowsAzure.Storage; using System.Configuration; using System; public static void Run(TimerInfo myTimer, TraceWriter log) { log.Info($"C# Timer triggered function executed at: {DateTime.Now}");
log.Info($"Timer schedule: {myTimer.Schedule}"); log.Info($"Timer last execution: {myTimer.ScheduleStatus.Last}"); log.Info($"Timer last execution: {myTimer.ScheduleStatus.Next}"); string conn = ConfigurationManager.AppSettings["functionappsuccb139_STORAGE"];
CloudStorageAccount storageAccount = CloudStorageAccount.Parse(conn); CloudBlobClient blobClient = storageAccount.CreateCloudBlobClient(); CloudBlobContainer container = blobClient.GetContainerReference("receipts"); } |
With this code in place, we can now specify that any blob over five minutes old needs to be deleted. This way, we have a clean system.
Next, we need to loop through all the CloudBlockBlobs objects within the receipts blob container and verify whether or not they are too old. If they are too old, we should delete them.
Let’s modify our code to reflect this.
Listing 3-m: The Modified run.csx for the Timer-Triggered Function
#r "Microsoft.WindowsAzure.Storage" #r "System.Configuration" using Microsoft.WindowsAzure.Storage.Blob; using Microsoft.WindowsAzure.Storage; using System.Configuration; using System; public static void Run(TimerInfo myTimer, TraceWriter log) { log.Info($"C# Timer triggered function executed at: {DateTime.Now}");
log.Info($"Timer schedule: {myTimer.Schedule}"); log.Info($"Timer last execution: {myTimer.ScheduleStatus.Last}"); log.Info($"Timer last execution: {myTimer.ScheduleStatus.Next}"); string conn = ConfigurationManager.AppSettings["functionappsuccb139_STORAGE"];
CloudStorageAccount storageAccount = CloudStorageAccount.Parse(conn); CloudBlobClient blobClient = storageAccount.CreateCloudBlobClient(); CloudBlobContainer container = blobClient.GetContainerReference("receipts");
DateTime oldestTime = DateTime.Now.Subtract(TimeSpan.FromMinutes(5));
log.Info($"Checking for old receipts"); foreach(CloudBlockBlob blob in container.ListBlobs().OfType<CloudBlockBlob>()) { var isOld = blob.Properties.LastModified < oldestTime; if (isOld) { log.Info($"Blob deleted: {blob.Name}"); blob.Delete(); } } } |
Let’s save this code to check that there are no compilation errors.

Figure 3-u: Compilation Succeeded
Awesome, no compilation errors. Now all we need to do is wait for the timer to execute so it can do its job.
If you now check the receipts blob container using the Azure Storage Explorer application, you might still find a blob there. If so, check the blob container again in 10 minutes, and you’ll see that the blob has been deleted.
Here’s the output from my tests.
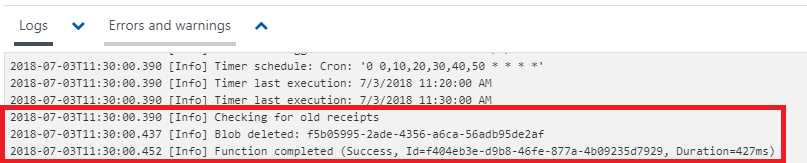
Figure 3-v: Output with a Blob Deletion Entry
In my case, the function automatically executed and deleted the blob entry that existed on the receipts blob container.
Summary
We started this chapter by exploring function metadata, and then we created a new blob-triggered function.
When we created the blob-triggered function, we set the path to hello-requests and used the special name inside braces, and we saw that the name of the blob is populated into the function parameter called name.
We also changed the incoming parameter from stream to CloudBlockBlob, and we saw how to access metadata about the incoming blob, such as the blob name.
We added some code to simulate sending a text message, and then wrote out a new blob that represented a message receipt.
After completing the blob-triggered function, we explored the basics of CRON expressions, which govern the execution of timer-triggered functions, and created a function that executes every ten minutes. This function does some housekeeping and removes blobs that are more than five minutes old.
As you’ve seen, this has been a very interesting chapter where we explored a variety of useful things to do with Azure Functions.
Next, we’ll have a look at HTTP-triggered functions, which is a way of allowing the outside world to execute code within an Azure Functions application.
We’ll learn how to create an HTTP trigger that posts some data and writes it to the queue that we have already set up. Sounds exciting, right?
- 1800+ high-performance UI components.
- Includes popular controls such as Grid, Chart, Scheduler, and more.
- 24x5 unlimited support by developers.