
Azure Functions Succinctly®

CHAPTER 2
Creating a Function App
Quick intro
Before closing the previous chapter, I promised that we were going to dive straight into the fun part, which is writing code. However, before we do that, let’s quickly set the stage for what we will be doing throughout this chapter.
Assuming you have already signed up for an Azure subscription—which is very easy to do, and you even get free credits from Microsoft to begin with—we’ll start off by creating our first Azure function app.
We’ll check out some of the most relevant options for what we’ll be doing, available on the Azure Functions section of the Azure Portal.
To understand how this works, we’ll have a quick look behind the scenes using a handy tool provided by Azure and see what’s inside the storage and queues that Azure provides.
Creating an Azure function app
To create an Azure function app, first make sure you’re logged in to the Azure Portal, and then click Create a resource. Next, click Serverless Function App, as shown in the following figure.

Figure 2-a: The Serverless Function App Resource on Azure
Notice that there’s a Quickstart tutorial link just below the Serverless Function App link. You can click the tutorial link to access the documentation, which is always an excellent resource to have at hand.
Once you’ve clicked the Serverless Function App link, you’ll be presented with the following screen, where you can enter the required details to create the function app.
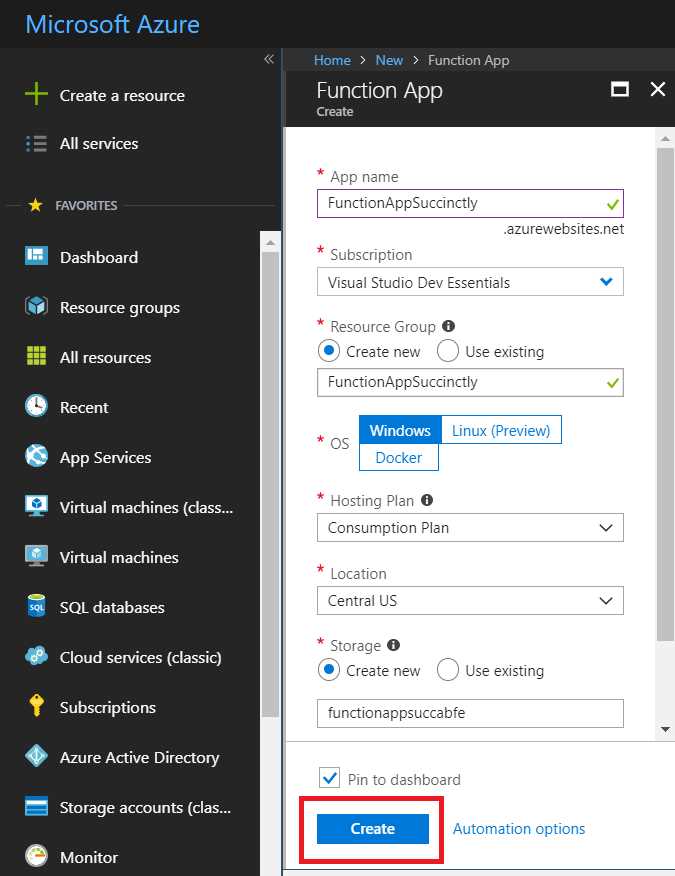
Figure 2-b: Creating a Function App on Azure
You’ll need to enter an App name that is unique. The Azure Portal will indicate whether or not the name has already been used. You’ll see a green check mark if the name is available, or an X if it is not.
You’ll also need to specify a Resource Group. You can create a new one or use an existing one.
There’s also an option to select the OS type. I usually choose Windows, as it includes both a .NET and JavaScript runtime stack, which means that you can either choose to write your Azure function app using C# or JavaScript.
As for the Hosting Plan, you can choose from the Consumption Plan or use the App Service Plan. The former lets you pay per execution, while the latter allocates resources based on your app’s predefined capacity with predictable costs and scale.
In my case, I’ll be using this Azure function app just for demos, so I’ve selected the Consumption Plan.
You also need to choose a Location. I usually choose East US or Central US as just a personal preference, but you can choose any you wish, one that is closest to your actual physical location, or one that best serves the needs of your product or service (closest to where most of your customers or users might be, for example).
It’s also necessary to select a Storage option. In my case, I’ve chosen the Create new option.
Finally, I’ve chosen to turn the Application Insights option off. Once all these options and requirements have been selected, click the Create button to finalize the creation of the Azure function app.
Function app dashboard
Now that our function app has been created, let’s have a quick look at what Azure has prepared for us, which can be seen in the following figure.
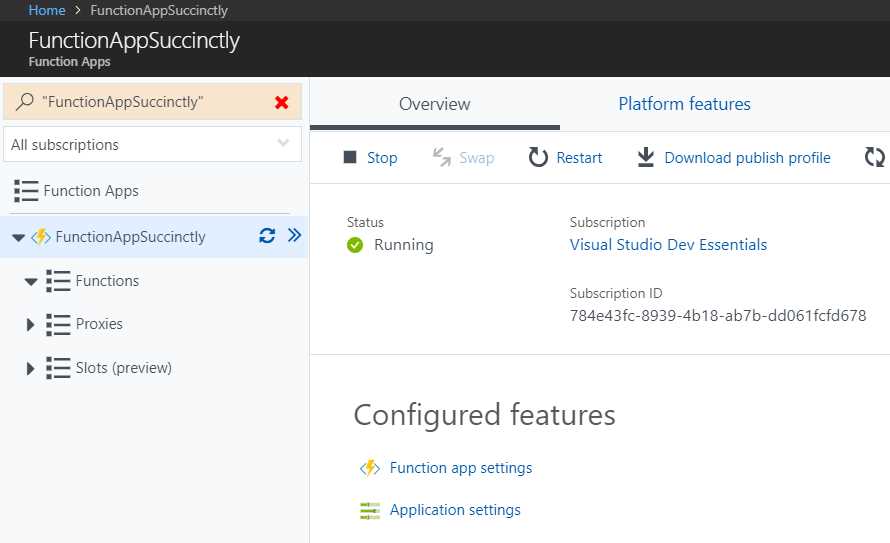
Figure 2-c: The Newly Created Function App
We won’t go through all the features that this Azure Functions app dashboard contains. The Azure Portal user interface is frequently updated, and most of the items and labels are self-descriptive and easy to understand. Instead, we’ll just focus our attention on the crucial items and the ones we need as we progress.
It’s important to understand that from the moment the Azure function app is created, it’s essentially active, meaning that it can execute code, but this doesn’t mean that it is incurring costs.
On the dashboard, it is possible to start, stop, and restart the Azure function as well as set a broad range of options and properties—from application settings, to deployment options, authentication, and more.
After an Azure function app has been created, by default it is optimized to use the best possible settings given the original requirements you defined. That means there’s no need to stress about tuning your app options. They’re probably as good as they can already be.
What is important is how to start using it, and to do that, we need to create our first function.
Creating a function
To create a new function, all we need to do is click the + button next to Functions, as you can see in the following figure.
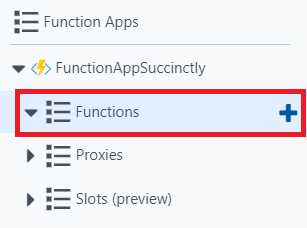
Figure 2-d: Creating a New Function
Once you’ve clicked the + button, you’ll see a screen that is self-explanatory and easy to navigate. Let’s have a look.
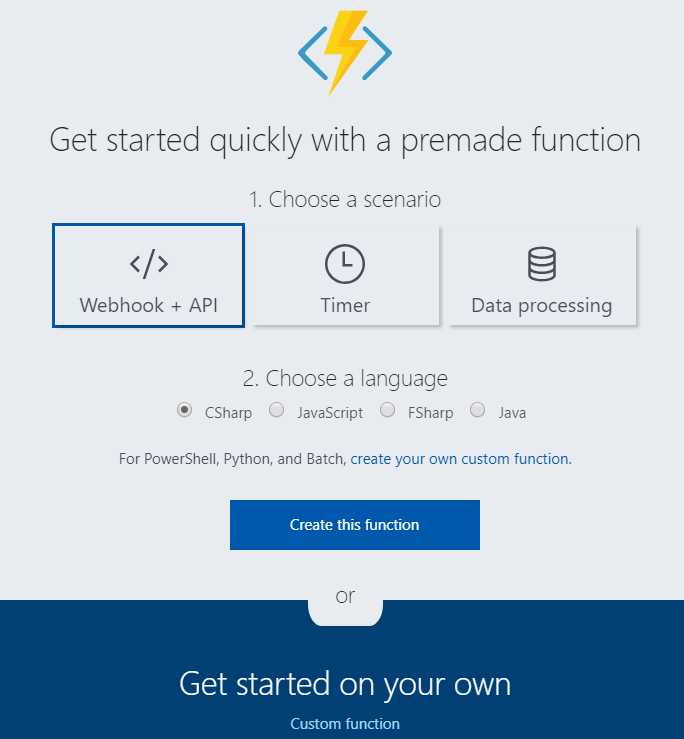
Figure 2-e: Functions—Getting Started Screen
In a screen that looks like the one shown in Figure 2-e, we can easily choose the type of function that we want to create. Let’s start off by creating a simple webhook using C# (the default option). So, go ahead and click Create this function.
Once we have done that, we get the code shown in Listing 2-a.
Listing 2-a: The Default Webhook Azure Function Code
using System.Net; public static async Task<HttpResponseMessage> Run(HttpRequestMessage req, TraceWriter log) { log.Info("C# HTTP trigger function processed a request."); // parse query parameter string name = req.GetQueryNameValuePairs() .FirstOrDefault(q => string.Compare(q.Key, "name", true) == 0) .Value; if (name == null) { // Get request body dynamic data = await req.Content.ReadAsAsync<object>(); name = data?.name; } return name == null ? req.CreateResponse(HttpStatusCode.BadRequest, "Please pass a name on the query string or in the request body") : req.CreateResponse(HttpStatusCode.OK, "Hello " + name); } |
Here’s how it looks on the Azure Portal.
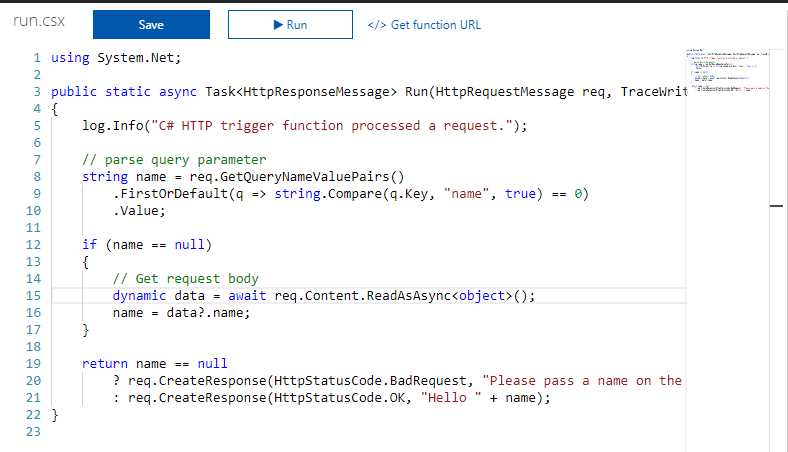
Figure 2-f: The Default Webhook Azure Function Code
What does this code do? Let’s explore it briefly by dissecting each of the main parts of this function.
The first part of the Azure function is responsible for parsing the query parameters that are passed to the function itself.
Listing 2-b: Parsing the Query Parameters
// parse query parameter string name = req.GetQueryNameValuePairs() .FirstOrDefault(q => string.Compare(q.Key, "name", true) == 0) .Value; |
Basically, req is an instance of the HttpRequestMessage class. The GetQueryNameValuePairs method is executed, which is responsible for getting the parameters passed to the Azure function.
Then using LINQ, the value of the first parameter name is returned if it is found within the list of parameters.
In short, what this piece of code does is retrieve the value of the name parameter, which is passed to the Azure function.
The next part is shown in the following code snippet.
Listing 2-c: Parsing the Request Body
if (name == null) { // Get request body dynamic data = await req.Content.ReadAsAsync<object>(); name = data?.name; } |
All this really does is retrieve the request body content by invoking the req.Content.ReadAsAsync method and assign the result to a dynamic variable. This variable is then used to obtain the name property (in case data is not null), thus the syntax data?.name (where the ? indicates that the object can be null).
Within the two previous snippets of code—the one that parses the query parameters, and the one that gets the body request—the code is doing the same thing, which is returning the value of a parameter called name.
Why do that at all? Surely it would be sufficient to just inspect the query parameters or the request body, right? The thing is, webhooks don’t often only pass along query parameters or a request body—they might pass both. This is the reason why both options are used within the Azure function.
We now come to the last bit of the Azure function, which simply executes the req.CreateResponse method in order to create an HTTP response with the value of the name parameter.
Although it might appear that a lot happens inside this function, not much is going on besides reading the value of a name parameter (either from the function’s query parameters or from the request body), which is sometimes referred to as the payload of the webhook, and then simply returning a response with the value read.
All this predefined function gives us is some boilerplate code with certain guidelines that we can use to write our own code.
Now that we’ve created our first function and explored what it does, let’s have a look at how we can test it using the Azure Portal.
Testing a function
To test the function that we just created within the Azure Portal, all we really need to do is open the Test pane on the right-hand side of the screen to check what parameters we can pass on to the function, and then click the Run button at the top.
Here’s where we can find the Test pane, as shown in the following figure.
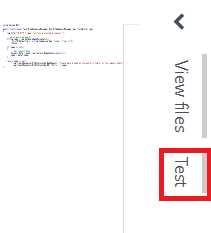
Figure 2-g: The Test Pane Tab
Here’s where we can find the Run button. See the following screenshot.

Figure 2-h: The Run Button
Before clicking Run, let’s open the Test pane to see what we have available for testing.
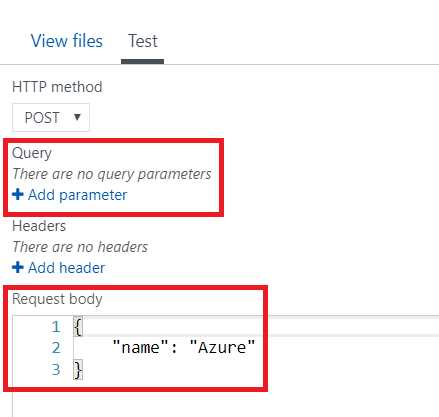
Figure 2-i: The Opened Test Panel
As you can see, I’ve highlighted the Query parameters section and the Request body section.
By default, the Azure Portal provides a JSON object with the name parameter and a value that can be used for testing.
To quickly test the function, all we need to do is click Run. After doing that, we can see the following result on the Test pane.

Figure 2-j: Testing Results
As we can see, the function has returned the correct string based on the input name parameter provided to the function through the request body.
The great thing about the Test pane is that we can also test our function by passing query parameters and header values.
Now that we’ve briefly seen how to test an Azure function, let’s explore how we can create queues and blobs by using the Azure Storage Explorer.
Azure Storage Explorer
One very useful tool when working with Azure Functions is the Microsoft Azure Storage desktop application, which is available for free.
So, go ahead and download it. Once that’s done, double-click the executable, and you’ll see an installation screen as follows.
Figure 2-k: Azure Storage Explorer Installer
The installation itself is very simple and straightforward, so there should be no difficulty installing this tool. At the end of the installation process, you’ll be asked to launch the application.
When you run the application for the first time, you’ll be asked to sign in with your Microsoft account. Once you’ve done that, you’ll see the following.
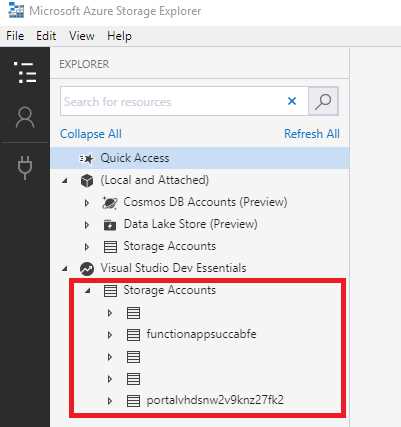
Figure 2-l: Storage Accounts in Storage Explorer
As you can see, these are all the Azure Storage accounts that exist within my Azure subscription. It might look different on your system.
When we created our Azure Functions application, a new storage account was automatically deployed as well, which in my case corresponds to the item functionappsuccabfe as shown in the previous screenshot. (The trailing “abfe” in the identifier represents four hex values, and it's just a coincidence in my case that all four digits were letters).
Let’s expand the storage account to see what we have available.
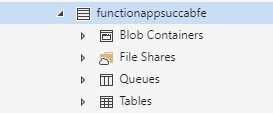
Figure 2-m: Items of an Azure Storage Account
We can see that the storage account is divided into various storage types: blob containers, file shares, queues, and tables.
We will use a couple of blob containers and a single queue for the examples that follow.
Let’s create the items that we need, starting with a new blob container. We can do this by simply right-clicking Blob Containers and choosing Create Blob Container. Next, give it a name. I’ll call mine hello-requests.
Once the blob container has been created, we can go into the pane on the right and manipulate the blobs within the blob container. For example, we can upload files into the blob storage or examine existing items in the blob container.
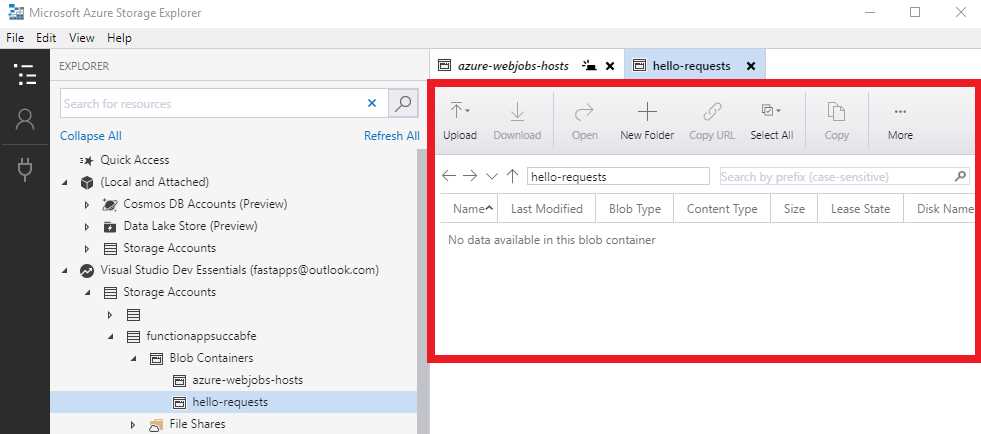
Figure 2-n: The Newly Created Blob Container
With our first blob created, let’s repeat the same steps to add a second blob, which I’m going to call receipts (we’ll use this later).
Let’s go ahead and create a queue. We can do this by right-clicking Queues and naming it hello-creation-requests. We should now see the following items.

Figure 2-o: Items Created—Storage Account
Just like with blob containers, we can use the right pane within the Azure Storage Explorer application to add new items to the queue and to delete queues.
Sharing code between functions
Now that we’ve seen how to use the Azure Storage Explorer to create blob and queue containers, which is a fundamental aspect of interacting with Azure Functions, it’s also important that we look at how we can share code between various functions within the same Azure Functions application.
In the examples that follow, we are going to be sharing a few classes between all the functions of our application. The best way to do this is to create a shared code function that doesn’t execute, but instead, hosts the code that we want to share with the rest of the functions within the Azure Functions application.
So, going back to the Azure Portal, open the Azure Functions application we previously created and create a new function by clicking the + button, as highlighted in the following figure.
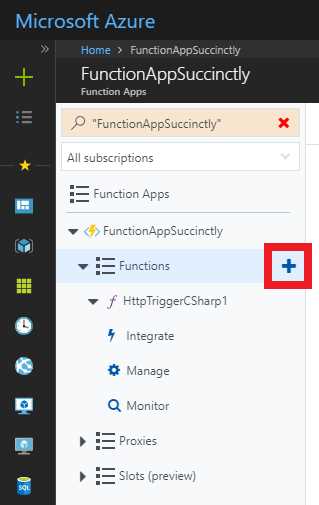
Figure 2-p: Create a New Function
This time we are going to select Manual trigger from the list of available function templates. You might need to scroll down through the list of available function templates to find it.
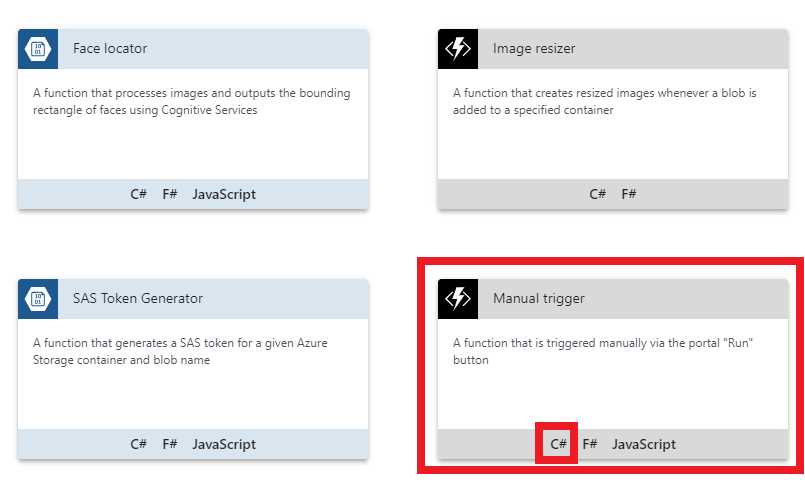
Figure 2-q: The Manual Trigger Function Template
You can create the function according to your programming language preference. In my case, I’ll click the C# option.
Once you’ve clicked the option, you’ll be asked to give the function a name, as shown in Figure 2-r. I’ve called the function SharedCode. After naming it, click Create to create the function.
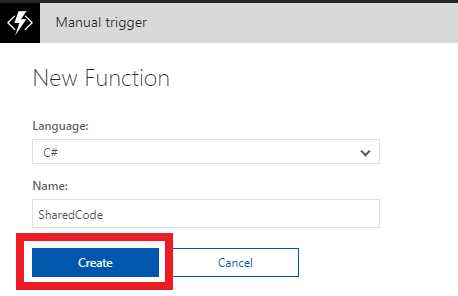
Figure 2-r: New Function Dialog
In principle, we now have a container that will host our shared code. By default, the following code has been added to the function by the Azure Portal.
Listing 2-d: Default Manual Trigger Function Code
using System; public static void Run(string input, TraceWriter log) { log.Info( $"C# manually triggered function called with input: {input}"); } |
With this in place, click the View files tab on the right-hand side of the screen. Now, let’s add our first class by clicking Add and name our file CreateHelloRequest.csx (where the .csx extension indicates a C# script, introduced with the release of the Roslyn compiler).
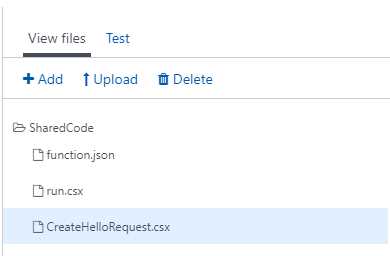
Figure 2-s: CreateHelloRequest.csx under View files
In the middle of the Azure Portal screen, you should see a blank area where we can add some code to CreateHelloRequest.csx.
I’ll go ahead and add the following boilerplate code to save you some time.
Listing 2-e: CreateHelloRequest Code
public class CreateHelloRequest { public string Number; public string FirstName; public override string ToString() => $"{FirstName} {Number}"; } |
This class represents a request to create a greeting for a given phone number and a given first name. This will ultimately result in a text message being sent to the number with a hello message using the first name.
Before doing anything else, make sure you click Save to update CreateHelloRequest.csx.
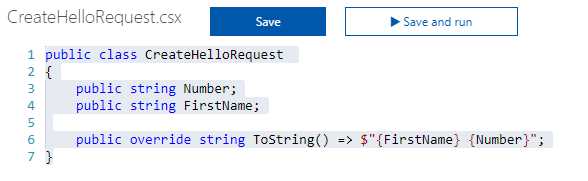
Figure 2-t: The CreateHelloRequest Code
Let’s go back to the View files pane to create a new file called HelloRequest.csx and paste the following code. Make sure you save the file.
Listing 2-f: HelloRequest.csx Code
public class HelloRequest { public string Number; public string Message; public override string ToString() => $"{Number} {Message}"; } |
Here we’ve overwritten the ToString method to return the Number to which we want to send the request and the Message we want to send.
Next, on the View files pane, let’s create another file called MsgSentConfirmation.csx and paste the following code. Don’t forget to save the file.
Listing 2-g: MsgSentConfirmation.csx Code
public class MsgSentConfirmation { public string Number; public string Message; public string ReceiptId; public override string ToString() => $"{ReceiptId} {Number} {Message}"; } |
This class is going to act as an audit log and confirm that a message was sent to a specific Number with a specific Message, and we’ll also keep the ReceiptId of the message gateway. What we are doing here is simulating an SMS gateway.
With this sharing code approach, it’s important to tell our Azure Functions app to monitor the SharedCode folder so that anytime changes occur to classes within this folder, any function that uses these classes can be also updated.
In order to do this, we need to edit the host.json file within the App Service Editor. This can be found under Platform features, as shown in the following screenshot.
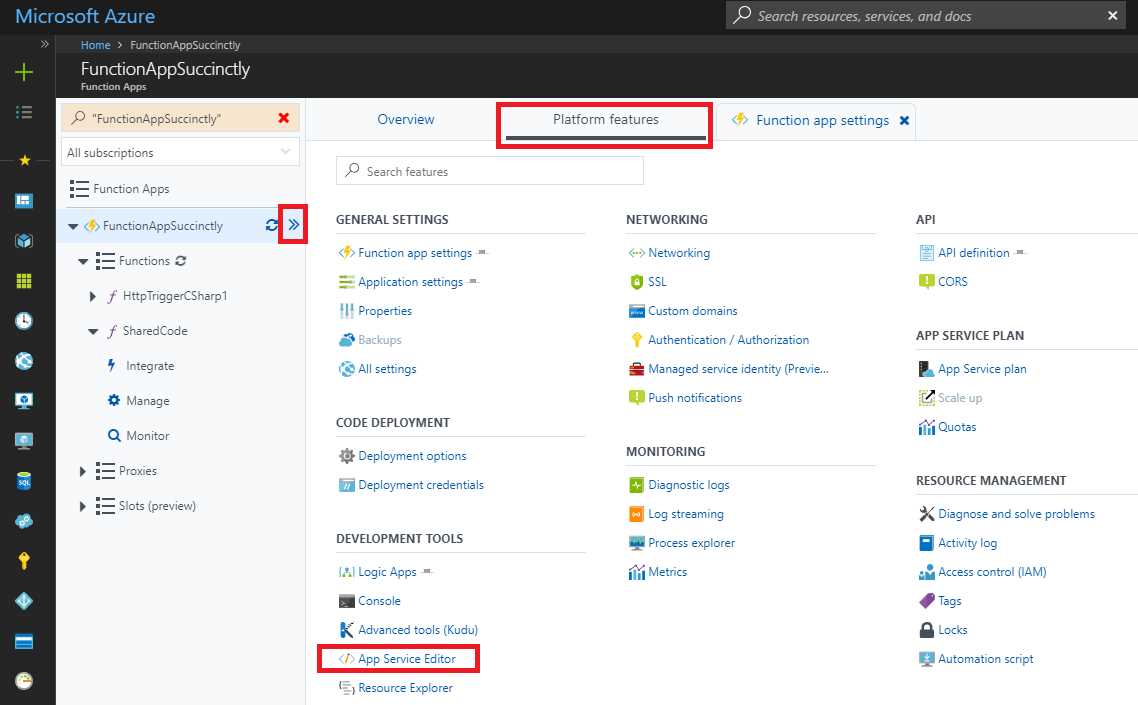
Figure 2-u: Function Apps Platform Features
Once you’ve clicked the App Service Editor option, a new tab should open in your browser, and you’ll be presented with a screen like the following one. Here you’ll be able to find the host.json file under the SharedCode item, as shown in the following figure.

Figure 2-v: App Service Editor
Once you’ve clicked the host.json file, you’ll be presented with an editor. Let’s go ahead and update this file. There is a setting we need to add to monitor the SharedCode folder, as follows.
Listing 2-h: The Updated host.json File
{ "watchDirectories": ["SharedCode"] } |
Notice how the host.json file is automatically saved after you add the entry.
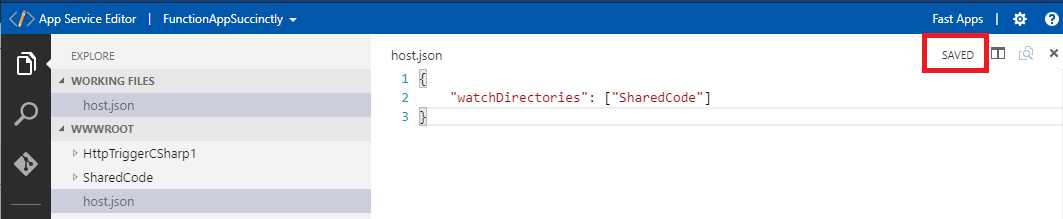
Figure 2-w: The host.json File Automatically Saved
The interesting thing about the watchDirectories setting is that if there is any change on any of the files contained within the SharedCode folder, the functions will get recompiled, which is also cool and handy.
With this done, let’s head back to the original tab where we have opened the Azure Portal and create a new manually triggered function. We’ll use this to reference the shared code function we just created.
Using shared code
Just like we did for our shared code function, let’s go ahead and create a new function by using the Manual trigger function template.
I’ll call this function ManualTrigger, but feel free to use any other name. As its name suggests, you can execute a manually triggered function from within the Azure Portal by clicking the Run button.
With the function created, let’s go ahead and modify the default code that was provided out of the box.
The first thing we are going to do is add a reference to one of the shared classes from the shared code function we previously created. To do this, we can use the special #load directive, and between quotation marks, indicate the name of the file that we want to load.
We can achieve this by modifying run.csx as follows.
Listing 2-i: Adding a Shared Code Class
#load "..\SharedCode\CreateHelloRequest.csx" using System; public static void Run (string input, TraceWriter log) { log.Info( $"C# manually triggered function called with input: {input}"); } |
Notice how we need to go up one folder level by using two periods right after the first quotation mark on the file path, and then finally go down into the SharedCode folder to load the CreateHelloRequest.csx file.
Now that we have a reference to the CreateHelloRequest class, let’s make the necessary modifications to put this functionality to work and test it out.
To achieve this, the second modification we need to apply to the previous code is change the string parameter of the Run method with a CreateHelloRequest parameter instead.
Listing 2-j: Adding a CreateHelloRequest Parameter
#load "..\SharedCode\CreateHelloRequest.csx" using System; public static void Run (CreateHelloRequest input, TraceWriter log) { log.Info( $"C# manually triggered function called with input: {input}"); } |
If we now click Save and add a JSON object to test with, passing the parameters required by the CreateHelloRequest class, we get the following results.

Figure 2-x: Testing with the CreateHelloRequest Parameters
As you can see, this works—nothing extraordinary, as the Run method is simply printing out the values passed through the CreateHelloRequest class. The interesting thing is that we were able to easily use a class that has been defined in another Azure function by simply adding a reference to it and passing the class name as a parameter.
Adding a message to the queue
In the real world, what we’ve just done—simply printing out values to the console—is not particularly useful, although it is valuable for testing.
What we really should aim to achieve is to do something with the data we receive through the Run method. When we run this function, we want to add a new message to the queue that we created previously using Azure Storage Explorer.
To do this, we need to go over to the Integrate option under the name of our Azure function and add a new output of type Azure Queue Storage, as follows.
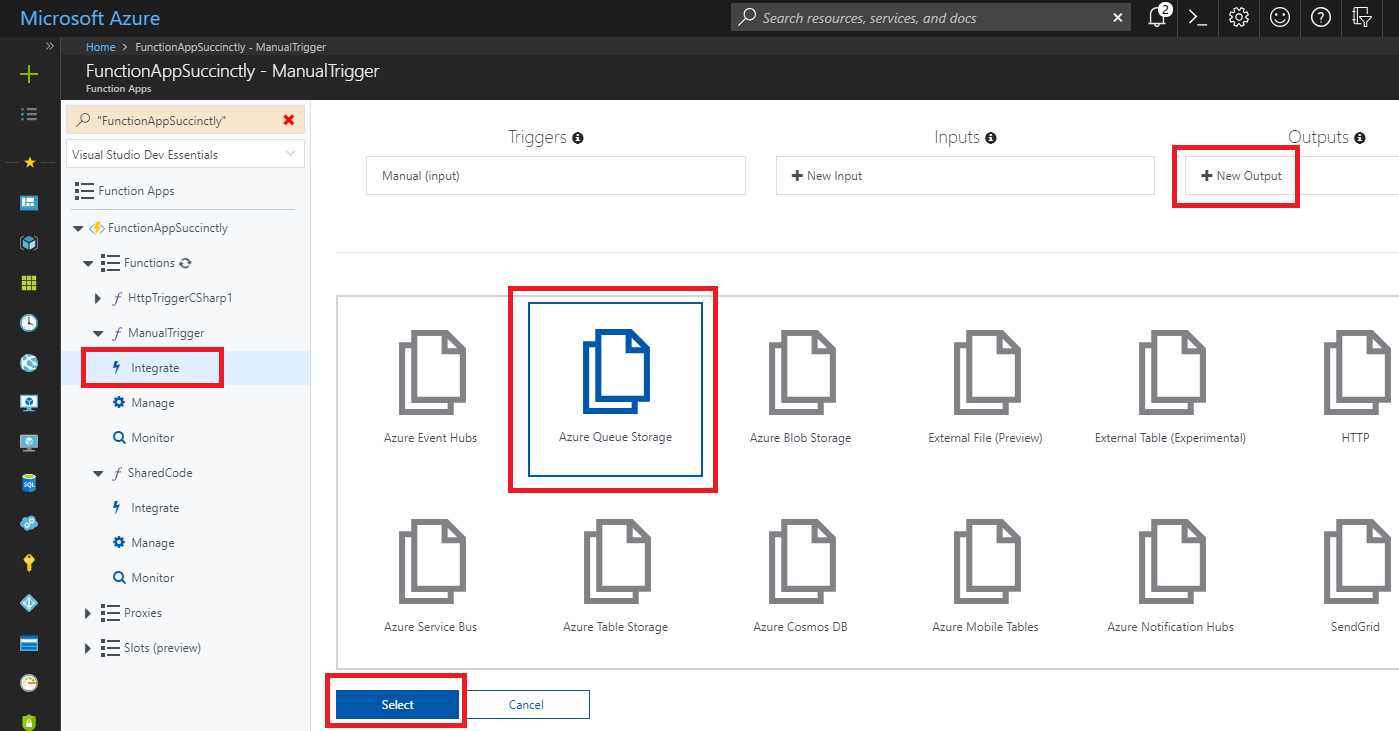
Figure 2-y: Adding an Azure Queue Storage as an Output Type (Step 1)
Once the Azure Queue Storage option has been selected, Azure asks us to add some additional details to finish configuring our queue storage. After clicking Select, you’ll see the following screen.
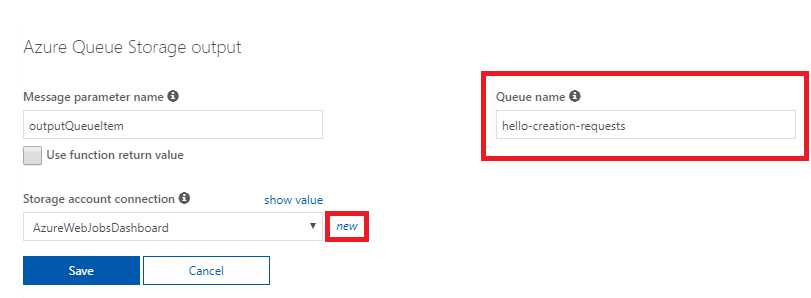
Figure 2-z: Adding an Azure Queue Storage as an Output Type (Step 2)
We can leave the Message parameter name with the default value; what we are really interested in changing is the Queue name. Here we need to use the same name we used when we created our queue using Azure Storage Explorer, which in my case was hello-creation-requests, as shown in Figure 2-z.
We also need to create a new Storage account connection. We can do this by clicking the new link next to the Storage Account connection drop-down list, as shown in Figure 2-z. After that, we’ll be asked to select the storage account we want to use.
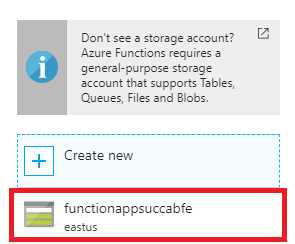
Figure 2-aa: Selecting a Storage Account
Once the storage account has been selected, it will appear as the selected option under Storage account connection. Select the storage account and click Save. The account connection will automatically have _STORAGE added to the end of its name.
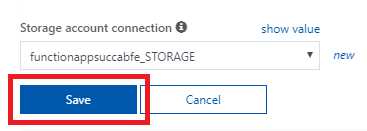
Figure 2-ab: Save the Azure Queue Storage Output
The Azure Queue Storage output will be shown at the top of the Outputs list, as highlighted in the following screenshot.
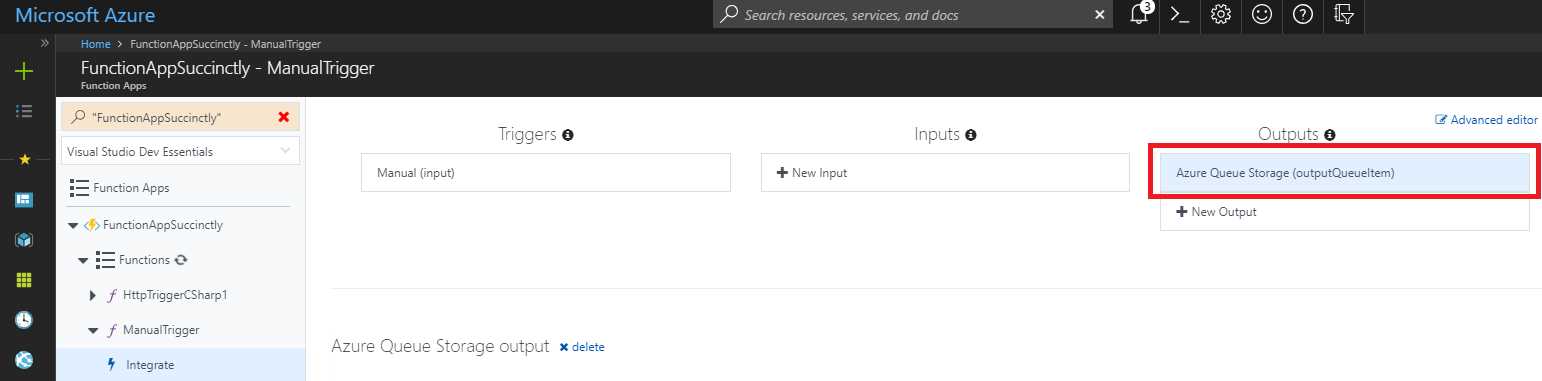
Figure 2-ac: Output List
Now that we have the output defined to an Azure Queue Storage, we need to go back to our code and modify the Run method. We need to add an extra parameter of type CreateHelloRequest, as shown in the following code listing.
Listing 2-k: Adding a CreateHelloRequest Parameter
#load "..\SharedCode\CreateHelloRequest.csx" using System; public static void Run (CreateHelloRequest input, TraceWriter log, out CreateHelloRequest outputQueueItem) { log.Info( $"C# manually triggered function called with input: {input}"); outputQueueItem = input; } |
Notice how we named the new out parameter outputQueueItem to match the binding we recently created (see Figure 2-z).
Also notice that we’ve had to assign to outputQueueItem the value of input; otherwise, we would get a compilation error if we were to run this method. This is because outputQueueItem has been defined as an out parameter, which means that a value must be assigned to it before the method finalizes.
If we now run this method and then open the Azure Storage Explorer application we previously installed, we should be able to see an entry added to our hello-creation-requests queue.
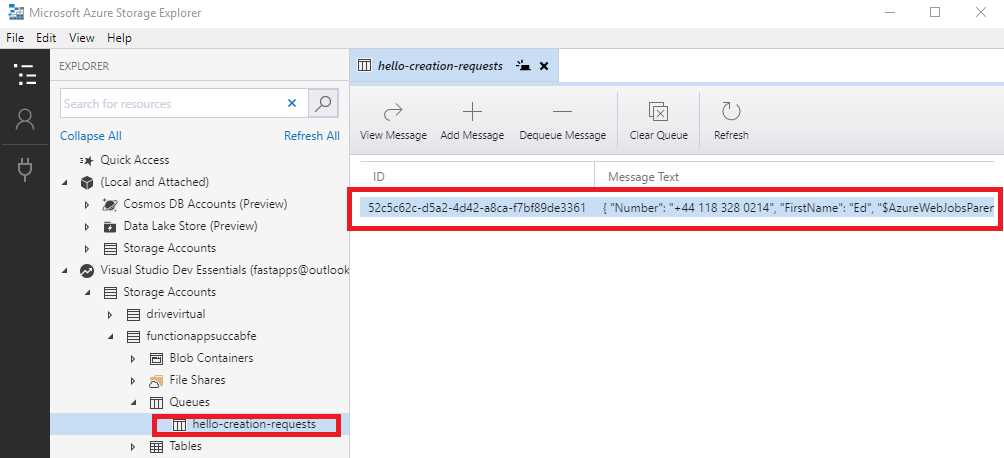
Figure 2-ad: Entry Added to the Azure Queue Storage
We can now see how the pieces are starting to fit together. If you double-click this queue entry, you’ll be able to see its content.
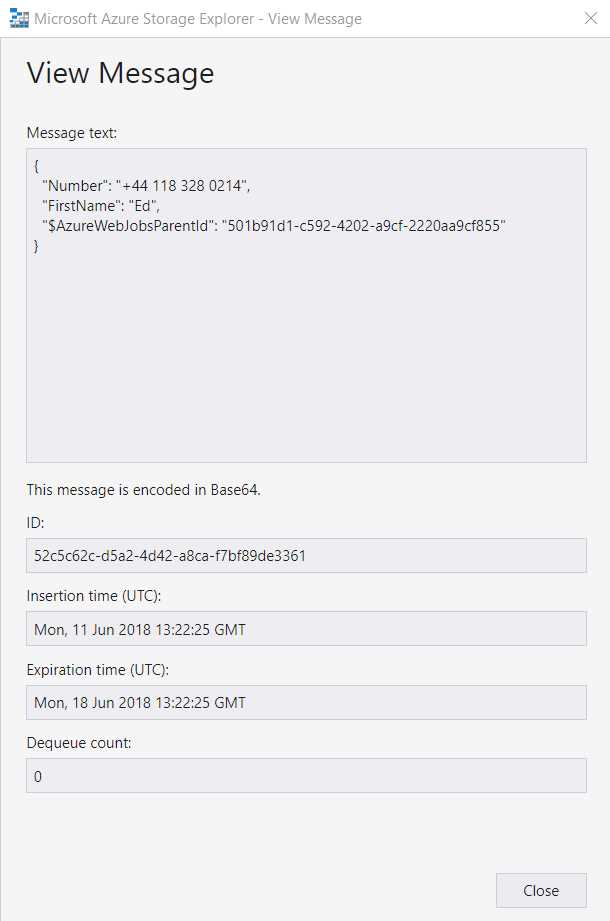
Figure 2-ae: Details of the Entry Added to the Azure Queue Storage
As you can see, the details have been saved into the queue as they were written—this is what we were expecting.
Now that we have this function that we can manually execute to add messages to the queue, let’s create a new function with a queue trigger to monitor this queue and automatically execute the function whenever a new message is added to the queue.
Adding a new queue trigger function
Let’s go ahead and create a new function by clicking the + button, as shown in Figure 2-p. This time, however, we are going to choose the Queue trigger template using C#, as shown in the following figure.
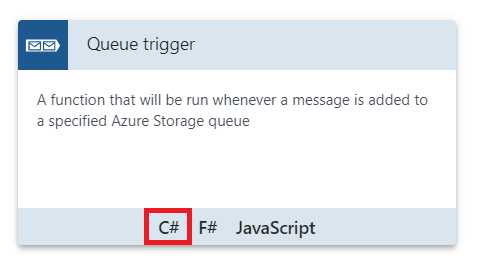
Figure 2-af: The Queue trigger Template Using C#
Once you’ve clicked the C# option, you’ll be presented with a screen where you’ll be asked to enter the Name of the function and the Queue name, and to select the Storage account connection. In my case, I’ve specified the following details.
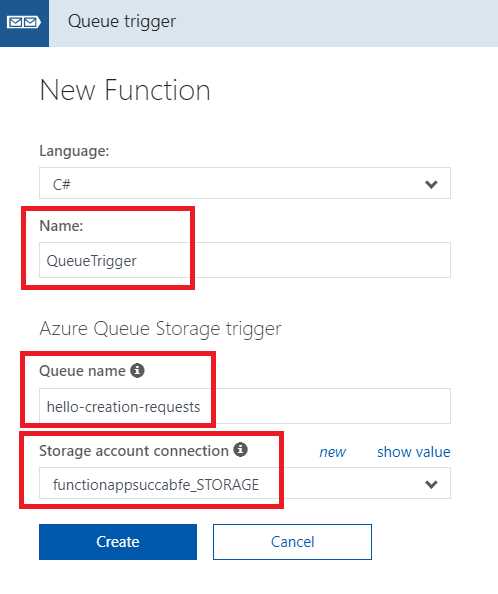
Figure 2-ag: The Queue Trigger Function Details
Notice how I’ve specified hello-creation-requests as the Queue name and selected the same Storage account connection we previously used.
Once you’ve specified the details, click Create to finalize the creation of the function.
With this done, any time we get a new message on the hello-creation-requests queue, this function will automatically execute, which is what we want.
Now that the function has been created, let’s have a look at its Run method, as follows.
Listing 2-l: The Run Method of the Queue Trigger Function
using System; public static void Run (string myQueueItem, TraceWriter log) { log.Info( $"C# Queue trigger function processed: {myQueueItem}"); } |
We can see that there’s a myQueueItem parameter, which we haven’t seen before. When this function is being triggered (when a new message being added to the queue), myQueueItem will contain the value of the message that triggered this function.
What this function is going to do next is take the CreateHelloRequest message from the queue, examine the current time, and create a hello greeting. Then, it is going to use the first name data from the message. Once the greeting has been created, it will place it on a blob within blob storage.
To do this, let’s add a new output of type of Blob Storage. Go to the Integrate option below the QueueTrigger function, and then click New Output.
Then, click Azure Blob Storage and select this option.
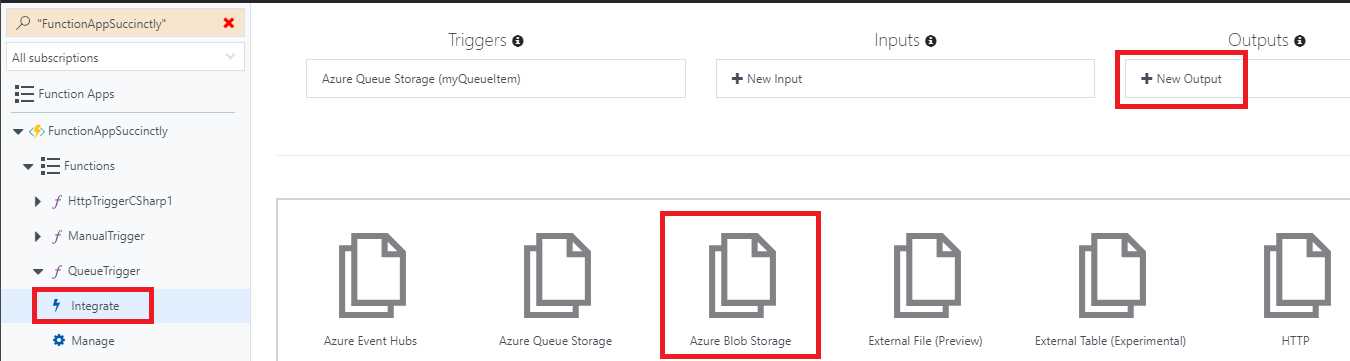
Figure 2-ah: Adding a New Blob Storage Output
In the screen that follows, let’s leave the parameter name as outputBlob (the default) and change the name of the blob to hello-requests, which we previously created.
We’re also going to choose the Storage account connection and set it to the same one we’ve been using so far. We can see this as follows.
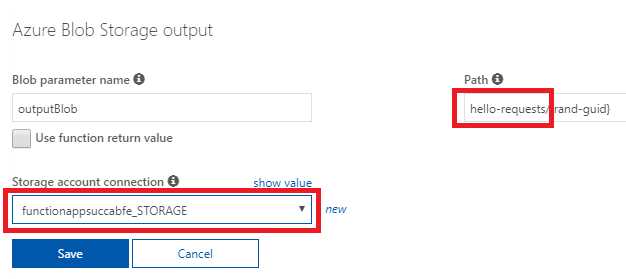
Figure 2-ai: Blob Storage Output Setup
Don’t forget to save the changes. Then, we’ll head back to the run.csx code, and add an additional parameter—outputBlob—that binds this to a new blob storage output.
I’m now going to paste a method called GenerateHello—which takes a first name and then generates a message based on the time of the day (it just appends the first name passed into the GenerateHello returned string).
Listing 2-m: The Updated run.csx for QueueTrigger
using System; public static void Run (string myQueueItem, TraceWriter log, out string outputBlob) { log.Info( $"C# Queue trigger function processed: {myQueueItem}"); } private static string GenerateHello (string firstName) { string hello; int hourOfTheDay = DateTime.Now.Hour; if (hourOfTheDay <= 12) hello = "The Morning..."; else if (hourOfTheDay <= 18) hello = "The Afternoon..."; else hello = "The Evening..."; return $"{hello} {firstName}"; } |
All this looks good so far, and the code is straightforward. However, we still need to add the references to the CreateHelloRequest and HelloRequest classes from our shared code. We can do this as follows.
Listing 2-n: References to the Shared Code
#load "..\SharedCode\CreateHelloRequest.csx" #load "..\SharedCode\HelloRequest.csx" |
Now the run.csx code should look as follows.
Listing 2-o: The Updated run.csx Code
#load "..\SharedCode\CreateHelloRequest.csx" #load "..\SharedCode\HelloRequest.csx" using System; public static void Run (string myQueueItem, TraceWriter log, out string outputBlob) { log.Info( $"C# Queue trigger function processed: {myQueueItem}"); } private static string GenerateHello (string firstName) { string hello; int hourOfTheDay = DateTime.Now.Hour; if (hourOfTheDay <= 12) hello = "The Morning..."; else if (hourOfTheDay <= 18) hello = "The Afternoon..."; else hello = "The Evening..."; return $"{hello} {firstName}"; } |
We had to add these references, as it’s an instance of the HelloRequest class that we are going to output to the blob storage.
So far so good, but have you noticed that we still need to do something to our code?
For this to work, we need to change the type of myQueueItem from string to CreateHelloRequest.
In addition to that, we’ll also need to create an instance of HelloRequest and assign the Number field of this object. As for the Message field, we’ll assign it the value returned from the GenerateHello method.
As an input to the GenerateHello method, we’ll pass the firstName from the incoming queue message.
We’ll still need to assign an output value to the output blob parameter—we’ll have to serialize HelloRequest as JSON and pass this out as a JSON string. To be able to do this, we’ll have to reference the Newtonsoft.Json library and add a using directive to the Newtonsoft.Json namespace.
Then, we can assign the value to the outputBlob parameter. We’ll need to use the SerializeObject method from JSON.NET by passing in the HelloRequest object.
Let’s see what all these changes look like. I’ve emphasized them in bold in the following code listing so they’re easy to spot.
Listing 2-p: The Final run.csx for QueueTrigger
#load "..\SharedCode\CreateHelloRequest.csx" #load "..\SharedCode\HelloRequest.csx" // In a .csx script file, the #r syntax is used to reference a .NET // assembly #r "Newtonsoft.Json" using System; using Newtonsoft.Json; public static void Run (CreateHelloRequest myQueueItem, TraceWriter log, out string outputBlob) { log.Info( $"C# queue trigger function processed: {myQueueItem}"); var helloRequest = new HelloRequest { Number = myQueueItem.Number, Message = GenerateHello(myQueueItem.FirstName) };
outputBlob = JsonConvert.SerializeObject(helloRequest); } private static string GenerateHello (string firstName) { string hello; int hourOfTheDay = DateTime.Now.Hour; if (hourOfTheDay <= 12) hello = "The Morning..."; else if (hourOfTheDay <= 18) hello = "The Afternoon..."; else hello = "The Evening..."; return $"{hello} {firstName}"; } |
It’s always recommended that you click Save after you’ve made any changes to the code. Not only will this effectively save the recent changes, but also compile the code and highlight any potential errors.
If the compilation has not returned any errors (as would be expected if the steps have been followed), then it’s now time to test the code.
Testing the queue trigger function
To test the queue trigger function that we’ve just created, let’s head back to the previously created manual trigger function.
Use the same test data we used before, and then click the Run button within the Test pane.
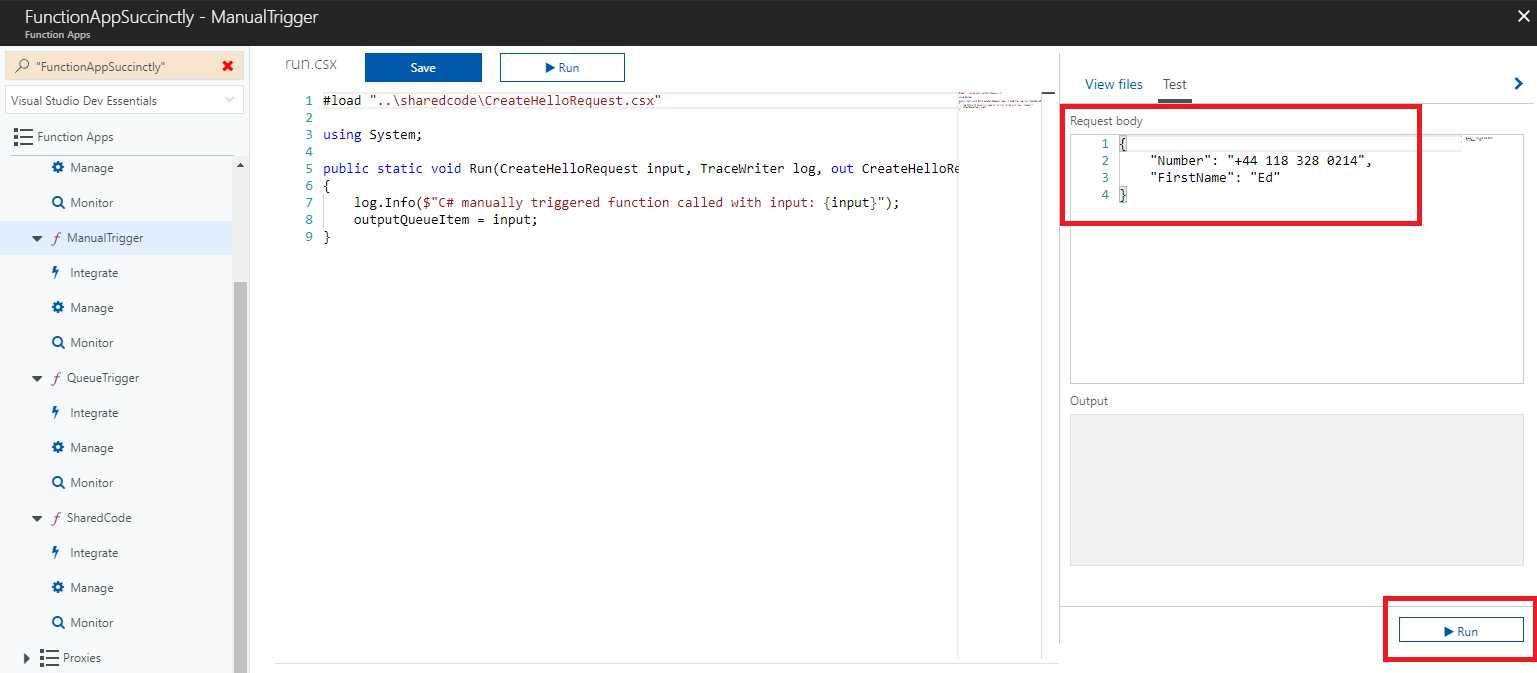
Figure 2-aj: The Manual Trigger Function
After running this function, go to the Azure Storage Explorer and refresh the content of the hello-requests blob. You’ll notice that a new item has been added.
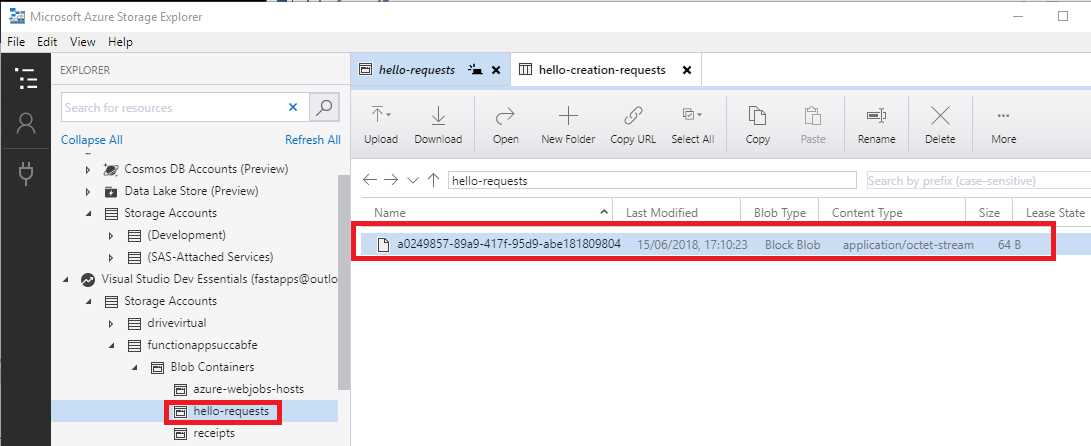
Figure 2-ak: Item Added to the Blob
If you now navigate to the hello-creation-requests queue, you’ll see that the queue item was removed. After we ran the manual trigger function, an entry was added to the hello-creation-requests queue, and this triggered the execution of the queue trigger function, which read (and removed) the queue entry, and then created the hello-requests blob entry.
To see the actual value written to the blob, simply double-click the blob entry and open it with a text editor if prompted. See the following figure.
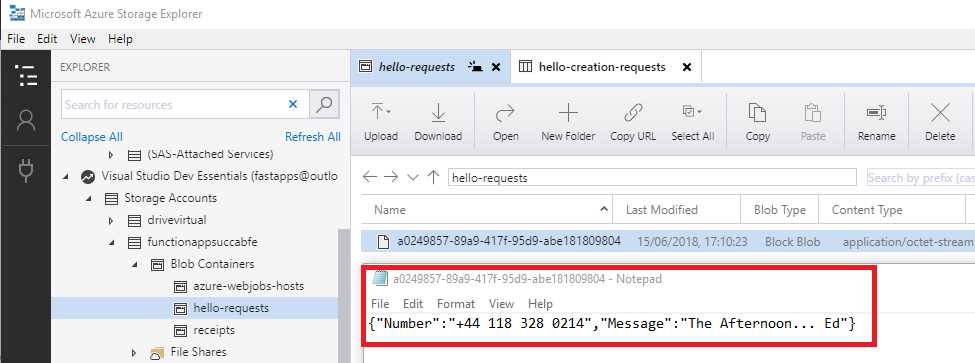
Figure 2-al: The Blob Entry Content
We can clearly see that the GenerateHello method did its job, as it returned the correct concatenated string—in my case, “The Afternoon… Ed”.
The static Run method
Something very important that you might not have even thought about is that the Run method of an Azure function is static.
This might seem like something trivial, but it is not. Let me explain why. When I was testing the interaction between the manual trigger and queue trigger functions, I accidently removed the static keyword from the Run method of the queue trigger function.
The consequence of this innocent mistake—which took me a while to figure out (and which I still haven’t been able to find properly documented anywhere)—was that the queue trigger function was not actually able to execute at all.
The difficulty of troubleshooting this was that everything looked like it was correctly set up, but it was difficult to determine whether the actual Run method within the queue trigger function was doing something.
This is so very important: always make sure your Run method is correctly marked as static to avoid losing time and running into unexpected situations.
Summary
It’s been a long but interesting chapter—I couldn’t have made it any shorter, even if I wanted to—and we managed to cover quite a lot of ground.
The main goal of this chapter was to walk you through all the steps required to get a small, but workable scenario where a couple of Azure functions work together, one triggering the other by sharing some common code, and using essential Azure components such as blobs and queues to establish that interaction.
I think we achieved this objective and managed to glue all these pieces together and build something precise, while keeping things as simple as possible.
In the next chapter, we are going to explore blob and timer triggers in more detail. One of the things we’ll do is to create a function that has a blob trigger, which will notice that we’re writing messages and execute the function.
Before we dive into those details, we’ll also have a quick look at queue trigger metadata.
- 1800+ high-performance UI components.
- Includes popular controls such as Grid, Chart, Scheduler, and more.
- 24x5 unlimited support by developers.