
Azure Durable Functions Succinctly®

CHAPTER 1
Azure Functions Recap
Serverless architecture
Serverless architecture is one of the trendy architectures of the moment, and sometimes people use fashionable architecture just because it is fashionable, and not because it’s needed.
Using the wrong architecture means having problems that you wouldn't have if you’d chosen the correct one. For this reason, the most important thing to understand before starting to use Azure Functions and Durable Functions is what serverless architecture is, and what kind of scenarios it addresses.
A serverless architecture (or the serverless technologies you can use to implement it) is based on the following pillars:
- Infrastructure abstraction
- Event-driven scalability
- Pay-as-you-go pricing model
Infrastructure abstraction means that you don't care about the infrastructure layer when your code runs. You write your code and deploy it on the platform, and the platform (Azure) chooses when your code runs. For this reason, serverless architecture is a PaaS (platform as a service) solution, and Azure gives you some technologies to implement it.
Event-driven scalability means that the platform scales your code (typically increasing or decreasing the number of the resources, behind the scenes, that host your code) as it needs, based on the number of events your solution receives. This consideration implies that you can use a serverless architecture when your solution manages events. If you don't have events in your scenario, serverless architecture is probably not the best choice.
The pay-as-you-go pricing model means that you pay only for the times your serverless code is executed. If you don't receive any events in your solution, you don't pay any money. On the other hand, if you receive one billion events and the platform scales to manage them, you pay for one billion of them.
To make an actual example, consider using Azure App Service. Azure App Service is a PaaS service provided by Microsoft Azure that allows you to host an HTTP application (like a website). App Service is not a serverless technology because:
- You don't manage the virtual machines (VM) behind the scenes of your app service instance, but you have to declare the power of those VMs. For this reason, you are not completely abstracted from the infrastructure that hosts your application behind the scenes.
- Even if your website manages HTTP calls, and you can consider an HTTP call as an event (someone wants to retrieve your home page), your App Service instance doesn't scale to manage any number of requests. The limit of the App Service is the App Service plan you use.
- You pay a monthly fee for the App Service plan you are using in your App Service, and you pay it even if nobody calls your website.
App Service doesn't match at least two of the three pillars of a serverless technology (event-driven scalability and pay-as-you-go pricing model). For this reason, App Service is not a serverless technology.
Azure serverless technologies
Azure has several serverless technologies, and the most important are:
- Azure Functions
- Azure Logic Apps
- Event Grid
We will talk about Azure Functions shortly.
Azure Logic Apps is a PaaS service that allows you to create a workflow to integrate and orchestrate data between external systems. Azure Logic Apps gives you a graphic editor that allows you to build workflows using building blocks, called connectors, to process, retrieve, and send data to external services.
The following figure shows you a simple logic app that copies a file from DropBox in OneDrive. As you can see, the workflow has a construct "if" in its definition: the logic app copies all the files with a name ending in .jpg to a specific folder.

Figure 1: A simple logic app that moves files between DropBox and OneDrive
One of the most important components of logic apps is connectors. When writing this book, the Logic Apps platform has more than 400 connectors for several enterprise services like SAP, Oracle, and IBM 3270.
The following figure shows you some of the most important connectors provided by Logic Apps.

Figure 2: Some of the most important connectors in Logic Apps
Every connector allows you to interact with a specific external service. It can have one or more triggers and actions. A trigger is a component that starts your logic app when an event occurs, while an action allows you to interact with an external service, for example, to save or read data from a database or send an email using Office 365.
You can consider Logic Apps a low-code or no-code platform. You don't need to know a programming language to create your workflow. At this moment, the most important limitation is that a logic app can run only in Azure, but Microsoft is working to make Logic Apps portable, like Azure Functions.
Azure Event Grid is the Azure routing event engine. It allows you to publish an event from any source and route it through any other destination. Event Grid implements the publish/subscribe pattern.
When you want to route an event from a source to a destination, you create an event grid topic to connect the event producer to the routing engine, and an event grid subscription to propagate the event from the event routing engine to the destination (called the handler). You can have more than one subscription for each topic. Event Grid also gives you some filtering capabilities to select what types of events a particular handler needs to receive.
In the following image, you can see sources and handlers for Event Grid.
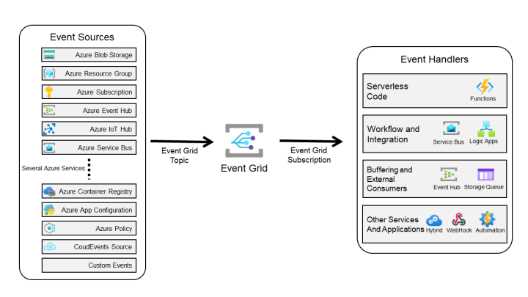
Figure 3: Event Grid sources and handlers
Azure serverless scenarios
In this section, I would like to provide you a few interesting scenarios in which you can leverage the power of a serverless architecture.
Web application order management
Here is a classic e-commerce scenario: when a customer buys something, the web application creates a message that contains the customer order and enqueues it in Service Bus. A function processes the order and writes the order data in a database.
The creation of the order is the event that triggers the whole process.
The schema of the scenario is represented in the following figure.

Figure 4: The order management scenario
Mobile application backend
In this scenario, a mobile application calls a REST API exposed by one Azure function that validates and processes the request and writes the data in a database. (In the following figure, you can see Cosmos DB, but you can figure out your favorite database in the process). When the data is persisted in the database, another Azure function is triggered and sends a mobile notification to several devices using Notification Hub.
The complete schema is shown in the following figure.
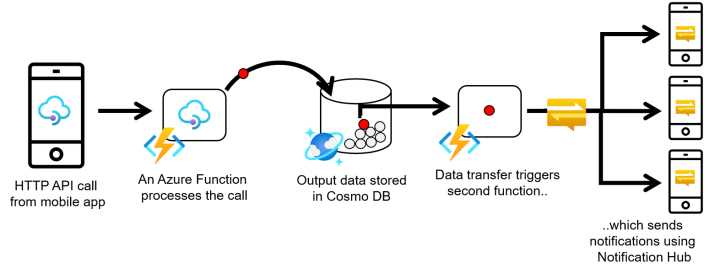
Figure 5: Mobile application backend scenario
Real-time file processing
Suppose you have to analyze and process pictures of a street taken by a security camera to retrieve a car's plates in transit. The following image describes the scenario.
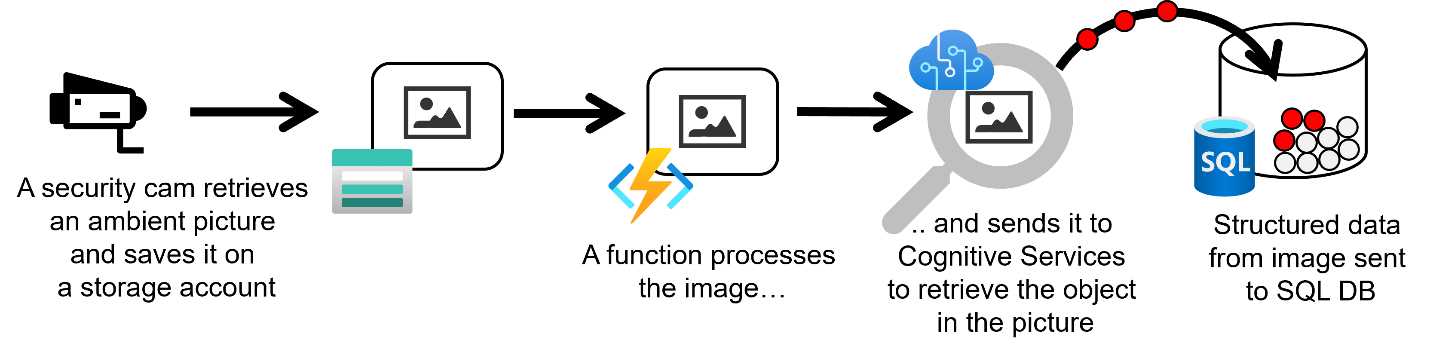
Figure 6: Real-time file processing
Every time the security camera takes a photo of the street (because, for example, a car passes in the field of view of the camera), it saves the photo in a storage account. An Azure function is triggered by the new image, calls Azure Cognitive Services to retrieve information about the car's plate in the picture, and then writes the data in a database.
Scheduled task automation
Azure functions (and serverless technologies in general) are very helpful when you need to automate tasks. In this scenario, an Azure function runs every 15 minutes to clean data in a database (removing entries, deduplicating entries, and so on). The complete scenario is described in the following figure.
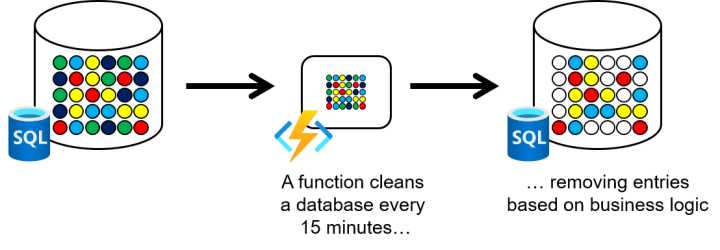
Figure 7: Scheduled task automation
All the scenarios I’ve mentioned can be considered workflow. In every scenario, several functions need to be orchestrated to achieve the goal. Sometimes it is not easy to do using standard Azure functions to implement those scenarios, but fortunately, Durable Functions, as we will see in the following chapters, can simplify implementing them.
What are Azure functions?
Azure Functions is one of the most important serverless technologies proposed by Azure. Even though this book is not directly about standard Azure functions, it is fundamental to recap what an Azure function is. As we will see in the following chapters, Durable Functions is based on Azure Functions, so all the basic behavior is the same.
An Azure function is literally a snippet of code that executes on a runtime called Azure Functions Runtime and can be written in several programming languages. In the following table, you’ll find all the programming languages supported at this moment.
Table 1: Programming languages supported by Azure Functions
Language | Supported Runtime |
|---|---|
C# | .NET Core 3.1 (.NET Core 5.0 in preview) |
JavaScript/TypeScript | Node 10 and 12 |
F# | .NET Core 3.1 |
Java | Java 8 |
Python | Python 3.6, 3.7, and 3.8 |
PowerShell | PowerShell Core 6 |
Azure Functions Core Tools allows you to develop and test your functions on your local PC. It is a multiplatform (runs on Windows, Linux, and macOS) command-line tool, and you can download and install it following these instructions.
Note: Azure Functions Core Tools also contains the Azure Functions Runtime, and that is the reason you can locally test your functions.
Once you install the tool, it provides you with a set of commands to create, implement, test, and deploy Azure functions in one of the supported programming languages.
When you start implementing your Azure functions, you put all of them in a function app. Function app is the deployment unit for Azure Functions (that means you deploy all the functions in the same function app simultaneously in the same Azure service), and the scalability unit for Azure.
To create your function app, you create the folder in which you want to create the function app, move inside it, and use the following command.
func init --worker-runtime dotnet
The command generates all the files you need for a .NET project, but you have the same behavior if you want to use a different runtime (for example, Java).
After you have created the function app, you can start to create every single function inside it. To create a function, you can use another command provided by the tool.
func new --name HttpHelloWorld --language c# --template httptrigger
The previous command creates the file definition for a function called HttpHelloWorld, written in C# and with an HttpTrigger trigger.
Once you create your functions using the tool, you can use your preferred IDE to change your code and compile and debug your functions. In this book, I will use Visual Studio.
Before looking at the code generated by the tool, we must define some terminology used in the Azure functions. The following schema summarizes all the components involved in an Azure function.
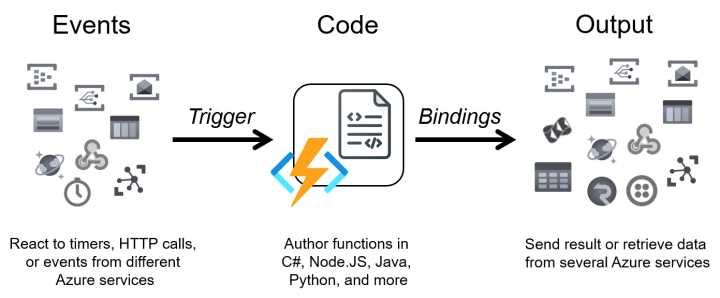
Figure 8: Azure functions components
Because Azure Functions is a serverless technology, every function is triggered by an event, and the component in the runtime with the responsibility to do that is called the trigger. An Azure function must have one and only one trigger.
Inside your function code, you can interact with external services using other components provided by the runtime. They are called binding; each can be used to read data, send data, or both. A function can have zero, one, or multiple bindings.
Now, we can take a look at the class and method that define a simple function. The following snippet of code is the HttpHelloWorld generated by the commands executed earlier.
Code Listing 1: Function code generated by the tool
public static class HttpHelloWorld { [FunctionName("HttpHelloWorld")] public static async Task<IActionResult> Run( [HttpTrigger(AuthorizationLevel.Function, "get", "post")] HttpRequest req, ILogger log) { log.LogInformation("C# HTTP trigger function processed a request."); string name = req.Query["name"]; string requestBody = await new StreamReader(req.Body).ReadToEndAsync(); dynamic data = JsonConvert.DeserializeObject(requestBody); name = name ?? data?.name; string responseMessage = string.IsNullOrEmpty(name) ? "This HTTP triggered function executed successfully. Pass a name in the query string or in the request body for a personalized response." : $"Hello, {name}. This HTTP triggered function executed successfully."; return new OkObjectResult(responseMessage); } } |
The attribute FunctionName, before the method definition, declares that Run is your Azure function (and defines the name of the function). When the Azure Functions runtime starts and tries to host your functions, you have to remember that it searches for all the methods in your code with that attribute. No matter what the name of your function method, the runtime refers to it using the name declared in the attribute.
The Run method has two arguments. The type of the first one is an HttpRequest, and it is decorated by the attribute HttpTrigger. That attribute tells the runtime that your function has a particular trigger. In this case, the trigger is an HttpTrigger; that means your function will answer to an HTTP request.
As you can see, the attribute of the argument defines the type of trigger, while the type of the argument is the payload associated with the trigger itself.
The other method argument is the log instance you can use to trace information into the platform log (in the same way you do with a standard .NET application).
You don't have any binding declared in the method signature in the previous function, but the function returns an HTTP response. You can consider the return value as one of the possible types of binding.
You can test your function locally. Azure Functions Core Tools provides you the command to execute the runtime and host your compiled code. To do that, open a command prompt, move into the folder that contains your function app, and run the following command.
func start
This command executes the runtime and hosts your functions. When the runtime starts, it scaffolds for your code to find all your functions, tries to resolve all triggers and bindings you use in your code, and finally, runs your functions.
Using the previous code sample, the runtime exposes one HTTP-triggered function that can receive and manage GET and POST requests at http://localhost:7071/api/HttpHelloWorld.

Figure 9: The output of the 'func start' command
To test your function, you can open a browser and navigate to the URL exposed by the runtime. If you navigate to the URL http://localhost:7072/api/httpHelloWorld, you receive the response shown in the following figure.
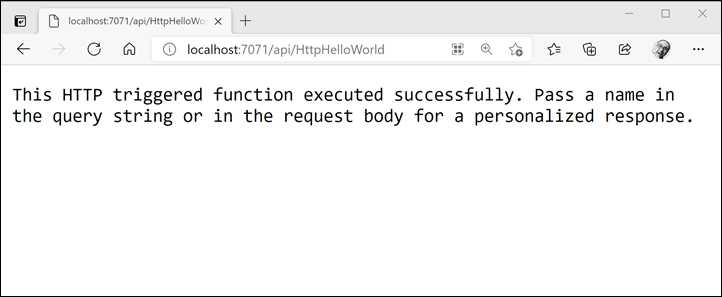
Figure 10: The response of the Azure function
If you navigate to the URL http://localhost:7072/api/httpHelloWorld?name=AzureDurableFunctionSuccinctly, you receive a different response, shown in the following figure.

Figure 11: The response of the Azure function
In the previous function, we use only a trigger and a response binding. Now we try to add a new binding in the function. The scenario may be: if the HTTP request contains the parameter name, we respond with the message hello, ... (as we do in the function shown earlier), but at the same time, we write a message in a queue.
The function code is the following.
Code Listing 2: The function with queue binding
public static class HttpHelloWorld { [FunctionName("HttpHelloWorld")] public static async Task<IActionResult> Run( [HttpTrigger(AuthorizationLevel.Function, "get", "post")] HttpRequest req, [Queue("outputQueue",Connection ="storageConnection")] IAsyncCollector<string> queue, ILogger log) { log.LogInformation("C# HTTP trigger function processed a request."); string name = req.Query["name"]; string requestBody = await new StreamReader(req.Body).ReadToEndAsync(); dynamic data = JsonConvert.DeserializeObject(requestBody); name = name ?? data?.name; if (!string.IsNullOrWhiteSpace(name)) { await queue.AddAsync($"Request received for name {name}"); } string responseMessage = string.IsNullOrEmpty(name) ? "This HTTP triggered function executed successfully. Pass a name in the query string or in the request body for a personalized response." : $"Hello, {name}. This HTTP triggered function executed successfully."; return new OkObjectResult(responseMessage); } } |
As you can see in the previous code, we add a new argument to the function method signature. The attribute Queue decorates the argument called queue. That is the declaration of the binding. We tell the runtime that we want to interact with a storage queue (the name of the storage queue is outputQueue, and it’s configurable using the attribute's properties). The binding payload for that kind of binding is an instance of the IAsyncCollector interface.
Note: The storage triggers and bindings are available in the package Microsoft.Azure.WebJobs.Extensions.Storage. You can add this package in your solution using NuGet integration provided by Visual Studio.
If you rerun the function and navigate to the URL http://localhost:7072/api/httpHelloWorld?name=AzureDurableFunctionSuccinctly, you receive the same response you see in Figure 11, but the function should write a message in the queue.
One of the questions you might have looking at the code is: which queue will the message write? In other words, how can I configure the connection between my function and the storage containing the queue?
One of the arguments of the queue attribute is the Connection argument. You can use this argument to declare the configuration value (stored in the configuration file) to use as a connection string for the storage.
In the previous snippet of code, we set storageConnection as the value for the Connection argument. It means that the runtime tries to read the configuration file and retrieves the value for the key storageConnection.
To test the function locally, you can use the file local.settings.json , which should look like the following.
Code Listing 3: The local.settings.json file
{ "IsEncrypted": false, "Values": { "AzureWebJobsStorage": "UseDevelopmentStorage=true", "FUNCTIONS_WORKER_RUNTIME": "dotnet", "storageConnection": "UseDevelopmentStorage=true" } } |
Because you are testing the functions locally, you can use the storage emulator on your machine to emulate the Azure storage account. The connection string UseDevelopmentStorage=true tells the runtime to connect to the local emulator. Of course, when you deploy your functions on Azure, you will substitute the connection string with a valid connection string for a real storage account.
Note: The storage emulator is installed automatically when you install the Microsoft Azure SDK, but if you want to install by yourself, you can download it here.
If you want to verify that the function wrote the message in the queue, you can use Microsoft Azure Storage Explorer, a multiplatform tool you can use to interact with a storage account and the storage emulator.
Note: You can download Microsoft Azure Storage Explorer here.
Using the Storage Explorer tool, we can check if the function, during the execution, wrote the message in the queue. In the following figure, you can see the screenshot of the tools and the message related to the previous execution.
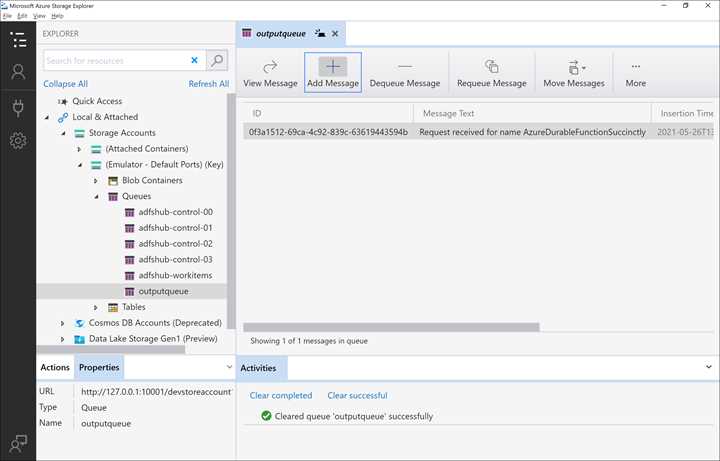
Figure 12: The Microsoft Azure Storage Explorer tool
In this chapter, we don't go deep into the details about Azure Functions because its purpose is to recap the fundamentals of the technology.
An important thing to notice is that if you look at the previous snippet of code, both triggers and bindings are declared using attributes. You have a declarative approach, and the runtime is responsible for creating and managing the actual classes you use to get data from the trigger or interact with the external service through the binding.
In addition, those classes are POCO classes (POCO stands for plain old CLR objects, which means simple classes that contain data) or the implementation of interfaces. For those reasons, an Azure function is designed for unit testing. In fact, you can mock the trigger payload and the binding classes using your favorite testing framework. The runtime injects the actual classes for triggers and bindings into your Azure functions and manages the lifecycle for those objects.
Note: All triggers and bindings, except for TimerTrigger and HttpTrigger, are available using external packages. You can find those external packages in the NuGet portal.
Azure Functions extensibility
In the previous paragraph, we had a brief recap about Azure Functions, and the role and use of triggers and bindings.
The Azure Functions SDK is built on top of the Azure WebJob SDK, and it inherits the extensibility framework from that.
Even if you have 20 triggers and bindings provided by Microsoft, you can develop your own triggers or bindings leveraging the power of extensibility.
Understanding how the runtime and its binding process work is essential for using the extensibility model of the Azure functions. The binding process is the way the Azure Functions runtime creates and manages all the objects related to triggers and bindings.
In particular, the Azure Functions runtime has two different phases for the binding process:
- Startup binding: This phase occurs when the host of the functions starts. During this phase, the runtime registers all the extensions you add using packages and allows you to register your extensions. An extension is a particular class that contains your triggers and bindings definitions.
- Runtime binding: This phase occurs every time a trigger starts a function. During this phase, the runtime, using the binding classes of each trigger and binding involved in the process, creates the payloads and runs the function code.
An extension is a class that implements the IExtensionConfigProvider interface of the WebJob SDK. It is also called the binding provider, and it is registered in the runtime during the startup phase. It is responsible for creating all the infrastructural classes used by the runtime to manage the binding class for triggers and bindings.
The startup binding phase is composed of several steps executed by the runtime each time it starts to host your functions:
- The runtime registers the integrated binding providers (for example, HttpTrigger and TimerTrigger) and allows you to register your binding providers (your extensions).
- The runtime analyzes your code, finding all the methods you decorated with the attribute FunctionName.
- For each method found in step 2 (potentially an Azure function), the runtime tries to resolve the dependency for each argument of the method using the binding classes defined in every single extension registered during step 1.
- When all the Azure functions found in steps 2 and 3 are processed, the runtime creates an internal representation for each function. The runtime will use those representations during the runtime phase to execute the function quickly. In this step, the runtime excludes every function not resolved in step 3.
- For each trigger used in each function, the runtime creates and executes the corresponding listener.
We will explain the role of the trigger listener later in this section.
The runtime binding phase is composed of two steps executed every time an Azure function is triggered:
- The runtime retrieves the internal representation of the function (created in step 4 of the startup phase), and for each binding in the method signature, creates the binding objects the runtime uses to generates the actual classes injected in the execution.
- If the runtime can generate all the binding objects correctly, then it executes the function passing them.
Implement a custom trigger
The classes you need to implement your custom trigger are the following:
- TriggerConfigProvider: This class implements the IExtensionConfigProvider interface. In the Initialize method exposed by the IExtensionConfigProvider interface, you must define:
- The attribute you use to decorate the function method.
- The payload associated with the trigger (such as the HttpRequest in the HttpTrigger).
- The binding provider class you use to create the actual binding object.
- TriggerAttribute: The developers use the attribute to decorate a method parameter to identify the function trigger. It inherits from Attribute class and is decorated by the BindingAttribute. It contains the properties you can use to configure the trigger behavior (such as the schedule expression for the TimerTrigger).
- TriggerBindingProvider: It implements the ITriggerBindingProvider interface and has the responsibility to create the actual binding object. It is a factory class in which you can read and validate the configuration data from the settings file.
- TriggerBinding: It’s created by the TriggerBindingProvider and implements the ITriggerBinding interface. It creates the Listener instance and manages its lifecycle.
- TriggerListener: This class implements the IListener interface. It listens to the event source and reacts to the events to execute the function. There is an instance of the Listener for each function you define in your code.
TriggerBinding and Listener are important for the whole process, and you take care of their implementation. Performance and memory occupation of your functions depend on the implementation of those classes.
In the following figure, you can see how the aforementioned classes interact to implement the binding process.

Figure 13: Class interaction for the trigger binding process
The entire process happens during the startup phase. It begins with the extension registration and ends with the listener startup.
Note: You can find the implementation of BlobTrigger (provided by Microsoft) in the GitHub repository.
Implement a custom binding
The involved classes in the custom binding pipeline are the following:
- BindingAttribute: This attribute decorates a function parameter to identify the binding. It inherits from Attribute class and is decorated by the BindingAttribute (like the trigger attribute you saw in the previous chapter). It contains the binding configuration data (such as the queue name for a QueueBinding) for binding in the function in which you use it. It is used by developers to declare they want to use your binding.
- BindingConfigProvider: It implements the IExtensionConfigProvider interface and adds the extensions to the runtime. A binding is defined using one or more binding rules. Defining a rule means that you:
- Declare what kind of binding attribute identifies the rule. When the runtime discovers that a binding attribute is used in a function, it then uses the corresponding rule.
- Add, if you want, a validator for the attribute (for example, you can check that a connection string is formally valid).
- Add the behavior for the rule that is the type of binding you want to support. It depends on what kind of object you want to use to implement the binding feature. You can have three types of bindings:
- BindToInput: You declare that your binding type is an object. You use this kind of behavior when you want to bind your data to a single input (such as a single row in a CloudTable).
- BindToCollector: You declare that you support a list in your binding, meaning your binding object is a collection that implements IAsyncCollector interface (for example, if you want to add multiple items to a queue).
- BindToStream: You want to support a stream as binding.
- BindingConverter: This is the class that creates the actual binding object. It must implement the IConverter interface. The runtime uses this class every time it runs a function to create the binding object.
- BindingInstance: The Binding class is the class that allows the developer to interact with the external service.
The following figure shows the interactions between the classes mentioned before in the different phases of the binding process.

Figure 14: Classes interaction for the binding process
During the startup phase of the functions host, the runtime uses your binding config provider to register the extension and creates an instance of the BindingConverter class to store the internal representation of every single function. During the runtime phase, when a listener runs a function that involves the custom binding, the runtime (in particular the FunctionExecutor, the runtime component that manages the execution context for the functions) uses the BindingConverter created in the startup phase to generate the binding instance and passes it to the function running.
You need to take care of the BindingConverter class implementation, because it manages the lifecycle of the classes that every function uses to interact with external services.
Note: You can find the implementation of the binding for CosmosDB (provided by Microsoft) in the GitHub repository.
- 1800+ high-performance UI components.
- Includes popular controls such as Grid, Chart, Scheduler, and more.
- 24x5 unlimited support by developers.