
Azure DevOps Succinctly®

CHAPTER 7
Test Plans
In the previous chapter, we looked at planning work and releasing to various environments using pipelines. An important aspect of all software development is testing. We have seen tests on boards, and when creating pipelines we can take into account that software has to be tested before it gets released to the next stage. In this chapter we are going to look at Azure DevOps Test Plans, which help testers manage their test plans.
Note: You may have noticed Azure DevOps has a menu item named Load tests. At the time of this writing it is still available, but it is deprecated and will be unavailable soon. Maybe the menu item will no longer be available when you read this, but in case it is, you now know you should not use it, and I am not going to discuss it in this book.
Enabling Test Plans
When you click Test Plans in the menu, you will either be taken to your test plans, or you will see a getting started page. It depends on what you did in Chapter 3, “Boards.” If you created any test tasks, you would see them here. If you did not, you will see a welcome page that explains how test plans work. I recommend you go to a project that has no tests yet so you can explore the welcome page, which has some good information. Make sure to watch the Test & Feedback browser extension video. It is less than two minutes, and I will not be discussing the extension in this book.
Note: If you already have an Enterprise, Test Professional, or MSDN Platforms subscription, you already have full access to all testing capabilities, and this section does not apply to you.
As you can read on the welcome page, you have to upgrade to get full test management capabilities. To get a 30-day free trial, go to Billing in your organization settings. Here you can click Start a free trial. You do not have billing set up to use this. During the trial all your Basic users will have full access to Test Plans. After the trial expires, you will need to buy Basic + Test Plans and assign it to specific users for them to continue using it.
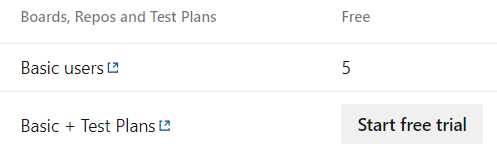
Figure 49: Enable Test Plans free trial
When you go back to your test plans, you should not see the welcome page anymore. Instead, you will be able to create a new test plan, and you will find some new items in the menu as well.
Before we continue, I would like to take a quick look at the free offering. We cannot disable the free trial, so for this organization, we are stuck. However, it is easy to quickly create a new organization with a basic project. Simply go to the overview page of your organization and click New organization. I have named my new organization testplanstest, but the name has to be unique, so choose any unique name (for example, by adding a number or your name). Next, create a project with the Agile work item process. We now have two organizations, one with full test management capabilities, and a free one with limited test management capabilities.
Creating a test plan on a free account
This section is for the free offering, but it also works on paid accounts. Go to your Boards and create two new product backlog items. Create three test tasks for each of them.
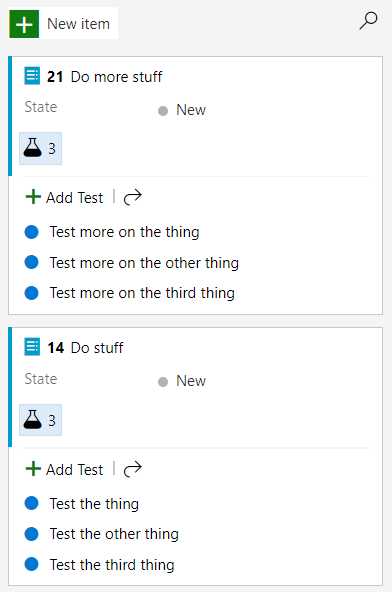
Figure 50: Some tests on a Scrum board
Now, when you go to your test plans, you will see a test suite with some tests on the board. Here you can pass or fail tests. You can do this manually or run automated tests. You can run tests manually and just set whether the test has passed or failed. You can also select Run for web application, Run for desktop application, or Run with options. For desktop applications, you need to download a test runner. When you select Run with options, you get some additional options, like automated testing with a release stage, and testing with Microsoft Test Manager 2017 Client or 2015 or earlier, which are not in the scope of this book. Run for web application allows you to add comments and attachments to tests and create bugs or add to existing bugs. You can also record your screen or add screenshots, but you will need the extension I mentioned earlier. You can do all of this directly in the test task or using other applications, like the Snip & Sketch tool that comes with Windows 10. When you do any of these test runs, you can review them later under Runs in the menu.
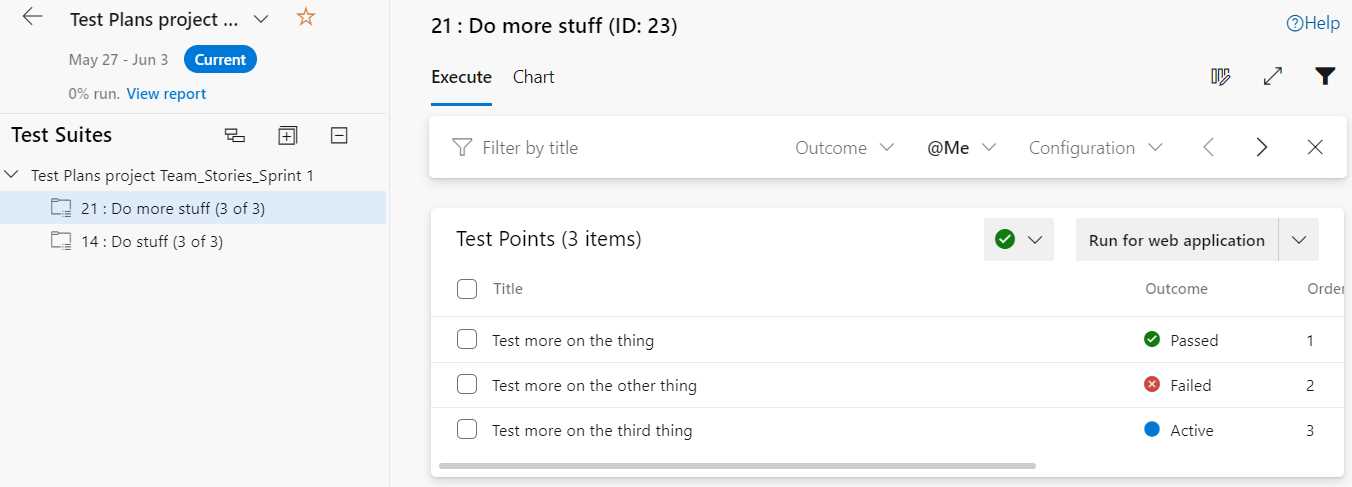
Figure 51: Test suite with tests
This is basically what test plans are about: organizing your tests in a central location and directly giving feedback to developers through Azure DevOps Boards.
Charts and reporting
Another cool feature is charts. Next to the Execute tab, you have a Chart tab. On the individual work item level, this is not truly relevant for anyone else but the tester. However, on the test suite level, you can get some cool insight for the team. You can create test case charts and test result charts. The test case charts are not going to work in our little project because we do not have sufficient users and work items. You could use these charts to see who created the most tests or has the most tests assigned. You can create pie, column, bar, line, and other types of charts. For example, I set the state of two tests to Ready and one to Done. Configuring a column chart on state would look as follows.
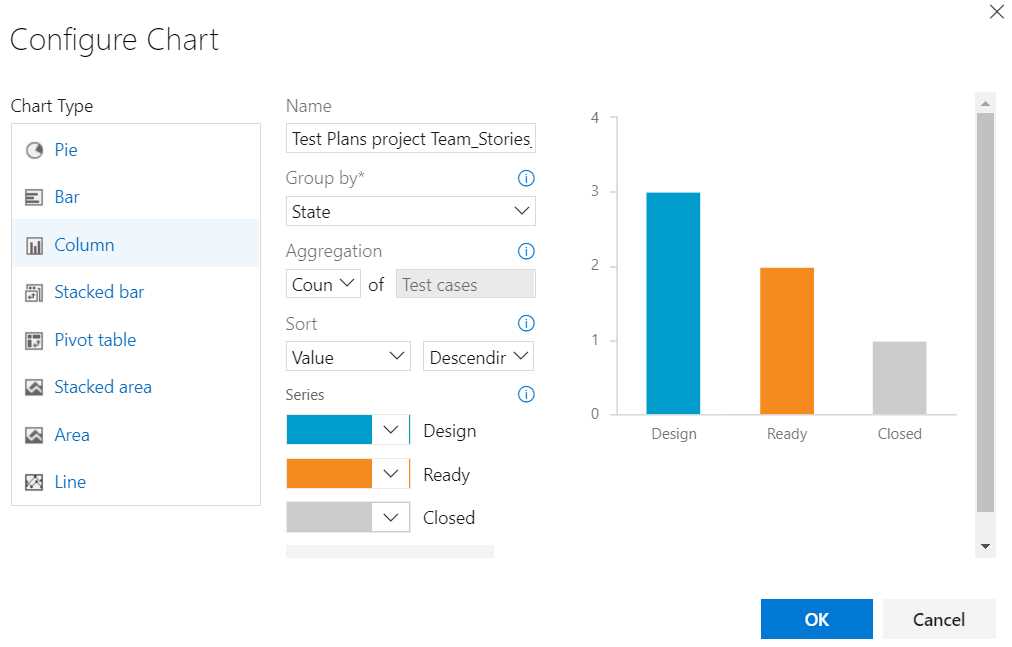
Figure 52: Configuring a column chart on state
While the number of test cases can be interesting at times, you probably want to know the results of your tests. Click + New and choose New test result chart. In the window that opens, select Outcome in the Group by field. Click OK to save the chart. You now get a pie chart that gives you an overview of the outcome of your tests. When you hover over the chart, you get a three-dot button (…) in the top-right corner of your chart. You can edit or delete the chart or add it to your dashboard so the whole team can track tests.

Figure 53: Test charts by outcome and suite
Charts are great, but for a quick summary of your test progress, you can simply go to the Progress report from the menu. This will show you a summary of the number of open tests, passed tests, failed tests, and the percentage of tests that have been run.
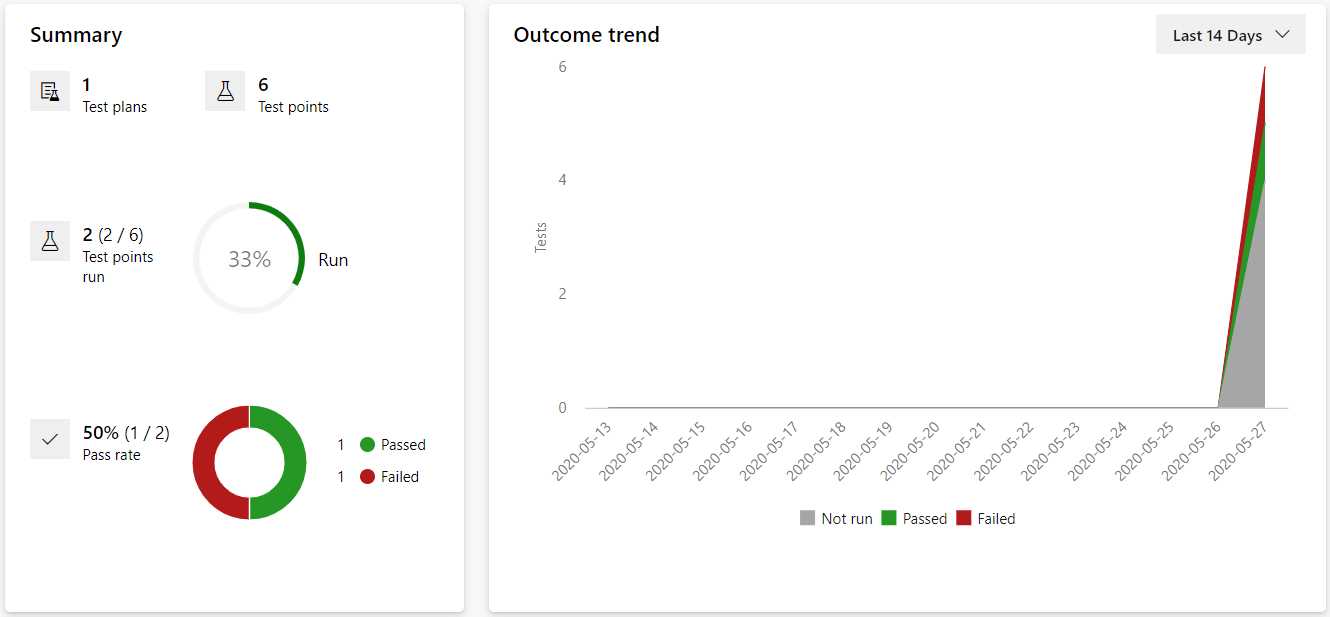
Figure 54: Progress report
With the progress report and your charts, you should have all the insight you need.
Creating a test plan on a trial or paid account
When you are on a trial or paid plan, you can create your test cases directly from your test plans instead of relying on a board task. Go to your organization with tests enabled, and go to a project where you have some test tasks. Now go to Test Plans, and you should see a difference already. Where the free plan has the Execute and Chart tabs, the paid plan also has a Define tab where you can create new test tasks. In case you do not have a plan yet, or you go back to the Test Plans overview, you will see that you have a new button here as well, + New Test Plan. Click the button and enter a name, for example Succinctly Test Plan.
In the test plan you can create a new test case. This is the same as adding a task on the board, so that has been covered already. You can also add an existing test case, which will open a pop-up window where you can define a query to find existing test cases. You can then select these tests and add them to your current test plan.
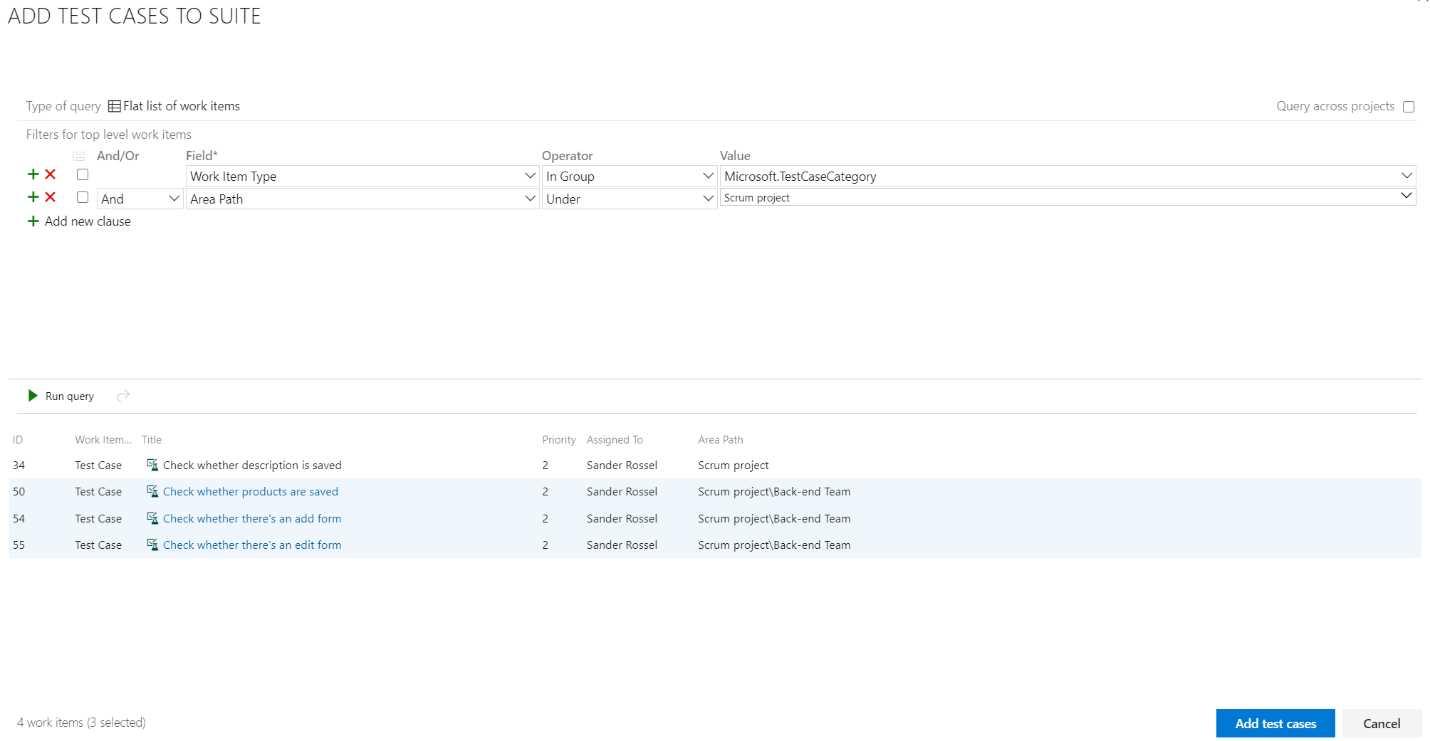
Figure 55: Add test cases to suite
Another way to add test cases to your test plan is by using the grid. Using the grid view, you can add multiple tests in an Excel-like interface. The tests and steps you enter are made into tasks when you save.
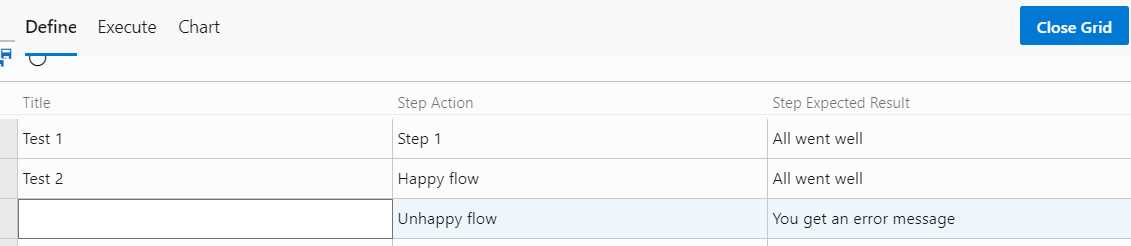
Figure 56: Add test cases using grid
In this example, Test 1 is created as a separate task with a single step, Step 1. Test 2 is created as a task with two steps, Happy flow and Unhappy flow.

Figure 57: Test task with steps
Whatever method of test creation you choose, creating your test plans and test cases using the paid tools is somewhat easier than in the free version. It gives you more control over what you create and where.
Parameters
Another useful addition to the paid tools is parameters. Using parameters, you can specify a set of values you want to use in your tests. For example, you could have a test where someone needs to order some items. It is important that the number of items is at least one. You also want to check if the name works correctly.
When you go to Parameters, you can create a new parameter set. Click the + button at the top left to create a new set. You now get another grid, where you can edit column headers and fields. The column header is the name of your variable. The cells below it are possible values. So, enter quantity and name (by double-clicking on a column header) for column names and 0, 1, 256, -1, an empty space, Sander, and null for values.
It is not immediately obvious, but you can remove columns by hovering over them and clicking the cross that shows up. You can add columns with the + button in the corner. The Save button icon shows two floppy disks instead of one (and I really do not know why).
In the Properties tab, you will find a work item-like interface. That is because your parameter set really is a work item. If you go to your work items, you will find it there, but it does not show up on your boards. It has a name, state, iteration, linked work items, and everything. This is also where you can delete the parameter set, in the menu at the top right.
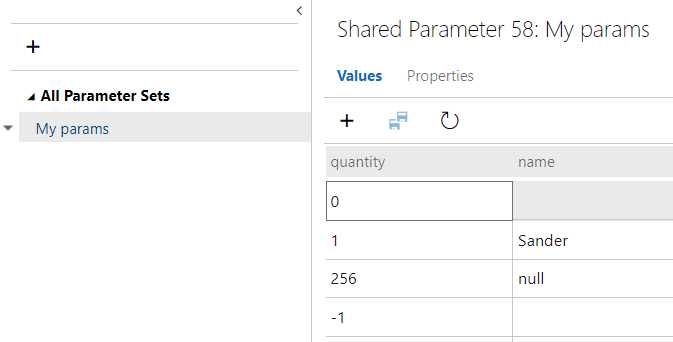
Figure 58: Parameter set
Now, go back to your test task and change the action of a step to @name orders @quantity items. This will automatically reference your parameter set to the task and show the values. These parameters are handy to keep around so you know what values you tested with, but they can also be used in automated tests.
Configurations
Another addition to paid testing plans is configuration. Here, you can specify a set of hardware and system variables. One configuration and two configuration variables are predefined. The variables are your browser and operating system, and the configuration is Windows 10. You can edit the predefined variables and configuration. For example, you can add MacOS and Linux as values to the Operating System variable and remove Windows 8.
Click + and then New configuration variable. Enter the name Graphics card and the values AMD Radeon and Nvidia GeForce, and then click Save. Click the + button again and click New test configuration. Enter the name Nvidia GeForce and add the configuration variable Graphics card that we just created. Assign the value Nvidia GeForce. Create another test configuration and do the same for the AMD Radeon.
Go back to your test plan and click the three-dot button that shows up when you hover over your test suite, and then click Assign configurations. You can now clear Windows 10 and select AMD Radeon and Nvidia GeForce. When you save your new configurations and go to the Execute tab, you will see that your test cases doubled, because all tests now have to be tested on both configurations. It would make sense to assign configurations for all major browsers or all major operating systems if you are developing a cross-platform application.
Summary
With Azure DevOps Test Plans, you can track your tests, generate reports and charts, and share them all with your team. When the entire team has insight into the test results, testing becomes a team effort. Managing tests with variables and configurations can make your work as a tester a lot easier. The easy integration with your boards gives direct feedback to developers, so failed tests can be fixed as soon as possible.
- Seamless integration with Azure DevOps data sources
- Real-time data visualization for actionable insights
- Customizable dashboards to meet your specific needs
- Enhanced collaboration with data-driven reporting