
Azure DevOps Succinctly®

CHAPTER 4
Repositories
In the previous chapters, we familiarized ourselves with Azure DevOps and planning work with Azure Boards. However, although you can plan all you want, ultimately a team will have to deliver software. With Azure DevOps Repositories (or Repos for short), teams of any size can share code, implement versioning, and review each other’s work. In this chapter we are going to take a closer look at Azure DevOps Repos.
Working with Repos using Visual Studio
I have already briefly touched upon the options for source control in Azure DevOps. Because Git is by far the most commonly used source and version control system today, I am not going to discuss Team Foundation Version Control. Also, this book is not so much about Git, so while we will use it throughout this chapter, I am not going to explain the Git basics.
Azure DevOps projects can contain multiple repositories. That makes sense because, especially with microservices, projects can consist of multiple applications or services. Using Git, every (code) project gets its own repository. A default repository is created when you create a new project in DevOps.
Open a project and browse to Repos in the left-hand menu. Here you will see your default repository or the repository you opened last. You can create or delete repositories at the top of the Repos screen by clicking the repository name. The default repository is empty, and we cannot do anything with it yet. Luckily, DevOps has a nifty Initialize button that creates a README.md file and/or a .gitignore file. You can pick the type of .gitignore file you want. There are loads, like VisualStudio, UnrealEngine, Node, Java, Android, and much more. Select the VisualStudio one, because I want to create a small C# project later, and click Initialize. This initializes the repository and shows you the contents of the README.md file, including the Markdown markup. You can browse other files on the left. Clicking a file shows you its contents and allows you to edit and rename files, but I do not recommend using this overview to do that.
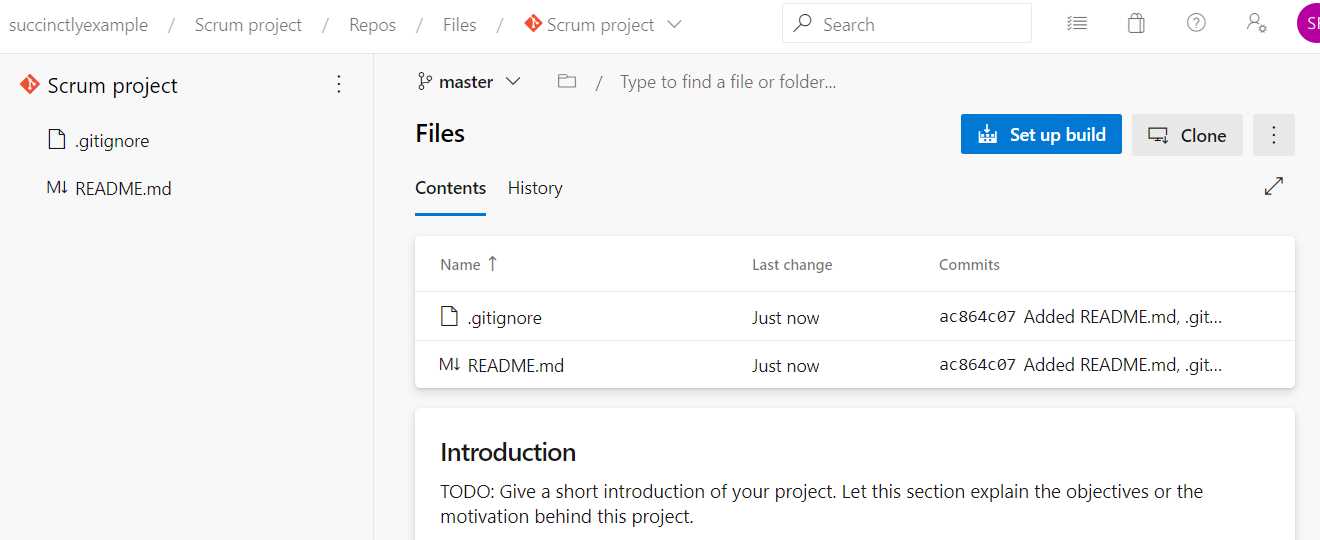
Figure 29: The Default Repository Page
We can now clone our repository. At the top right is a Clone button, which lets you clone your repository directly using various applications such as Visual Studio, Visual Studio Code, Android Studio, Eclipse, and others. If you would like to use another application that is not listed, you can use the HTTPS or SSH URI to connect however you like.
Note: In the following section, we are going to use Visual Studio and .NET Core. If you are using Azure and Azure DevOps, but not Visual Studio or .NET Core, or if you just want to get through this chapter quickly, you can just commit a simple text file with a simple text, like Hello Git. However, in the next chapters we are going to use our .NET Core project to create an automatic build and release to Azure.
Unfortunately, cloning directly with Visual Studio does not seem to work for me, so I am going to clone from within Visual Studio instead. In Visual Studio, open Team Explorer (in the menu under View). There, click the green power plug icon and then Manage Connections > Connect to a Project. You can now add an account, which could be the Outlook account that we created in Chapter 2, or any other account that you use to sign into Azure DevOps. This will list your Azure DevOps organizations as well as the projects and Git repositories. When you connect from here, everything works as it should.
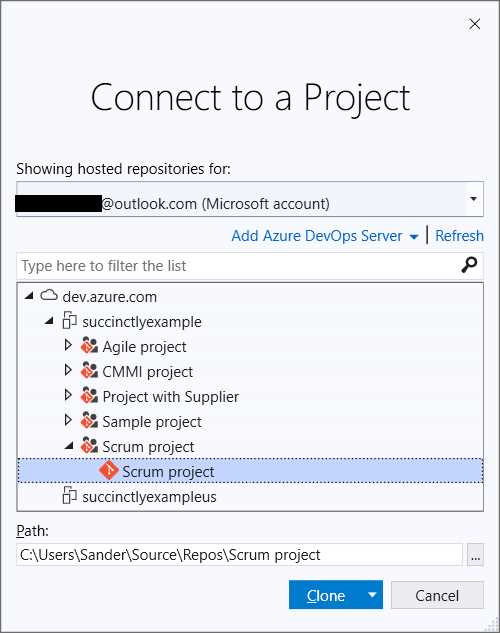
Figure 30: Connect to a Project Using Visual Studio
When you clone the repository, Visual Studio will open the folder and show the .gitignore and README.md files. Now, using Visual Studio, create a new ASP.NET Core Web Application with Razor Pages and save it in the folder where you cloned your repository. You can leave all the defaults (the No Authentication and Configure for HTTPS options selected; the Enable Docker Support and Enable Razor runtime compilation options cleared). Press F5 to debug the application to make sure you get the default web application page.
When everything works as expected, we can commit and push our code back to Azure DevOps. Go back to your Team Explorer and click the home icon, and then click Changes. You will see all the files that were added to your repository except the ones that are excluded by the .gitignore file, like the bin and obj folders. Click + next to Changes where it shows all your added files. This will stage your files, meaning they are ready to be committed. Enter a commit message (for example, My first commit), open the Commit Staged drop-down button, and click Commit Staged and Push instead. This will push your changes back to Azure DevOps.
Now, go back to Azure DevOps and check the History tab.
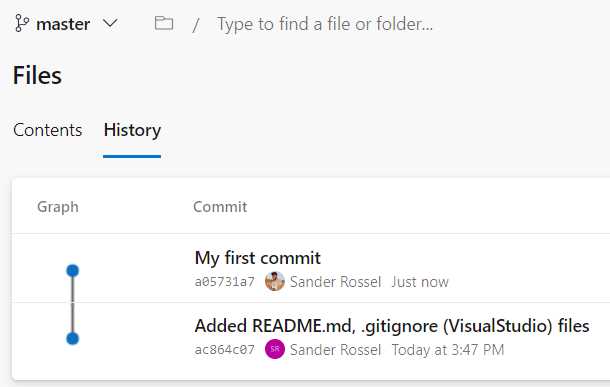
Figure 31: Repository History
That was quite a bit of work, but we are going to use this later, so it is not for naught.
Another method of viewing your history is by going to Commits on the left-hand menu. You can click any commit to view what has been changed in that commit. You may be wondering why the screenshot shows SR in the initialization commit and my picture in the commit from Visual Studio. The answer is that they are two different accounts with the same name.
There is also a Pushes menu item that shows your pushes. Notice that this is not the same as a commit. Depending on how you work it can often be the same, but you can also make multiple commits and one push.
Branching
One important aspect of Git is branching. Git has made branching much easier than that of its Subversion predecessors. There are two types of branches, local branches and remote branches. Local branches are branches that you created on your computer, but merge back to a remote branch before you push them. A remote branch is a branch that is created on the server, in this case Azure DevOps, and that you can share between coworkers. You can start with a local branch and then push that to Azure DevOps (the remote), making it a remote branch. Of course, we can also create new branches in Azure DevOps directly.
Go to Branches in the menu, and you will see a list of your own branches, all branches, and stale branches. Stale branches are branches that have not seen a new commit in over three months. In the top-right corner, click New branch. In the pop-up window, enter develop as the name and base it on the master branch. Leave Work items to link empty and click Create. You have now created a new branch that can be checked out by the team.
When you hover over a branch you will see the three-dot button (…); click on it to see other actions that you can do with a branch. Here you can create new branches off an existing branch, delete branches, view files and history, compare branches, and set branch policies. I will talk about these policies later. First, let us make a commit on our new development branch.
In Visual Studio, go to your Team Explorer again and click the home icon. Now, click Branches, open remotes/origin, and then double-click develop. If you do not see the branch, go back to home, go to Sync, and click Sync. This will synchronize your repository with the remote. When you are on the develop branch, go to your code and make a change. For example, go to index.cshtml and change Welcome to Welcome develop. Commit your changes as you did before.
Now, in Azure DevOps go to Branches. You can already see that the develop branch is one commit ahead of the main branch (in the Behind | Ahead column). Click the three-dot button on the develop branch and click Compare. You should now see your new change as a difference between the two branches.
Merging
No doubt you want to merge this change back to the master branch. You can do this locally and then push to the remote, but you can also do this using Azure DevOps. To do this, you have to create a pull request. In Azure DevOps, you will see the message You updated develop 1m ago [Create a pull request]. Click Create a pull request or, alternatively, if you do not see the message, go to branches, click the three-dot button on the develop branch, and click New pull request there.
In the pull request form that opens, you can set a title and description for your pull request, as well as link to work items. You can also set reviewers, people who must approve your changes before they are merged to master. Leave everything as it is and click Create. Next, you will be taken to a page with the pull request. Instead of accepting it right away, click Pull requests in the menu. Here you will see your pull request as well. Go back to the organization page and click My pull requests. It will be visible there as well. I will go into pull requests in more detail later, but for now open the pull request and click Complete. In the complete form that opens, clear the Delete develop after merging option and then click Complete merge. After that, you can close the pull request by clicking Close where Complete was.
Now, go back to the master branch and view the commits. It will show you a graph with the merge clearly visible.

Figure 32: A Merged Commit
Next, let us look at some branch policies that will force us to create pull requests and prevent us from approving our own changes.
Branch policies
When you have a branching strategy, such as GitFlow, you want people to work in a specific way. Often, you will have one branch for development and another for deployment, which is often the master branch. The deployment branch should be the one that goes to production, and should not change until a new deployment is done. That way, you always know what code is running on production, and you can find and fix bugs without having to worry about new code. For this reason, you can set branch policies.
Go to your master branch and click Branch policies. You will be taken to a new form where you can set various properties on your master branch. At the top is the text Protect this branch. Protecting a branch means that you cannot directly commit on this branch. Instead, you will have to create a pull request, which I will talk about in a moment. A protected branch also cannot be deleted.
The first four checks on this page are all about protecting your branch. Enabling any one of these protects your branch, and will require people to create a pull request. A pull request is simply a check before merging one branch back to the other.
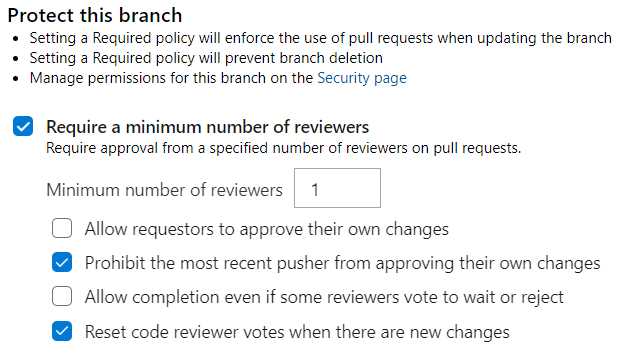
Figure 33: Protecting Your Branch
We have briefly seen a pull request before we completed it ourselves. Completing your own pull request kind of defeats the purpose of having pull requests. Here, you can set a minimum number of reviewers and whether the author can approve their own changes. The minimum number of reviewers depends on your team. If you have a team of two, setting the minimum to three is a sure way of never getting any work done. Also, when people make a vote to accept or reject your changes, you can make a change and add that to the pull request. You can set whether this will reset votes. Also, if someone else on the team makes the change, you can prohibit them from approving their own change. Last, if two people approve your change, but one person rejects it, you still have enough approvers to complete the pull request. You can set whether a reject overrides all approvals.
You can also require people to link to a work item in a pull request. That way, code that is merged back into master can always be traced back to a work item. You will know who requested the change and why (assuming your work item is up to par).
People can comment on pull requests, for example: “Why did you use recursion instead of a for loop?” or, “This code is technically correct, but the casing is not according to our guidelines.” You can require these comments to be resolved before a pull request can be accepted.
Last, you can limit the amount of merge types. In our pull request, we chose to have a merge commit even though it was not necessary. Since we did not have any other commits on our master branch, we could have fast-forwarded, but that would obscure the fact that there was once a merge. So, you may want to prohibit some merge types.
Other policies include the Build validation, which I am going to discuss in a later chapter, Require approval from additional services, which is out of scope for this book, and Automatically include code reviewers. That last policy is interesting, so we are going to set it. This simply enables you to add some default reviewers in your pull requests. This can be your lead developer, for example, or someone from QA. We have one other person in our organization, so we are going to add that account as a required reviewer. Click + Add automatic reviewer and find the other account. You can add filters for specific reviewers, like *.html;*.css;*.js for your team’s lead front-ender. We are leaving the filter blank to add the reviewer to all pull requests. Click Save. By hovering over the new reviewer, you can edit or delete them. You can also (temporarily) disable the reviewer.
Whenever you clone the repository, the master branch is checked out and you would be inclined to start building and commit back to the master branch. When you check the branch overview, you will notice that the master branch has a “default” label. It would make a lot more sense now to have the develop branch as our default branch. To change this, go to your project settings and then to Repositories. Click your branch, and then select Set as default branch.
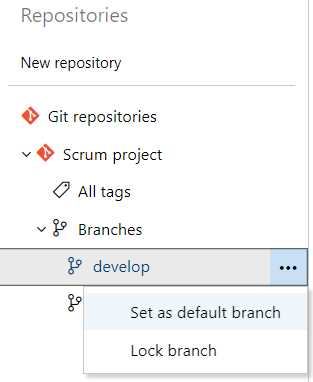
Figure 34: Set Default Branch
If you go back to the branch overview, you will see that the default label moved to the develop branch. If you now clone the repository you will get the develop branch by default.
To test all of this we just have to create a new pull request, which we are going to do in the next section.
You can find other policies under project settings by going to Repositories and then the Policies tab. Here, you can limit file size and maximum path length, block pushes that contain reserved names, and block pushes from authors whose email does not match a specific pattern.
Pull requests
Time to create another pull request. Make another change; for example, change Welcome develop to Welcome pull request, and commit and push it to Azure DevOps. Then create a pull request like you did before.
Tip: Did you accidentally commit and push to master? You will get an error message saying the remote repository rejected your push. You now still have a local commit, but no way to push it. You can right-click your branch in Visual Studio, and then click Reset > Keep Changes (--mixed). This will revert your commit but keep your changes. It is possible that you will get conflicts, which you will have to fix before continuing. You can then switch to the correct branch and create a new commit.
Go to Pull requests in the DevOps menu and click New pull request. The next window looks the same as before. You will notice that your other account was not added as a required reviewer, but do not worry about that. You could change the description if you wished. I sometimes do that when I want an opinion of some coworkers, like “I have used x to solve the problem, but maybe y would be better, what do you guys think?” Once you have created the pull request, your other account should receive an email that a pull request was created and that the account was added as a reviewer. In the pull request you will also see that the reviewer was added, and that the reviewer must approve. You can still approve it yourself, but if you set the policy that authors cannot approve their own work, this will do nothing except show others that you are approving your own changes. Others will get an email saying that you approved though, so it can be a nice reminder when people do not review your changes in due time.
Next to the Approve button is a Set auto-complete button. You can click the drop-down arrow on this button and select Complete, but you will get an error that this is not possible. You can also abandon the pull request here, which is basically a delete, or mark it as a draft if you still wish to change it. The auto-complete option works quite well, and personally I like to use it as much as possible. Normally, people would have to approve your changes, and then you would have to return to your pull request and manually complete it, like we did last time. However, when you set auto-complete, your pull request is automatically completed when all conditions are met, and everyone approved. Note that you can still get merge conflicts by the time everyone approved. You would have to fix those first by updating your branch, fixing the merge conflicts, and then pushing them back to your merge conflict.
Try making another change and pushing it. I changed request to requests so that it now says Welcome pull requests. Your Azure DevOps pull requests will update automatically and show a message that new changes were pushed. All reviewers will get another email notifying them about this change.

Figure 35: Pull Request
Set the auto-complete, which is the same as manually completing. Notice that this time you cannot delete the develop branch because it is the default branch. If you are working with feature branches and you are done with a feature, it is good practice to delete the branch, so you do not get hundreds of stale branches. Once you have set the auto-complete, you can log in with your other account.
As a reviewer, you can cancel the auto-complete and manually complete the pull request instead. Of course, you can cast your vote, approve, approve with suggestions, wait for author, or reject. You can view commits and pushes specific to this pull request. You are probably most interested in the Files tab. Here you can compare the old code with the new. The default view is to have the changes inline, but you can change this to side-by-side in the top right, which is my preferred view. You can comment on code by clicking on the comment icon in the margin. The author will get an email and can respond to your comment. When a comment is answered, you can resolve the comment and it will be closed. There is a policy that requires all comments to be resolved before you can complete a pull request. When you are done reviewing the changes, click Approve, and the pull request will complete and close automatically (if you have set that option).
Branch security
Sometimes it can be good if someone can override certain settings. Imagine being the only one in the office because people are on vacation or on sick leave, but you really need to get some code out. Obviously, the code reviewers are not going to do a review today, but you cannot wait until next week. Using roles, you can set certain permissions for groups or people. Go to your branch overview and click Branch security, right under Branch policies. You can find it under your project settings as well, under Repositories and Security. There, you can set project-wide security settings as well as branch-specific security settings.

Figure 36: Branch Security
As always, you should be careful who you give permissions to. One permission to look out for is “Bypass policies when completing pull requests,” which you can set on every level, including for specific users (at the branch level). Other permissions include reading, creating branches, deleting repositories, editing policies, and forcing pushes. As with project security, these groups are inherited. You can allow or deny a specific permission, or you can leave it on Not set and set it at another level.
Tags
Last, you can view your Git tags in Azure DevOps. Like branches, you can create tags locally and push them to DevOps, or you can create them in DevOps directly. A tag is a pointer to a specific point in the Git history. They are often used to denote a specific version, like v1.0 or beta-0.9.1. A tag can be viewed as a branch that does not change. Once the tag is created, it gets no further commits. You can create a tag by going to Tags in the menu and then clicking New tag in the upper-right corner. You have to give it a name and a description and specify which branch, other tag, or specific commit you want to base your tag on.
Another way to create a tag is by going to your commits and selecting Create tag from the inline menu on any commit. This will create a tag on that specific commit. Going to your tag then shows the code as it was in that specific commit.
Using tags to order your work can really help in keeping your number of branches down. For example, instead of creating a branch v1.0, you can create a tag. If v1.0 has a bug, you can branch from the tag and then merge it back into your current branch or release.
Summary
Azure DevOps offers everything you would expect from Git and CI/CD tooling. You can have branches, pull requests, code comparisons, code reviews, and tags, and you can link back to work items. In the next chapters, we are going to automatically build and deploy the code that we keep in our Azure DevOps repos.
- Seamless integration with Azure DevOps data sources
- Real-time data visualization for actionable insights
- Customizable dashboards to meet your specific needs
- Enhanced collaboration with data-driven reporting