
Azure DevOps Succinctly®

CHAPTER 6
Release Pipelines
In the previous chapter, we looked at build pipelines. In this chapter we are staying with pipelines, but we are going to construct release pipelines. A lot of what we saw in the previous chapter can be used in this chapter. Similarly, some topics from this chapter can be applied to the previous, but I have left them for this chapter because they are more relevant here.
The pipeline editor
Go to Releases in the left-hand menu and click New pipeline. The first step in the editor is selecting a template. We get no YAML choice this time. Next to the Empty job at the top, you will find a lot of Azure App Service deployments. There are default templates for deploying Java, Node.js, PHP, Python, Go, and Ruby on Rails applications to Azure App Services. You will also find Azure Service Fabric and Azure Functions deployments, and IIS and SQL database deployments. That is all very Microsoft and Azure centered, but you can deploy to AWS, Google Cloud, other platforms, and your own servers as well. For now, choose the Azure App Service deployment template, which will deploy a .NET application to Azure. Next, you can enter a stage name and owner. Change the stage name to Development (the D in DTAP).
You now have a form on the left side with an empty rectangle for artifacts, and on the right side a rectangle for stages, with another rectangle for the Development stage we just created. Before we forget, change the name of your pipeline. Click New release pipeline at the top, and change the name to something like Scrum project release.
Next, click + Add an artifact. You can now pick a build, an Azure DevOps Repository, a GitHub repository, or a TFVC (Team Foundation Version Control) repository. By clicking 5 more artifact types, you can choose additional artifact types, Jenkins among them. Since we have a build, we are going to keep that. In the drop-down you can select your build, which should be Scrum project build (if you picked the Scrum project’s default repository for the YAML build in the previous chapter). You can then choose a default version, which defaults to the latest. You can deploy specific versions, but we want the latest, so keep that. You can also enter a source alias, which is the name of the artifact in the deployment pipelines. This is usually your repository name prefixed with an underscore, so enter _Scrum project build. Click Add and the artifact will be added. This pipeline now has access to any artifacts the selected build produces. That is why it was so important to publish an artifact in the previous chapter.
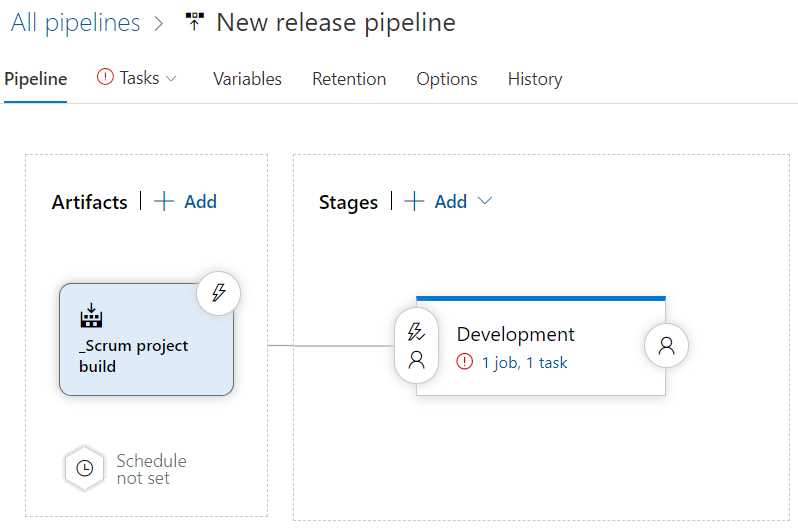
Figure 43: New release pipeline
As you can see, there is a red exclamation point next to your tasks. Click Tasks at the top, or 1 job, 1 task on the Development stage. This will take you to an editor that is not unlike the classic build pipeline editor. You will see some stage settings and parameters. These are linked parameters, which work the same as in the build pipelines. You will need to specify an Azure subscription and an app service name. The subscription is easy; just open the drop-down and you will see all subscriptions that you have access to with your current account. That should be your free account that we created at the start of this book. When you select the subscription, you have to authorize it before you can use it. You can do this by clicking the Authorize button that appears after choosing your subscription. The app service name is a bit of an issue since we do not have an app service yet.
Ignore the app service setting for now, and look at the other settings. We have the app type, Web app on Windows, which is fine for us. You will notice that the agent settings are mostly the same as in the build pipeline. The Deploy Azure App Service task is where the magic happens, though. There is the subscription, app service type, and app service name that are linked to the stage variables, so we have seen those. Next, there is a Deploy to Slot or App Service Environment setting. This is specific to Azure, so it is not in the scope of this book. The same goes for the Virtual application setting. The next setting, Package or folder, is relevant for us. This is the file that the task copies to your App Service. The task expects this to be a zip file, which is also the default setting in the build pipeline.
When you look at the Additional Deployment Options, you will see a Select deployment check box. This is not selected by default, meaning the task will decide for you based on the files it gets. When you select it, you will get to choose from Web Deploy, Zip Deploy, and Run From Package. You can also set some additional settings, like if additional files need to be deleted from the App Service, if you want to take the App Service offline, and if you want to exclude your App_Data folder. You do not need these settings now, but I wanted to point them out to you because you may need them in some cases.
Another interesting section is Application and Configuration Settings. In fact, .NET Core loads the config.Environment.json configuration file based on the ASPNETCORE_ENVIRONMENT environment variable. We can set that here. Click the three-dot button (…) next to the App settings and click Add. Now, enter ASPNETCORE_ENVIRONMENT for name and Development for value. This should make sure that variable is added to your App Service environment.
Unfortunately, we cannot save our pipeline until we fix the App Service name issue. Go to your Azure portal (by browsing to https://portal.azure.com). There, click + Create a resource, search for Web App, and create one. In the settings blade that pops up, click Create new for Resource Group and name it development. The name of your web app should be something unique, like sander-succinctly-dev-app (use your own name). For Runtime stack, select .NET Core 3.1 (LTS). Choose the region that is closest to you. Click Next and disable Application Insights on the next tab. Then click Review + Create > Create.
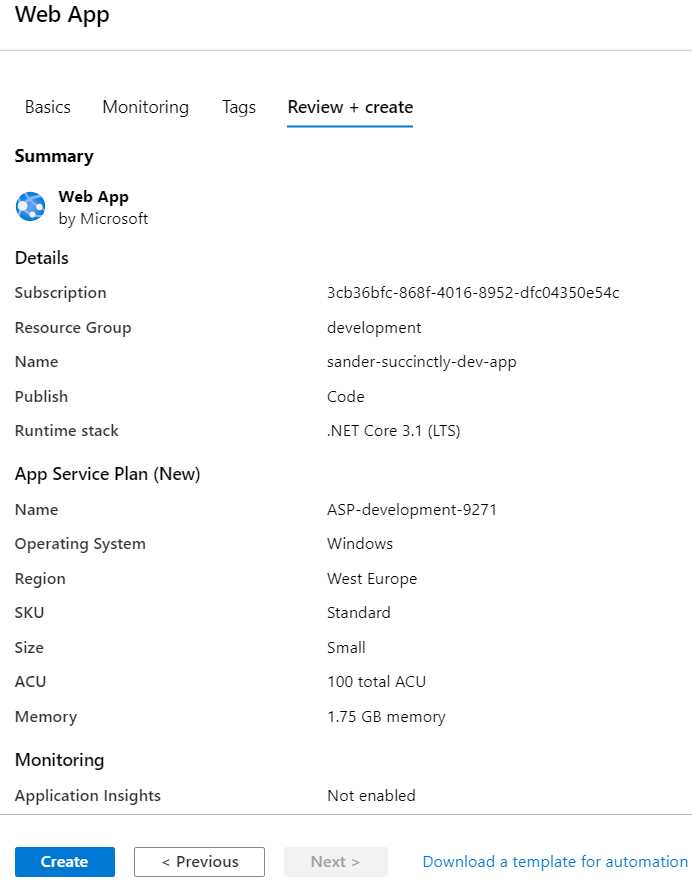
Figure 44: Web App summary
Once the web app is created, you will see a Go to resource button, which will take you to the web app settings in Azure. Click the URL at the top of the Overview page, which is open by default. If you cannot find it, the URL should be https://[your web app name].azurewebsites.net. If all went well, you should see a default web app page.
Now, go back to your release pipeline, open the App Service name drop-down, and select your web app. Next, click Save at the top right to save the pipeline, and then click Create release. In the blade that opens, click Create. A message should appear on the top of the screen, which you can click to go to your release overview.
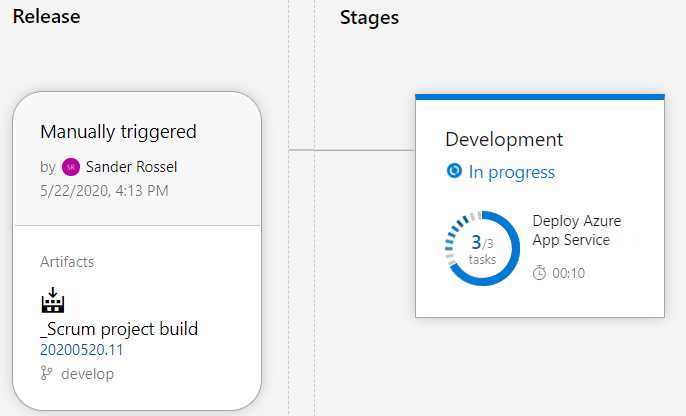
Figure 45: Release overview
Hover over the stage and click the Logs button, which opens a logging screen similar to the build logging. When the release is finished successfully, go back to your web app URL and refresh the page. It should now show you the ASP.NET Core default project page.
If you go to the Azure portal, find the web app and go to Configuration, where you will also find the ASPNETCORE_ENVIRONMENT setting that we added.
Deploying Azure resources
We have now automated the deployment of the software, but not the environment. Azure DevOps can deploy Azure resources using ARM (Azure Resource Management) templates, PowerShell, or the Azure CLI. First, let us deploy the resource group using the release pipeline.
The easiest way to create a new resource group using Azure DevOps is by using the Azure CLI. Go back to your editor and click the + button on the Run on agent job. You can now add a task. These are the same tasks that we saw in the build pipeline, but some of them make a lot more sense in a deployment. Go to Deploy and find the Azure CLI task. If you cannot find it, use the search field at the top right. Add the task and drag it above the Deploy Azure App Service task.
In the Azure CLI task, you will need to specify your Azure subscription again. This time, when you open the drop-down, you will see Available Azure service connections. I will get back to that in a minute, but for now select the connection and not the subscription. For script type, select Shell, and change Script path to Inline script. The script is a one-liner.
Code Listing 6
az group create --name "development" --location "West Europe" |
If you save and run now, you will find that the release does nothing. That is because the deployments are incremental and so can be run over and over. Only changes will be deployed.
Deploying ARM templates
Deploying the web app is a bit trickier. You will have to create an App Service and an App Service plan, which determines your memory, cores, features, and costs. We went with the default before, so Azure generated a name for the plan. First, let us see how we can create both. You can use the Azure CLI again, but I want to use an ARM template instead. ARM stands for Azure Resource Management. These templates are written in JSON, and you can generate templates by going to your Azure resource and going to Export template. Unfortunately, these templates are not always pretty, and you usually have to edit them manually. Microsoft also has a GitHub repository with example templates. One of these templates does almost what we want: the 101-webapp-basic-windows template. We can do three things: add an additional GitHub artifact (you need a GitHub account for this), create a new repository, and add the file there (or add the file to our existing repository). I always prefer to have a separate repository with all my ARM templates.
So, go to your Repos and create a new one named ARM Templates with a VisualStudio gitignore. I do not usually do this, but add a new file and name it WebAppTemplate.json. Then copy the contents of the file in GitHub to your DevOps file. Unfortunately, the template does not work because the location variable is invalid, and we also do not want to create a new App Service plan; we want to use our existing one. So, remove the location parameter and change the parameter references to [resourceGroup().location], add an appServicePlanName parameter, and remove all variables. Also replace the variable references to their respective parameters. That is a bit complicated, but the result should look as follows.
Code Listing 7
{ "$schema": "https://schema.management.azure.com/schemas/2019-04-01/deploymentTemplate.json#", "contentVersion": "1.0.0.0", "parameters": { "webAppName": { "type": "string", "metadata": { "description": "Base name of the resource such as web app name and app service plan" }, "minLength": 2 }, "sku":{ "type": "string", "defaultValue" : "S1", "metadata": { "description": "The SKU of App Service Plan, by default is Standard S1" } }, "appServicePlanName": { "type": "string" } }, "resources": [ { "apiVersion": "2018-02-01", "type": "Microsoft.Web/serverfarms", "kind": "app", "name": "[parameters('appServicePlanName')]", "location": "[resourceGroup().location]", "properties": {}, "dependsOn": [], "sku": { "name": "[parameters('sku')]" } }, { "apiVersion": "2018-11-01", "type": "Microsoft.Web/sites", "kind": "app", "name": "[parameters('webAppName')]", "location": "[resourceGroup().location]", "properties": { "serverFarmId": "[resourceId('Microsoft.Web/serverfarms', parameters('appServicePlanName'))]" }, "dependsOn": [ "[resourceId('Microsoft.Web/serverfarms', parameters('appServicePlanName'))]" ] } ] } |
Now go back to your pipeline and add a new artifact. Because we do not have to build the JSON template, we can just add an Azure Repos Git type directly. Select the repository, the master branch, and the Latest from the default branch default version.
Now, go back to your tasks and add an ARM template deployment task. Make sure it is between your Azure CLI task and the Azure App Service build. In the ARM template deployment task, we have to select the available Azure connection again, as well as a subscription. Leave the action as Create or update resource group. For Resource group, choose development. Select the location you used for your web app in Azure. In the Template field, you can browse your artifacts for the ARM JSON template, so click the three-dot button and select it. Skip the Template parameters field because we do not have a separate parameters file. In Override template parameters, click the three-dot button and enter the name of your web app (for me, that is sander-succinctly-dev-app) and the name of your App Service plan, which you can find in Azure. Click Save and start a new release. If everything went well, the release succeeds, and nothing happened. Check Azure to see that no additional resources were created and that your web app still works.
Adding a new stage
At this point, we should be able to release the entire development environment from scratch—that is the resource group, the web app, and the App Service plan. Let us confirm this by creating a new environment. Go to your pipeline and click the Pipeline tab. If you hover over the Development rectangle, you should see two buttons, Add and Clone. Click Clone and rename Copy of Development to Test. This should create a new stage that is linked to the Development stage. To remove the link, click the little lightning icon on the Test stage and change After stage to Manual only. If you always want to release the Test stage after a build, you can also select After release.
When you now hover over the Tasks tab at the top, you will be able to choose between Development and Test. Go to the tasks of your Test stage. We now have to change everything that relates to a specific environment. For example, the name of the resource group should be test and not development. I have a better alternative, though.
Variables
Click the Variables tab. This looks the same as the build variables. Add the following variables.
Table 1: Development variables
Name | Value | Scope |
|---|---|---|
Environment | Development | Development |
ResourceGroupName | development | Development |
ServicePlanName | [Name of your plan] | Development |
WebAppName | [Name of your web app] | Development |
Now replace all those values in your tasks with the variable. In your deployment process parameters, replace your App Service name with $(WebAppName). In the Azure CLI task, replace development with $(ResourceGroupName). In your ARM template deployment, set $(ResourceGroupName) as the value in the Resource group field, and replace the web app name and the service plan name in your template parameters. And in the App settings of your Azure App Service Deploy, replace Development with $(Environment).
All these variables will now be replaced with their values at release time. Now go back to the Pipeline tab and delete the Test stage by clicking on it and clicking Delete in the blade. Now clone the Development stage again, again renaming the clone to Test and setting it to Manual only. The new Test stage will now also reference the variables, but if you go back to the Variables tab, you will see that all variables have been clones too. That means you only need to set the values for the new variables, and you are good to go! So set the values to the following.
Table 2: Test variables
Name | Value | Scope |
|---|---|---|
Environment | Test | Test |
ResourceGroupName | test | Test |
ServicePlanName | test-plan | Test |
WebAppName | sander-succinctly-test-app | Test |
Save your changes and create a new release. When creating the release, you now see two stages. Click Development to cancel its selection and click Create. Your release will not start the Development stage now because you have deselected it. The Test stage will not start either, because you have to manually start it. So, go to your release overview and deploy the test stage manually. When all goes well, the release succeeds, and you should see a new test resource group in Azure with an App Service and an App Service plan. Browsing to the new web app should show your web app. Creating an Acceptance and/or Production environment should now be easy. The new stages are shown in your releases overview.
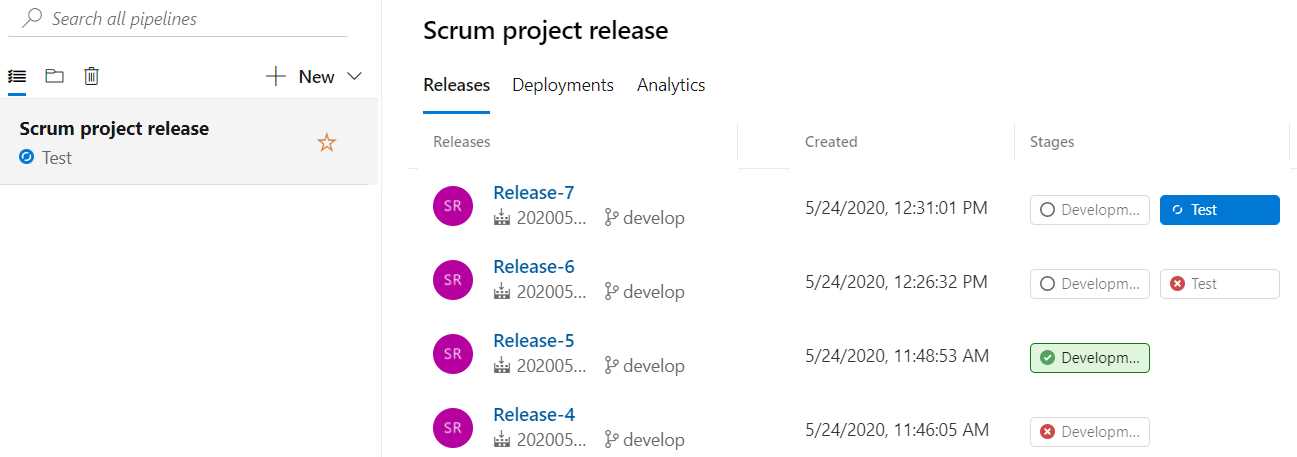
Figure 46: Releases overview
You can have different tasks per stage in your release pipeline. The clone can be a handy starting point, but they do not have to be the same.
Approvals
One thing you may want to add to your stages is a pre- or post-deployment approval. You can go from one stage to the next fully automated, or you can trigger the next stage manually, but either way you may want to limit who can trigger releases. When you go to the pipeline editor, you can click on the little person icon on the left or right of a stage rectangle. When you do, a blade opens, and you will be able to enable pre- and post-deployment approvals.
Service connections
By building our pipelines, we created an Azure connection. This was done for us automatically, but we can also create one manually or edit the automatically generated one. Creating one ourselves goes a bit outside the scope of this book, but I want to point it out. Go to your project settings, and then go to Service connections. This is where you should see a list of your connections. We currently have one, Free Trial ([subscription ID]). When you click it, you can edit it with the button in the top-right corner. You cannot do a lot with it, and I suggest you only change the name and description, because if you mess this up you can reset all connections in all your pipelines. Any GitHub connections will be shown here as well.
Go back to the Azure portal and check your Azure Active Directory. Go to App registrations, and you will see a registration that has the name of your DevOps organization and project with an ID. This is how Azure and Azure DevOps are linked together. By deleting the registration here, you invalidate the link. If you want to manually create a service connection, you will also have to create an app registration here.
Variable groups
One cool feature of Azure DevOps pipelines is variable groups. This is a predefined collection of variables that you can use in build and release pipelines. What is even better, is that you can link it to an Azure Key Vault, which gives you the ability to manage secrets in Azure, complete with Azure AD access management, and then use them in Azure DevOps.
To create a variable group, go to Library, under Pipelines, and click + Variable group. Name the variable group whatever you like, for example Secrets development. You cannot have multiple stages in a variable group, so if you want some stage-specific secrets, you will have to create multiple variable groups. You can now add a variable (for example SqlServerPassword), give it a value, and click the lock icon. Save the variable group.
Now, go back to your release pipeline and edit it. Go to the Variables tab and click Variable groups. You can now link a variable group. You can link it to either the release scope (meaning the variables and their values are shared across stages) or a specific scope, for example Development. If you link the variable group to Development, the SqlServerPassword variable is now accessible from the Development stage tasks. The value must still be changed in the variable group. If you delete the variable from the group and you still use the variable in your release, the release will break. If multiple pipelines use the SqlServerPassword variable and you change your password, you only have to change it in the variable group and all pipelines will use the new password.
Linking an Azure Key Vault
Azure Key Vault is a great way to manage secrets. I use it for my Azure applications all the time. Go to your Azure portal, find all services, and search for Key Vault. Create a Key Vault in your development resource group and name it [your name]-succinctly-kv-dev. Naming is a bit of a hassle because it cannot be more than 24 characters, and has to be unique across Azure. Again, choose the region closest to you. Click Review + create > Create. Once the Key Vault is created, go to the resource, go to Secrets, and click + Generate/Import to create a secret. Create a SqlServerPassword secret and give it any value. Go back to your variable group and enable Link secrets from an Azure key vault as variables. This will give you a warning that your current secrets will be erased, but continue anyway. You now have to select a subscription and a key vault, and authorize it. Once it is authorized, you can click Add and select the secrets you want to link. Select the SqlServerPassword secret you created, and it will be linked. The SQL Server password is now managed in Azure Key Vault.
When you go back to your Key Vault and go to Access policies and refresh it, you will see your DevOps application registration now has Get and List permissions on your secrets.
Task groups
Another nice feature of Azure DevOps is task groups. They are especially useful in release pipelines where YAML is not an option. Go back to your release pipeline editor and go to your tasks. The Azure CLI task to create a resource group is pretty neat. You may want to reuse that, but you do not want to remember or look up the correct CLI commands to create one. Instead, you can create a task group. This groups one or more tasks together so that you can reuse them in other pipelines. Right-click the task and select + Create task group. You are prompted to give the task group a name, description, and category, and to configure parameters. Name it Create resource group and delete the default value for the ResourceGroupName parameter. Then click Create. Your task is now converted to a task group, and you have to enter the ResourceGroupName parameter. Give it the value $(ResourceGroupName) and save.
Right-click the task group and select Manage task group. This will open your task group, which has the Azure CLI task. There are two caveats. First, the variable ResourceGroupName will be used as the public display name for the variable in your task group. ResourceGroupName is not a nice name for a variable, so change it to Resource group name so it looks good in the UI. The second is the Azure subscription, which is not a variable at all. Trying to make this variable may prove difficult, but if you use the variable $(AzureSubscription), you will find that it works. The name will be AzureSubscription instead of Azure subscription, but the description is copied to your variable.
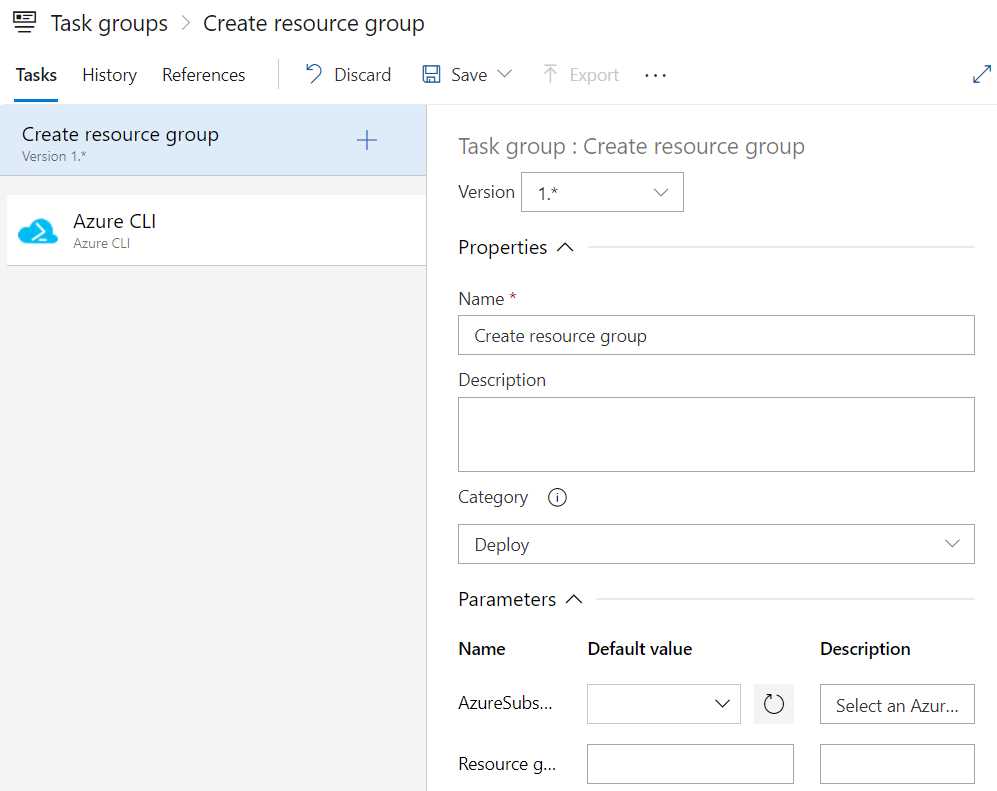
Figure 47: Task group
Save the task group and go back to your release pipeline where it is used. You can find this under the References tab in your task group. You will find that the pipeline broke because the task group definition broke. Add the Azure subscription and resource group name, and it should work again.
To prevent your pipeline from breaking, you can save a task group as a draft. Simply click Save and select Save as draft. This will create a draft that you can use in pipelines. However, when you publish the draft it will be deleted, so it is not recommended to use the draft. Once you have a draft, you can publish the draft. The Publish draft button is next to the Save button, and it is only visible when you have a draft. When you publish, DevOps will warn you that your previous task will be overwritten unless you check Publish as preview. So, check the box and click Publish. You will now get a version 2.*. When you go back to your pipeline, you will now be able to select a new version, which is labeled Preview. You can publish the preview by going back to your task group and clicking Publish preview, which is at the same location as the Publish draft button. Once you have published the preview, you have a definitive version 2.*.
You can select multiple tasks and make them into task groups, you can edit additional tasks to a task group, and you can even use task groups inside your task groups. Your task groups will be added to the list of tasks, so you can add them to any pipeline by simply adding a task and finding your task group.
Deployment groups
Besides deploying to your cloud environment of choice, you can deploy to your own on-premises servers. To do this, you have to create a deployment group and register a server to that group. So, go to Deployment groups in the left-hand menu and click Add a deployment group. You can now enter a name for your group (for example, succinctly-servers) and a description. The idea is that you can group servers into logical groups for deployment, but I am assuming we only have our non-server laptop or desktop available.
Once you have created the deployment group, you will be taken to the Group Management page. Here, you will find a PowerShell script that you can run on your computer. Copy the script, run a PowerShell prompt as administrator, and paste the code. When it asks you for an authentication type, go for the default, which is Personal Access Token. For the next step we need to create another access token, so go to your access tokens and create one that has Read & manage access on Deployment Groups. Enter the generated token in your PowerShell prompt and proceed with all the defaults. When you return to your deployment group in Azure DevOps, you will find your computer in the Targets tab. Clicking it allows you to add custom tags.
For simplicity and clarity, my example is going to be a bit contrived. To do any real deployments to your computer is not feasible, and not in the scope of this book. Go to your release pipeline and create a new stage. Now, remove the agent job that is created by default. Instead, click the three-dot button on your stage and click Add a deployment group job. In the job, add a task and search for the Copy files task. In the task, enter $(System.DefaultWorkingDirectory)/_Scrum project build/drop/ in the source folder (or browse using the three-dot button) and any local path in the target folder, for example C:\Temp\Deployment. The local path does not have to exist; the task will create it for you. Then simply save and run the stage. The stage will run on your local computer and when it is done, you will find your artifact in the Deployment folder.
Using deployment groups allows you to run releases on your own servers. For example, when you have websites running in IIS, you can simply copy your files to the corresponding IIS folder. You can also run batch or PowerShell scripts on your machine to do additional tasks. With the Required tags property in the job, you can filter your servers, so you are certain that an application is released to the correct server.
Creating a deployment group will also create a deployment pool, which can be found in your organization settings. To completely remove this, you have to delete your computer from the deployment group, delete the deployment group, and then delete the deployment pool. You can also delete the Azagent folder from your computer, which is in C:\ by default.
Environments
Last, but not least, are environments. This is by far the least-obvious feature of Azure DevOps. When you go to Environment from the menu, you can create an environment with a name and description, and that is about it. You can add a Kubernetes namespace or a virtual machine resource, but whatever you’re supposed to do with it is not obvious as this point.
Remember how you cannot use YAML for release pipelines? This right here is the solution. A build supports YAML, but does not have stages, while a release has stages, but not YAML. Environments have both. We are already halfway to using them. The trick is to create a YAML file like you do for a YAML build pipeline, but format it slightly differently.
First, you have to define stages. Within those stages you define jobs. The jobs contain the steps. Also, make sure you use the Publish Pipeline Artifacts step, and not the Publish build artifacts step. The trick is in the deployment stage. You specify a deployment, and in the deployment you specify an environment. The environment is created when it does not exist. Next to the environment, a deployment has a strategy, which defaults to runOnce. Under runOnce you get your deploy and preDeploy nodes, which contain steps.
A complete YAML file that builds the software and deploys the artifact to an (already existing) app service looks as follows.
Code Listing 8
trigger: - master stages: - stage: Build variables: buildConfiguration: 'Release' restoreBuildProjects: '**/*.csproj' jobs: - job: Build pool: vmImage: 'windows-2019' steps: - task: DotNetCoreCLI@2 displayName: Build inputs: projects: '$(restoreBuildProjects)' arguments: '--configuration $(buildConfiguration)' - task: DotNetCoreCLI@2 inputs: command: 'publish' publishWebProjects: true arguments: '--configuration $(buildConfiguration) --output $(build.artifactstagingdirectory)' - task: PublishPipelineArtifact@1 inputs: targetPath: '$(build.artifactstagingdirectory)' artifact: 'drop' publishLocation: 'pipeline' - stage: DeployDev variables: appName: 'sander-succinctly-dev-app' environment: 'Development' jobs: - deployment: Development pool: vmImage: 'windows-2019' environment: 'succinctly-webapp' strategy: runOnce: deploy: steps: - task: AzureRmWebAppDeployment@4 displayName: 'Deploy Azure App Service' inputs: ConnectionType: 'AzureRM' azureSubscription: 'Free Trial (3cb36bfc-868f-4016-8952-dfc04350e54c)' appType: 'webApp' WebAppName: $(appName) packageForLinux: '$(Pipeline.Workspace)/**/*.zip' AppSettings: '-ASPNETCORE_ENVIRONMENT $(Environment)' |
If you need an additional stage, like test, acceptance, or production, you can simply copy the DeployDev stage and paste it at the bottom. You can then change the name and variables to reflect the new stage.
When you save and run the YAML file, you will see the pipeline running in the build pipelines, and you can find it in your environments.
Figure 48: Multistage pipeline
Unfortunately, these environment pipelines, or multistage pipelines, are quite new and do not have all the functionality you would expect—most importantly, manually triggering stages. It is a common scenario to automatically build and deploy to a development and/or test environment. After a few days you do a manual release to a user acceptance environment, and a few days later you do a manual release to production. There are some techniques to work around this limitation, like working with conditions, approvals, or using different environments. But all of them are workarounds, and for that reason I still prefer the classic release pipelines. Having a manual trigger is a much-requested feature, so hopefully Microsoft will implement it soon.
You can set approvals in multistage pipelines, but this is not obvious, and applies to all deployments in a single pipeline. When you go to an environment, click the button in the top-right corner, and you can select Approvals and checks. When you add an approval, all deployment stages have to be approved before they run.
Summary
Using Azure DevOps, you can create release pipelines using a relatively easy editor. Releasing your applications to Azure is supported out of the box. Secret management using variable groups and Azure Key Vault adds an extra layer of security. Using deployment groups allows you to deploy to your own servers. With environments, YAML is supported for releases as well.
- Seamless integration with Azure DevOps data sources
- Real-time data visualization for actionable insights
- Customizable dashboards to meet your specific needs
- Enhanced collaboration with data-driven reporting