
Azure DevOps Succinctly®

CHAPTER 2
Configuring Azure DevOps
In the previous chapter, we looked at the theoretical foundations of DevOps. We have also seen how Azure DevOps can help teams adopting DevOps. In this chapter we are going to create an Azure and Azure DevOps account and configure Azure DevOps.
While Azure and Azure DevOps are free to get started, you do need to enter your credit card information when creating an Azure account. This is very unfortunate for people from countries where credit cards are not as accepted as in the United States. In fact, I got my credit card just so I could create an account.
Creating a Microsoft account
Let us start by creating a Microsoft account. If you already have one, you can skip this section. Browse to this site to either sign in or create a Microsoft account. Click Sign In, which will allow you to create a new account and give you some extra options. You can sign up using a personal account by clicking No account? Create one! You can also create a new Outlook account by clicking Get a new email address.
Alternatively, if you don’t have an account yet and want a new email address, the easiest thing to do is to create an Outlook account here. I will explain this a bit more in the next section.
By clicking on Sign-in options, you can also sign in using a personal GitHub account with OAuth or a security key.
Note: Microsoft has really messed up account creation in the past. Personally, I still have an email address that is used for both a personal and a work account, and I have no way of seeing which account I am logged into. Sometimes I have to switch accounts, which is just logging in again with the same email address. To fix this issue, Microsoft has disabled registration with a work or school email address. In practice, this means any email from a domain that is configured in an Azure Active Directory (Azure AD or AAD). So, if you have an email address [email protected] and want to use it at this point, you may be out of luck. No worries though; you can still use it later. You can read more about this issue here.
Creating an Outlook account
I am going to sidetrack a little here to look at the Outlook account creation. I created one just for this book. It is mostly straightforward, save for some minor details. The CAPTCHA is all caps and no space (even if the characters are on separate lines). Microsoft asks for your phone number, which is used for account retrieval or two-factor authentication (2FA). They are sending you an access code, so you have to have access to the entered phone number.
After the account creation, you may get an error page. Just wait a minute or so and try logging in again. Make sure you first log out with any other Microsoft accounts you may have. You should now have access to your Outlook mailbox.
Tip: If you are using this account just for the sake of having a Microsoft account, you may want to forward your email to your main email account. That way, you will never miss important emails, like Azure updates or issues with your account. Click the cog in the upper-right corner and click View all Outlook settings at the bottom. You may have to verify your account. Notice that they are first asking you for the last four digits of your phone number. I was waiting for them to send me a code, but that is the next step. If you read the text it is obvious, but you may not expect it. Once you have verified your account, go to Forwarding and enter your preferred address.
Creating an Azure tenant
Next, we are going to create an Azure tenant and subscription. An Azure tenant is basically a container for your users, accounts, and subscriptions. A subscription is a service within Azure that allows you to create (paid) Azure resources. Obviously, if you already have an Azure subscription, you can skip this section.
Browse to this website and click Start free. You can only use the free service if you do not have another Azure subscription associated with your Microsoft account. In the next window, you have to sign in with a Microsoft account.
When you are logged in, Microsoft will take you to the identity verification page. Enter or verify your information. Next, you will need to authenticate by phone. After that you need to enter your credit card information (again, this is unfortunate, especially since it is not even charged, but for now it’s a necessity). In the agreement, you have to explicitly agree to the subscription agreement, offer details, and privacy statement. You also have to explicitly opt out of the Microsoft newsletter with tips on Azure, pricing updates, and offers from Microsoft and partners.
After you have agreed, you will be taken to a page to register for a demo, or whatever offer they have available at the time you register. Skip it and go straight to the Azure portal, either by clicking the on-screen button or by browsing to the Azure portal. Here you will see your new tenant and subscription.
Azure subscriptions
In the Azure portal, use the hamburger menu at the top right, go to All services, and search for Subscriptions. Click Subscriptions. This should give an overview of your subscriptions, of which you currently have one: the Free trial subscription.
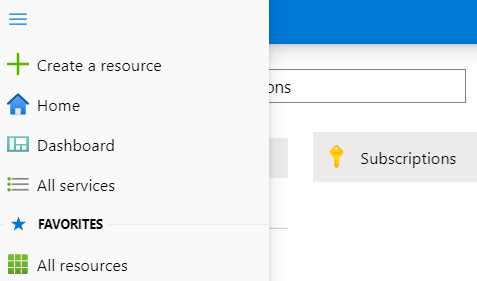
Figure 2: Find Azure Subscriptions
In the Subscriptions screen, you can upgrade your subscription to a paid one (or pay-as-you-go). Do not do this yet, because you will miss out on the free stuff. The free subscription offers a couple of popular services for free (at certain tiers), like 5 GB of Blob storage and file storage, and 250 GB SQL databases, as well as $200.00 or €170.00 credit to use for paid services. It is important to know that Azure bills according to usage. So, if you create a virtual machine that costs €100.00 a month, but you delete it after half a month, you are only billed €50.00. If you keep track of your expenses and delete resources once you are done with them, €170.00 can last you quite some time. Some Azure resources are always free, like serverless offerings (see my other book, Azure Serverless Succinctly), the free tier of App Service, and Azure Active Directory.
Azure Active Directory
The heart of your Azure account lies in the Azure Active Directory, or AAD. This is where you can find the name and ID of your Azure tenant. When you use the top-right hamburger menu, it should be in the list of favorites. It is also at the top of your home screen by default. You will be taken to the Azure AD overview. The user-friendly name for your directory is “Default Directory,” which you can change. If you signed up using an Outlook account, the name of your tenant will be something like [youremail]outlook[number].onmicrosoft.com—not a nice name, and you cannot change it. You can create another tenant and pick your name, but that is not in the scope of this book. However, if you do want to experiment with this, you can click + Create a directory at the top. There is also a Delete directory button, which you can use to delete your directory later if you want to.
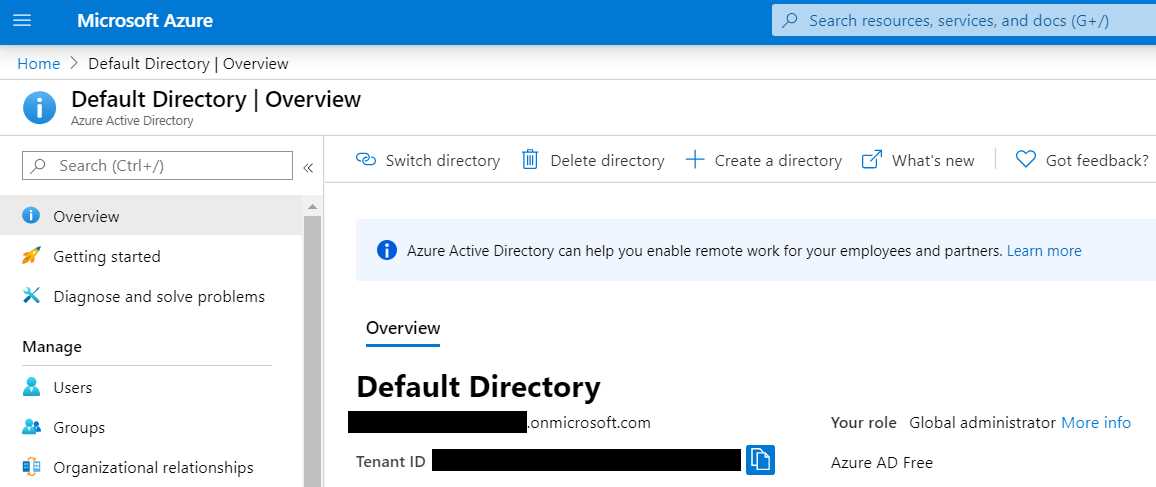
Figure 3: Azure AD Overview
If you go to Properties, you can change Default Directory to Succinctly Directory, just Succinctly, or whatever you like. You can also change your notification language, your technical contact email address, and your privacy information. Do not forget to save if you change anything.
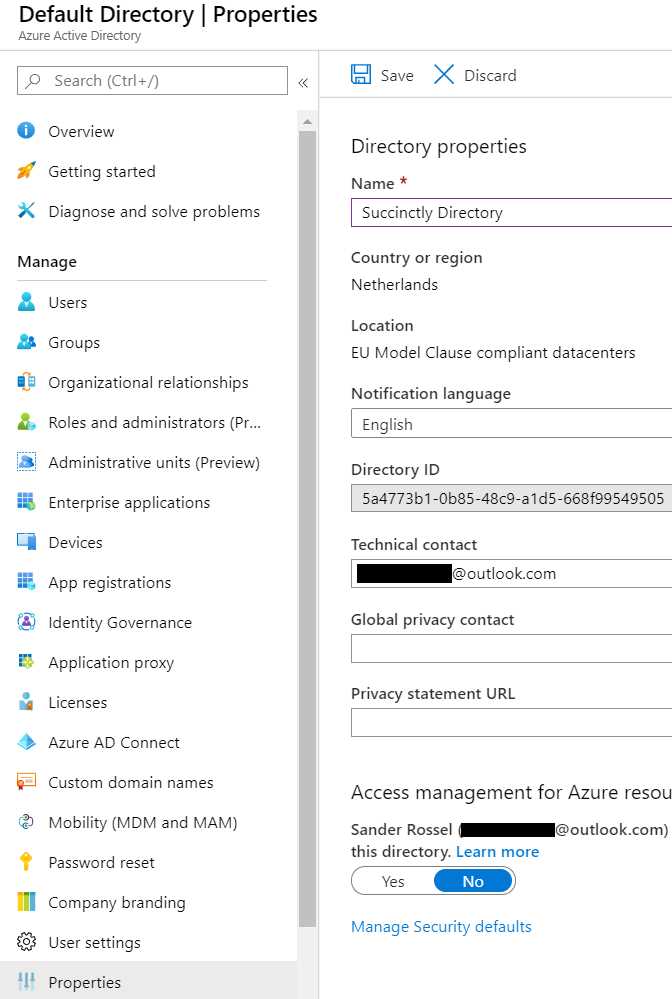
Figure 4: Azure AD Properties
Last, you can view all your users by going to Users. Users that we add in Azure DevOps will be added here as well. We will add some users later.
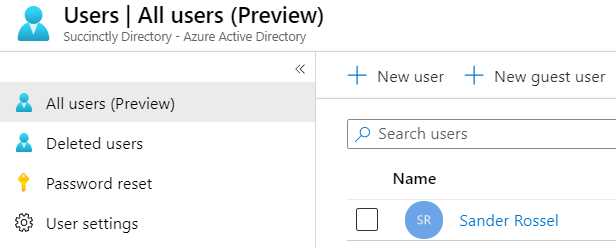
Figure 5: Azure AD Users
As you probably already guessed, Azure has much more to offer, but these are the important services that we will need in the remainder of this chapter. Azure AD is especially important, and we are going to see a lot of it.
Creating an Azure DevOps account
Next, we can create an Azure DevOps account. Now that we have a Microsoft account, this should be a lot easier. Go here and click Start free. Alternatively, you can click Start free with GitHub.
Since you already have an account that is connected to Azure, Azure DevOps just asks you to verify a few things. Again, opt out of the promotional offers, enter your country, and click Continue. Optionally, you could switch your directory if you have multiple, but we are not doing that now.
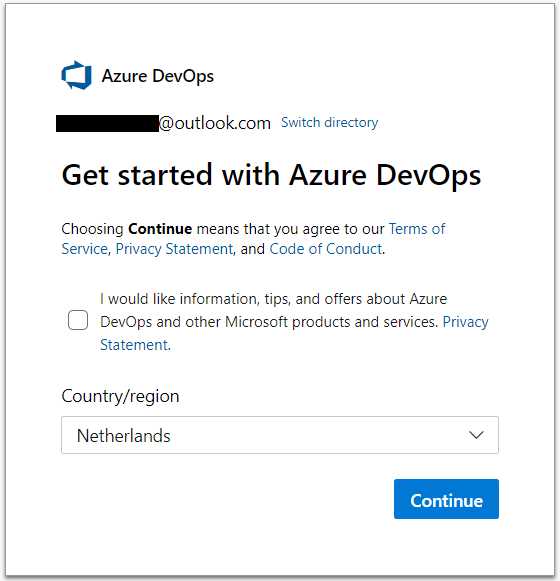
Figure 6: Creating an Azure DevOps Account
The next screen takes you to your default organization, which is named something like [youremail][number]. Most of the screen is dedicated to project creation. Here, you can enter a project name and description, and specify whether it is a public or private project, whether you want to use Git or Team Foundation Version Control (TFVC), and your work item process (basic, Agile, Scrum, or CMMI). Those last two options are under Advanced, and you should leave them for now.
You should not use TFVC unless you have a specific need. It is an older version control system that is centralized. Git is a distributed version control system, and the de facto standard in the industry. For more information on the two, click the question mark icon. The workings of the different source control systems are not in scope of this book.
We will look at the different work item processes in the next chapter.

Figure 7: Azure DevOps Home Page
That’s it—you now have your very own Azure DevOps environment. You may create a project now, but we will be doing that later in this chapter as well. In the remainder of this chapter, we are going to focus on organization and project configuration.
Managing your DevOps organizations
Before we create a project, let us look at some organization settings. You can find the organization settings in the lower-left corner. The first thing we want to do is change our company name. The Name field only allows alphanumeric characters, no spaces or special characters. You can enter uppercase and lowercase letters, but I prefer all lowercase myself. I am going to change the company name to succinctlyexample. The organization name must be unique, or you will get a message that the name is unavailable. I am also going to change my time zone to UTC+01:00 for the Netherlands (Amsterdam). You can add a privacy URL and an organization description if you like. When you save, you will have to retype your organization name.
Changing your organization name has a great impact on your projects and teams. Not now, because you do not have anything yet, but it will in the future. Maybe you have noticed, but the URL of your Azure DevOps environment is https://dev.azure.com/[yourorganizationname]/. Changing the organization name changes the URL of your DevOps environment! That means everyone in the entire company has to change every DevOps URL they have. You need to change documentation, bookmarks, Git repositories, possible feeds to NuGet, other packages, and everything else that somehow links to your Azure DevOps account. Changing the name and getting a new URL may take a while, so your new environment may not be directly available. If you have some projects, expect some downtime. So, the little warning before saving is in order.
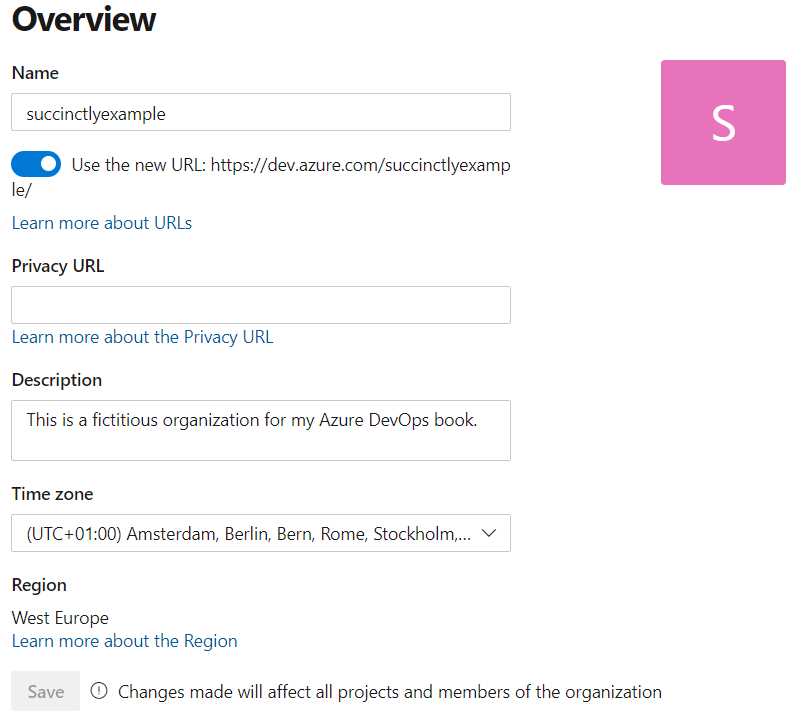
Figure 8: Azure DevOps Organization Settings
Another important setting you can view here is the region of your company. Mine is currently West Europe. It was set automatically. For some reason, we were not able to set it at organization creation, but if you would create a new company now you can, as we will see in a bit. Region is important because every region has its own privacy laws. For example, a lot of European companies do not want their data to leave Europe because Europe has strict privacy laws. My customers often ask me explicitly where their data is stored. The weird thing about region is that it cannot be changed here. Instead, you need to go to the DevOps Virtual Agent. There you need to select the quick action Change Organization Region. There have been reports that the Change Organization Region feature does not work properly in some scenarios. One alternative is to create a new organization, but this usually is not feasible. So hopefully the Virtual Agent will work for you, or you will have to contact Microsoft support.
Another setting that can be changed here is the organization owner, but that is only possible when you have at least one other user in your company. An organization owner has all permissions in an organization, so be careful who you give ownership to. Of course, not everyone can change the organization owner.
You can also delete an organization. This will irrevocably delete all your boards, repositories, pipelines, test plans, and artifacts. So do not ever use this self-destruct button unless you are very sure you can delete an organization, like the test organization we are using now.
Before we look into any other settings, let us look at how to create a new organization where you can set the name and region on creation.
Creating a new organization
Go back to the main page of Azure DevOps, https://dev.azure.com/succinctlyexample (of course, your organization name will be different). Now, at the left, underneath your organization name, you can click New organization. You will be taken to the same screen as before. However, when you click Continue, you will now be taken to a second screen where you can pick an organization name and region. After that you will be taken back to the home page of Azure DevOps, and you will now have two organizations on the left side of the screen.
Other than that, this organization is the same as the other one. Keep both organizations for now, but pick one that you will be using for the remainder of the book.
Not all your organizations will show up in the organizations list on the left side. We are going to connect our environment to our Azure AD later, and only organizations in the same Azure AD will show up here. It is somewhat confusing and annoying, but that is how it currently works.
Creating a project
Creating your first project is easy. Just go to the home screen and fill out the project name, which can contain uppercase and lowercase letters, numbers, and some special characters (I have named mine Sample project), and an optional description. Leave the visibility on Private and leave the advanced settings alone. Then click + Create project. Your project will now be created, and you will be taken to the project page. The project overview page is still empty now, but we can fix that later.
For now, go back to the organization page by clicking on the Azure DevOps logo at the top left, or in the breadcrumbs at the top. The organization page looks different now. It shows your projects, of which you now have one. You can also switch to My work items and My pull requests, which we will create in later chapters. You can create new projects on the top right.
Every project can have multiple boards and repositories, so you really have to plan how you will be creating your projects. For example, your company may be creating an ERP application and a CRM application. You can create two projects: one for ERP, and one for CRM. Both projects will probably have multiple code repositories. Perhaps you have some shared services between the two, so you can create a third project named Core services or whatever. Or maybe those will be separate repositories in the ERP project. You can use separate boards in both projects, and you can have one board that both project teams use, or separate boards in the same project. You can also just have a single project and keep all the repositories for both the ERP and CRM in there. If you have multiple customers for whom you create customer-specific products, put those in separate projects. Do not mix different customers in the same project. Also, if you have separate teams, give them their own projects. So, if one team only did the ERP and another other team only did the CRM, give them separate projects.
I will give you an example of my own company, JUUN Software. I have one organization that I use for a couple of projects. Each project is for a different customer. They are relatively small projects for customers who have no IT department or on-premises infrastructure. Some projects have multiple repositories for different parts of the software. I also have a customer who wants access to the source code I write for them. They basically hired me to set up their Azure environment and write software for them, but they want to be able to expand the team or continue the project when I'm no longer involved at some point in the future, as they do have their own IT department. I set up a separate organization for them, which has multiple projects.
In the past, I have worked for a company that always kept all source code in-house and never shared with their customer. They had one organization and maybe hundreds of projects of which sometimes tens of projects belonged to the same customer.
On top of that, you can assign users to projects individually, so project access is another variable to consider when creating new projects.
As you can see, different requirements require different strategies.
User management
It is time to add another user to our project. For this, you will need a second email address. You probably already have one (maybe a work address or a second private address), but if you do not, create one. This can be another Outlook account, a Gmail account, or even a work account that is already registered in an Azure AD somewhere.
The easiest way to add a new user is by going to your organization settings and clicking Users in the menu on the left. On the right, click Add users. Now, simply add one or more email addresses of the users you want to add. Your access level can be Basic, Stakeholder, or Visual Studio Subscriber. You can add a total of five free, Basic users. Basic users have full access to all Azure DevOps features, such as Boards, Repos, and Pipelines. Stakeholders have limited access, but are always free. They have full access to Pipelines, no access to Repos, and limited access to Boards. You can find more information on stakeholder access here. Visual Studio subscribers already pay for access through a professional or enterprise subscription. They have full access, but do not take up a free user slot.
You can also add users to projects if you have any. If you select your sample project, you can also add your new users to a group in your chosen projects. The groups are Project Readers, Contributors, and Administrators. These groups are self-explanatory, so I will not say too much about them. Just be careful who you give administrator access to. A contributor can access everything in a project, but cannot set certain settings (but still more than you might want them to).
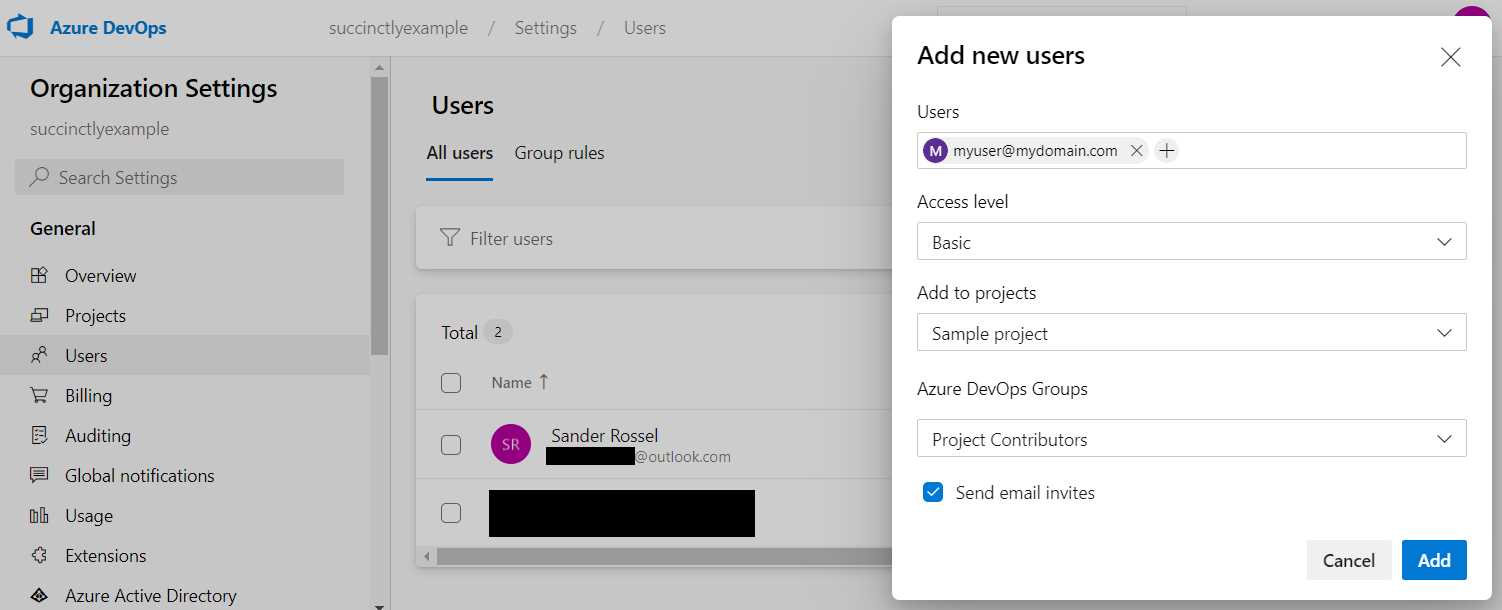
Figure 9: Add a New User
Add a user with Basic access and add them to the Contributor group for your sample project. Leave Send email invites selected. You should receive an invitation in your email shortly (be sure to check your spam folder as well). Click Join now in the email to get started.
We are going to leave the new user for now, and continue with our current user.
The new user is added to the user overview. You can click the three-dot button (…) at the end to change their access level for the company or for individual projects, resend the email invite, or delete the user. If you log in with the new user, you can still access the user overview, but you cannot access the three-dot button to manage a user or invite new users.
Billing
As mentioned, you can add five free users to your account, and unlimited stakeholders and Visual Studio subscribers (because they already pay for an account). However, you get more than just five users. Later, when we are going to add CI/CD pipelines, we need build time as well. The free tier offers 1,800 minutes (30 hours) running time per month and one self-hosted agent. Jobs can only run sequentially. So, if you want to build and release two projects, you will have to wait for the first build, then the second build, then the first release, and then the second. You may be tempted to think a build only takes a few seconds at a time, but unfortunately, they take up minutes on Azure DevOps because the code has to be downloaded every time, as well as any packages that would be cached on your own machine. A typical build can require minutes at a time, and for complex builds and releases you are looking at 10 minutes each. That means that with a single job at a time, you will have to wait for maybe half an hour for two builds and releases to complete. Next to that, you also get artifacts and cloud-based load test limits.
If you want to scale up the number of users, your build time, or the number of parallel jobs, you can do so in the Billing settings. Here you can view your free users, build minutes, self-hosted agents, artifacts, and cloud-based tests, as well as your paid ones. To set up billing, click Set up billing and you will see the Azure subscription that is linked to your account. We are currently on a free trial subscription that has a spending limit, so we cannot set up billing. I am not going to ask you to remove the spending limit or upgrade to a paid account since we will not need it, but if you have one it is as easy as selecting an Azure subscription, which is linked to your account. After the subscription is connected, you can just add a number of users, parallel jobs, agents, etc.
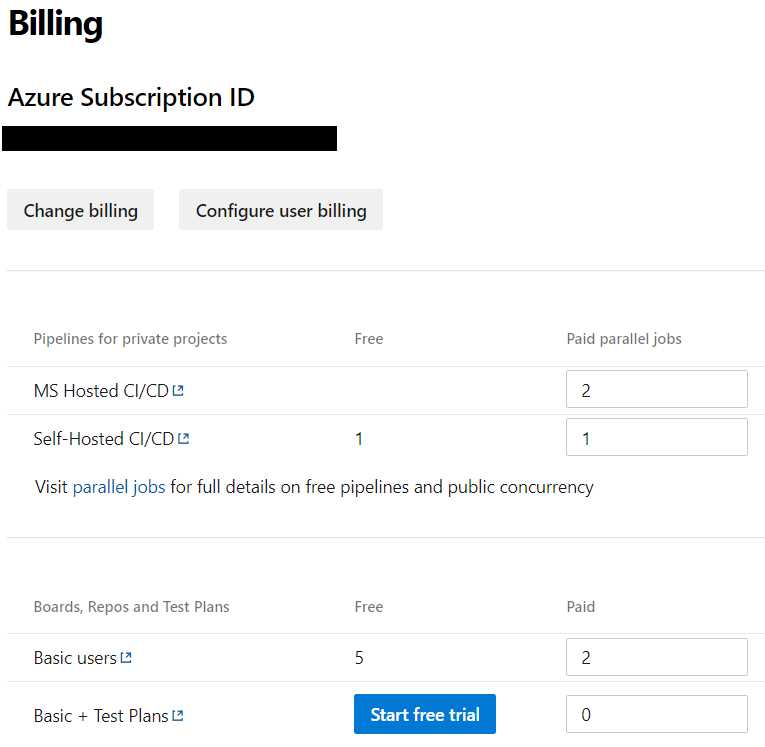
Figure 10: Azure DevOps Billing
Your users can be billed for a single organization or for multiple organizations. So, either a user is billed per organization, or a user in multiple organizations is only billed once. The first is useful when you have only a few users that work for multiple organizations; the latter is useful when many users access multiple organizations. The multi-organization billing applies to the Azure subscription, so you do not get five free users. That also means that all the organizations this user is a part of need to be part of the same Azure subscription. You can change this setting under Configure user billing once billing is set up.
You are billed daily, so if you add users and remove them after two weeks, you will only pay for those two weeks. The prices per added resource per month used to be displayed here somewhere, but that has been removed. However, you can view the pricing details here. For the Basic plan, the first five users are free and each additional user is $6 per month, while an extra parallel job costs $40 a month.
To change your billing or remove it entirely, click Change billing and either select another Azure subscription, or click Remove billing.
Connecting an Azure AD
We have seen that your Azure subscription is already used in billing scenarios. However, you can also connect an Azure AD to your organization. You would want this so you can manage users in one place (Azure AD), although you still have to assign their access rights in Azure DevOps by assigning roles to users. In the organization settings, click Azure Active Directory in the menu on the left. The following screen cannot be simpler since it only has one button, Connect directory. Click that button and you will be able to choose a directory. If you followed along with this book, you will only have one choice, which in my case is the Succinctly Directory.
You will get a warning though: 1 out of 2 members is not part of the Azure AD and will lose access to the Azure DevOps organization. We are going to re-establish access for that user in a second. For now, connect to the Azure AD.
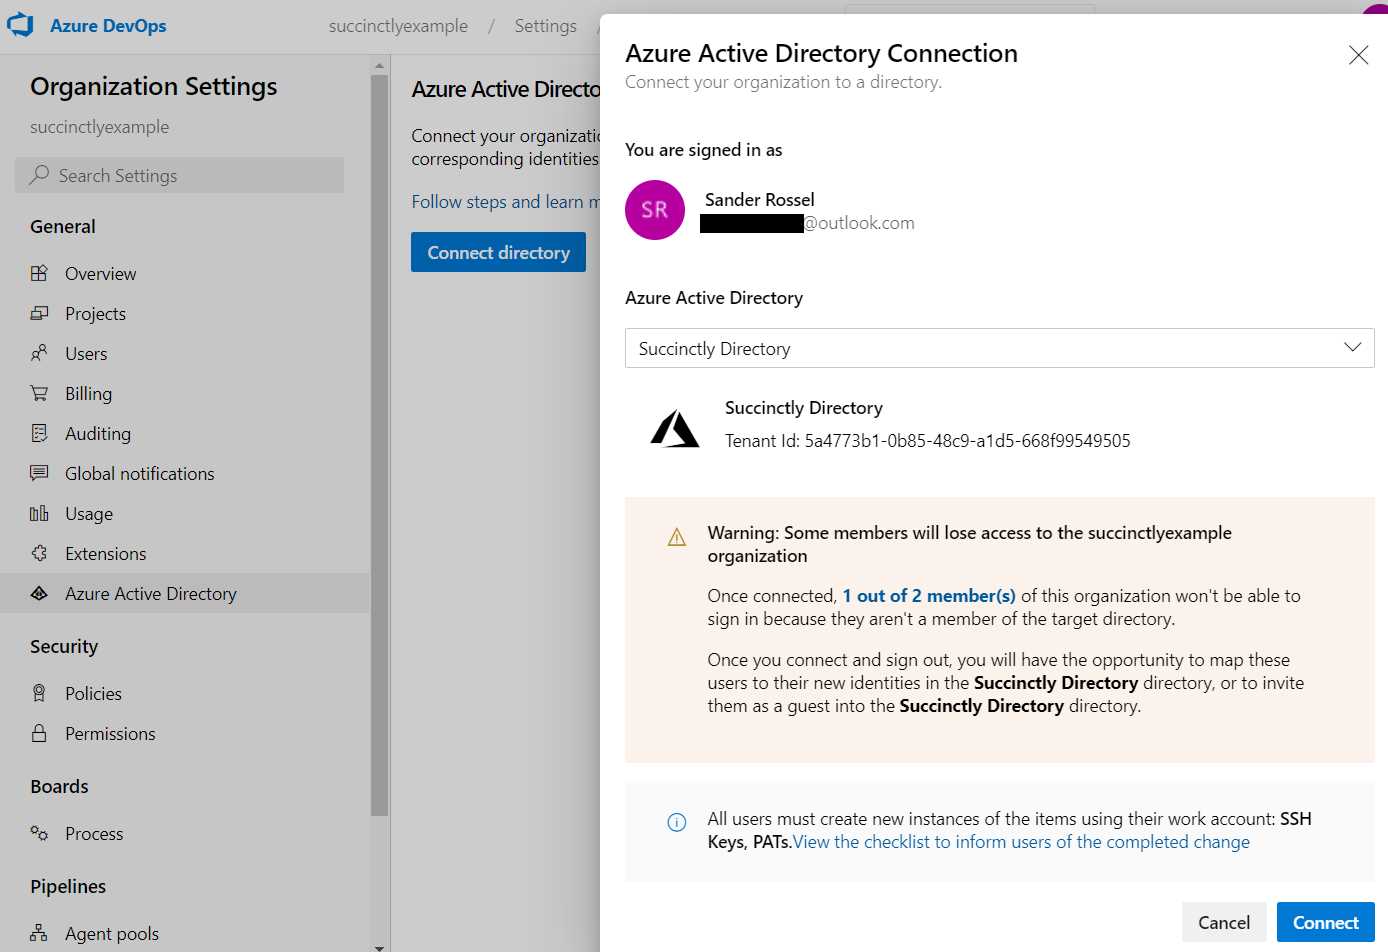
Figure 11: Azure AD Connection
After connecting you will be forced to sign out. For some reason, I was not able to sign back in for a few minutes, so be a little patient. Be sure to sign out completely before signing back in. When you are able to sign back in, you will be asked to verify your identity, and then you will be given access to the organization again. We can now see what I told you before—the other organization that we created is not in the list of organizations anymore because it is not connected to the same Azure AD. It gets a little messy here. On the top right, click your initials and click your account (right above Sign in with a different account). You will briefly see Switch identity, and you will be prompted for your password again. You will then be taken to an overview of all your organizations, which only shows the other organization! You can click it to enter it. Now go back to your main organization, and you will be denied access. You have to click Sign out and login with a different account and log in to exactly the same account. Good job, Microsoft! Did I mention they messed up accounts?
Unfortunately, our second user just lost access completely. Now you can do two things. Enter the user into Azure manually, or delete the user from the organization and re-invite them. First, let us add them into Azure manually. Go to https://portal.azure.com/ and navigate to Azure AD, and then to users. There, click + New guest user. Enter a name and email address, and click Invite. They should now get another invite. They must then click the link in the email and provide our Azure AD access to their account. After that they can log in to our Azure DevOps organization again after confirming their identity.
For the second method, we must either delete this user or add a third user to our organization. Deleting the user requires a little extra explanation. In addition to deleting the user in Azure DevOps, we must now also delete the user from Azure AD manually. To delete them from Azure AD, simply go to your Azure AD users again, click the user, and click Delete in the menu bar at the top. If you also deleted the user in Azure DevOps, then the user is now officially a stranger again. You can now add the user to DevOps again, just like we did before. The user will receive another invite, but it looks a little different this time. That is because it is an Azure AD invite, just like when we added the user to Azure AD manually. If the user clicks on the link in the mail and accepts the terms, this user is now added to Azure AD and to Azure DevOps.
Another method of adding users is to first add them to Azure AD, which will often be the case if you synchronize Azure AD with your on-premises AD. When the user is already in Azure AD, you can add them to Azure DevOps as well, except this time you get a little auto-complete when entering their email address. Other than that, it is the same process.
Project settings
Next, we are going to look at some project settings. These settings can be set for individual projects. Browse to your project and click Project settings in the lower-left corner (in the same place as your organization settings). You will be taken to the overview page where you can change the name and description of a project as well as the visibility. You can also change the available services here. If you decide not to use test plans, you can completely disable it here and declutter the UI a bit. Also, you can add project administrators and completely delete the project.
We will look at teams and permissions in the next section.
You can also add service hooks that allow you to integrate with other services. You can notify various services of events that happen within your project, like code being pushed, a build triggering, or a work item being updated. Not every service supports all events. Other than that, service hooks are outside the scope of this book.
The last setting I will describe here is that of dashboards. It is possible to add dashboards for your project. There are only three settings and they are well described, so I will leave it at the mention of them. However, go back to your project overview page and you will see Summary, Dashboards, and Wiki in the menu. By going to Dashboards, you can add widgets like assigned work items and burndown charts. Just click Edit at the top to add some widgets, and simply drag them in the boxes. You can also create new dashboards by clicking on the down arrow next to Sample project Team - Overview. You can now view various projects statistics, like failing builds and deployments, or burndown charts, with a few clicks.
Last, you can add a wiki by going to the menu item with the same name. Here you can add pages on important issues in your project, like application architecture, code structure, best practices, or jargon that everyone should know about. The actual creation of a wiki is not in scope of this book.
Security
Security is a critically important aspect of Azure, Azure DevOps, and any cloud service. Azure DevOps has some security settings as well. In the organization settings menu, you will see a Security heading with two subitems, Policies and Permissions. Policies are organization-wide settings. You can click on the little link icons to get more information for each setting. You might want to disallow public projects, so no one accidentally creates a public project with sensitive customer data. Turning off external guest access can also be a good policy. This forces you to add all new users in your (Azure) AD first so people cannot use personal emails. This is not very practical when you work with a lot of contractors, but may add extra safety. Personally, I never needed these policies.
The Permissions tab is a little more interesting. Here, you can view, change, add, and delete groups, and assign users. A group allows or denies certain permissions to the users that are assigned to the group. There are a couple of built-in groups, of which Project Collection Valid Users and Project Collection Administrators are the most important. The first gives the least access and contains every other group, and by extension every other user, while the latter is reserved for administrators. When you click Project Collection Administrators, you will notice that you cannot edit it. The Project Collection Valid Users can be edited as you like. It is advised to not edit the built-in roles, and to create new roles if these built-in ones are insufficient. Keep in mind that these roles give or deny access on the organization level.
When you click Project Collection Valid Users and then check the Members tab, you will see all other roles in your organization, as well as the Project Valid Users role on the Sample project. If you click the role and check out the members, you will notice the Readers, Contributors, and Project Administrator roles that we could set when adding new users. If you drill down further to the Contributors role and its members, you will find the user that we added. You can change these roles by changing permissions, adding a group image, or changing the name or description. You can also delete these groups. Unless you know what you are doing and really want to spend some time figuring this out, I suggest you leave it alone. At most, add a new group.
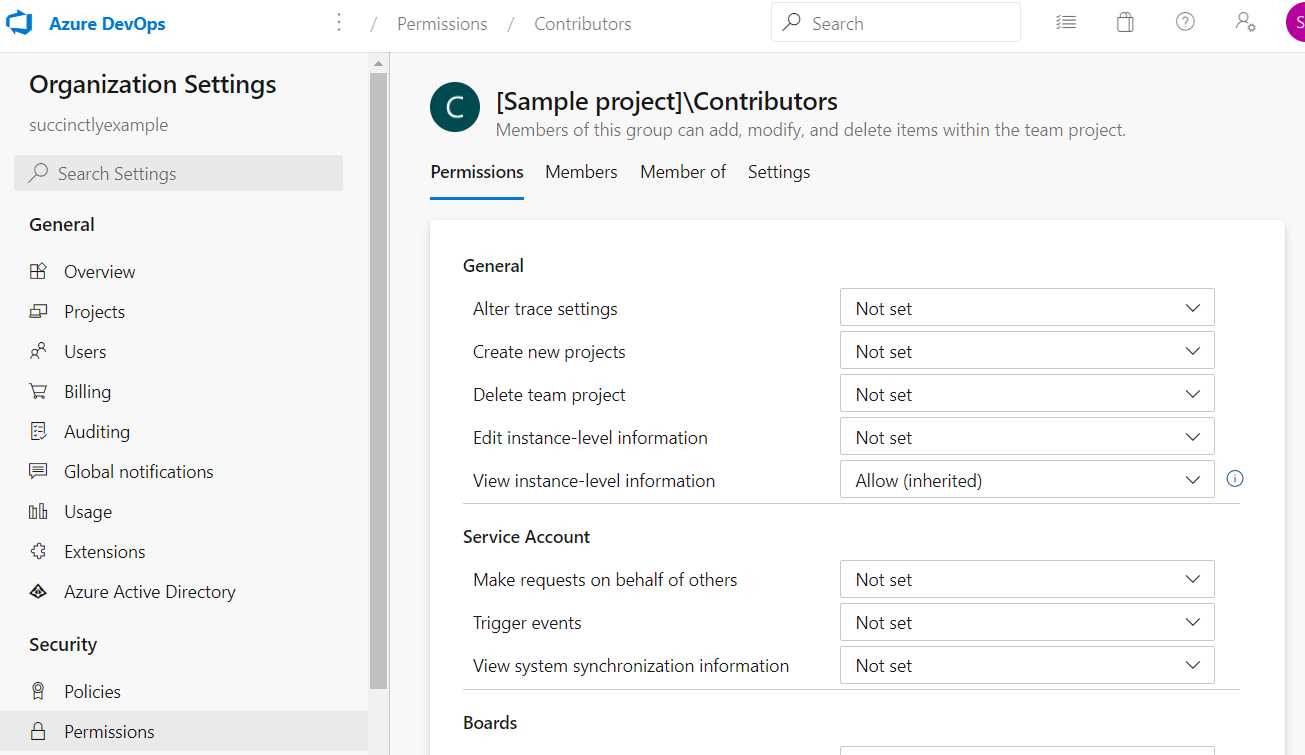
Figure 12: Contributors Role
If you go back to the permissions screen of the organization, you will see a warning that you only have one Project Collection Administrator, and that you should add a second one to reduce the risk of losing access. You can add your other user by clicking the message, or you can add it to the group directly. To do this, click on the group, go to members, and click Add in the upper-right corner. Simply find your user and click Save. If you now log in as the other user and go to the user overview, you will find that you now have the rights to add and change users. Other than that, this user can now disconnect Azure AD or connect another one, add and change groups, and even remove you as an administrator and owner. Basically, this user has unlimited power—so be extremely careful who you assign to this role!
Notice that by drilling down the members of members of roles, you will eventually end up in roles that are specific to your projects, like the Contributor and Reader roles. You can find these project-specific roles by browsing to your project settings. Here you can find Permissions as well, under General settings. Next to groups and users, this level also has teams. You can find Teams in the menu as well, right above Permissions. A team is a collection of users that you can assign to a role. Every user in that team will then have the same roles, unless someone in the team has some specific roles assigned to the user account.
While permissions are important, this is also advanced stuff, and most teams can use the default provided roles. I’m not going over how to create custom roles, but feel free to experiment with it at your leisure.
Other settings
We have looked at the most important settings. Some settings that I have not mentioned yet are the auditing and usage logs under organization settings. This is where you can view who did what and when. This is particularly important when something goes wrong and you need to identify the users involved. There are also global notifications under organization settings, and notifications under project settings. These are the same, but in a different scope. This is where you can configure when certain notifications are being sent. I would leave that alone as users can override them individually as well (in the upper-right corner, next to your initials, under Notifications). Speaking of which, that is where you can change other personal settings as well, such as your theme, time zone, and profile. (I think it is nice to add a picture of yourself there so you do not get all those boring initials.) I will explain the personal access tokens, SSH keys, and alternate credentials briefly in a later chapter.
Another important organizational setting I have not discussed is extensions. Here you can browse the Marketplace for extensions other people created that should make life easier while using Azure DevOps. I would not advise you to add unofficial extensions to Azure DevOps, but some of them can be handy. There are extensions for Slack integration, SonarQube, and something as simple as code search. Some are official Microsoft extensions; others are official extensions from other companies, and some are made by users who are not backed by any (large) company. Most are free, but some are not. Browse at your own leisure and use at your own risk. Simply click on an extension and click Add for free or Get.
Other settings that you may be wondering about, like repos and pipeline settings, will be discussed in the upcoming chapters.
Summary
Azure DevOps offers plenty of possibilities for project, user, and group management. By using groups and permissions, you can secure your environment. By creating different projects or even different organizations, people and teams can work independently according to their own needs. By connecting to Azure, you can use Azure AD for user management and your Azure subscription for billing for necessary upgrades. Azure DevOps can provide value for teams of any size.
- Seamless integration with Azure DevOps data sources
- Real-time data visualization for actionable insights
- Customizable dashboards to meet your specific needs
- Enhanced collaboration with data-driven reporting