
Azure DevOps Succinctly®

CHAPTER 5
Build Pipelines
In the previous chapter we used Azure DevOps to save our code in Git source control. In this chapter we are going to use Azure DevOps pipelines to build our code. By automatically building your code, you are immediately notified when your code breaks a build in a way that prevents deployment. While planning work and using Git is important in any environment, the biggest strength of DevOps, for me, lies in automated builds and deployments. It reduces risk, saves time, and allows you to deploy at any time with minimal downtime, if any.
Classic build pipelines
Let us start by creating our first build pipeline. Our goal is to be able to build our software so that we know our source has no incorrect syntax (it happens), packages are available, and that any automated tests succeed. Go to Pipelines > Create Pipeline.
You will now be asked where your source code is: Azure Repos Git, Bitbucket Cloud, GitHub, another Git repository, or Subversion. However, we are not going to answer that. Instead, we are going to click Use the classic editor to create a pipeline without YAML. We will get back to this later, but I think the classic editor is more suitable for learning purposes.
In the classic editor you are once again asked to select a source, where you can select the same sources as before. You will notice you can select other projects than the one you are in now, so that is an option too. However, we will just keep our current project and default repository. The default branch for manual and scheduled builds is interesting since we have two branches, develop and master. Basically, we want both to build as soon as something is committed to them. After all, both must always be deployable, where develop is ahead of master. Keep develop so we will at least know our latest commit builds as it should.
Next, you get to select a template. At the top is the YAML template that we just opted out from. Featured templates include .NET desktop, Android, ASP.NET, Docker Container, Maven, and Python package. However, we are going for the ASP.NET Core template. If none of the templates satisfy your needs, you can select Empty job at the top and start from scratch.
Once you select the ASP.NET Core template you will be taken to the pipeline editor. The pipeline editor shows an agent job, which is basically a set of tasks that are executed on a single server. In the agent job you see the steps Restore, Build, Test, Publish, and Publish Artifact.
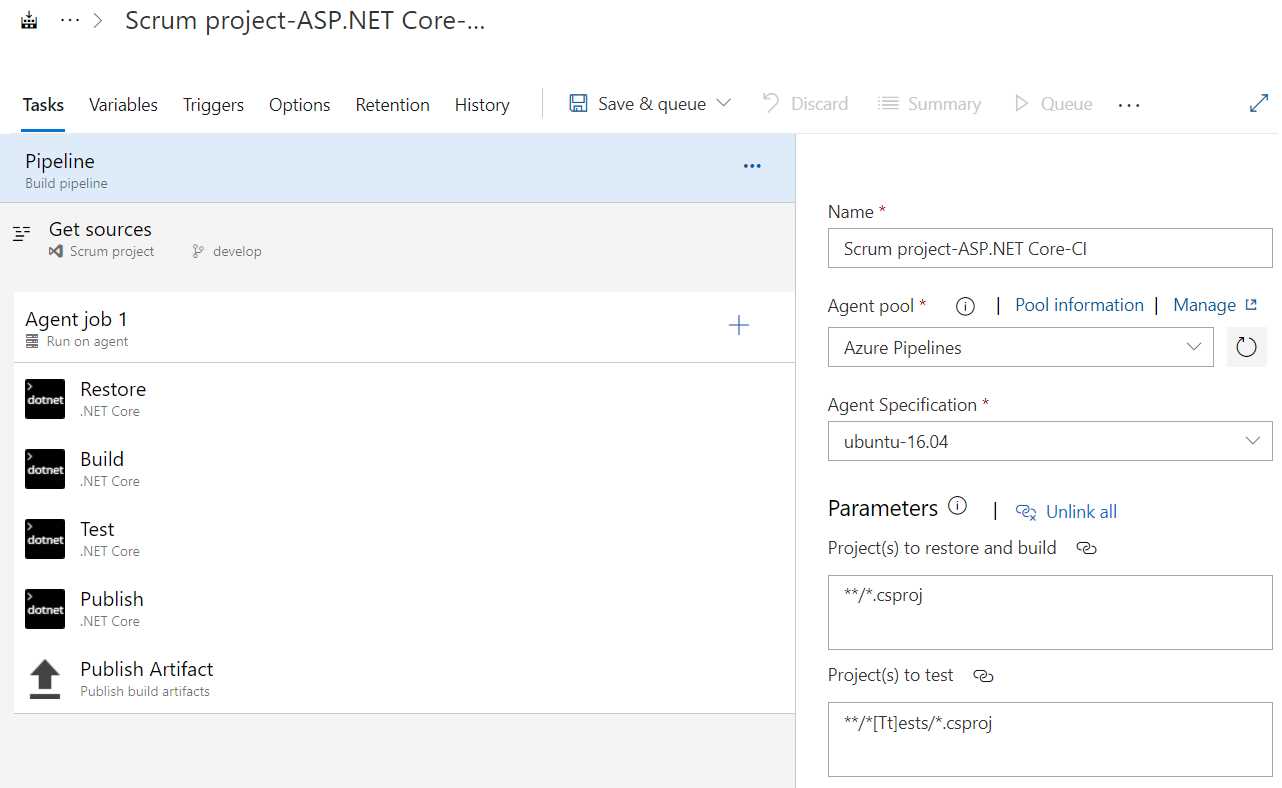
Figure 37: Pipeline Editor
Let us look at the various levels in your pipeline: the pipeline, jobs, and tasks.
Pipeline settings
Before you continue, you probably want to change some pipeline settings. First, the name of your pipeline. For some reason I often forget this, and I am left with a generic pipeline name. Name it something like WebApplication1 Build (if you did not rename your web application). Next, you can choose an agent pool, either Azure Pipelines or privately hosted agents. We do not currently have a privately hosted agent, so Azure Pipelines is our only option. That means your build is executed on a server hosted by Azure DevOps rather than your own. You can also pick an agent specification. You can pick macOS, Ubuntu, or Windows. The list is not long, but you should be able to build most of your projects on one of those. For everything else, you have private agents. Change the agent to windows-2019. These agent settings are inherited by your jobs, but can be overwritten. On a side note, I never need more than one job. The parameters are a bit difficult to explain now, but we will get back to them later.
If you click Get sources, you will find your Git settings that you just entered and some additional settings that I will not go into.
Agent settings
On Agent job 1 you can configure some settings, like parallelism, demands, and overwriting the agent pool. A demand is something that applies to your self-hosted servers. Imagine you have a server that has a third-party application installed that is necessary to build your source (for example, a license for a library you are using). You can tag your private server with third-party license and then demand here that the pipeline agent have that specific tag. Or maybe you use it for a different version of Visual Studio. For example, the visualstudio label must have a value of 2015 or 2019. We will see this later.
You can add extra agents by clicking the three-dot button (…) on your pipeline. You can add an agent job (running on a server) or an agentless job. The agentless job is limited in what it can do, but it can delay execution, invoke REST APIs or Azure Functions, and publish to Azure Service Bus, to name a few. Personally, I never needed these, but I wanted to point them out. You could add a second agent if you want to build on multiple platforms, for example Ubuntu for Android and macOS for iOS, if you have a mobile app.
Tasks
Below your agent, you will find tasks. In our current template we have four .NET Core tasks, which run the dotnet command-line interface with a specific command, and a Publish build artifacts task, which will create an artifact of any build output. We can add tasks if we want by clicking + on the agent job. If you do this, you will see all tasks, but you can filter by Build, Utility, Test, Package, Deploy, or Tool tasks, as well as download more tasks through the Marketplace. Here you can find tasks that can run Bash scripts, batch scripts, use cURL to upload files, sign Android APK files, build Docker images, run Grunt or Gulp for JavaScript, and much more. I have not counted them, but including the Marketplace there are probably hundreds of tasks that you can use. Needless to say, I am not going to discuss them all.
Next, let us examine the Restore task. You can see that even though it is named Restore, the task is of type .NET Core, just like the Build, Test, and Publish tasks. This task runs the dotnet command-line tool with the restore command and no arguments. You can set additional settings like feeds to use, but the defaults will do for now. This task will now perform dotnet restore on your project as if you were running it from the command line.
Linking settings
The interesting part to notice here is the Path to project(s) settings. You cannot change this, and clicking the little chain icon reveals that it is linked. This is linked to the parameters we saw in the pipeline settings. If you want to change this value, you have to either unlink it or change the value in the pipeline settings. If you opt for the latter, you will change the value for every other setting that it is linked to. The Arguments setting is not linked, so click on the little i icon next to it and click Link. In the pop-up that opens, edit the display name so that it is easy to recognize and enter some value. Then click Link.
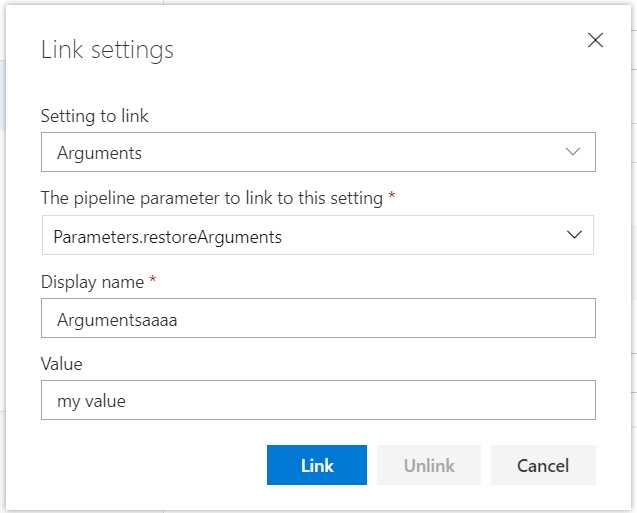
Figure 38: Link Settings
You will now see that the argument setting is linked as well. When you go back to the pipeline settings you will see your Argumentsaaaa parameter with my value. Clicking on the chain icon tells you where it is used. You can now link this to other fields as well. Go back to the Restore task, click the chain icon, and click Unlink. This will unlink the field and remove the parameter. You can now edit the value again, so make it empty.
The Build and Test tasks work pretty much the same, except the command is different and they get an (unlinked) argument. These arguments come from a variable that we will look at in a moment.
Artifacts
Before we continue, I would like to discuss the Publish and Publish Artifact tasks. The goal of your pipeline is to create an artifact that you can deploy. First, we will need to publish the software, and then we can make an artifact that contains the published software.
The Publish task is another dotnet CLI command, but this time it is the publish command, which will publish your software so that it is ready for deployment. In the task you will see a check box labeled Publish web projects, which is on by default. With this setting enabled, the task will publish all projects that either have a web.config or a wwwroot folder. If you have a web project without either of those, or you simply do not have a web project, this step will currently publish nothing. In this case we are fine, but if you have any other project type, for example a Console app, be sure to deselect this. You will then have to enter the path to your project, which is linked to **/*.csproj by default, but that means all your projects will be published, while you only want your entry project to be published (all other referenced projects will be included in the published folder). So, you will have to unlink the value and enter something like MyProject/MyProject.csproj, or keep using wildcards and enter **/MyProject.csproj.
Also, if you do not want your published project to be zipped, make sure to clear the Zip published projects check box.
The next task creates your artifact, which is simply any output of this pipeline. The Publish task publishes your project to a default folder, which is accessible using the build.artifactstagingdirectory variable. In this task you will see that the Path to publish is set to $(build.artifactstagingdirectory). The $() means that anything between parentheses is a variable that is to be interpreted. You can name your artifact, but the default name is drop. You can also specify a location, either Azure Pipelines or A file share, which makes you enter a path. Keep all the defaults.
We are not done yet, but before we continue let us click Save & queue at the top and see our pipeline in action!
Running a build
To sum up what we have done, we picked the ASP.NET Core template, changed the name of our pipeline, and changed the agent specification to windows-2019. That is all you need to do before saving and queueing.
When you click Save & queue at the top of the editor, you will be presented with a prompt. You can enter a save comment, like changed the publish path. More importantly, you can change the agent pool, agent specification, which branch you would like to build, any demands, and any variables. Leave everything as it is and click Save and run.
This should start the build. You will see a summary of your run, as well as your jobs and their status. Your build will be queued and as soon as an agent becomes available, your tasks start running. Keep in mind that you have only one hosted agent available, so if a build or deployment is running, another build or deployment will have to wait for the other to finish. You can buy more agents in the billing section of the organization settings. If you pay for one parallel job, you will be able to run two pipelines simultaneously, and so on.
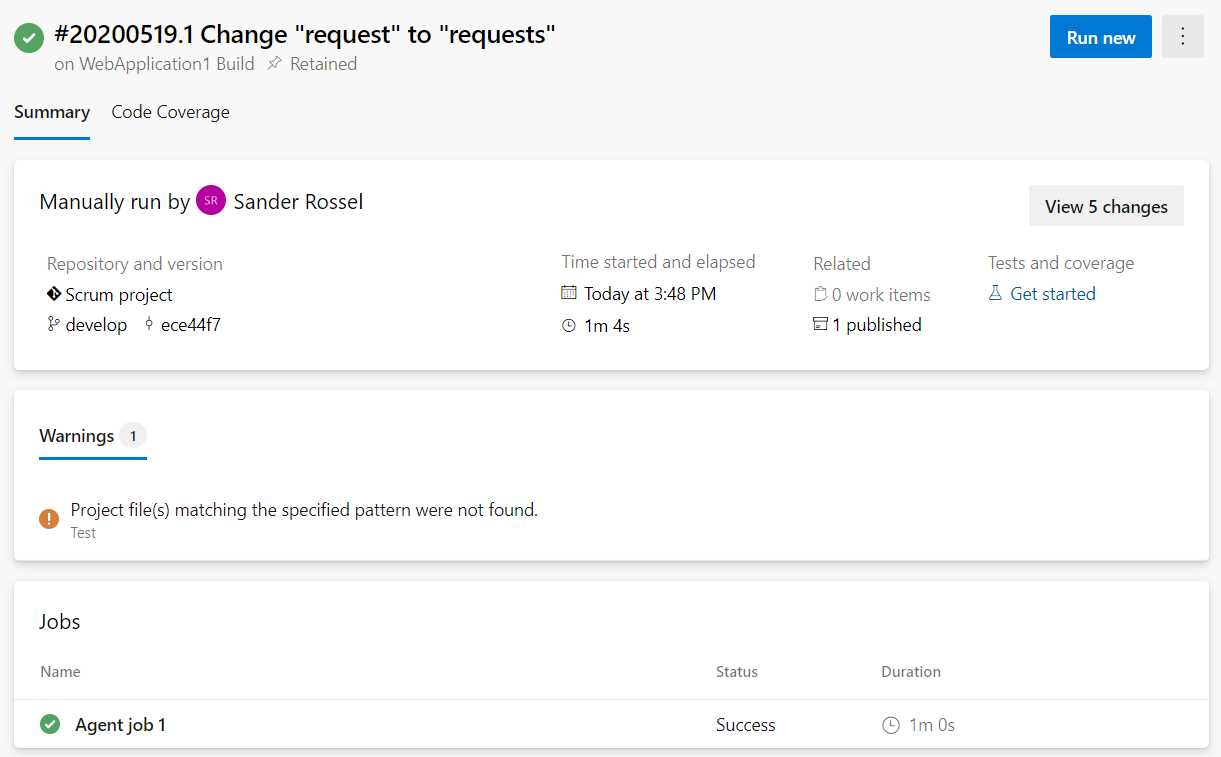
Figure 39: Build summary
When the build is finished you will see a warning that no tests were found, which is true and as planned, so we can ignore this warning. You will see that the job succeeded, but you can drill down to the individual tasks by clicking on the task. In the next form you can see the tasks and logging of the tasks. This is invaluable when a job fails and you want to know why.
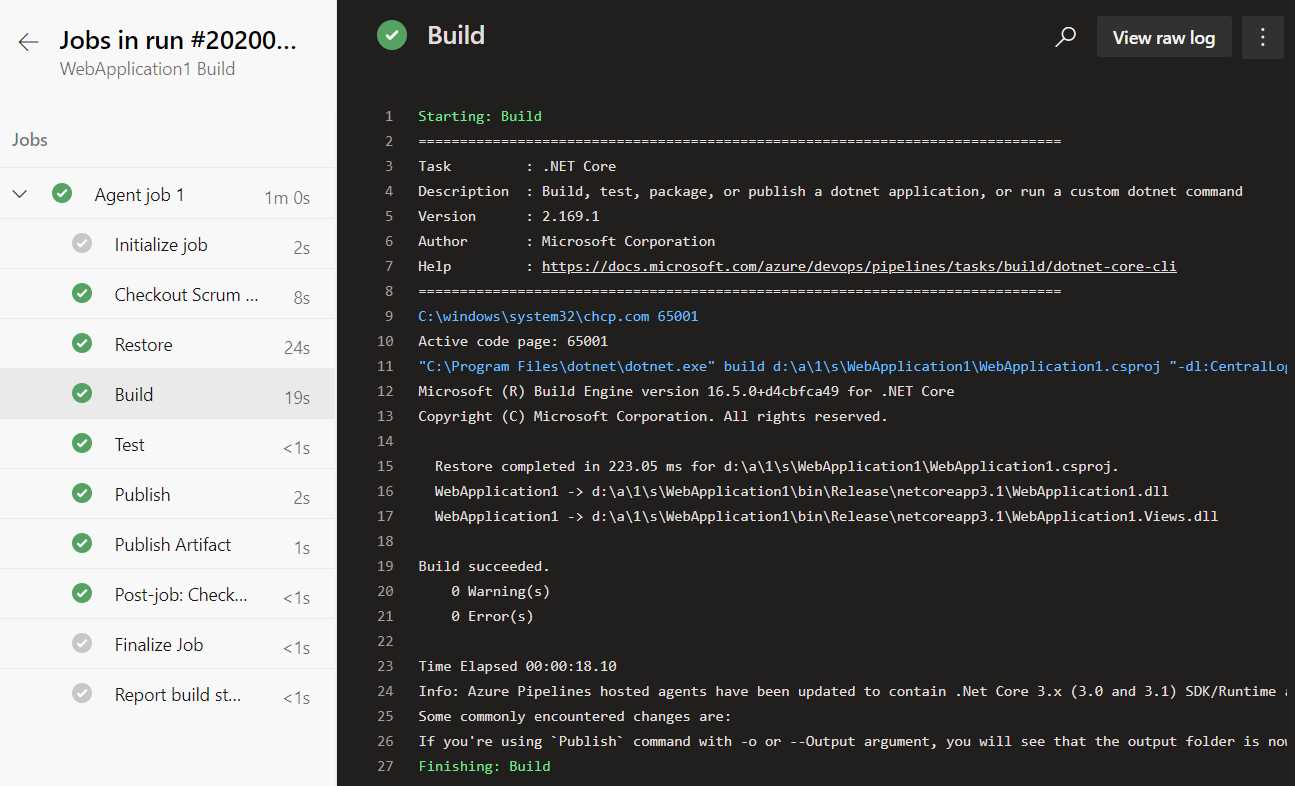
Figure 40: Build output
We can also view the artifacts this build has produced, if any. Go back to the summary and click 1 published. You will now see your drop artifact, and if you click it you will see it contains a zip file named WebApplication1.zip. You can download it to view the contents. If you disabled zipping in the artifact task, you will see all the files here and you can browse them. We will need this artifact later if we are going to deploy this project.
Variables
Let us go back to the designer. When you go to your pipeline overview, you can hover over it and click the three-dot button, and then click Edit. This is also where you can start a new run or delete a pipeline. You can also click the pipeline, which will give you an overview of the individual runs and an Edit button in the top right.
Examine the Build task. You will notice that it has an argument, —configuration $(BuildConfiguration). If you look at the top, you will notice a few extra tabs, one of which is Variables. This is where your variables are stored. You can use it as an alternative for linking values. You can add new variables and make them settable at queue time, which means you can change them before you trigger a manual build. An important feature is a secret variable. If you need any passwords in your build that you do not want to display as plain text, you can add them as variables, enter the passwords, and then click the little lock icon. The value will now be shown as ********, and after saving your pipeline you cannot unlock it to see the value. The only way to change the value is by entering it again. The real value will be used in your jobs of course, but any job output will be censored.
On the left you will see pipeline variables, variable groups, and predefined variables. We are currently looking at pipeline variables. You can follow the predefined variables link for a list of variables you can use (like Build.ArtifactStagingDirectory). Variable groups are useful, but we will use those when we are going to set up deployment pipelines. They allow you to predefine groups of variables that can be used across builds and deployments. These variables can even be stored in Azure Key Vault so you can use them across applications.
Continuous integration
This is what it is all about—continuous integration! Go to the Triggers tab in your build pipeline, and select the Enable continuous integration option. This will trigger a build every time you push to the develop branch. You can change the branch or add a branch. You can also exclude branches instead. You can add a path filter, so you can exclude some paths from triggering a commit. You can batch changes while a build is in progress. So, if two teammates make a commit while the pipeline is building, only a single new build is queued. On one hand, this speeds up the building process, but on the other hand, if that build fails, you do not know which of the commits made it fail. So that is a little trade-off.
On the left side, you can also add schedules. For example, you could schedule a build for every morning at 5:00 AM. When you develop on the develop branch, you could schedule builds for the master branch so you are sure it still builds as it should. If you do, be sure to clear the Only schedule builds if the source or pipeline has changed check box. By building every day you can be sure no external dependencies broke, like NuGet feeds and packages. You can also chain builds, but since we have no other builds at this time, we cannot configure this.
Save the pipeline, make a commit to your repository, and see the pipeline getting triggered automatically. I am skipping other settings in the build pipeline editor. You get the idea, so you can play around with them. Let us look at private agents next.
Private agents
In our free account, we have room for one private agent. An agent can be a Windows, Linux, or Apple device, so we have some choice there. We are going to make our own computer into an agent. A private agent has a few benefits over hosted agents. First, a hosted agent is always a fresh machine. That means you will have to wait for Azure DevOps to find and clean a machine, which can take time. Second, because it is a fresh machine, you will always have to download your source and restore your packages, which takes time. The benefit of that is that you can be certain your software builds on any machine. With a private agent you do not have to clean your source in between builds, so downloading and restoring can be a lot faster. Your queueing time is probably also faster, so all in all your builds will speed up considerably. You can always choose to clean up your source code on a private agent, too; it is a setting on the agent in your build pipeline. Another huge benefit to private agents is that they are your own servers, so you can install whatever you want. If you need some custom third-party software installed for source code to run, you can.
Installing the agent
Go to your project settings and find your Agent pools. Here you can create new pools and manage existing ones. You have two pools already: Azure Pipelines, which is your Azure DevOps hosted pool, and Default, which you can use for private agents. You can add new pools, which can be interesting if you want to limit access to specific pools. You can also add a pool that contains an Azure virtual machine scale set, but that is in preview at the time of this writing and not in the scope of this book. We are going to use the Default agent pool. Click it, and you will find some information on the pool, but it is mostly empty since we do not have an agent in the pool yet. Click New agent, and you will see a pop-up that guides you through the setup process. I am going to install the agent for Windows.
Unfortunately, the pop-up gives you just enough information to get started, but not enough to finish it. The first step is simple; download the agent by clicking Download. Make sure you put it in your Downloads folder.
Next, open Windows PowerShell and browse to the folder where you want to install the agent. For example, entering cd C:\ will install the agent in C:\agent. Next, follow the next step in the pop-up.
Code Listing 1
|
Add-Type -AssemblyName System.IO.Compression.FileSystem ; [System.IO.Compression.ZipFile]::ExtractToDirectory("$HOME\Downloads\vsts-agent-win-x64-2.168.2.zip", "$PWD") |
If you did not place your download in the Downloads folder, you will have to change the path in PowerShell.
Next, PowerShell will ask for a URL. Use the URL of your DevOps organization, so for me that is https://dev.azure.com/succinctlyexample/.
Creating an access token
Next, PowerShell will ask for an authentication type. The default is PAT (Personal Access Token) so we will use that. We do not have a PAT yet, but we can create one. Go back to Azure DevOps and in the top right, click the little person with the cog (next to your picture or initials) and then select Personal access tokens from the menu. You probably already have some tokens that you were unaware of because the system created those for you.
Click + New Token > Show all scopes (at the bottom). The only scope we need is Read & manage Agent Pools. Give your token a name (for example, Private agent token) and click Create. You will now get your token, and you will never see it again—so be sure to copy it. Paste it in Notepad or something just to be safe.
Now that you have your token, you can enter it in the PowerShell prompt.
The next questions are about your pool and agent name, and whether you want to run your agent as a service. Just pick the default options so it will not run as a service, and will not start at startup.
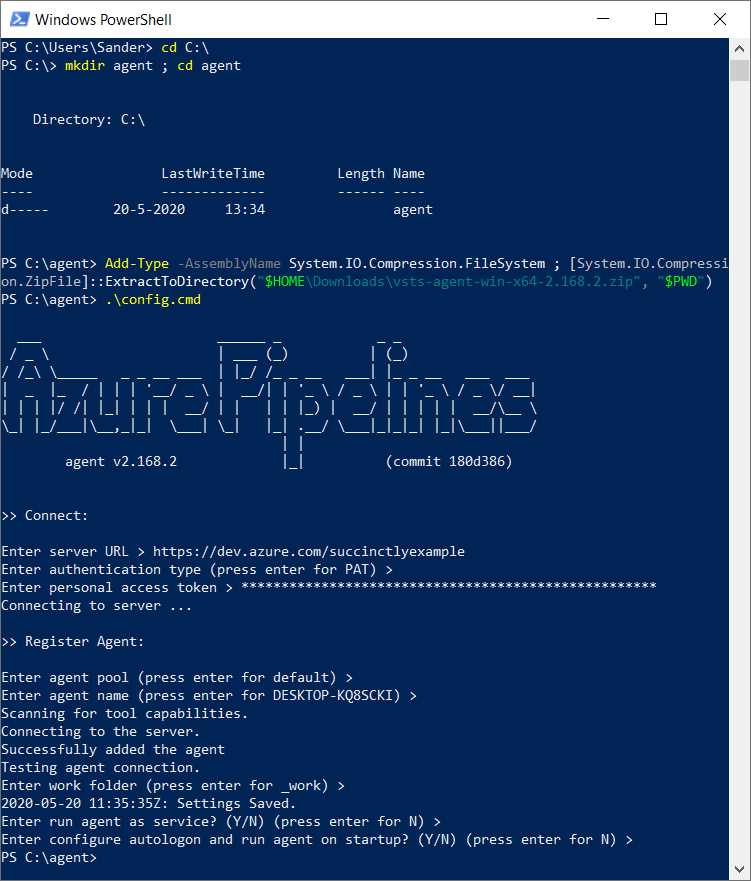
Figure 41: Private agent configuration
You now have a private agent installed.
Running locally
Now go back to your agent pool in Azure DevOps. You will see your agent in the agents list, but it shows as offline. Because the agent is not installed as a service, you have to run it manually. Run it by running run.cmd in your agent folder. The status in DevOps will update to online and the status will be idle.
Edit your build pipeline so that it uses your private agent instead, and save and queue a build. The status in your agent overview should change to Running build x, and in your local command prompt you should see Running job: agent job 1. The build should finish successfully. You can browse to your agent folder and check out the _work folder for your source and artifact (in subfolders 1\s and 1\a).
When you run it again, you will see the speed gain. The hosted build took 1m 4s for me; the first local build took 46s, but the second local build only took 21s. That is three times as fast for a simple project.
You can delete the agent in your agent overview in the agent pool settings. Your pipeline will still have the Default agent pool, so it will fail if you run it. You can simply delete the agent folder on your computer. If you installed it as a service, you should uninstall the service first.
YAML pipelines
We have seen how to build and run pipelines, but we have yet not seen the YAML pipelines that are now default. YAML is a markup language (although YAML stands for “YAML Ain't Markup Language”) that allows you to build pipelines as code. The benefit of using code instead of a designer is that you can now treat your pipeline as any other code file, complete with source control and everything. The downside is that it is a lot harder to write, although copying and pasting becomes easier.
Create a new build pipeline and this time select Azure Repos Git when it asks where your code is. Next, select your repository. After that, you can pick a template again. You can choose Starter pipeline for a minimal pipeline, or any of the other predefined YAML templates. When you click Show more you will find the ASP.NET Core template again. When you click that template, you will be presented with a YAML file that is pretty readable, at least now that we can make a visual representation in our head.
Code Listing 2
# ASP.NET Core # Build and test ASP.NET Core projects targeting .NET Core. # Add steps that run tests, create a NuGet package, deploy, and more: # https://docs.microsoft.com/azure/devops/pipelines/languages/dotnet-core trigger: - master pool: vmImage: 'ubuntu-latest' variables: buildConfiguration: 'Release' steps: - script: dotnet build --configuration $(buildConfiguration) displayName: 'dotnet build $(buildConfiguration)' |
You will immediately see the problem with YAML. I do not want the latest Ubuntu image; I want the windows-2019 image. We have to make an educated guess and change ubuntu-latest to windows-2019, and hope that it works. The only reason we know windows-2019 exists at all is because we played around with the designer first. Also, change the trigger to develop.
Once you click Save and run, you will have to enter a commit message. That is because the YAML file is committed to your main branch. Alternatively, you can commit it on a new branch. Click Save and run and watch the build, which should succeed. Do not forget to pull the commit in your local repository. You will notice an azure-pipelines.yml file in the root of your repository. The new build pipeline will have the same name as your repository.
You can create multiple YAML pipelines for a single repository. You will get an azure-pipelines-1.yml file (or -2.yml, etc.) and a new Repository name (1) pipeline will be created. You can rename pipelines once they have been created by clicking on the three-dot menu. When you edit a pipeline in Azure DevOps, you can also associate the pipeline with another YAML file by clicking the three-dot menu in the upper-right corner and going to Settings. You can delete a pipeline, but this will not delete the YAML file.
Luckily, once the pipeline is created and you have your YAML file, there is an editor in Azure DevOps that makes it a lot easier to add steps to your file. Azure DevOps does not add a publish task by default, so we will have to add our own. Edit your pipeline and find the .NET Core task in the task list on the right. When you click it, you will get an editor like what you are used to. Pick the publish command, and you will get the Publish web projects and Zip published projects check boxes, just like before. When you click Add, a complete task is added to the YAML.
Code Listing 3
- task: DotNetCoreCLI@2 displayName: Publish inputs: command: 'publish' publishWebProjects: true arguments: '--configuration $(BuildConfiguration) --output $(build.artifactstagingdirectory)' |
Notice that only the non-default settings are added to the YAML. I added the displayName manually.

Figure 42: YAML editor
We will also have to add the Publish build artifacts task to the YAML, which you can add in the same manner.
Code Listing 4
- task: PublishBuildArtifacts@1 displayName: Publish Artifact inputs: PathtoPublish: '$(Build.ArtifactStagingDirectory)' ArtifactName: 'drop' publishLocation: 'Container' |
When you save the YAML file, you will make another commit to the develop branch and the build is automatically triggered.
Everything should work as it did, but your pipeline is different now that you build using a script rather than a task that you can configure using the editor. Personally, I just want the same pipeline we had before. Luckily, this is not difficult. Go back to your old pipeline and edit it. In the agent settings, click the View YAML button in the top right (next to Remove). When you click this, you will get your YAML output. It will give you some warnings that not all parameters are present in the pipeline, but we can fix that. You can add additional variables to your YAML script, like the buildConfiguration variable.
If you need to add variables that can be set at queue time or are secret, you can add variables in the top right of the editor, next to Save (or Run). These variables are not added to the YAML file.
The complete script should look something like the following code.
Code Listing 5
trigger: - develop pool: vmImage: 'windows-2019' variables: buildConfiguration: 'Release' restoreBuildProjects: '**/*.csproj' testProjects): '**/*[Tt]ests/*.csproj' steps: - task: DotNetCoreCLI@2 displayName: Restore inputs: command: restore projects: '$(restoreBuildProjects)' - task: DotNetCoreCLI@2 displayName: Build inputs: projects: '$(restoreBuildProjects)' arguments: '--configuration $(buildConfiguration)' - task: DotNetCoreCLI@2 displayName: Test inputs: command: test projects: '$(testProjects)' arguments: '--configuration $(buildConfiguration)' - task: DotNetCoreCLI@2 displayName: Publish inputs: command: 'publish' publishWebProjects: true arguments: '--configuration $(buildConfiguration) --output $(build.artifactstagingdirectory)' - task: PublishBuildArtifacts@1 displayName: Publish Artifact inputs: PathtoPublish: '$(Build.ArtifactStagingDirectory)' ArtifactName: 'drop' publishLocation: 'Container' condition: succeededOrFailed() |
You may now choose to edit the YAML using the Azure DevOps editor, or edit it directly in your local repository. You can find the YAML schema in the documentation.
Security
You probably know the drill by now, but you can manage security for your pipelines in the same way that you can manage it for your projects and repositories. Go to your pipelines overview, click on the three-dot menu, and select Manage security. This will open a pop-up where you can set permissions for actions such as deleting build pipelines, deleting individual builds, stopping builds, and viewing builds. Again, you can set these for groups or for individual users.
Summary
With build pipelines you can configure automated builds. In this chapter we worked with an ASP.NET Core project, but we have seen support for JavaScript, Python, Java, Go, and other languages as well. When the hosted build agents cannot satisfy your building needs, you can always install a private agent. With YAML you can configure your pipelines as code, making them manageable in your source control management.
- Seamless integration with Azure DevOps data sources
- Real-time data visualization for actionable insights
- Customizable dashboards to meet your specific needs
- Enhanced collaboration with data-driven reporting