
Azure DevOps Succinctly®

CHAPTER 3
Boards
In the previous chapter, we created a DevOps account, an organization, and a project. A project comes with a default Kanban board. In this chapter we are going to use and configure various boards and see how they can be used by teams to improve productivity.
Terminology
The first thing we must establish is some terminology. If you go to your project and click Boards in the menu, you will be taken to a page with recently updated work items. Of course, this page is empty because we have no work items yet.
We can create a new work item by clicking + New Work Item at the top. We then get to pick between Epic, Issue, or Task.
We will get to their meanings in a second, but first let us look at what other types of work items we have. Go back to the organization page and create a new project. This time, open the advanced settings and choose Agile as your work item process. Name it Agile project. Do the same for Scrum. When you look at the different work item types for the different processes, you will see a lot more types.

Figure 13: Work Item Processes
The CMMI (Capability Maturity Model Integration) type has some extra types as well, but I am not going to discuss CMMI in this book. Instead, we will focus on Basic, Agile, and Scrum. I am going to discuss the methods next, but this page has some great visuals to better understand the various methods.
Note: The Agile and Scrum methodologies are not in the scope of this book. Instead, I will give you a basic understanding so that you can put the Azure DevOps tooling into perspective. You can read other books on Agile and Scrum, and even become certified, so that should give you a bit of an idea of the breadth of these methodologies. That said, I have experienced that every organization uses Agile and Scrum differently. Some organizations are just messing around and calling it “Agile,” and others do it purely to satisfy stakeholders because Agile and Scrum are hot and happening. Some teams have the certifications and follow the rules religiously while other teams interpret the rules more loosely. Whatever you do, the information in this chapter should help you become proficient with Azure DevOps Boards, whatever methodology you (strive to) use.
Backlogs
Before we continue, let us discuss backlogs for a minute. A backlog is simply a list of work that needs to be done. Project managers, product owners, and/or business analysts write epics, issues, and other work items, depending on their process, and place them on a backlog. There is a hierarchy between the various work item types. In the Basic process, epics contain issues, and issues contain tasks. Say you have a product and you want to add a web shop; this could be an epic. Another epic is that you want a wiki for your product. These epics are placed on the backlog and can be prioritized.
Within the epic you have features and/or issues. These can be prioritized as well. After that, the developers know what they should work on next, and can start creating tasks for work they think needs to be done. A task can be simple, like “On the homepage, add a link to the web shop.” The effort required to complete these tasks or issues can then be estimated. Once everything is estimated, a manager should have insight into how much effort a feature or epic is going to be.
This process should also make clear how many developers can work on a single task. If your team has four developers and only two can effectively work on the web shop, the other two can work on the wiki simultaneously.
Estimating
Individual issues, and especially tasks, should not be too much work. The more work, the harder it is to give accurate estimates. If your estimate is too big, consider breaking up an issue into multiple issues. Estimates are often given using points equal to the Fibonacci sequence (the next number is the sum of the previous two, so 0, 1, 1, 2, 3, 5, 8…) or in t-shirt sizes (XS for extra small, S for small, M for medium, and so on). In theory, your estimates should be relative to some base issue. Pick a small issue and say, “this is a 2 or an S” and then estimate whether the next issue is less work (a 1 or an XS) or more work (3, 5, M, L). In practice, people often measure in hours, for example S, or 2, equals two hours, but this is not how it should work. Of course, if it works for you, be my guest.
Sprints
All processes support sprints. A sprint is a period, usually two or three weeks, in which work items will be completed and deployed. With a full backlog, teams can plan their sprints. The top-priority issues will be placed in a sprint, after which teams can estimate the effort it takes to complete an issue or the tasks in an issue. Teams will estimate how much work they can do in the next sprint. If people are on vacation or there is a holiday coming up, you know you will be able to deliver less work that sprint, and you can plan accordingly. If your estimates are accurate, teams will be able to predict how much work they can finish in a sprint. So, if they estimate the top 10 issues and the next sprint has room for the top five issues, the next five can be moved to the sprint after that. Teams can now give estimates, like the web shop epic will take three sprints to implement.
Once a sprint is planned, the team commits to it and it is more or less set in stone. Of course, if any issues turn up, like bugs in production, there should be room to solve those as quick as possible. This will probably lead to fewer points or shirt sizes being fixed that sprint, which helps in keeping track of trends. In some cases, sprints are dropped entirely because something else just took priority. This could be the result of some crisis (COVID-19, at the time of writing), a critical bug like a data breach, or a change in law. In my experience though, it is usually the result of bad management.
By working in sprints, you can plan ahead, but more importantly, you can plan for change. You only plan two or three sprints ahead, so if priorities or specifications change, you can pick up these changes in two or three weeks at most, depending on the length of your sprint. It is recommended to finish your current sprint, so you are not left with half-finished work. Also, constantly changing priorities can cause stress, which has a detrimental effect on the team and office atmosphere.
To sum it up, we have work items, which are placed in backlogs, estimated, and then planned into sprints. Now let us look at the individual processes. While they have a lot of similarities, there are some important differences between them as well.
The basic process
The basic process is a simple one. It has three work item types: epic, issue, and task. As stated before, there is a hierarchy between them. An epic has issues, and an issue has tasks.
Note: The term "epic" is derived from Agile terminology. Originally, an epic was two or more Agile stories (which makes sense), but at some point, the meaning of the two terms switched, leading to a non-obvious meaning of epic.
Let us start by creating an epic. In Azure DevOps, go to your work items of the first project we created. Click + New Work Item and select Epic. In the screen that opens, enter Read Azure DevOps Succinctly as the title, assign yourself, and then click Save. If you now go back to your work items, you should see the epic in the overview.
Next, create a new Issue. Enter Read Chapter 3 as a title and assign yourself. On the right side, look for Related Work and click + Add link and choose Existing item. Select Parent for Link type and select the epic we just created for Work items to link. By linking the issue to the epic, we are saying that this issue is a part of the epic. You can mess this up by making the epic part of the issue instead, so be sure to make the proper link type. We can circumvent this issue by creating issues directly in epics, like we are going to do next with a task. It is good practice to add a description to your card unless the title makes everything clear to everyone, but it hardly ever does.
If you work in an Agile or Scrum process, you should also enter the Acceptance Criteria, that is, when a story is considered done. For example, Acceptance Criteria can be “A user can register using email, password is stored encrypted with salt.” Do not enter any effort or story points yet; those should be discussed with the team when the items are planned for the next sprint. You get updates on items you created or are assigned to. If you want to get updates on other items, you can click Follow in the upper-right corner. Click Save again and return to the work items.
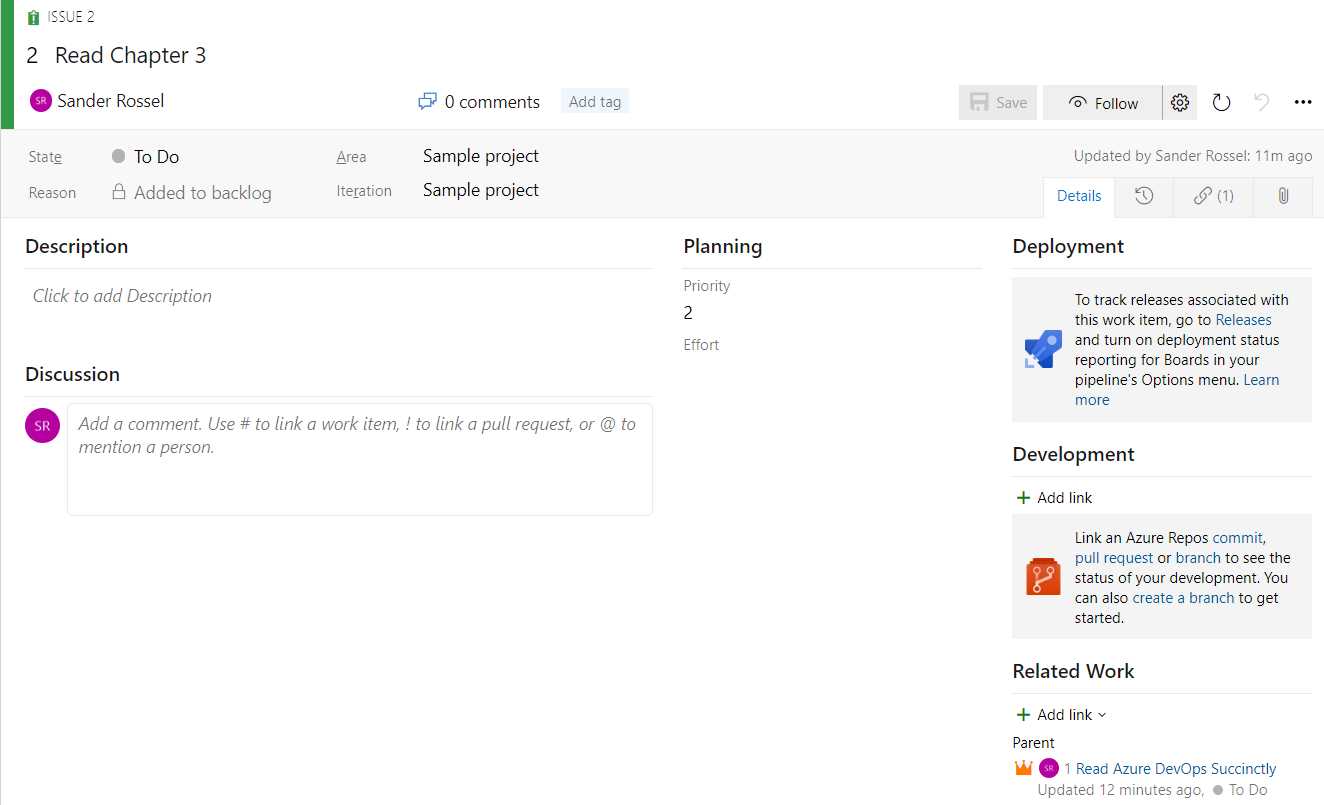
Figure 14: Issue Creation
Next, we are going to create a task as a part of the issue, but we are going to do that a little differently. Open the issue again and add another link, but this time choose a new item. The link type will be Child, and the work item type will be Task by default. Enter Read terminology as a title. A new window will now open for the task creation. Everything is fine for now, so just save and close.
If you now look at the work items, you just see a list with the three items we just created. However, when going to Backlogs in the menu on the left, you will see your issue, and when you click the little arrow in front of the title, it will show the task as well. In the upper-right corner, you can set the view from Issues to Epics, and the epic will be shown too.
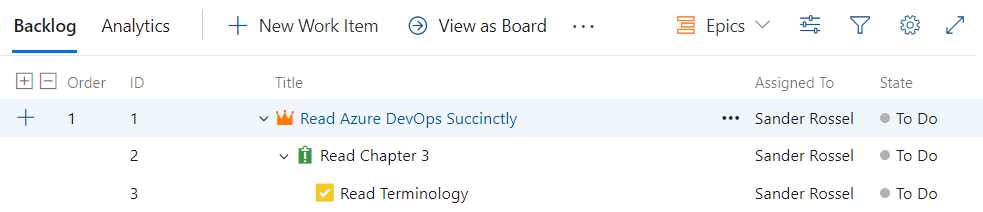
Figure 15: Backlog
Next, click Boards in the menu. This is where you will be spending a lot of time when developing. You see three columns: To Do, Doing, and Done. You can view issues or epics on the board, although I always prefer issues because you will be working on issues, not epics. The squares (or rectangles) of your issues are called cards. The issues have tasks that you can show or hide. You can create new issues and tasks on this board as well.
You will probably discuss with your team who is going to work on what issue, but sometimes everyone is busy, and some issues are still left untouched, and you can pick an issue to work on. To let the team know you are working on an issue, simply click and drag it to the next lane. You can then check off the tasks that you have completed.
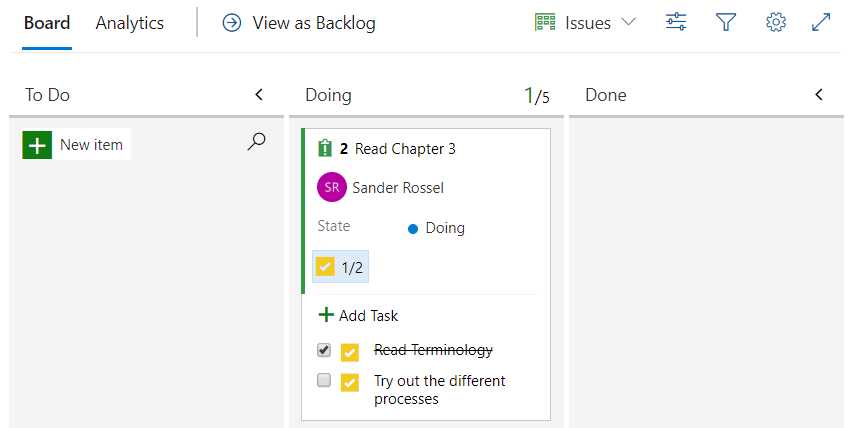
Figure 16: Work Items on a Board
You may notice 1/5 is in the Doing column. Generally, a team should not have more than five developers, and each developer should not work on more than one item at a time. Of course, when you are done with the issue you can move it to the next column.
This example has three columns, but you will often see more columns. For example, you may see a Test column where developers move their finished issues so testers can pick them up and move them to a Testing column. I have also seen a Deployed column, which indicated whether the issue was deployed to production. The number and name of columns is not set in stone, and you can add or remove them as you wish, which we will see later. In fact, you can already see different columns in the Agile and Scrum processes.
If you open a card, you can start a discussion. For example, if you have a question for someone regarding this card, you can ask your question and mention them using @. For instance, “@Sander Rossel Do you want this in blue or in pink?” Mentioned people will get an email. The mentioned user can then respond, “I want this in pink” and it is now documented for everyone to see. You can also use # to link to other work items or ! to link to pull requests, which we will discuss in the next chapter.
You can use this board as you see fit. Maybe you do not need epics or tasks and simply want to work with issues only. Feel free to do so.
Because you have some work items assigned to you, you can now go back to the organization home screen and select the My work items tab. You should see the epic and issue assigned to you as well as the status and your activity, like “Updated the Read Chapter 3 issue.”
The Agile process
Let us look at the Agile process next. This works mostly the same as the basic process in that you can make work items with a certain hierarchy, put them in your backlog, show them on the board, and drag them between columns.
At the top of the hierarchy, we still have the epic. An epic consists of features, which consist of user stories. The user story is equal to the issue from the basic process. Tasks remain the same, under User Stories. The issue in the Agile process is something different, which we will look at in a bit. A user story can have tasks, bugs, and tests.
Figure 17: Agile Backlog
Tests and issues are not shown in the backlog, but tests are shown on the board. Tasks, bugs, and tests are part of user stories, and are shown in the user story card. Creating a test also creates a test plan, but we will get to that in another chapter.
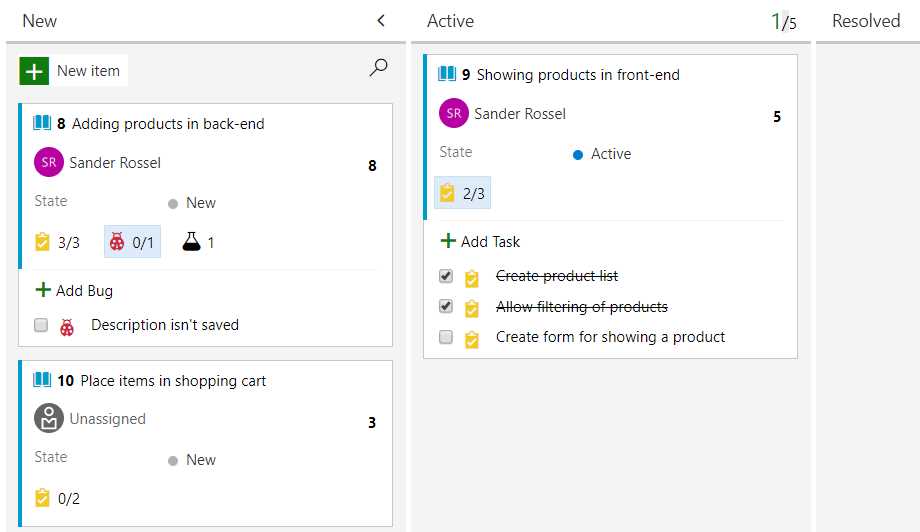
Figure 18: Agile Board
Queries
We still have the issue work item. An issue is something that blocks planned work or a release, such as explicit permission required from a manager, or waiting for a supplier. In this example I have created an issue that the server capacity is insufficient for the new load we expect from the web shop. The problem is, we cannot see the issue in the backlog or on the board. For this, we can create queries. A query is a filter over your work items. For example, you can have a query for the current sprint, for just your items, for all resolved items, or for items that are (not yet) estimated. Queries are useful to get various overviews and can be personal or shared with the team.
Go to Queries in the left-hand menu. Your default view will be Favorites, but if you switch to All you will see two personal queries, Assigned to me and Followed work items. Open Assigned to me and see the results. Clicking on Editor shows the actual query, which is
Assigned To | = | @Me.
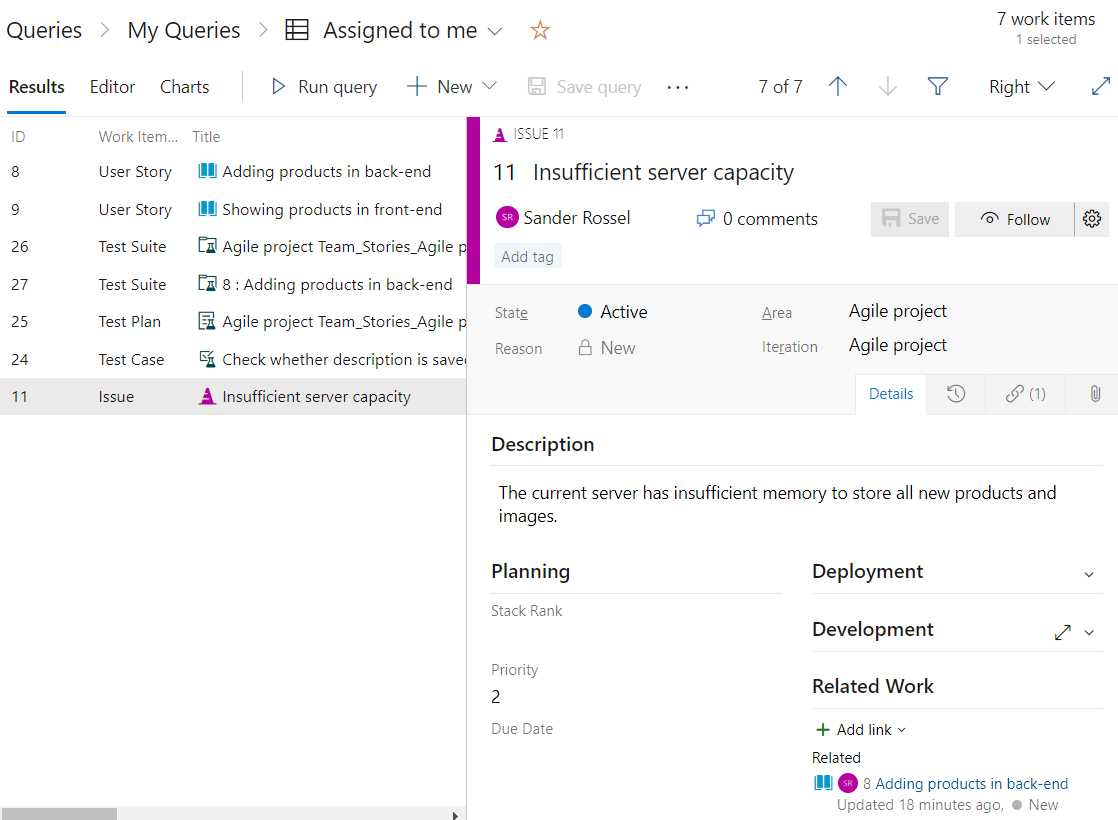
Figure 19: Assigned to Me Query
Go back to the query overview and click + New query. The default query is any work item type and any state, but let’s change any work item type to Issue and run the query. You should now see your issue. However, we also want to filter out any issues that have been solved, so change the state filter to State | Not In | Closed,Completed,Inactive,Removed,Resolved. Save the query in the Shared Queries folder and name it Active Issues.
The Scrum process
Last but not least, we have the Scrum process. The Scrum process looks a lot like the Agile process. In fact, just switch “user story” with “product backlog item” and “issue” with “impediment,” and you are pretty much there. There are some differences though. The first is that a bug is now managed with requirements instead of with tasks. That means a bug gets a separate card on the board and is visible in the backlog.

Figure 20: Scrum Board
In this example, the bug relates to the Adding products in back-end work item, but since it is planned separately, we can close the work item. As such, it is not shown in the backlog anymore.

Figure 21: Scrum Backlog
Again, impediments are not shown on the board or on the backlog, but you can make custom queries to find them.
Customizing the board
We have now seen the Azure DevOps board defaults, but you can customize the board, items, and backlog. Go to your board in the Scrum project and click the cog icon in the upper-right corner; this should open the settings page.
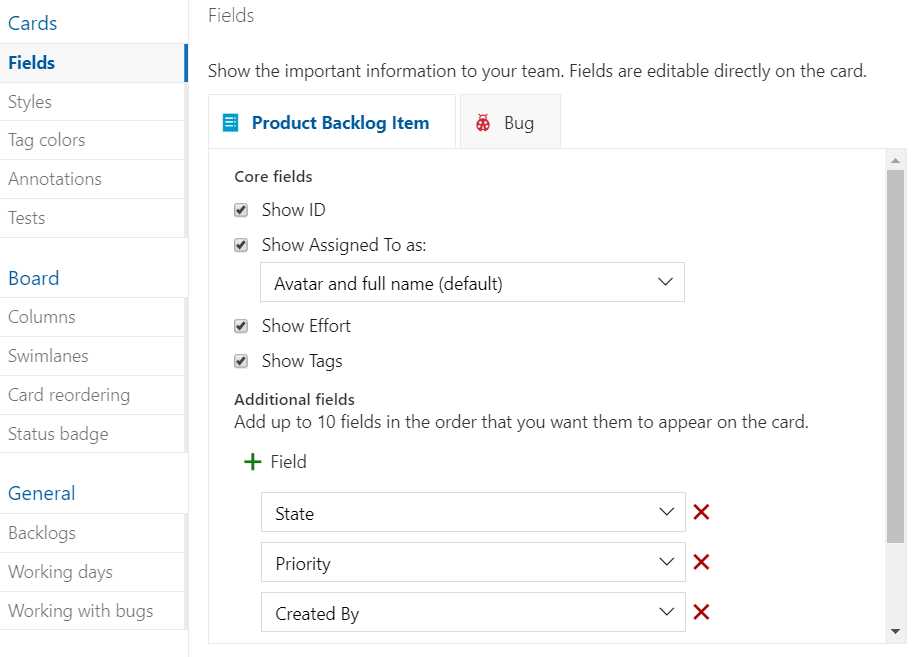
Figure 22: Board Settings
First, you can customize cards. You can change the information that is shown on your cards. These can be issues, user stories, or product backlog items and bugs, depending on your type of project. For example, you could add the fields Priority and Created By. Next, you can change the style of your card if some criteria are met. For example, enter rule name Red for blocked, pick some red color for Card color, and in the criteria add Tags | Contains | Blocked. Now go to a card on the board and edit it. Next to title, you can add a tag, so add Blocked. The card should now be red. You can also add colors to specific tags. We already added a Blocked tag, so add a tag color for Blocked, and give it any color you like so it stands out. Under Annotations you can specify if you want tasks and tests to be visible on the board. I will return to test settings later.
You can also customize the board itself. You can add and delete columns. For example, add a column and name it Testing, set the WIP limit to 0, and set the state mapping for both bugs and product backlog items to Committed. Drag the column between Committed and Done. Swimlanes are like columns, but horizontal. There is a default lane that must always be there, but we can add a new line. For example, instead of creating a column called Testing, we could have added a Testing lane. That way when developers are done working on an item, they can move the item to the Testing lane, and testers will know they can start testing the item. Card reordering defines whether items on the board are ordered according to the backlog, or whether the backlog is ordered according to the board. I will come back to the Status badge later.
In the General settings we can set the backlog navigation levels, working days, and how we handle bugs. We have seen the Bugs are managed with requirements setting in the Scrum process, and the Bugs are managed with tasks setting in the Agile process. By selecting Bugs are not managed on backlogs and board, bugs become invisible, much like issues in Agile or impediments in Scrum.
Working in sprints
Now that we are comfortable with using the board and backlog and creating work items, we can start planning our work. The Scrum project will have six sprints planned by default. You can view these sprints by going to the Sprints menu item. You should see the taskboard, which says “You do not have any work scheduled yet.” Go to your Backlog (in the left-hand menu, not the top menu), and you should see your sprints on the right side. Simply grab a Product Backlog item and drag it into Sprint 1 on the right. Alternatively, click the three-dot button (…) when hovering over a work item, select Move to iteration, and select Sprint 1. Make sure you have one or two open tasks in the item. Now, if you go back to Sprints and check your backlog there, you should see the work item in that sprint. The Sprint 1 card on the right should also show the planned effort in that sprint. The real value is in the taskboard, though. This should now show you all planned work items and their tasks, which you can now drag between columns individually. As a developer, this is where I spend most of my time.
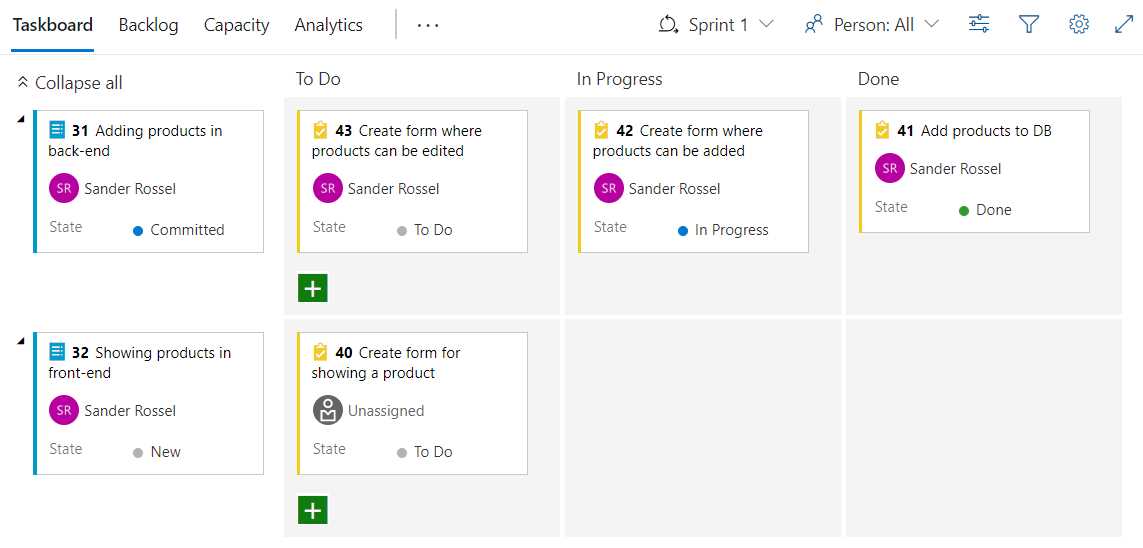
Figure 23: Sprint Taskboard
You can sort items on the taskboard by sorting them in the (sprint) backlog. In the top-right corner, you can switch between sprints. You can also create new tasks on the taskboard directly.
Under the Capacity menu, you can plan your team’s capacity, like how many hours every team member can spend on various tasks, such as development and design. This helps you in planning work and makes for more accurate reporting. Enter 8 hours for Development and click Save.
Under Analytics, you can view your Burndown Trend. This is the amount of effort left in a sprint. Unfortunately, the page is not currently showing us anything. We can fix that by giving our sprints start and end dates. Go to your project settings and navigate to Project configuration. You will see your sprints, and if you hover over Sprint 1 you should see Set dates. Click that and set the start day to a few days back, and set the end date at two weeks after the start date. Do the same for Sprint 2, and set the start date a day after the end date of Sprint 1. For example, my first sprint starts on a Monday and ends two weeks later, also on a Monday. My second sprint starts on Tuesday and ends on Monday two weeks later. Every next sprint then starts on a Tuesday and ends on a Monday. You are free to set different start and end dates, like maybe Friday and Monday or Tuesday and Wednesday.
Go back to your burndown chart; if you have entered your team’s capacity, it should show your remaining capacity per day. It will also show that you have some items that are not estimated. These are your tasks that have not been estimated yet. Normally, you would do that up front, but let us estimate them now. We are going to fake some estimates, of course, so let us say 8 per task entered in Remaining work. Set the Activity to Development except for one, which you can set to any other activity.
If you now go back to the chart, it looks a bit weird. First, we said our capacity was 8 hours a day. Then, we dragged some tasks into the sprint that were not yet estimated. Last, we estimated the tasks, but only for three or four days of work in a 10-day sprint. The only way to fix this is by setting the start of the sprint to today, so it does not look like you added lots of work halfway in the sprint (although this will also happen in practice). It may take a few minutes for the work to show up in the burndown chart.

Figure 24: Burndown Trend
In a perfect sprint, the green, gray, and blue lines are equal, but I have never seen that happen. The blue line often starts a bit above the green line, planned by either an optimistic or an oppressed Scrum team, and the gray line starts a bit above green too, of course. After that, the blue line goes down quickly because people do the easy tasks that have been overestimated first. After that people realize they need something done in this sprint, so the blue line goes up a bit again. Then the blue line starts to go down slowly because people have issues with code, and tasks take longer than expected. At the end of the sprint, people quickly commit their work and update their tasks, so the blue line drops to near bottom, but not completely. The remaining work is taken into the next sprint. I am just saying, you are having a good sprint if the lines are near each other.
In the sprint planning, you can create child items. This is useful if you estimate that you need multiple sprints for a specific feature. You can create an iteration of a month and create two sprints within that iteration.
Sprints automatically end and start at the specified dates.
Customizing your process
It is possible to customize your process. Go back to organization settings and find Boards - Process in the menu. Here you will find your processes and the fields that are used in those processes. You cannot customize the built-in processes, but I would not recommend it anyway. Instead, hover over a process, click the three-dot button and select Create inherited process. Inherit the Basic process and name it Basic incl. Supplier, and in the Description put something like A simple, basic process that supports collaboration with suppliers. Now click on the name of the newly created process, and you will see the various item types. Click on an item type to study how it was set up. Then go back and click + New work item type and enter Supplier Issue in the title. You can also change the icon and the icon color if you like.
In the next form, you can customize your task any way you want. Hide Deployment, Development, and Related Work (in the right column) from the layout. Click Add a field in the middle column and name it Estimated Delivery Date, and then select Date/Time as Type. Now change the name of the new middle column to Planning. Add another new field and select Use an existing field, and then select Acceptance Criteria. This field will be placed in the first column, under Description.
You can add new field groups, add multiple pages of fields, and create rules and states. You can create other fields too, like Ticket ID, and add them to existing work item types (in inherited processes), like issue or task. Any new field you create becomes visible in the Fields tab under the Process settings. You can delete any custom fields there, but they will also be removed from your work items.
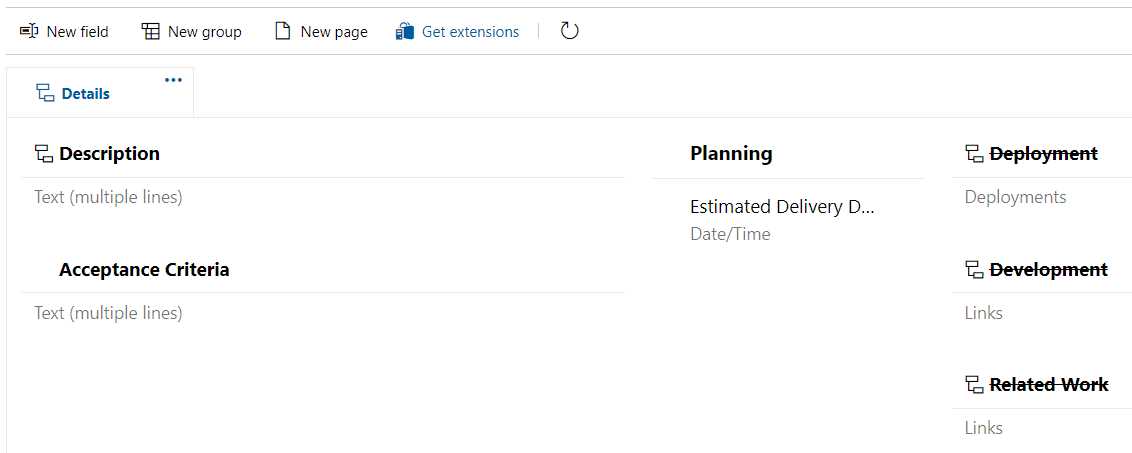
Figure 25: Custom Process
Once you are done customizing your new work item, create a new project and select the Basic incl. Supplier process. Go to your project board, add a new work item, and select the Supplier Issue. You will see it has a description, acceptance criteria, and an estimated delivery date. Unfortunately, like impediments, the new work item type does not show up on the boards or backlog, but we can change that too. Go back to your custom process and click the Backlog levels tab. Under Requirement backlog, edit the Issues backlog and then add the Supplier Issue.
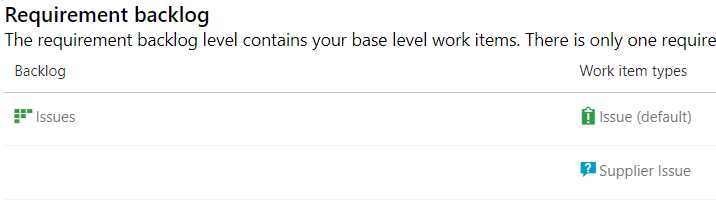
Figure 26: Custom Work Item as Requirement Backlog
Now it should be shown on your board and on your backlog. You will recognize it by the different icon.

Figure 27: Custom Work Item on the Board
If you like, you can also create a new top-level portfolio backlog, so that is the same level as an epic. To do this, just go back to the Backlog levels and click + New top level portfolio backlog. More interesting, perhaps, is to create a new item on the iteration backlog level, so at the same level as a task. If you do this, you can even create a new custom task directly from your boards.
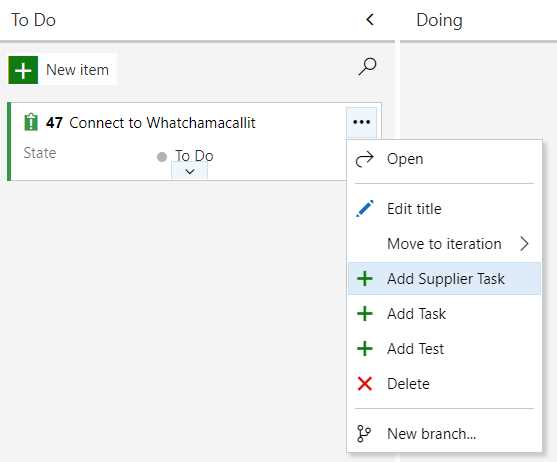
Figure 28: Add Supplier Task
Migrating processes
Now that you have your new process, you probably want to migrate your Scrum project to the new process. To do this, go to the Process settings in the Organization settings. Click the Basic process and go to the Projects tab. Here you will see the projects with that project type listed. Click the three-dot button and select Change process. Select the new project type and click Save. You cannot just migrate from any project type to any other project type. For example, if you moved from Basic to Scrum, you would lose all your issue work items. Azure DevOps gives you a warning when this happens. So, think ahead before selecting a work process.
Multiple boards
It is possible to use multiple boards in a single project. You can do this by creating teams within a project. We have already seen this briefly in the previous chapter. Go to your project settings and create a new team named Back-end Team. If you now go to Boards, you can select your team board at the top left of the board. When creating a new work item, you can set the Area to either Scrum project (the default team) or Back-end Team. The same goes for your backlogs.
The biggest difference is in the planning of the sprints. I will not say too much about it, but in your project settings you have your boards Team configuration. Here you can plan iterations and specify team-specific board settings. The team can be selected at the top of the screen (in the breadcrumbs section). For example, if your organization works 24/7, you may have a weekend team that works on Saturday and Sunday. You cannot have different processes per team in the same project.
Summary
In this chapter we used boards to plan our work. We were able to create various work items under different process types. By viewing them on the board and in the backlog, we were able to plan and estimate our work. By working in sprints, we get more reliable reporting in the form of a burndown chart. Using the sprint taskboard makes it even easier to focus on the current sprint. By customizing your processes, you can add fields that are important to your specific workflow.
- Seamless integration with Azure DevOps data sources
- Real-time data visualization for actionable insights
- Customizable dashboards to meet your specific needs
- Enhanced collaboration with data-driven reporting