
Azure DevOps Succinctly®

CHAPTER 8
Artifacts
We have now seen most of what Azure DevOps has to offer. One feature that is often overlooked is artifacts. You can create your own NuGet, npm, Maven, and Python feeds, and push any kind of package to DevOps. This allows you to share and reuse your packages from a centralized (private) repository.
The default feed
When you browse to Artifacts in DevOps, you will see your default feed that was created for you. This feed will be accessible for you to publish and restore packages from. You will see a Connect to feed button that you can click for information on how to publish and restore packages for various package managers. We are not going to use this feed though. Your default feed is scoped to your organization, while new feeds will always be scoped to your project. Organization-scoped feeds are always private, while project-scoped feeds are public if the project is public. The URL for connecting to your feed will also be slightly different because your project-scoped feeds do not have the organization name in the URL. An organization-scoped feed is also visible in all your projects, while a project-scoped feed is not.
If you want to remove the default feed, you can. In the top-left you will see the name of your current feed, and using the cog in the top-right, you can edit and delete your feed. When you delete a feed, it will be moved to the bin, where you have to delete it again for permanent deletion. If you change your mind, you can also restore your feed from the bin.
Creating a feed
To create a new feed, click + Create Feed. Enter a name for your feed, like succinctlyfeed. Next, you need to think about the visibility of your feed. You can make it visible to everyone in your Azure Active Directory, to members of your organization, or only to specific people. For this example, choose members of your organization.
The next option is whether you want to enable upstream sources. These are packages from common public sources. So, if your package needs another package from another source, that package is downloaded to your feed and accessible from there. This allows you to use only one feed, and if the package is removed from the source feed, you will always have it backed up in your own feed. Of course, if a package is pulled from the feed, you should consider looking for an alternative to receive updates, if this is important for that package. The downside is that it takes up space, and you can only store up to 2 GB for free. Above that, you will be billed, or, if billing is not set up, you will not be able to upload any more packages. For now, disable upstream sources because it creates some noise, and we do not want that.
When you create the feed, be sure to select it in the upper-left corner.
Connecting to your feed
Before we can do anything, we will need to connect to our feed. We have various ways to do this.
Visual Studio
The easiest and most straightforward way is to connect using Visual Studio. Open any project in Visual Studio and from the top menu, go to Tools > NuGet Package Manager > Package Manager Settings. This will take you to the general NuGet options. Select Package Sources. Click the + button to add a new source, and name the source succinctlyfeed. Now, go to Azure DevOps, select Connect to feed, and then select Visual Studio. This will show you the name and source. Copy the source and paste it into the Source field in Visual Studio, and then click Update. Go to Tools > NuGet Package Manager > Manage NuGet Packages for Solution. You can select your new feed in the upper-right corner. Click the Browse tab, and you will be prompted for your Azure DevOps credentials. After you enter them, you will have access to your feed. Your account will be added to your Visual Studio accounts, which can be accessed in the upper-right corner.
.NET Core CLI
Another method of adding a NuGet source to either Visual Studio or our solution or project, is to use the .NET Core CLI tool. Open a command prompt and use the dotnet nuget command.
Code Listing 9
dotnet nuget add source [your source] --name succinctlyfeed --username [your email] --password [your password] |
This will add a source to your global Nuget.Config file, which you can find at %APPDATA%\NuGet\NuGet.Config. You will see it has a packageSourceCredentials element.
You can also add the feed at the solution level. To do this, create a new file in your solution folder and name it NuGet.Config. It needs at least a root element, so edit the file and add the following.
Code Listing 10
<?xml version="1.0" encoding="utf-8"?> <configuration> </configuration> |
Now use the same command as before, but with an extra --configfile option.
Code Listing 11
dotnet nuget add source [your source] --name succinctlyfeed --username [your email] --password [your password] --configfile path\to\NuGet.Config |
You can find more information on the nuget.config file here.
Personal access token
We can also use a PAT instead of our username and password. Go to DevOps and create a new access token. Give it any of the authorizations for the Packaging scope. You can now use the token to add your source. You can use any username.
Code Listing 12
dotnet nuget add source [your source] --name succinctlyfeed --username [whatever you like] --password [your token] |
This also works on the solution level.
Now that we can connect to our source, let us see how we can publish packages.
Publishing packages
In this section we are going to create a NuGet package and publish it to our feed. First, we have to create a package. Open Visual Studio and create a new Class Library (.NET Standard) project. Name it SuccinctlyPackage and enter a property in the default Class1 (for example, a Name property). Also make sure the class is public. This will be our package.
Code Listing 13
namespace SuccinctlyPackage { public class Class1 { public string Name { get; set; } } } |
Next, open the project file and add a GeneratePackageOnBuild element to the PropertyGroup. The entire .csproj file should look as follows.
Code Listing 14
<Project Sdk="Microsoft.NET.Sdk">
<PropertyGroup> <TargetFramework>netstandard2.0</TargetFramework> <GeneratePackageOnBuild>true</GeneratePackageOnBuild> </PropertyGroup>
</Project> |
Now, when you build the project, a .nupkg file is created in your bin\Debug folder (or bin\Release when you make a release build).
The next step is to publish it to our feed. This should be as simple as doing a dotnet nuget push, but unfortunately, it is a little more difficult. The CLI tool will add the credentials to the push request, but you will get an error stating “The request to the server did not include the header X-NuGet-ApiKey, but it is required even though credentials were provided.” We can now add a PAT to our CLI command, or we can use the Azure Artifacts Credential Provider. The PAT is easy enough if you already have one.
Code Listing 15
dotnet nuget push path\to\SuccinctlyPackage.1.0.0.nupkg --source succinctlyfeed –-api-key pat [your token] |
This should work, but entering your token every time you do this is tiresome at best, so let us look at an alternative.
Azure Artifacts Credential Provider
As an alternative to the PAT, we can use the Azure Artifacts Credential Provider. You can go back to Connect to feed in DevOps and select either dotnet or NuGet.exe. This will show the message “First time using Azure Artifacts with NuGet.exe on this machine? Get the tools.” Click the button and you will see a blade with “Download and install the credential provider.” That link will take you here. Personally, I find the manual installation the easiest. Download the latest version of the .NET Core Credential Provider and copy the plugins folder to %UserProfile%\.nuget.
If you now try to push again, use the az value for your --api-key option and specify the --interactive option.
Code Listing 16
dotnet nuget push path\to\SuccinctlyPackage.1.0.0.nupkg --source succinctlyfeed –-api-key az --interactive |
You will now have to copy a link from your command window, paste it in a browser, and then copy a code from your command window and paste that in the browser as well. You then have to log in to your account, and the command prompt will continue. You can then close the browser window. After you have used the Credential Manager once, it will remember your credentials, and you do not have to do this again.
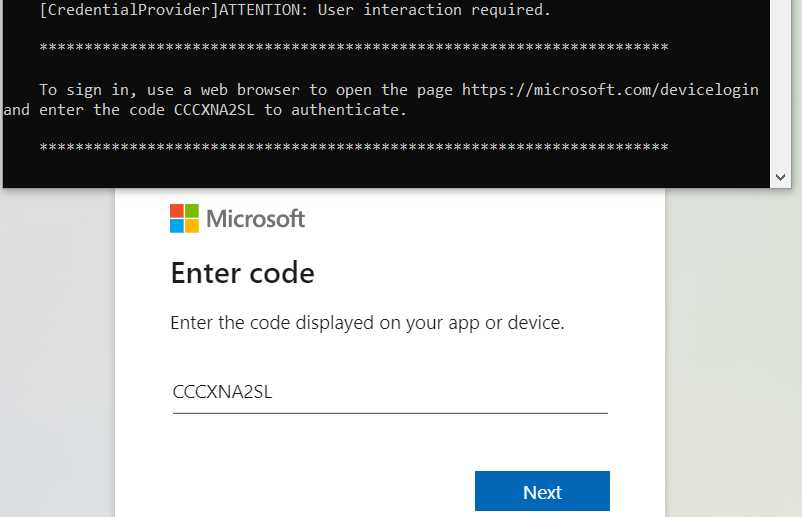
Figure 59: Azure Artifacts Credential Provider
Whether you have used the PAT or the Credential Manager, your package should now be successfully published to your feed in DevOps.
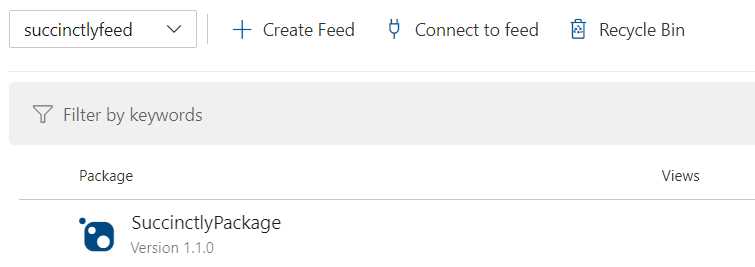
Figure 60: Published package
You cannot publish identical packages twice, so when you need to publish again for whatever reason, you will need to create a new version of your package. If you go to your package project in Visual Studio, right-click the project and click Properties, and then go to the Package tab, you will find the package version, as well as other properties you can set for your package.
You can now view all sorts of information about your package in DevOps, like authors, versions, how often it was downloaded, how many users your package has, and more. You can also delete a version, but beware that this will not let you republish the same version again.
Publishing using pipelines
Publishing packages manually requires quite a bit of work, so automating this task is not a bad idea. I have created a repo and pushed my code there. Next, I simply created a pipeline and copied our previous work, except this time I do a NuGet push instead of publish and publish artifact. Just be sure to change the path of the packages to push, because your .nupkg file is not in the artifact staging directory. Instead of building, you can also use the dotnet pack command, which gives you some extra options and will place your .nupkg file in the artifact staging directory. It is not strictly necessary though. The classic designer is intuitive enough, and the YAML for the nuget push command looks as follows.
Code Listing 17
- task: DotNetCoreCLI@2 inputs: command: 'push' packagesToPush: '**/*.nupkg' nuGetFeedType: 'internal' publishVstsFeed: '[feed id]' |
The term publishVstsFeed is a bit of legacy from the time when Azure DevOps was still named Visual Studio Team Services (VSTS). If you build this, you will get an error that the package already exists. You should update the package version and the build will trigger again, but this time it will succeed, and you will get a new package.
If you want to be able to rebuild the pipeline without it failing, for example because you also have a regular project in your repository, you cannot use the .NET Core task. I am not sure, but it may be a bug that the nuget push command does not allow for additional arguments (it is the only command of the .NET Core task that does not allow arguments). Instead, you can use the NuGet task, which is almost the same, except it has an extra property, Allow duplicates to be skipped.
Code Listing 18
- task: NuGetCommand@2 inputs: command: 'push' packagesToPush: '**/*.nupkg' nuGetFeedType: 'internal' publishVstsFeed: '[feed id]' allowPackageConflicts: true |
For some reason, this does not add the option -SkipDuplicate, but simply ignores the response 409 (Duplicate).
Restoring using pipelines
When you add a reference to your package in your web app by adding the feed to Visual Studio, you will get a build error saying “error NU1101: Unable to find package SuccinctlyPackage. No packages exist with this id in source(s): NuGetOrg.” That is a clear enough error message, so let us fix it.
We have two options: use a NuGet.Config on the solution level instead so any pipelines know where to look, or add an additional feed. Since we explicitly did not use the NuGet.Config, let us look at the additional feed.
Code Listing 19
- task: DotNetCoreCLI@2 displayName: Restore inputs: command: 'restore' projects: '$(restoreBuildProjects)' feedsToUse: 'select' vstsFeed: '[feed id]' |
That should fix your restore step, and it will now build correctly again.
Summary
Using artifacts, you can host your private packages, whether they are NuGet, npm, or Maven packages. Other packages are supported as well. By using pipelines, you can publish your packages automatically so everyone in the team can easily deploy fixes or changes to existing packages.
- Seamless integration with Azure DevOps data sources
- Real-time data visualization for actionable insights
- Customizable dashboards to meet your specific needs
- Enhanced collaboration with data-driven reporting