
Azure Cognitive Services Succinctly®

CHAPTER 5
Vision
Quick intro
Computer vision is one of the most exciting aspects of AI, and for me, one of the coolest sets of services and APIs that Azure offers.
The Computer Vision API, as its name implies, is an AI service that analyzes content in images. It was the first vision service released by Azure.
It allows developers to create thumbnails, get insights from images, perform optical character recognition (OCR), detect and extract handwritten text in images, and identify field values from images and scanned documents.
Cognitive Services offers other vision services that give developers the ability to detect and identify faces in images and build custom vision models for specific domains.
In this chapter, we’ll specifically focus on using the Computer Vision API and see how it can allow us to gather insights from images and extract text contained within them.
Without further ado, let’s see how we can put the power of Cognitive Services at our disposal and use it to work with images.
Creating the Computer Vision API service
In order to start exploring the Computer Vision API, we need to create an Azure service instance of it.
To do that, go to the Azure portal, navigate to All resources, and click Create resource. Then, enter Computer Vision in the Search the Marketplace search box, and select the Computer Vision option from the drop-down menu, which will display the following.
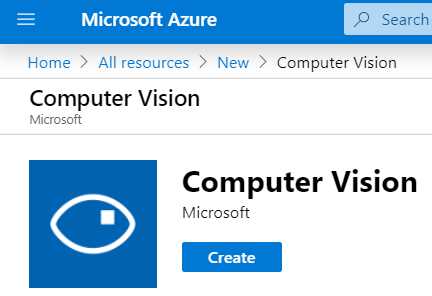
Figure 5-a: Computer Vision API Service
Then, click Create—this will display the following screen, which displays the fields that need to be filled in.
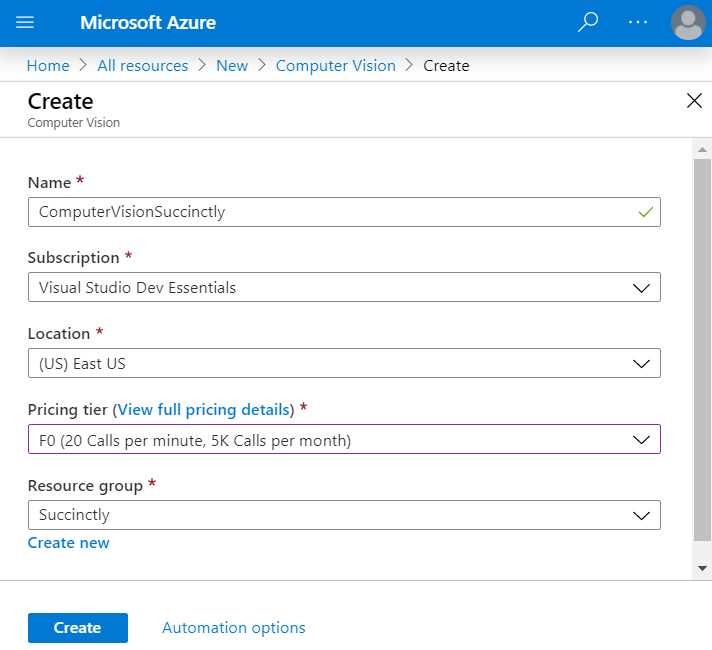
Figure 5-b: Creating a Computer Vision API Service
Enter the required field values. Notice that I’ve chosen the F0 option, which indicates the free pricing tier, and I’ve reused the Succinctly Resource group that had been previously created.
When you’re done, click Create to finalize the creation of the Computer Vision API service. Once the deployment of the Azure resource has been finalized, you will see the following screen.
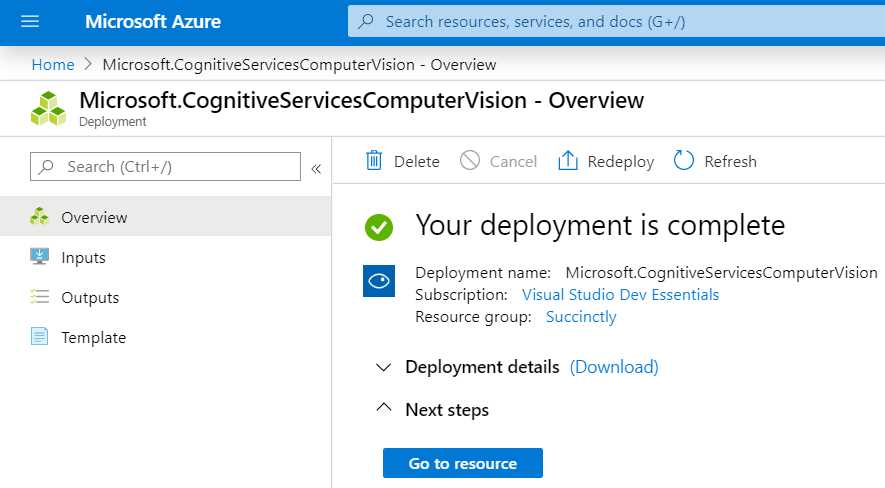
Figure 5-c: Computer Vision API Service Ready
Next, click Go to resource to get the key and endpoint.
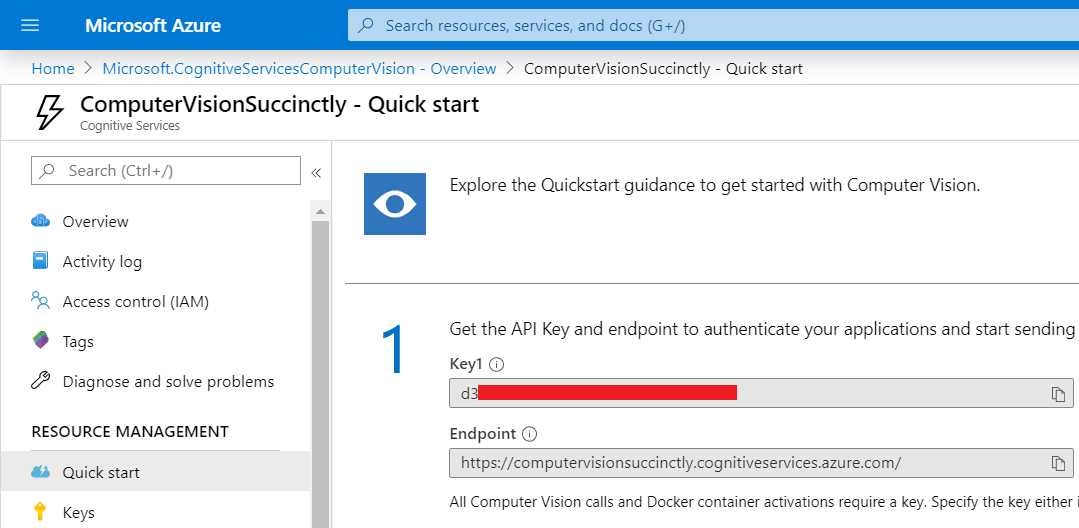
Figure 5-d: Computer Vision API Service Quick Start Page
Now that we have created the Computer Vision API service, it’s time to start to work on the Visual Studio projects we’ll be developing.
Creating VS projects
Since we’ll be learning various aspects of the Computer Vision API, I personally think that it’s better to keep each aspect of the Computer Vision API separated and organized into different Visual Studio projects.
By now, you know how to create console app (.NET Framework) projects with Visual Studio, so we’ll skip that explanation going forward, and start directly with each project’s code.
Accessing the API
Our first Visual Studio project within this chapter is going to focus on how to access the Computer Vision API. So, go ahead and create a Console App (.NET Framework) project named AccessAPI in Visual Studio.
This is the image that we’ll be analyzing using the Computer Vision API, which is available for download at Pixabay.
Feel free to download and save this image to a local folder (or alternatively, use any other). In my case, I’ll save it as image.jpg to a folder called Test on my local drive.

Figure 5-e: Image to Analyze (Courtesy of Pixabay)
Once the image is created, open the Program.cs file and replace its content with the following code.
Code Listing 5-a: Program.cs (AccessAPI Project)
using System; using System.IO; using System.Net.Http; using System.Net.Http.Headers; using System.Text; namespace AccessAPI { static class Program { private const string subscriptionKey = "<< Key goes here >>"; private const string cEndpoint = "https://computervisionsuccinctly.cognitiveservices.azure.com/"; private static string uriBase = $"{cEndpoint}vision/v2.1/analyze";
static void Main() { string imageFilePath = @"C:\Test\image.jpg";
MakeAnalysisRequest(imageFilePath); Console.WriteLine("\nPlease wait...\n"); Console.ReadLine(); } public static async void MakeAnalysisRequest( string imageFilePath) { HttpClient client = new HttpClient(); client.DefaultRequestHeaders.Add("Ocp-Apim-Subscription-Key", subscriptionKey); string requestParameters = "visualFeatures=Categories,Description,Color&language=en"; string uri = uriBase + "?" + requestParameters; HttpResponseMessage response = null; byte[] byteData = GetImageAsByteArray(imageFilePath); using (ByteArrayContent content = new ByteArrayContent(byteData)) { content.Headers.ContentType = new MediaTypeHeaderValue("application/octet-stream"); response = await client.PostAsync(uri, content);
string contentString = await response.Content.ReadAsStringAsync();
Console.WriteLine("\nResponse:\n"); Console.WriteLine(JsonPrettyPrint(contentString)); } } public static byte[] GetImageAsByteArray(string imageFilePath) { FileStream fileStream = new FileStream( imageFilePath, FileMode.Open, FileAccess.Read); BinaryReader binaryReader = new BinaryReader(fileStream);
return binaryReader.ReadBytes((int)fileStream.Length); } public static string JsonPrettyPrint(string json) { if (string.IsNullOrEmpty(json)) return string.Empty; json = json.Replace(Environment.NewLine, ""). Replace("\t", ""); StringBuilder sb = new StringBuilder(); bool quote = false; bool ignore = false; int offset = 0; int indentLength = 3; foreach (char ch in json) { switch (ch) { case '"': if (!ignore) quote = !quote; break; case '\'': if (quote) ignore = !ignore; break; } if (quote) sb.Append(ch); else { switch (ch) { case '{': case '[': sb.Append(ch); sb.Append(Environment.NewLine); sb.Append( new string(' ', ++offset * indentLength)); break; case '}': case ']': sb.Append(Environment.NewLine); sb.Append( new string(' ', --offset * indentLength)); sb.Append(ch); break; case ',': sb.Append(ch); sb.Append(Environment.NewLine); sb.Append( new string(' ', offset * indentLength)); break; case ':': sb.Append(ch); sb.Append(' '); break; default: if (ch != ' ') sb.Append(ch); break; } } } return sb.ToString().Trim(); } } } |
Let’s analyze this code. First, make sure you assign the value of the Computer Vision API subscription key from the Azure portal to subscriptionKey.
Notice that the Computer Vision API endpoint has already been assigned to cEndpoint. However, the code will be using uriBase to invoke the service, and not cEndpoint.
The string assigned to uriBase contains the endpoint, plus the name of the API version (v2.1) and method (analyze); this API method performs the analysis on the image.
The Main method invokes the MakeAnalysisRequest method, which receives the image location (imageFilePath) as a parameter.
Now, let’s have a look at the MakeAnalysisRequest method. The call to the API is done through an instance of the HttpClient class.
The subscription key is added as a header parameter to the HttpClient instance by calling the DefaultRequestHeaders.Add method.
Following that, the specific analysis features that the API will check for are indicated by assigning
"visualFeatures=Categories,Description,Color&language=en" to requestParameters.
In order to send the image to the API for analysis, the image must be converted to a byte array; this is what the GetImageAsByteArray method does.
The method does this by invoking the ReadBytes method from a BinaryReader object that was created with a FileStream instance obtained by reading the image file name (imageFilePath).
Then, the byte array obtained as a result of the call to the GetImageAsByteArray method is passed as a parameter when creating a new ByteArrayContent instance.
The ByteArrayContent object that contains the image information is passed to the API when the PostAsync method is invoked.
The result returned by the API is retrieved by calling the ReadAsStringAsync method from the response.Content object.
Previously we looked at the JsonPrettyPrint method—which, as you know, is simply used to print out the API results nicely—so we’ll skip that.
That’s all there is to it. As you have seen, the code wasn’t that complicated. If we execute this code, we get the following result.
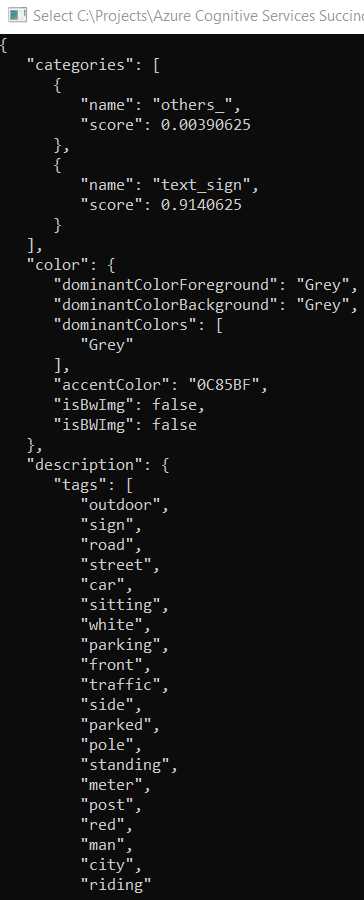
Figure 5-f: Image Analysis Results (Part 1)
Notice how the Computer Vision API was able to detect that the picture corresponds to a sign, and also found the relevant colors of the image. Besides that, various tags that describe the image were identified.
If you scroll down, you’ll also see that the Computer Vision API has labeled the image with descriptive text, which clearly indicates what it is, as you can see in the following figure.
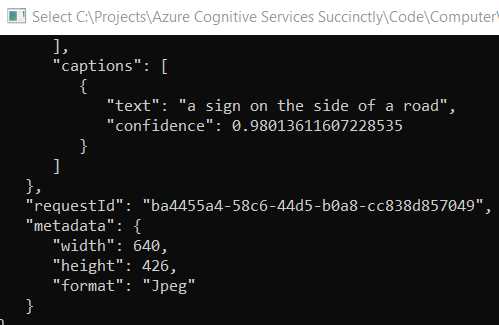
Figure 5-g: Image Analysis Results (Part 2)
In essence, the Computer Vision API received an image as a set of pixels and came up with a result that includes keywords and properties that describe what those pixels are, which is quite impressive.
Generating thumbnails
Now, let’s create a new Visual Studio project, which we can use to generate thumbnails. I’ll call this project CreateThumbnails.
After you’ve created the project, go to the Solution Explorer, right-click References, select Manage NuGet Packages, and search for computer vision in the search bar. Once the result appears, click Install.
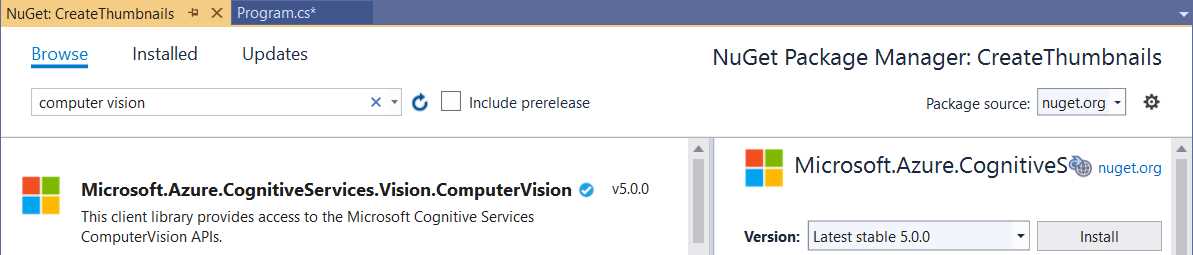
Figure 5-h: ComputerVision NuGet Package
We’ll be using this package from now on to work with the Computer Vision API, which is easier than working directly with the API. So, go to the Program.cs file and add the following code.
Code Listing 5-b: Program.cs (CreateThumbnails Project)
using System; using System.IO; using System.Threading.Tasks; using Microsoft.Azure.CognitiveServices.Vision.ComputerVision; namespace CreateThumbnails { class Program { const string API_key = "<< Key goes here >>"; const string API_location = "https://computervisionsuccinctly.cognitiveservices.azure.com/"; static void Main(string[] args) { string imgToAnalyze = @"C:\Test\image.jpg"; SmartThumbnail(imgToAnalyze, 80, 80, true); Console.ReadKey(); } public static ComputerVisionClient Authenticate( string key, string endpoint) { ComputerVisionClient client = new ComputerVisionClient(new ApiKeyServiceClientCredentials(key)) { Endpoint = endpoint }; return client; } public static byte[] ReadFully(Stream input) { byte[] buffer = new byte[16 * 1024]; using (MemoryStream ms = new MemoryStream()) { int read; while ((read = input.Read(buffer, 0, buffer.Length)) > 0) { ms.Write(buffer, 0, read); } return ms.ToArray(); } } public static void SmartThumbnail(string fname, int width, int height, bool smartCropping) { Task.Run(async () => { string imgname = Path.GetFileName(fname); Console.WriteLine($"Thumbnail for image: {imgname}"); Stream thumbnail = await SmartThumbnailGeneration( fname, width, height, smartCropping); string thumbnailFullPath = string.Format ("{0}\\thumbnail_{1:yyyy-MMM-dd_hh-mm-ss}.jpg", Path.GetDirectoryName(fname), DateTime.Now); using (BinaryWriter bw = new BinaryWriter(new FileStream(thumbnailFullPath, FileMode.OpenOrCreate, FileAccess.Write))) bw.Write(ReadFully(thumbnail)); }).Wait(); } public static async Task<Stream> SmartThumbnailGeneration( string fname, int width, int height, bool smartCropping) { Stream thumbnail = null; ComputerVisionClient client = Authenticate( API_key, API_location); if (File.Exists(fname)) using (Stream stream = File.OpenRead(fname)) thumbnail = await client.GenerateThumbnailInStreamAsync( width, height, stream, smartCropping); return thumbnail; } } } |
Let’s go over this code to understand what it does. The first thing we’ve done is add a reference to the Computer Vision SDK we added, which is what the following instruction indicates.
using Microsoft.Azure.CognitiveServices.Vision.ComputerVision;
Next, we find the API_key and API_location, which will be used to access the service. Don’t forget to change the value of API_key.
Next, we define the Main method. All it does is specify the location of the image that is going to be used—which is the same one we used in the previous example (the image sign from Pixabay)—and invoke the SmartThumbnail method.
The SmartThumbnail method is where the thumbnail of the image gets created. This method calls the others, so let’s start exploring it first.
The execution of the code contained within the SmartThumbnail method is wrapped around a Task.Run(async () => {}).Wait(); construct. This is done so that the code execution is fully asynchronous and non-blocking.
The SmartThumbnailGeneration method is the one that invokes the Computer Vision API and creates the thumbnail Stream object that is returned to the SmartThumbnail method.
The resultant thumbnail file is written to disk using the Write method from the BinaryWriter instance, which is created using a FileStream object.
The Write method requires a byte array, so this is why the image needs to be converted from a Stream object to a byte array. This is done by invoking the ReadFully method.
The thumbnail’s file name is going to use this naming convention: thumbnail_{1:yyyy-MMM-dd_hh-mm-ss}.jpg (for example, thumbnail_2020-Jan-11_09-56-08.jpg).
Now, let’s move our attention to the SmartThumbnailGeneration method. The first thing this method does is invoke Authenticate, which creates a ComputerVisionClient instance.
The SmartThumbnailGeneration method will be able to generate the thumbnail by invoking the GenerateThumbnailInStreamAsync method from the ComputerVisionClient instance. The image is sent to the Computer Vision API as a stream object.
The Authenticate method basically creates a ComputerVisionClient instance by passing an ApiKeyServiceClientCredentials object as a parameter.
Now, let’s run the program and what we get. Go to the folder where test.jpg resides and check the resultant thumbnail file.
![]()
Figure 5-i: Thumbnail File Created
Let’s open the file (double-click it) to see what it looks like.

Figure 5-j: Thumbnail File Opened
Awesome—we now know how to use the Computer Vision API to create thumbnails. As you have seen, it wasn’t difficult to do.
Optical character recognition
A very interesting feature of the Computer Vision API is the ability to recognize words and sentences from images. This is what we are going to explore now.
So, let’s go ahead and create a new Console .NET Framework Visual Studio project—I’ll call it RecognizeOcr.
Once you’ve created the project, go to the NuGet Package Manager and install the Computer Vision SDK, just like we did with the CreateThumbnails project.
Then, go to Program.cs and add the following code.
Code Listing 5-c: Program.cs (RecognizeOcr Project)
using System; using System.Collections.Generic; using System.IO; using System.Threading.Tasks; using Microsoft.Azure.CognitiveServices.Vision.ComputerVision; using Microsoft.Azure.CognitiveServices.Vision.ComputerVision.Models; namespace RecognizeOcr { class Program { const string API_key = "<< Key goes here >>"; const string API_location = "https://computervisionsuccinctly.cognitiveservices.azure.com/"; static void Main(string[] args) { string imgToAnalyze = @"C:\Test\receipt.jpg"; TextExtractionCore(imgToAnalyze).Wait(); Console.ReadLine(); } public static ComputerVisionClient Authenticate(string key, string endpoint) { ComputerVisionClient client = new ComputerVisionClient(new ApiKeyServiceClientCredentials(key)) { Endpoint = endpoint }; return client; } public static List<string> GetWords(OcrLine line) { List<string> words = new List<string>(); foreach (OcrWord w in line.Words) words.Add(w.Text); return words; } public static string GetLineAsString(OcrLine line) { List<string> words = GetWords(line); return words.Count > 0 ? string.Join(" ", words) : string.Empty; } public static async Task TextExtractionCore(string fname) { using (Stream stream = File.OpenRead(fname)) { ComputerVisionClient client = Authenticate( API_key, API_location); OcrResult ocrRes = await client.RecognizePrintedTextInStreamAsync(true, stream); foreach (var localRegion in ocrRes.Regions) { foreach (var line in localRegion.Lines) Console.WriteLine(GetLineAsString(line)); } } } } } |
Let’s explore what is going on here. The first thing we have done is add the references to the Computer Vision API with these two using statements.
using Microsoft.Azure.CognitiveServices.Vision.ComputerVision;
using Microsoft.Azure.CognitiveServices.Vision.ComputerVision.Models;
Then, just like in the previous example, we have the API_key and API_location values. Don’t forget to replace the value of API_key with the corresponding subscription key value for the Computer Vision API from the Azure portal.
Next, we have the Main method, which invokes TextExtractionCore—to which the image to be analyzed (imgToAnalyze) is passed as a parameter.
The TextExtractionCore method is quite straightforward. The image is opened as a Stream object, and the Authenticate method returns an instance of ComputerVisionClient.
Optical character recognition (OCR) is performed on the image (in order to extract the text contained within the image) by calling the RecognizePrintedTextInStreamAsync method from the ComputerVisionClient instance.
Then, for each of the ocrRes.Regions results returned, each OCR line is printed to the console by invoking the GetLineAsString method—which returns the words found on each line as a one-line string.
The GetLineAsString method basically loops through each OcrWord occurrence found within line.Words and returns a List<string> object.
As you have seen, adding OCR detection capabilities was very easy to do. Before we run the program, let’s have a look at the image we’ll be testing—it’s basically a scanned expense receipt.
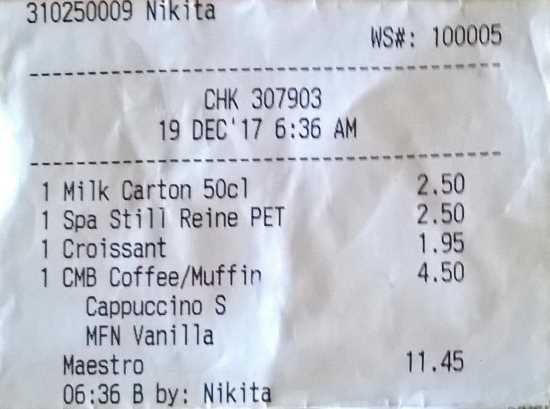
Figure 5-k: Scanned Receipt Image (receipt.jpg)
You can try with any other scanned receipt you have at hand—just make sure the image has a good resolution. Now, let’s run the program to see what results we get.
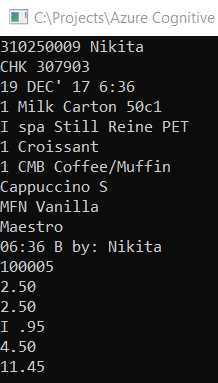
Figure 5-l: Scanned Image Results
With just a few lines of code, we were able to extract the text contained within the scanned image receipt.
Adding field logic
Extracting text from images is great, but the real value comes when we are able to make sense of the information extracted. We achieve this by adding specific field logic.
Say we would like to find the date and the highest amount found within the extracted text—this way we could know the receipt’s date and also the total value. This is what we are going to do now.
So, going back to Program.cs, let’s add the following changes to the existing code, which I’ve highlighted in bold.
Code Listing 5-d: Modified Program.cs (RecognizeOcr Project)
// Previous using statements... using System.Globalization; using System.Text.RegularExpressions; namespace RecognizeOcr { class Program { // Previous code...
public static async Task TextExtractionCore(string fname) { List<string> strList = new List<string>(); using (Stream stream = File.OpenRead(fname)) { ComputerVisionClient client = Authenticate(API_key, API_location); OcrResult ocrRes = await client.RecognizePrintedTextInStreamAsync (true, stream); foreach (var localRegion in ocrRes.Regions) foreach (var line in localRegion.Lines) strList.Add(GetLineAsString(line)); Console.WriteLine("Date: " + GetDate(strList.ToArray())); Console.WriteLine("Highest amount: " + HighestAmount(strList.ToArray())); } } public static string ParseDate(string str) { string result = string.Empty; string[] formats = new string[] { "dd MMM yy h:mm", "dd MMM yy hh:mm" }; foreach (string fmt in formats) { try { str = str.Replace("'", ""); if (DateTime.TryParseExact (str, fmt, CultureInfo.InvariantCulture, DateTimeStyles.None, out DateTime dateTime)) { result = str; break; } } catch { } } return result; } public static string GetDate(string[] res) { string result = string.Empty; foreach (string l in res) { result = ParseDate(l); if (result != string.Empty) break; } return result; } public static string HighestAmount(string[] res) { string result = string.Empty; float highest = 0; Regex r = new Regex(@"[0-9]+\.[0-9]+"); foreach (string l in res) { Match m = r.Match(l); if (m != null && m.Value != string.Empty && Convert.ToDouble(m.Value) > highest) result = m.Value; } return result; } } } |
What have we done here? First, we added the following using statements, which we previously didn’t have.
using System.Globalization;
using System.Text.RegularExpressions;
Then, we modified the TextExtractionCore method. First, we added the following instruction, which initializes a string List.
List<string> strList = new List<string>();
This list will be used to store the OCR results returned by the Computer Vision API, instead of writing them to the console. This is done as follows.
strList.Add(GetLineAsString(line));
Then, before the TextExtractionCore method finalizes, we invoke the GetDate method, which finds the date within the OCR results returned (strList.ToArray()) and invokes the HighestAmount method. As its name implies, the HighestAmount method returns the highest amount found within the OCR results returned.
Console.WriteLine("Date: " + GetDate(strList.ToArray()));
Console.WriteLine("Highest amount: " + HighestAmount(strList.ToArray()));
The GetData method is actually very simple. All it does is loop through each line of text results found to check which line contains a date and retrieve it, which it’s able to do by calling the ParseDate method.
The ParseDate method is able to retrieve the date from the results by looking for the following date string patterns: dd MMM yy h:mm and dd MMM yy hh:mm.
The HighestAmount method finds the highest amount contained within the text returned by the OCR results by looking for all occurrences that match the [0-9]+\.[0-9]+ regular expression, and checking which of those has the highest numeric value.
Let’s now run the code to see what we get.
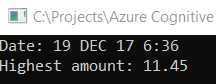
Figure 5-m: Scanned Image Results (Date and Highest Amount)
Cool—we can see that the program has been able to recognize the date and highest amount. Code Listing 5-e shows the full-blown code with all the modifications.
Code Listing 5-e: Full Program.cs (RecognizeOcr Project)
using System; using System.Collections.Generic; using System.Globalization; using System.IO; using System.Text.RegularExpressions; using System.Threading.Tasks; using Microsoft.Azure.CognitiveServices.Vision.ComputerVision; using Microsoft.Azure.CognitiveServices.Vision.ComputerVision.Models; namespace RecognizeOcr { class Program { const string API_key = "<< Key goes here >>"; const string API_location = "https://computervisionsuccinctly.cognitiveservices.azure.com/"; static void Main(string[] args) { string imgToAnalyze = @"C:\Test\receipt.jpg"; TextExtractionCore(imgToAnalyze).Wait(); Console.ReadLine(); } public static ComputerVisionClient Authenticate( string key, string endpoint) { ComputerVisionClient client = new ComputerVisionClient(new ApiKeyServiceClientCredentials(key)) { Endpoint = endpoint }; return client; } public static List<string> GetWords(OcrLine line) { List<string> words = new List<string>(); foreach (OcrWord w in line.Words) words.Add(w.Text); return words; } public static string GetLineAsString(OcrLine line) { List<string> words = GetWords(line); return words.Count > 0 ? string.Join(" ", words) : string.Empty; } public static async Task TextExtractionCore(string fname) { List<string> strList = new List<string>(); using (Stream stream = File.OpenRead(fname)) { ComputerVisionClient client = Authenticate( API_key, API_location); OcrResult ocrRes = await client.RecognizePrintedTextInStreamAsync(true, stream); foreach (var localRegion in ocrRes.Regions) foreach (var line in localRegion.Lines) strList.Add(GetLineAsString(line)); Console.WriteLine("Date: " + GetDate(strList.ToArray())); Console.WriteLine("Highest amount: " + HighestAmount(strList.ToArray())); } } public static string ParseDate(string str) { string result = string.Empty; string[] formats = new string[] { "dd MMM yy h:mm", "dd MMM yy hh:mm" }; foreach (string fmt in formats) { try { str = str.Replace("'", ""); if (DateTime.TryParseExact(str, fmt, CultureInfo.InvariantCulture, DateTimeStyles.None, out DateTime dateTime)) { result = str; break; } } catch { } } return result; } public static string GetDate(string[] res) { string result = string.Empty; foreach (string l in res) { result = ParseDate(l); if (result != string.Empty) break; } return result; } public static string HighestAmount(string[] res) { string result = string.Empty; float highest = 0; Regex r = new Regex(@"[0-9]+\.[0-9]+"); foreach (string l in res) { Match m = r.Match(l); if (m != null && m.Value != string.Empty && Convert.ToDouble(m.Value) > highest) result = m.Value; } return result; } } } |
Visual Studio projects: full code
You can download the complete source code for each of the Visual Studio projects created throughout this book from this link.
Final thoughts
Throughout this chapter, we’ve explored how to use the Computer Vision API to analyze images, generate thumbnails, extract text contained within images, and also get specific field values to make sense of the information extracted.
Still, the Computer Vision set of APIs in Azure offers even more possibilities, such as the ability to detect faces and create your own models to do things like recognize ordinary, day-to-day objects.
If you take a step back and think about it, it’s quite impressive how with just a few lines of code, we are able to get an application to have vision-like capabilities.
The Azure team has done a fantastic job wrapping up this incredible functionality into a set of APIs that are both easy to use and learn in a relatively short amount of time.
We’ve now reached the end of this book, yet there’s so much more to explore about Cognitive Services.
A very interesting aspect of Cognitive Services is search, specifically the web search side of it, which empowers developers to build search engine capabilities within their apps.
For instance, you can leverage image search capabilities that use the same underlying technology as the Bing image search engine to retrieve images that correspond to specific terms or trending internet queries.
Regarding the search aspect of Cognitive Services, a complete book on the subject could be written, not only on how to search for images and perform visual searches, but also how to search for terms and entities, and how to combine search capabilities with other Azure services. I highly recommend that you explore these amazing features and APIs that Azure has to offer for search.
Beyond that, keep an eye on services that are still in preview mode. I’m very excited about Form Recognizer and Ink Recognizer—both have a very promising outlook.
I hope this book has given you sufficient insights on how to use the power of Cognitive Services to build applications that are infused with AI with very little code, which you can use to tackle real-world business problems within your work and your organization, and that your customers might need.
Thank you for reading this book, and until next time, take care.
All the best,
Ed
- 1800+ high-performance UI components.
- Includes popular controls such as Grid, Chart, Scheduler, and more.
- 24x5 unlimited support by developers.