
Azure Cognitive Services Succinctly®

CHAPTER 4
Speech
Quick intro
Cognitive Services also provides the ability to integrate and add speech processing capabilities to your application, which include:
- Speech to text: Transcribes audible speech into readable and searchable text.
- Text to speech: Converts text to lifelike speech for more natural interfaces.
- Speech translation: Integrates real-time speech translation into your apps.
- Speaker recognition: Identifies and verifies the people speaking based on audio.
In this chapter, we’ll be focusing on implementing text to speech with Azure Cognitive Services, which provides a great way to give a voice to your application, and we’ll also explore how to convert speech to text.
Speech translation and speaker recognition are beyond the scope of this book, and probably deserve a full book to cover them in depth.
Nevertheless, text to speech and speech to text are two very exciting capabilities within Cognitive Services. So, without further ado, let’s jump right into both.
Speech project
With Visual Studio 2019 open, create a new Console App (.NET Framework) project. I’ll name mine Speech, which we can see as follows.
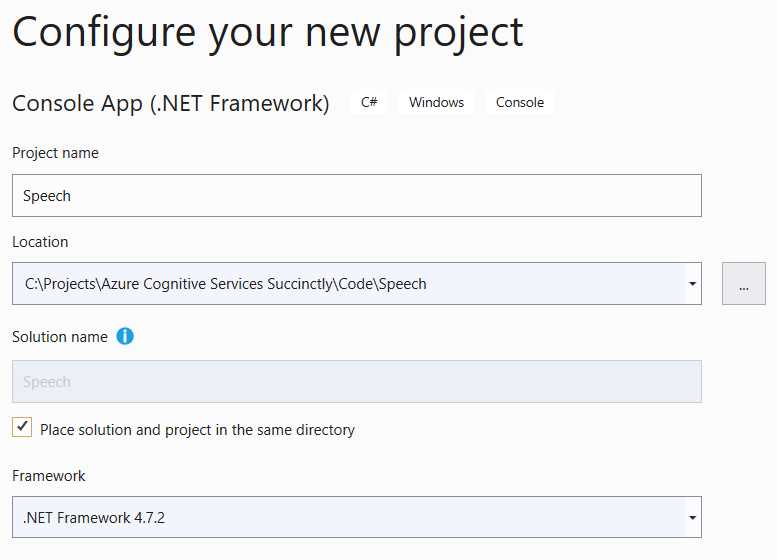
Figure 4-a: Creating the Speech Project
Within this project, we will organize the code for both the text-to-speech and speech-to-text logic.
Creating the Speech service
We are going to start our journey with Cognitive Services and the Speech SDK, and learn how to convert text to synthesized speech.
Before we can write any code, let’s create a Speech service instance on the Azure portal. Here’s a link to the official documentation.
In the Azure portal, navigate to All resources and click the Create resource or the Add resource button. Enter Speech in the Search the Marketplace search box and select the Speech option from the drop-down list, which will display the following.
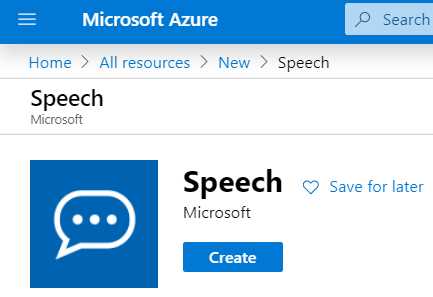
Figure 4-b: Speech Service
Next, click Create. This will display the following screen, which displays the fields that need to be filled.
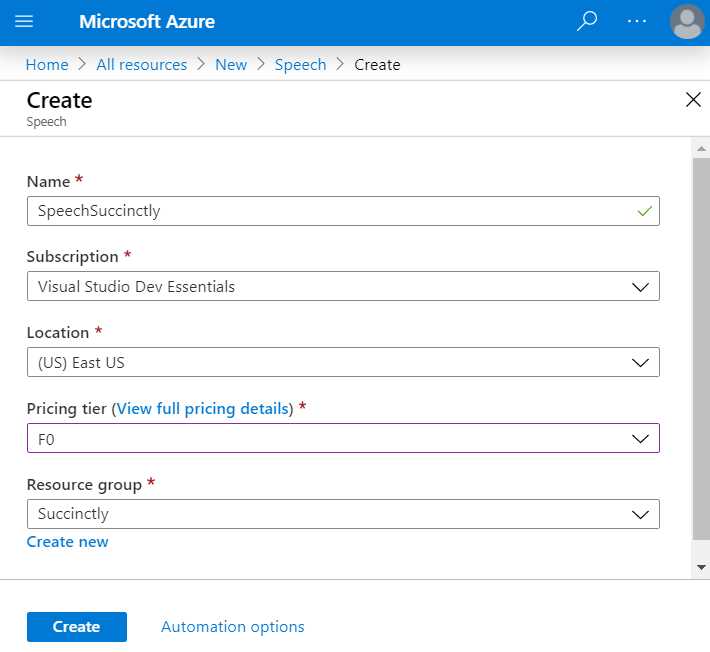
Figure 4-c: Creating a Speech Service
Enter the required field values. Notice that I’ve chosen the F0 option, which indicates the free pricing tier, and I’ve also reused the Succinctly resource group that had been previously created.
When you’re done, click Create to finalize the creation of the Speech service. Once the deployment of the Azure resource has been finalized, you will see the following screen.
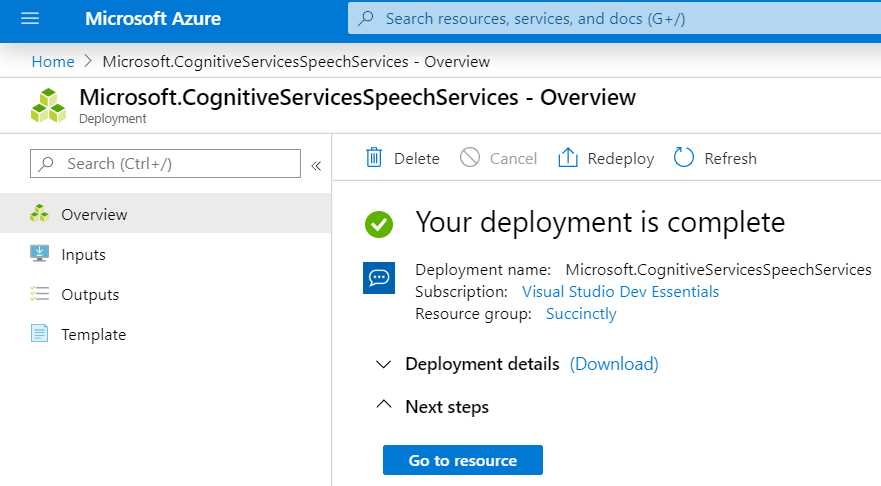
Figure 4-d: Speech Service Ready
Click Go to resource to access the service’s key and endpoint.
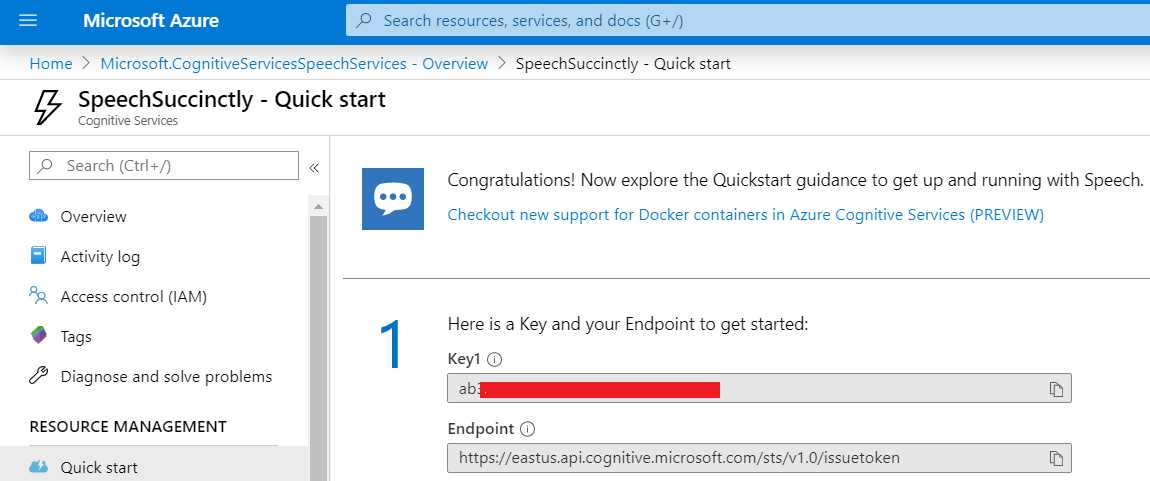
Figure 4-e: Speech Service Quick Start Page
Now that we have created the Speech service, it’s time to work on the Visual Studio project.
Setting up the Speech SDK
Before we can write any code, we need to set up the Speech SDK by adding it to our Visual Studio project. We can do this from the Solution Explorer by right-clicking References and selecting Manage NuGet Packages. Once you do that, you’ll see the screen shown in Figure 4-f.
To install the Speech SDK (Microsoft.CogntiveServices.Speech), click the Browse tab, enter speech in the search bar, and then click Install.
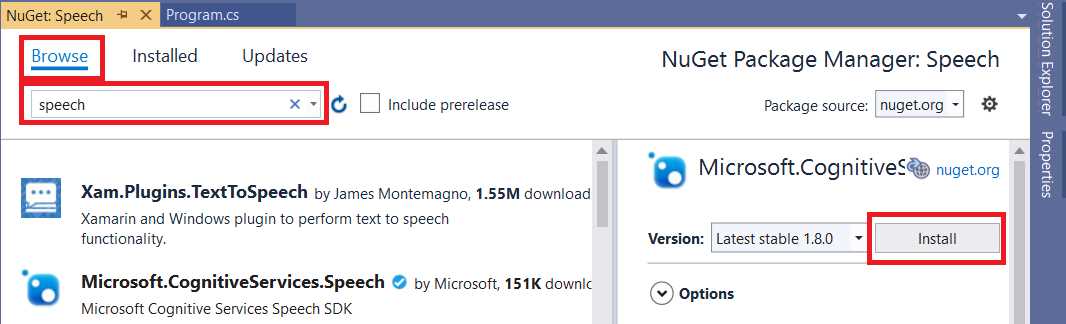
Figure 4-f: NuGet Package Manager—Speech SDK
Once you’ve installed the SDK, we can start to write some code.
Text to speech
Listing 4-a shows the full code for the text-to-speech program, which creates a speech synthesizer using the default speaker as audio output.
Please make sure to replace cKey with the value of your Speech service subscription key, and if you’re not using the East US (eastus) region, set the value of cRegion to another Azure region.
Code Listing 4-a: Text to Speech (Program.cs)
using System; using System.Threading.Tasks; using Microsoft.CognitiveServices.Speech; namespace Speech { class Program { private const string cKey = "<< Key goes here >>"; private const string cRegion = "eastus"; // Azure region public static async Task TextToSpeechSynthesisAsync(string text) { var config = SpeechConfig.FromSubscription(cKey, cRegion); // Speech synthesizer using the speaker as audio output using (var synthesizer = new SpeechSynthesizer(config)) { using (var r = await synthesizer.SpeakTextAsync(text)) { if (r.Reason == ResultReason.SynthesizingAudioCompleted) Console.WriteLine($"Speech synthesized " + $"to speaker for text [{text}]"); else if (r.Reason == ResultReason.Canceled) { var cancellation = SpeechSynthesisCancellationDetails.FromResult(r); Console.WriteLine($"CANCELED: " + $"Reason={cancellation.Reason}"); if (cancellation.Reason == CancellationReason.Error) { Console.WriteLine($"Cancelled with " + $"Error Code {cancellation.ErrorCode}"); Console.WriteLine($"Cancelled with " + $"Error Details " + $"[{cancellation.ErrorDetails}]"); } } } Console.WriteLine("Waiting to play " + "back to the audio..."); Console.ReadKey(); } } static void Main() { TextToSpeechSynthesisAsync("Hey, how are you? " + "Are you going out now with Cathy?").Wait(); } } } |
If you attempt to run this code, you’ll probably get the following error.

Figure 4-g: Any CPU Platform Error—Speech SDK
This is because, by default, Visual Studio set our project to compile to Any CPU, as you can see in the following figure.

Figure 4-h: Any CPU Setting—Visual Studio 2019
The error is very descriptive. Essentially it means that you must choose a target platform to compile the code to. You can do this by clicking the drop-down arrow next to Any CPU.
Go ahead and do that—you should see something like the following options.
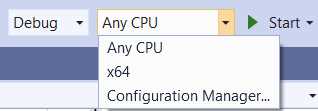
Figure 4-i: Additional Platform Settings—Visual Studio 2019
Then, click the Configuration Manager option to set up a target platform if you don’t have one set up already.
In my case, I had previously set up x64 as a target platform (which would compile my code to 64 bits), so I could have chosen this one from the list.
After you have clicked the Configuration Manager option, you should see a screen similar to the following one.
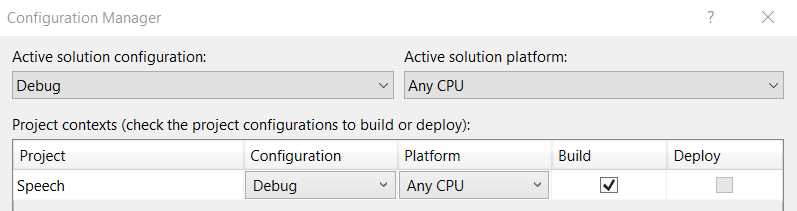
Figure 4-j: Configuration Manager (Before Selection)—Visual Studio 2019
In the Platform drop-down menu, click New, which you can see in the following figure.
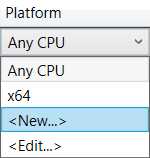
Figure 4-k: Platform Drop-Down—Visual Studio 2019
After you’ve clicked New, you’ll see the screen shown in Figure 4-l. You can choose to use the default x86 platform (32 bits) or select x64 (64 bits) from the New platform drop-down list, depending on which operating system architecture you need to target.
If you are using a 32-bit operating system, you must choose x86. However, if your operating system is 64 bits, you can choose to target x86 or x64 (preferably the latter).
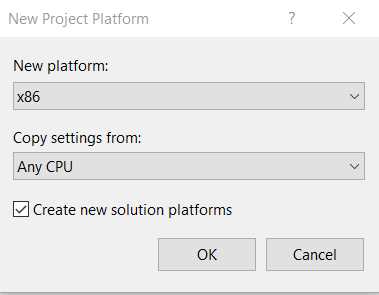
Figure 4-l: New Project Platform—Visual Studio 2019
Once you’ve selected an option, click OK. Now you should be able to see that the Speech project was assigned to the build option you selected, as shown here.
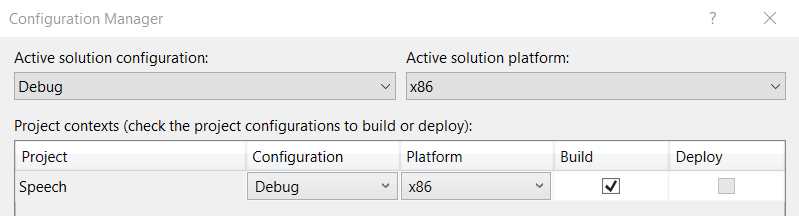
Figure 4-m: Configuration Manager (After Selection)—Visual Studio 2019
With the right build option selected, you are now ready to compile your code. So, let’s run the project to see what we get.

Figure 4-n: Running the Code
If you have your computer speakers on, you should have heard the following text being synthesized to speech: "Hey, how are you? Are you going out now with Cathy?"
Text to audio
Now let’s take this code a step further and instead of directly synthesizing the written text to speech, we’ll have the code create an audio file that can be used to play the written text.
As we should be able to reuse most of the existing logic we already have, let’s refactor the code we’ve already written as follows.
Code Listing 4-b: Program.cs (Code Refactored)
using System; using System.Threading.Tasks; using Microsoft.CognitiveServices.Speech; namespace Speech { class Program { private const string cKey = "<< Key goes here >>"; private const string cRegion = "eastus"; // Azure region public static async Task TextToSpeechSynthesisAsync(string text) { var config = SpeechConfig.FromSubscription(cKey, cRegion); using (var synthesizer = new SpeechSynthesizer(config)) await Synthesize(text, synthesizer); } private static async Task Synthesize(string text, SpeechSynthesizer synthesizer) { using (var r = await synthesizer.SpeakTextAsync(text)) { if (r.Reason == ResultReason.SynthesizingAudioCompleted) Console.WriteLine($"Speech synthesized " + $"to speaker for text [{text}]"); else if (r.Reason == ResultReason.Canceled) { var cancellation = SpeechSynthesisCancellationDetails.FromResult(r); Console.WriteLine($"CANCELED: " + $"Reason={cancellation.Reason}"); if (cancellation.Reason == CancellationReason.Error) { Console.WriteLine($"Cancelled with " + $"Error Code {cancellation.ErrorCode}"); Console.WriteLine($"Cancelled with " + $"Error Details " + $"[{cancellation.ErrorDetails}]"); } } } Console.WriteLine("Waiting to play " + "back to the audio..."); Console.ReadKey(); } static void Main() { string txt = "Hey, how are you? " + "Are you going out now with Cathy?"; TextToSpeechSynthesisAsync(txt).Wait(); } } } |
As you might have noticed, all we’ve done is extract the lines of code that made up the core logic of the TextToSpeechSynthesisAsync method into a new method called Synthesize.
The reason we want to do this is that we are going to add a new method called TextToAudioFileAsync, which will also invoke the logic contained within the Synthesize method.
But before we can add the logic for the TextToAudioFileAsync method, let’s reference a couple of additional namespaces our new code will need, which I’ve highlighted in bold in the following code listing.
Code Listing 4-c: Program.cs (Using Statements—New Items)
using System; using System.Threading.Tasks; using Microsoft.CognitiveServices.Speech; using System.IO; using Microsoft.CognitiveServices.Speech.Audio; |
Now, let’s add the code for the TextToAudioFileAsync method, which we can see as follows.
Code Listing 4-d: Program.cs (TextToAudioFileAsync Method)
public static async Task TextToAudioFileAsync(string fn, string text) { var config = SpeechConfig.FromSubscription(cKey, cRegion); using (FileStream f = new FileStream(fn, FileMode.Create)) using (BinaryWriter wr = new BinaryWriter(f)) wr.Write(System.Text.Encoding.ASCII.GetBytes("RIFF")); using (var fo = AudioConfig.FromWavFileOutput(fn)) using (var synthesizer = new SpeechSynthesizer(config, fo)) await Synthesize(text, synthesizer); } |
Notice how the code of the TextToAudioFileAsync method looks almost identical to the code of the TextToSpeechSynthesisAsync method. I’ve highlighted the differences in bold.
The TextToAudioFileAsync method first creates an empty audio (.wav) file, which is done by creating a new FileStream instance, that gets passed the name of the file (fn) as a parameter.
This FileStream instance (f) is passed as a parameter when creating a new BinaryWriter instance. Then, the BinaryWriter object (wr) is used to write the content of the file, which is done by executing the System.Text.Encoding.ASCII.
Then, the AudioConfig.FromWavFileOutput method is invoked by passing fn as a parameter. This results in a fo object, which is then passed to the new SpeechSynthesizer instance as a parameter.
The TextToAudioFileAsync method can be invoked from the Main method as follows.
Code Listing 4-e: Program.cs (Main Method)
static void Main() { string txt = "Hey, how are you? " + "Are you going out now with Cathy?"; string fn = @"C:\Test\hello.wav"; TextToAudioFileAsync(txt, fn).Wait(); } |
If we execute the program, we should get an audio file containing the synthesized written text. Let’s have a look.

Figure 4-o: Newly Created Audio File
If you now double-click the file, you should be able to listen to the synthesized text. Isn’t that cool? Personally, I think this is impressive, given that there is very little code involved—that’s the power of Azure Cognitive Services.
Text to speech and audio code
Just to make sure that we have a complete overview of what we’ve done, the following listing shows the full source code of what we have written for achieving the text-to-speech and text-to-audio functionalities.
Code Listing 4-f: Program.cs (Full Source Code)
using System; using System.IO; using System.Threading.Tasks; using Microsoft.CognitiveServices.Speech; using Microsoft.CognitiveServices.Speech.Audio; namespace Speech { class Program { private const string cKey = "<< Key goes here >>"; private const string cRegion = "eastus"; // Azure region public static async Task TextToSpeechSynthesisAsync(string text) { var config = SpeechConfig.FromSubscription(cKey, cRegion); using (var synthesizer = new SpeechSynthesizer(config)) await Synthesize(text, synthesizer); } public static async Task TextToAudioFileAsync(string text, string fn) { var config = SpeechConfig.FromSubscription(cKey, cRegion); using (FileStream f = new FileStream(fn, FileMode.Create)) using (BinaryWriter wr = new BinaryWriter(f)) wr.Write( System.Text.Encoding.ASCII.GetBytes("RIFF")); using (var fo = AudioConfig.FromWavFileOutput(fn)) using (var synthesizer = new SpeechSynthesizer(config, fo)) await Synthesize(text, synthesizer); } private static async Task Synthesize(string text, SpeechSynthesizer synthesizer) { using (var r = await synthesizer.SpeakTextAsync(text)) { if (r.Reason == ResultReason.SynthesizingAudioCompleted) Console.WriteLine($"Speech synthesized " + $"to speaker for text [{text}]"); else if (r.Reason == ResultReason.Canceled) { var cancellation = SpeechSynthesisCancellationDetails.FromResult(r); Console.WriteLine($"CANCELED: " + $"Reason={cancellation.Reason}"); if (cancellation.Reason == CancellationReason.Error) { Console.WriteLine($"Cancelled with " + $"Error Code {cancellation.ErrorCode}"); Console.WriteLine($"Cancelled with " + $"Error Details " + $"[{cancellation.ErrorDetails}]"); } } } Console.WriteLine("Waiting to play " + "back to the audio..."); Console.ReadKey(); } static void Main() { string txt = "Hey, how are you? " + "Are you going out now with Cathy?"; string fn = @"C:\Test\hello.wav"; TextToSpeechSynthesisAsync(txt).Wait(); TextToAudioFileAsync(txt, fn).Wait(); } } } |
Speech to text
Now that we’ve covered how to convert text to speech and to save text to an audio file, it’s now time to see how we can use the speech-to-text capability.
To do that, we’ll continue to work on our Program.cs file. As you’ll see shortly, the process is almost identical to what we have done, but instead of a SpeechSynthesizer, we’ll be using a SpeechRecognizer class.
Let’s add the following two new methods, which will be able to recognize speech and output text.
Code Listing 4-g: Program.cs (Full Source Code)
using System; using System.IO; using System.Threading.Tasks; using Microsoft.CognitiveServices.Speech; using Microsoft.CognitiveServices.Speech.Audio; namespace Speech { class Program { private const string cKey = "<< Key goes here >>"; private const string cRegion = "eastus"; // Azure region // Previous text to speech and audio methods
public static async Task SpeechToTextAsync() { var config = SpeechConfig.FromSubscription(cKey, cRegion); using (var recognizer = new SpeechRecognizer(config)) await Recognize(recognizer); } private static async Task Recognize(SpeechRecognizer recognizer) { var result = await recognizer.RecognizeOnceAsync(); if (result.Reason == ResultReason.RecognizedSpeech) Console.WriteLine($"Recognized: {result.Text}"); else if (result.Reason == ResultReason.NoMatch) Console.WriteLine("Speech could not be recognized."); else if (result.Reason == ResultReason.Canceled) { var cancellation = CancellationDetails.FromResult(result); Console.WriteLine ($"Cancelled due to reason={cancellation.Reason}"); if (cancellation.Reason == CancellationReason.Error) { Console.WriteLine ($"Error code={cancellation.ErrorCode}"); Console.WriteLine ($"Error details={cancellation.ErrorDetails}"); Console.WriteLine ($"Did you update the subscription info?"); } } } static void Main() { SpeechToTextAsync().Wait(); Console.ReadLine(); } } } |
If we now run the program with this code and speak a few words—in my case, I’ll say “I’m writing a book”—we should be able to see the code recognizing the spoken words. The following figure shows what mine recognized. How cool is that?

Figure 4-p: My Spoken Words Recognized as Text
Let’s try to understand what we have done here. Basically, the SpeechToTextAsync method creates a SpeechRecognizer instance and then invokes the Recognize method, passing that SpeechRecognizer object as a parameter.
The logic of the Recognize method is very similar to the logic of the Synthesize method. The main difference is that instead of calling the SpeakTextAsync method, the RecognizeOnceAsync method is invoked.
The other difference is that the conditional statements of the method check the value of result.Reason and compare that to the value of ResultReason.RecognizedSpeech, instead of ResultReason.SynthesizingAudioCompleted (as there isn’t synthesized completed audio to check because it is being recognized instead).
Audio to text
Using the audio file that we previously created, let’s write some code to read it and recognize the recorded speech as text.
So, let’s expand Program.cs to do that. Let’s create an AudioToTextAsync method that will read the content of the audio file and invoke the Speech service.
Code Listing 4-h: Program.cs (AudioToTextAsync Method)
public static async Task AudioToTextAsync(string fn) { var config = SpeechConfig.FromSubscription(cKey, cRegion); using (var ai = AudioConfig.FromWavFileInput(fn)) using (var recognizer = new SpeechRecognizer(config, ai)) await Recognize(recognizer); } |
As you can see, the code of the AudioToTextAsync method looks almost identical to the SpeechToTextAsync method.
The differences are highlighted in bold. Basically, the name of the audio file (fn) that is going to be read is passed to the method.
The file is read by invoking the AudioConfig.FromWavFileInput method, which returns an audio input (ai) object that is passed as a parameter when a new instance of the SpeechRecognizer class is created.
We can invoke the AudioToTextAsync method from the Main method as follows. Notice how I’ve left the original text that was recorded as comments.
Code Listing 4-i: Program.cs (Main Method)
static void Main() { // string txt = "Hey, how are you? " + // "Are you going out now with Cathy?"; string fn = @"C:\Test\hello.wav"; AudioToTextAsync(fn).Wait(); Console.ReadLine(); } |
Let’s now execute the program and see what results we get.

Figure 4-q: Recorded Audio Recognized as Text
We can see that the recorded audio has been recognized correctly. But what happened to the second sentence—"Are you going out now with Cathy?”
The RecognizeOnceAsync method within Recognize returns one utterance (sentence) only. It basically stops recognizing when it detects a pause (silence)—thus, the second utterance was not recognized.
To recognize all the sentences that have been recorded within the audio file, we need to use the StartContinuousRecognitionAsync method instead.
Let’s add some logic to achieve that. We can do this by creating a new method called AudioToTextContinuousAsync.
Code Listing 4-j: Program.cs (AudioToTextContinuousAsync Method)
public static async Task AudioToTextContinuousAsync(string fn) { var config = SpeechConfig.FromSubscription(cKey, cRegion); using (var ai = AudioConfig.FromWavFileInput(fn)) using (var recognizer = new SpeechRecognizer(config, ai)) await RecognizeAll(recognizer); } |
As you can see, this method is almost identical to the AudioToTextAsync method; the only difference is that AudioToTextContinuousAsync invokes RecognizeAll instead of Recognize.
So, let’s have a look at the RecognizeAll method to see what it does.
Code Listing 4-k: Program.cs (RecognizeAll Method)
private static async Task RecognizeAll(SpeechRecognizer recognizer) { var taskCompletetion = new TaskCompletionSource<int>(); // Events recognizer.Recognizing += (sender, eventargs) => { // Handle recognized intermediate result }; recognizer.Recognized += (sender, eventargs) => { if (eventargs.Result.Reason == ResultReason.RecognizedSpeech) Console.WriteLine($"Recognized: {eventargs.Result.Text}"); }; recognizer.Canceled += (sender, eventargs) => { if (eventargs.Reason == CancellationReason.Error) Console.WriteLine("Error reading the audio file."); if (eventargs.Reason == CancellationReason.EndOfStream) Console.WriteLine("End of file."); taskCompletetion.TrySetResult(0); }; recognizer.SessionStarted += (sender, eventargs) => { // Started recognition session }; recognizer.SessionStopped += (sender, eventargs) => { // Ended recognition session taskCompletetion.TrySetResult(0); }; // Starts recognition await recognizer. StartContinuousRecognitionAsync().ConfigureAwait(false); // Waits for completion Task.WaitAny(new[] { taskCompletetion.Task }); // Stops recognition await recognizer.StopContinuousRecognitionAsync(); } |
That’s quite a bit of code! What is happening here?
First, as this is a continuous async operation, we need to create a TaskCompletionSource instance, which we will use to wait for the completion of the task.
Then, to be able to follow along with what happens, we need to subscribe to various events, such as the Recognizing, Recognized, Canceled, SessionStarted, and SessionStopped events.
Next, we hook up the following lambda function, which displays each utterance recognized by the Speech service.
recognizer.Recognized += (sender, eventargs) =>
{
if (eventargs.Result.Reason == ResultReason.RecognizedSpeech)
Console.WriteLine($"Recognized: {eventargs.Result.Text}");
};
Each recognized utterance is passed to the lambda function as a parameter and is accessible through the eventargs.Result.Text property.
Then, on the Canceled event, we check if there’s a problem reading the audio file, or if we have reached the end of the file. This is achieved as follows.
recognizer.Canceled += (sender, eventargs) =>
{
if (eventargs.Reason == CancellationReason.Error)
Console.WriteLine("Error reading the audio file.");
if (eventargs.Reason == CancellationReason.EndOfStream)
Console.WriteLine("End of file.");
taskCompletetion.TrySetResult(0);
};
Notice also how the taskCompletion object’s state is set to zero by executing this instruction, taskCompletion.TrySetResult(0), in order to indicate that the continuous running process has nothing more to wait for.
On the SessionStopped event, we also need to set the taskCompletion object’s state to zero, which is done as follows.
recognizer.SessionStopped += (sender, eventargs) =>
{
//Ended recognition session
taskCompletetion.TrySetResult(0);
};
We could also add some logic to the Recognizing and SessionStarted events. These could be useful for processing intermediate results, such as adjusting the output text—for example, if the audio would contain profanity—by intercepting the text and changing the output, but in this case, we are simply outputting everything as is.
The final three instructions are where the magic happens.
// Starts recognition
await recognizer.StartContinuousRecognitionAsync().ConfigureAwait(false);
// Waits for completion
Task.WaitAny(new[] { taskCompletetion.Task });
// Stops recognition
await recognizer.StopContinuousRecognitionAsync();
The call to the StartContinuousRecognitionAsync method starts the continuous speech recognition. Then, the call to the Task.WaitAny method simply waits for the continuous recognition process to complete. Finally, the call to the StopContinuousRecognitionAsync method finalizes the continuous recognition process.
Before we run the program, let’s check the following full source code for Program.cs with all the changes made.
Code Listing 4-l: Program.cs (Full Source Code)
using System; using System.IO; using System.Threading.Tasks; using Microsoft.CognitiveServices.Speech; using Microsoft.CognitiveServices.Speech.Audio; namespace Speech { class Program { private const string cKey = "<< Key goes here >>"; private const string cRegion = "eastus"; // Azure region public static async Task TextToSpeechSynthesisAsync(string text) { var config = SpeechConfig.FromSubscription(cKey, cRegion); using (var synthesizer = new SpeechSynthesizer(config)) await Synthesize(text, synthesizer); } public static async Task TextToAudioFileAsync(string text, string fn) { var config = SpeechConfig.FromSubscription(cKey, cRegion); using (FileStream f = new FileStream(fn, FileMode.Create)) using (BinaryWriter wr = new BinaryWriter(f)) wr.Write( System.Text.Encoding.ASCII.GetBytes("RIFF")); using (var fo = AudioConfig.FromWavFileOutput(fn)) using (var synthesizer = new SpeechSynthesizer( config, fo)) await Synthesize(text, synthesizer); } private static async Task Synthesize(string text, SpeechSynthesizer synthesizer) { using (var r = await synthesizer.SpeakTextAsync(text)) { if (r.Reason == ResultReason.SynthesizingAudioCompleted) Console.WriteLine($"Speech synthesized " + $"to speaker for text [{text}]"); else if (r.Reason == ResultReason.Canceled) { var cancellation = SpeechSynthesisCancellationDetails.FromResult(r); Console.WriteLine($"CANCELED: " + $"Reason={cancellation.Reason}"); if (cancellation.Reason == CancellationReason.Error) { Console.WriteLine($"Cancelled with " + $"Error Code {cancellation.ErrorCode}"); Console.WriteLine($"Cancelled with " + $"Error Details " + $"[{cancellation.ErrorDetails}]"); } } } Console.WriteLine("Waiting to play " + "back to the audio..."); Console.ReadKey(); } public static async Task SpeechToTextAsync() { var config = SpeechConfig.FromSubscription(cKey, cRegion); using (var recognizer = new SpeechRecognizer(config)) await Recognize(recognizer); } public static async Task AudioToTextAsync(string fn) { var config = SpeechConfig.FromSubscription(cKey, cRegion); using (var ai = AudioConfig.FromWavFileInput(fn)) using (var recognizer = new SpeechRecognizer(config, ai)) await Recognize(recognizer); } public static async Task AudioToTextContinuousAsync(string fn) { var config = SpeechConfig.FromSubscription(cKey, cRegion); using (var ai = AudioConfig.FromWavFileInput(fn)) using (var recognizer = new SpeechRecognizer(config, ai)) await RecognizeAll(recognizer); } private static async Task RecognizeAll( SpeechRecognizer recognizer) { var taskCompletetion = new TaskCompletionSource<int>(); // Events recognizer.Recognizing += (sender, eventargs) => { // Handle recognized intermediate result }; recognizer.Recognized += (sender, eventargs) => { if (eventargs.Result.Reason == ResultReason.RecognizedSpeech) Console.WriteLine ($"Recognized: {eventargs.Result.Text}"); }; recognizer.Canceled += (sender, eventargs) => { if (eventargs.Reason == CancellationReason.Error) Console.WriteLine("Error reading the audio file."); if (eventargs.Reason == CancellationReason.EndOfStream) Console.WriteLine("End of file."); taskCompletetion.TrySetResult(0); }; recognizer.SessionStarted += (sender, eventargs) => { // Started recognition session }; recognizer.SessionStopped += (sender, eventargs) => { // Ended recognition session taskCompletetion.TrySetResult(0); }; // Starts continuous recognition await recognizer. StartContinuousRecognitionAsync().ConfigureAwait(false); // Waits for completion Task.WaitAny(new[] { taskCompletetion.Task }); // Stops recognition await recognizer.StopContinuousRecognitionAsync(); } private static async Task Recognize(SpeechRecognizer recognizer) { var result = await recognizer.RecognizeOnceAsync(); if (result.Reason == ResultReason.RecognizedSpeech) Console.WriteLine($"Recognized: {result.Text}"); else if (result.Reason == ResultReason.NoMatch) Console.WriteLine("Speech could not be recognized."); else if (result.Reason == ResultReason.Canceled) { var cancellation = CancellationDetails.FromResult(result); Console.WriteLine ($"Cancelled due to reason={cancellation.Reason}"); if (cancellation.Reason == CancellationReason.Error) { Console.WriteLine ($"Error code={cancellation.ErrorCode}"); Console.WriteLine ($"Error details={cancellation.ErrorDetails}"); Console.WriteLine ($"Did you update the subscription info?"); } } } static void Main() { string txt = "Hey, how are you? " + "Are you going out now with Cathy?"; string fn = @"C:\Test\hello.wav"; // TextToSpeechSynthesisAsync(txt).Wait(); // TextToAudioFileAsync(txt, fn).Wait(); // SpeechToTextAsync().Wait(); // AudioToTextAsync(fn).Wait();
AudioToTextContinuousAsync(fn).Wait(); Console.ReadLine(); } } } |
Notice how I’ve commented out all the method calls within the Main method, except for the one that invokes AudioToTextContinuousAsync.
This way, we can execute the program and see if we are able to read the complete audio file. Let’s give it a go.

Figure 4-r: Recorded Audio Recognized as Text (Continuous Processing)
The program was able to recognize all the audio as text correctly. The only difference is a K instead of a C for the word Cathy, which if you think about it, is really nothing, as it’s pronounced the same way in both cases.
Summary
Throughout this chapter, we’ve explored how to convert text to speech and speech to text using the Speech SDK along with the Speech service from Azure. Considering what we’ve accomplished with relatively few lines of code, it’s quite amazing what can be achieved.
There’s still quite a lot you can explore with this awesome Azure service, such as being able to perform intent recognition, speech translation, conversation transcription, and how to use the service to create voice assistants.
Beyond the Speech service, we still have a bit to explore with Cognitive Services, such as how to extract information from scanned documents using Computer Vision. We’ll also use some of these Computer Vision services to do other cool things, such as generate thumbnails from images and perform image analysis—exciting stuff!
- 1800+ high-performance UI components.
- Includes popular controls such as Grid, Chart, Scheduler, and more.
- 24x5 unlimited support by developers.