
Azure Cognitive Services Succinctly®

CHAPTER 2
Decision
Quick intro
Cognitive Services APIs can be divided into five distinct categories based on the area of AI they touch. They are decision, language, speech, vision, and web search.
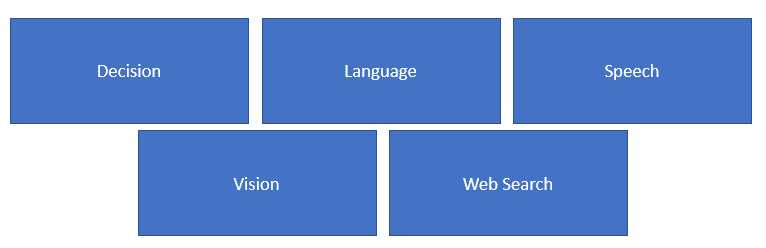
Figure 2-a: Cognitive Services Categories
In this chapter, we will explore the decision category of APIs, particularly the Content Moderator. As the name implies, decision APIs allow developers to infuse logic into their apps that give these applications the ability to make faster and smarter decisions.
At the time of writing this book, the following Cognitive Services decision APIs are available.

Figure 2-b: Cognitive Services Decision APIs
The Anomaly Detector API scans data for patterns that can be used to detect anomalies within data. It uses an inference engine that analyzes data from a time-series perspective, and is able to use the right algorithm to help highlight potential incidents, fraud, and significant data changes before they actually occur.
We’ll be focusing on the Content Moderator set of APIs in this chapter. These give developers the ability to detect potential offensive and unwanted text and images, including profanity and undesirable text, as well as adult images and videos.
The Personalizer API gives developers the ability to deliver a personalized and relevant experience for each user, which is achieved by using an automatic optimization model based on reinforcement learning.
Take a step back and think about this for a moment: personalization is what made Amazon the retail powerhouse and company it is today, by giving each user a tailored buying and checkout experience, based on the user's tastes. This gave Amazon the edge in retail.
That same level of fine-grained personalization is also available to you as a developer via the Personalizer API, which you can use to infuse personalization into your apps. There is an equivalent API from Amazon Web Services called Personalize.
Content Moderator APIs
Content Moderator is a set of APIs that is responsible for inspecting text, image, and video content for material that is potentially offensive, risky, or deemed undesirable.
To better understand how these Content Moderator APIs and their respective features work together, let’s look at the following diagram, which provides an overview.
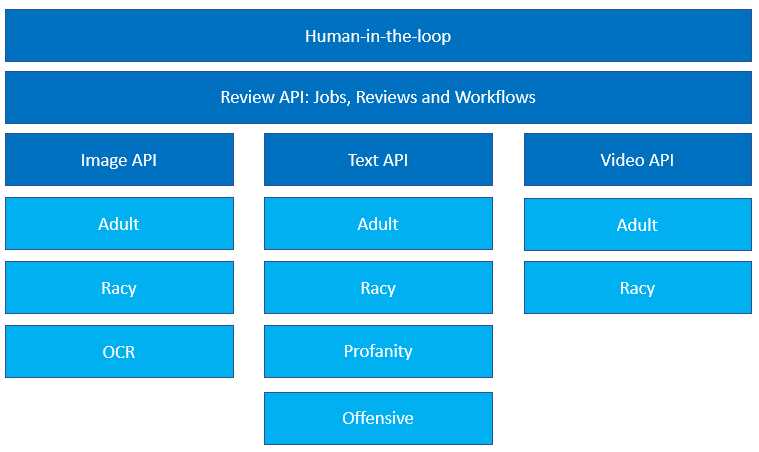
Figure 2-c: Content Moderator APIs and Features
When any of these APIs find such material, it applies appropriate labels to the content, and your app can decide what to do with it.
The application can then handle the flagged content in order to comply with specific regulations or maintain the desired environment for users.
Once flagged content has been identified, it’s also possible to include human verification in what is known as human-in-the-loop, which is done with a review tool.
The main three Content Moderator APIs are Image, Text, and Video:
- The Image API is able to detect adult and racy content within images and to perform optical character recognition.
- The Text API is able to detect profanity and adult, racy, and offensive text content.
- The Video API is able to detect adult and racy content within videos.
These APIs constitute the core of what the Content Moderator is able to provide as a service. The output of what these three APIs return can be combined with content workflow, review, and approval processes that might involve a human-in-the-loop, or more.
Now that we’ve explored a bit of the theory behind Content Moderator APIs, let’s create an instance of the service to start working with it.
Creating a Content Moderator instance
To create a Content Moderator instance, let’s go to the Azure portal, and in the search bar, type moderator.

Figure 2-d: Searching for Content Moderator (Azure Portal)
Then, select the Content Moderator option from the list of Marketplace results, which will display the following screen.
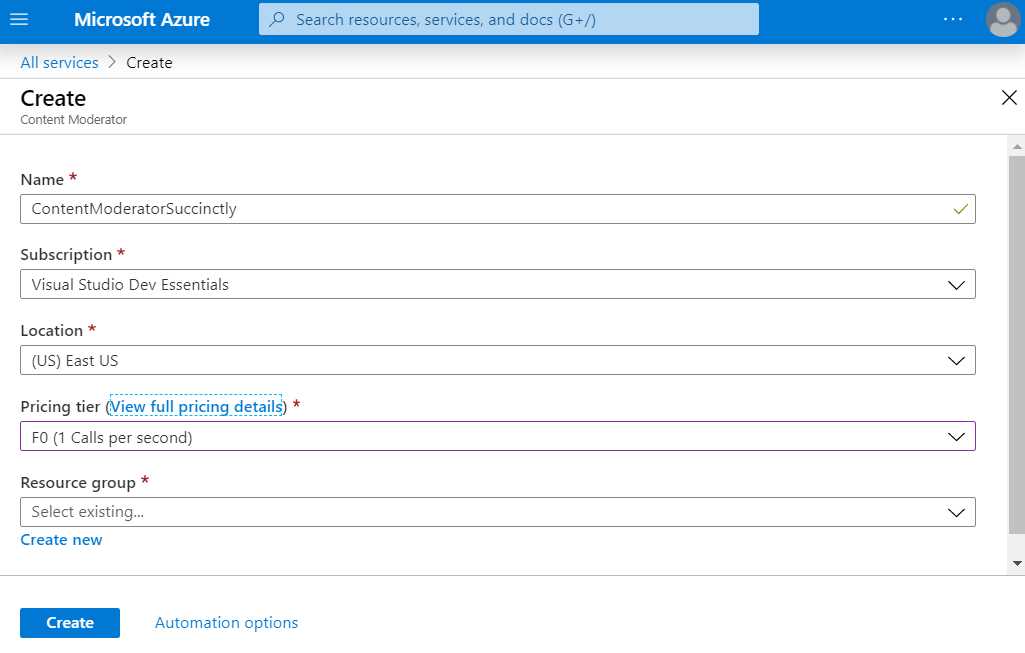
Figure 2-e: Create Content Moderator (Azure Portal)
You’ll need to specify a Name and Subscription, select a Location, and indicate the Pricing tier—in my case, I’ve chosen the F0 tier.
The F0 pricing tier includes one call per second to the service. This is the free tier option, which is more than enough for experimenting with the service, so I would recommend you choose this one to avoid incurring unnecessary costs. You can find more details about the pricing of this service here.
If you have an existing Resource group, you can select it from the list, and if you haven’t created one yet, which is most likely the case, then click Create new, which is what I’m going to do. You’ll see the following dialog box.
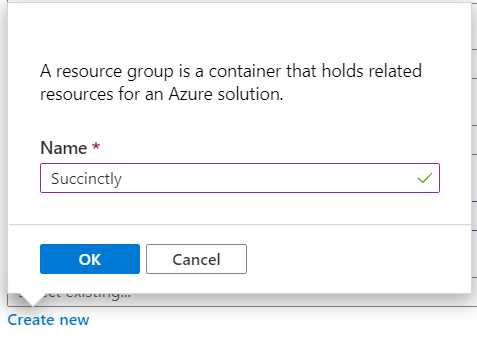
Figure 2-f: Create New Resource Dialog (Azure Portal)
Enter the required Name for the resource and click OK. I’ve named the resource Succinctly, as I’ll use it for other Cognitive Services that we’ll be exploring throughout this book. I recommend that you do the same, so it’s easier to follow along.
Once that’s done, click Create. This will create the Content Moderator service instance, and you will see a screen similar to the following one.
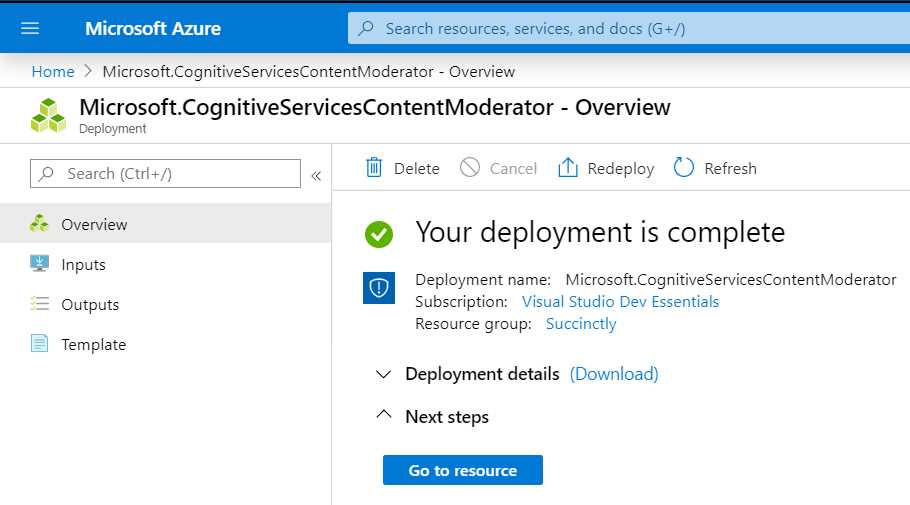
Figure 2-g: Content Moderator Deployment Complete (Azure Portal)
With the instance created, we are now ready to start using the service. To do that, click Go to resource so we can get the key, which can be seen as follows.
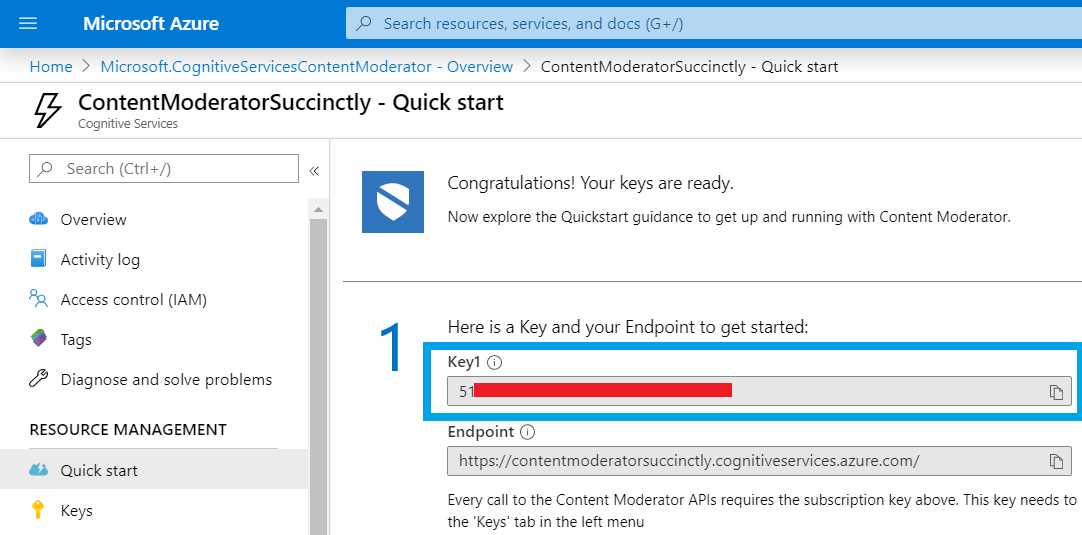
Figure 2-h: Content Moderator—Quick Start (Azure Portal)
Something to notice is that I have not highlighted the Endpoint field, but just the Key field. The reason is that that the endpoint stated in the Quick start screen is the generic one, but depending on which Content Moderator API we use, the actual endpoint might vary.
To know which endpoint to use, it’s best to refer to the Content Moderator API reference and check which API you want to use.
In our first example, we’ll use the Image Moderation API and the API to moderate text. The endpoints for both APIs are almost identical, so we are now ready to start writing some code.
Toolset
Throughout this book, we’ll be writing code with the Visual Studio 2019 Community Edition, using the C# programming language. Go ahead and download Visual Studio 2019 Community Edition and install it if you haven’t yet. By using the default installation options, you’ll be fine to proceed with the samples that will be presented throughout this book.
With Visual Studio 2019 open, choose the Console App (.NET Framework) option when creating a new project, which will be sufficient for our task.
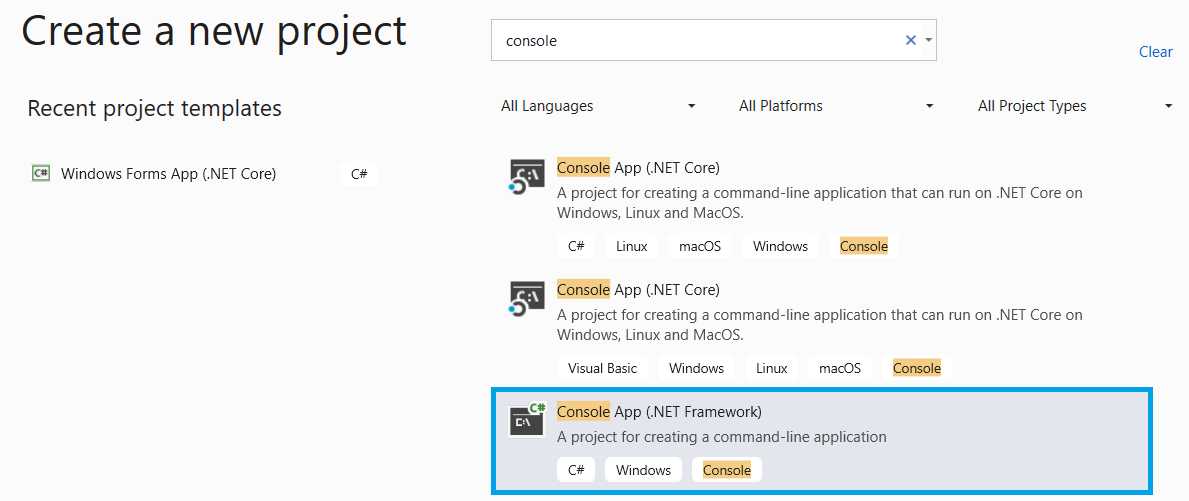
Figure 2-i: Creating a New Project—Quick Start (Azure Portal)
Accessing the API
Code Listing 2-a: Text to Moderate
This is a crap test message from [email protected], 28128166778, 255.255.255.255, |
The code in Listing 2-b is responsible for sending this image and text to the Content Moderator APIs and moderating them.
To better understand it, let’s explore the complete code first, and then break it into smaller chunks.
Code Listing 2-b: Full API Access Code—Image and Text Moderation (Program.cs)
using System; using System.Net.Http.Headers; using System.Text; using System.Net.Http; using System.Web; using System.Collections.Specialized; using System.IO; using System.Threading.Tasks; namespace HttpClientDemo { static class Program { // Azure Content Moderator Endpoint private const string cEndpoint = "https://eastus.api.cognitive.microsoft.com/contentmoderator/"; private const string cModerate = "moderate/v1.0/"; private const string cOcpApimSubscriptionKey = "Ocp-Apim-Subscription-Key"; private const string cSubscriptionKey = "<< here goes your key >>"; // Change this!! // Image API private const string cImageApi = "ProcessImage/"; // Text API private const string cTextApi = "ProcessText/"; private const string cPath = @"C:\Test"; // Change this path!!
private static string cStrImage1 = $@"{cPath}\pic.jpg"; private static string cStrText1 = $@"{cPath}\test.txt"; static void Main() { ProcessRequest(cStrImage1, "image/jpeg", QryStrEvaluateImage(false)); ProcessRequest(cStrText1, "text/plain", QryStrScreenText(false, true, "", true, "")); Console.ReadLine(); } public static void ProcessRequest(string image, string contentType, string uri) { Task.Run(async () => { string res = await MakeRequest(image, contentType, uri); Console.WriteLine("\nResponse:\n"); Console.WriteLine(JsonPrettyPrint(res)); }); } public static async Task<string> MakeRequest(string image, string contentType, string uri) { string contentString = string.Empty; HttpClient client = new HttpClient(); client.DefaultRequestHeaders.Add( cOcpApimSubscriptionKey, cSubscriptionKey); HttpResponseMessage response = null; if (File.Exists(image) && uri != string.Empty && contentType != string.Empty) { // This is important byte[] byteData = GetAsByteArray(image); using (var content = new ByteArrayContent(byteData)) { content.Headers.ContentType = new MediaTypeHeaderValue(contentType); response = await client.PostAsync(uri, content); // This is important contentString = await response.Content.ReadAsStringAsync(); } } return contentString; } public static byte[] GetAsByteArray(string filePath) { FileStream fileStream = new FileStream(filePath, FileMode.Open, FileAccess.Read); BinaryReader binaryReader = new BinaryReader(fileStream); return binaryReader.ReadBytes((int)fileStream.Length); } // Specific to the Image API public static string QryStrEvaluateImage(bool cacheImage) { NameValueCollection queryString = HttpUtility.ParseQueryString(string.Empty); queryString["CacheImage"] = cacheImage.ToString(); return cEndpoint + cModerate + cImageApi + "Evaluate?" + queryString.ToString().ToLower(); } // Specific to the Text API public static string QryStrScreenText(bool autoCorrect, bool pii, string listId, bool classify, string language) { NameValueCollection queryString = HttpUtility.ParseQueryString(string.Empty); queryString["autocorrect"] = autoCorrect.ToString().ToLower(); queryString["PII"] = pii.ToString().ToLower();
if (listId != string.Empty) queryString["listId"] = listId; queryString["classify"] = classify.ToString().ToLower();
if (language != string.Empty) queryString["language"] = language; return cEndpoint + cModerate + cTextApi + "Screen?" + queryString.ToString(); } public static string JsonPrettyPrint(string json) { if (string.IsNullOrEmpty(json)) return string.Empty; json = json.Replace(Environment.NewLine, ""). Replace("\t", ""); StringBuilder sb = new StringBuilder(); bool quote = false; bool ignore = false; int offset = 0; int indentLength = 3; foreach (char ch in json) { switch (ch) { case '"': if (!ignore) quote = !quote; break; case '\'': if (quote) ignore = !ignore; break; } if (quote) sb.Append(ch); else { switch (ch) { case '{': case '[': sb.Append(ch); sb.Append(Environment.NewLine); sb.Append( new string(' ', ++offset * indentLength)); break; case '}': case ']': sb.Append(Environment.NewLine); sb.Append( new string(' ', --offset * indentLength)); sb.Append(ch); break; case ',': sb.Append(ch); sb.Append(Environment.NewLine); sb.Append( new string(' ', offset * indentLength)); break; case ':': sb.Append(ch); sb.Append(' '); break; default: if (ch != ' ') sb.Append(ch); break; } } } return sb.ToString().Trim(); } } } |
Checking the results
If we run this code, we should see the following output for the text file that was sent to the API for moderation.
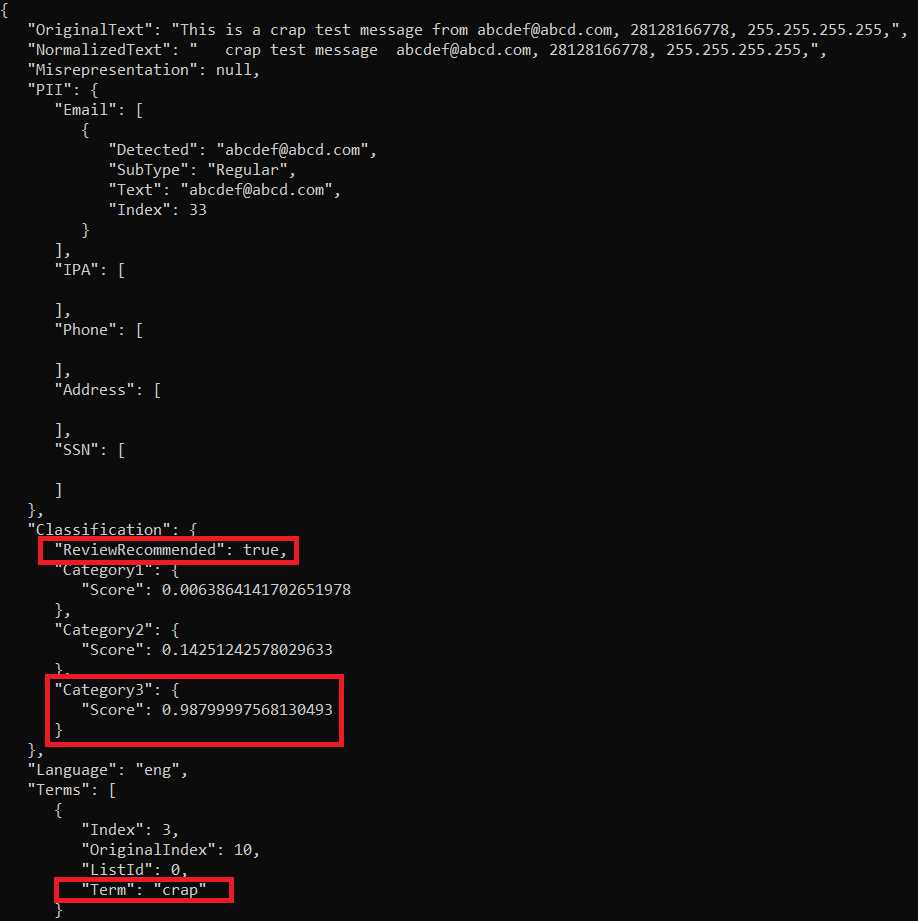
Figure 2-k: Console Output Results (Text Moderation)
Notice how the API has recommended that this text be reviewed, by giving it a high score and highlighting the term that contains profanity.
If you scroll down on the console output, you will see the results of the image moderation, which can be seen as follows.
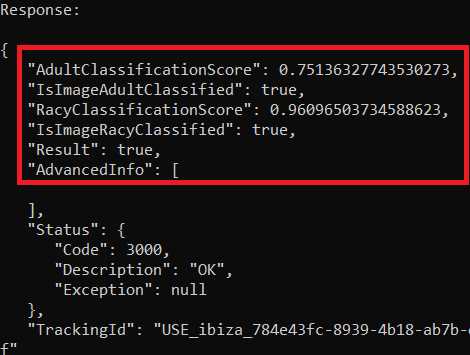
Figure 2-l: Console Output Results (Image Moderation)
Notice how this image has been classified as adult and racy content, scoring high on both. Although we wouldn’t expect any other results, I’m sure you’ll agree with me that this is quite impressive, given the limited code we’ve written to achieve this.
Main method and endpoint
To understand how this works, let’s break the code into smaller chunks and explore what each part does.
Code Listing 2-c: API Access Code—Image and Text Moderation (Program.cs, Part 1)
using System; using System.Net.Http.Headers; using System.Text; using System.Net.Http; using System.Web; using System.Collections.Specialized; using System.IO; using System.Threading.Tasks; namespace HttpClientDemo { static class Program { // Azure Content Moderator Endpoint private const string cEndpoint = "https://eastus.api.cognitive.microsoft.com/contentmoderator/"; private const string cModerate = "moderate/v1.0/"; private const string cOcpApimSubscriptionKey = "Ocp-Apim-Subscription-Key"; private const string cSubscriptionKey = "<< here goes your key >>"; // Change this!! // Image API private const string cImageApi = "ProcessImage/"; // Text API private const string cTextApi = "ProcessText/"; private const string cPath = @"C:\Test"; // Change this path!!
private static string cStrImage1 = $@"{cPath}\pic.jpg"; private static string cStrText1 = $@"{cPath}\test.txt"; static void Main() { ProcessRequest(cStrImage1, "image/jpeg", QryStrEvaluateImage(false)); ProcessRequest(cStrText1, "text/plain", QryStrScreenText(false, true, "", true, "")); Console.ReadLine(); }
// More code to follow… } } |
We start off by importing the required references and defining the constants that we need to access the API, such as the endpoint (cEndpoint combined with cModerate) and the key (cSubscriptionKey).
Note: Change the value of << here goes your key >> with the value obtained from the Content Moderator subscription key (found on the Azure portal).
Next, we define the access API methods for the Image (cImageApi) and Text (cTextApi) APIs. These are the API calls that are used to moderate the content.
After that, we define the local folder (cPath) in which the moderated image and text content resides on disk. You may change this value to any other local folder on your machine.
The variables cStrImage1 and cStrText1 refer to the actual names of the image and text files being moderated.
The Main method invokes the ProcessRequest method for both the image and text content, but with different query parameters for each: QryStrEvaluateImage for the image, and QryStrScreenText for the text.
Requests methods
Now, let’s explore the ProcessRequest and MakeRequest methods.
Code Listing 2-d: API Access Code—Image and Text Moderation (Program.cs, Part 2)
public static void ProcessRequest(string image, string contentType, string uri) { Task.Run(async () => { string res = await MakeRequest(image, contentType, uri); Console.WriteLine("\nResponse:\n"); Console.WriteLine(JsonPrettyPrint(res)); }); } public static async Task<string> MakeRequest(string image, string contentType, string uri) { string contentString = string.Empty; HttpClient client = new HttpClient();
client.DefaultRequestHeaders.Add( cOcpApimSubscriptionKey, cSubscriptionKey); HttpResponseMessage response = null; if (File.Exists(image) && uri != string.Empty && contentType != string.Empty) { // This is important byte[] byteData = GetAsByteArray(image); using (var content = new ByteArrayContent(byteData)) { content.Headers.ContentType = new MediaTypeHeaderValue(contentType); response = await client.PostAsync(uri, content); // This is important contentString = await response.Content.ReadAsStringAsync(); } } return contentString; } |
The ProcessRequest method is very simple—all it does is invoke the MakeRequest method from within an anonymous async function that gets called by Task.Run. This done so the MakeRequest code doesn’t block execution of the other code in the program.
The MakeRequest method is the one that invokes the API. It does that by creating an HttpClient instance, to which cSubscriptionKey is passed as a header parameter of the HTTP request.
Then, if the actual file to moderate exists on disk (File.Exists(image)), and the URL (uri) of the request and contentType are not empty, the content of the file is sent to the API to be processed.
That content is first deserialized as an array of bytes (byte[]), which is what GetAsByteArray returns. That array of bytes is then transformed into a ByteArrayContent object, which is easier to submit to the API.
Before the request to the API can be submitted, an instance of MediaTypeHeaderValue must be created by passing contentType as a parameter.
The actual call to the API is performed by invoking the PostAsync method from the client object. This returns an object named response, which has type HttpResponseMessage.
The Content property of the response object is read as a string, and this is done by invoking the ReadAsStringAsync method, which returns the result that’s written to the console as an output—this is what the MakeRequest method returns.
GetAsByteArray and query string methods
Now, let’s have a look at the other methods that are responsible for enabling the call to the API, which we can see as follows.
Code Listing 2-e: API Access Code—Image and Text Moderation (Program.cs, Part 3)
public static byte[] GetAsByteArray(string filePath) { FileStream fileStream = new FileStream(filePath, FileMode.Open, FileAccess.Read); BinaryReader binaryReader = new BinaryReader(fileStream); return binaryReader.ReadBytes((int)fileStream.Length); } // Specific to the Image API public static string QryStrEvaluateImage(bool cacheImage) { NameValueCollection queryString = HttpUtility.ParseQueryString(string.Empty); queryString["CacheImage"] = cacheImage.ToString(); return cEndpoint + cModerate + cImageApi + "Evaluate?" + queryString.ToString().ToLower(); } // Specific to the Text API public static string QryStrScreenText(bool autoCorrect, bool pii, string listId, bool classify, string language) { NameValueCollection queryString = HttpUtility.ParseQueryString(string.Empty); queryString["autocorrect"] = autoCorrect.ToString().ToLower(); queryString["PII"] = pii.ToString().ToLower();
if (listId != string.Empty) queryString["listId"] = listId; queryString["classify"] = classify.ToString().ToLower();
if (language != string.Empty) queryString["language"] = language; return cEndpoint + cModerate + cTextApi + "Screen?" + queryString.ToString(); } |
The GetAsByteArray method reads the file that gets sent to the API as a FileStream object, which gets passed to a BinaryReader instance, and the containing bytes are read using the ReadBytes method.
The QryStrEvaluateImage method is specifically for working with images, and its purpose is to create a query string that gets passed to the API that is suitable for processing images. It adds the CacheImage parameter and uses the API’s Evaluate method.
The following is how the full URL to the API call would look, once the QryStrEvaluateImage method has been invoked:
https://{endpoint}/contentmoderator/moderate/v1.0/ProcessImage/Evaluate[?CacheImage]
Essentially, this is what the URL that invokes the API that performs image moderation looks like.
The QryStrScreenText method, on the other hand, is specifically for working with text. Its purpose is to create a query string that gets passed to the API that is suitable for processing text, which it’s able to do by calling the Screen API method.
It uses several parameters that are not used by the QryStrEvaluateImage method, such as:
- Autocorrect: Used for automatically correcting misspelled words, when set to true.
- PII: Used for detecting personally identifiable information, when set to true.
- listId: Represents a list of words to be used for matching.
- classify: Enables text classification.
- language: Indicates the language to detect within the text; if nothing is specified, it defaults to English.
For text moderation, the URL would look like this once the QryStrScreenText method has been invoked:
https://{endpoint}/contentmoderator/moderate/v1.0/ProcessText/Screen[?autocorrect][&PII][&listId][&classify][&language]
Writing the results
The final part of the code focuses on writing to the console the results returned by the calls to the API. It does this by invoking the JsonPrettyPrint method.
Code Listing 2-f: API Access Code—Image and Text Moderation (Program.cs, Part 4)
public static string JsonPrettyPrint(string json) { if (string.IsNullOrEmpty(json)) return string.Empty; json = json.Replace(Environment.NewLine, "").Replace("\t", ""); StringBuilder sb = new StringBuilder(); bool quote = false; bool ignore = false; int offset = 0; int indentLength = 3; foreach (char ch in json) { switch (ch) { case '"': if (!ignore) quote = !quote; break; case '\'': if (quote) ignore = !ignore; break; } if (quote) sb.Append(ch); else { switch (ch) { case '{': case '[': sb.Append(ch); sb.Append(Environment.NewLine); sb.Append(new string(' ', ++offset * indentLength)); break; case '}': case ']': sb.Append(Environment.NewLine); sb.Append(new string(' ', --offset * indentLength)); sb.Append(ch); break; case ',': sb.Append(ch); sb.Append(Environment.NewLine); sb.Append(new string(' ', offset * indentLength)); break; case ':': sb.Append(ch); sb.Append(' '); break; default: if (ch != ' ') sb.Append(ch); break; } } } return sb.ToString().Trim(); } |
In order to understand the value that this method adds to our application, it is important to look at how the results would appear if this method is not used. Let's see how the results are displayed when JsonPrettyPrint is not used.
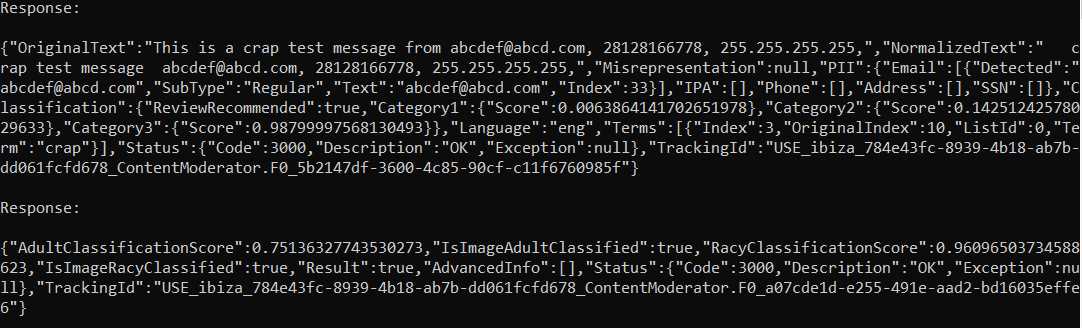
Figure 2-m: Console Output Results (without JsonPrettyPrint)
Note: If you would like to try this yourself, all you need to do is replace Console.WriteLine(JsonPrettyPrint(res)); with Console.WriteLine(res); within the ProcessRequest method.
As you have seen, the results are not very readable, which is the main reason why JsonPrettyPrint is used.
Since the JsonPrettyPrint method is not really part of the Content Moderator set of APIs and functionality, let’s go over it very quickly.
Given that the result returned by the API is in JSON format, which tends to be quite long, we need to have a string that can accommodate the result. We can achieve this by creating an instance of the StringBuilder class.
We loop over each character within the JSON result, which is done with the following code: foreach (char ch in json). Each character is appended to the StringBuilder class, with enough indentation (indentLength) and offset such that when the resultant string is written, it is displayed nicely.
That’s it—this is how Content Moderator can be used to allow your application to make better decisions regarding the content it processes.
I’d recommend running this application with other images and text and check the results it returns. You’ll have a ton of fun and learn a lot by checking the resultant patterns.
Summary
Content Moderator APIs allow you to infuse your apps with AI-powered decision-making capabilities easily and quickly.
There are two other Cognitive Services that are related to decision-making and are definitely worth exploring: Anomaly Detector and Personalizer. We won’t be covering them in this book, but if these are AI topics that excite you, I suggest you explore them a bit.
If you feel inclined to play with either of them, I’m sure you’ll have a lot of fun and also be impressed with their ease of use, accuracy, and sophistication.
- 1800+ high-performance UI components.
- Includes popular controls such as Grid, Chart, Scheduler, and more.
- 24x5 unlimited support by developers.