
Azure Bot Service Succinctly®

CHAPTER 2
Composer Bot Basics
Overview
In the preceding chapter, we explored how to install Node.js and Composer and saw how straightforward that process was.
In this chapter, we will use Composer to create a zip code bot using a third-party API, which will give us some insights about zip code locations.
You might find some similarities between the steps and scenarios involved and those available in the Composer documentation quickstart and tutorials (to maintain consistency with the official docs); however, we'll dive deeper into details than those resources do.
This will be an exciting and fun project—so without further ado, let's get started.
Composer UI
First, let's get acquainted with the Composer UI to understand which components make up this product's user interface.

Figure 2-a: Composer's Main Screen (Source: Microsoft)
The Composer UI components highlighted in the preceding figure are the ones that we will be primarily using throughout this book. These elements make up the following four main sections, most commonly known as panes:
- The navigation pane: This is the main section that contains Composer's main options and features.
- The bot explorer: This section displays the elements that make up your bot projects, such as dialogs, triggers, intents, and other bot-specific items.
- The authoring canvas: This section is where the bot's logic resides, and it contains all the actions associated with a selected trigger.
- The properties pane: This area is where you can set the properties for specific actions, such as sending or receiving an external request, or requesting input from the user.
There is also a title bar containing the application's name and a menu bar that you can use to start the execution of a bot, access your account settings, or view application alerts.
As you can see, the UI is self-descriptive and easy to navigate.
Zipcodebase
To create our zip code bot, we first need to sign up for an external third-party API called Zipcodebase that will give us access to a database of zip code information worldwide.
Note: We'll be using the Zipcodebase service; however, this is independent of Composer, and you could use any other zip code API or service provider.

Figure 2-b: Zipcodebase Website
To get started, click either the FREE PLAN or the REGISTER button—this will take you to a screen similar to the following one.

Figure 2-c: Zipcodebase Website – Choosing a Subscription
Make sure the free plan is selected and then scroll to the bottom of the page to fill in the details requested.

Figure 2-d: Zipcodebase Website – Creating a Profile
After you have registered for the service, you might be prompted to verify your email. Check your email and verify it so you can start to use the service.
After verifying your email address, log in to Zipcodebase to get your API key. You should see the following.

Figure 2-e: Zipcodebase Dashboard – API Key
Make sure you copy the API key to the clipboard.
We are now ready to create an empty bot using Composer.
Creating an empty bot
We are going to develop our zip code bot from scratch. Open Composer and click + Create new.

Figure 2-f: Composer Main Screen – Create new Button
A screen similar to the following one will appear. Here you can select the bot template to use.

Figure 2-g: Composer – Select a template Screen
Let's select the Empty Bot template for C# and then click Next. After doing that, you will see a screen similar to the following one.

Figure 2-h: Composer – Create a bot project Screen
I've called the project ZipcodeBot, set the Runtime type to Azure Web App (you can also choose Azure Functions), and set the location to a local folder on my machine (feel free to select a different folder). After you’ve specified these fields, click Create.
Composer will download the bot template, build the runtime, and merge packages—this might take a few seconds or up to a couple of minutes. Afterward, you will see the created bot.
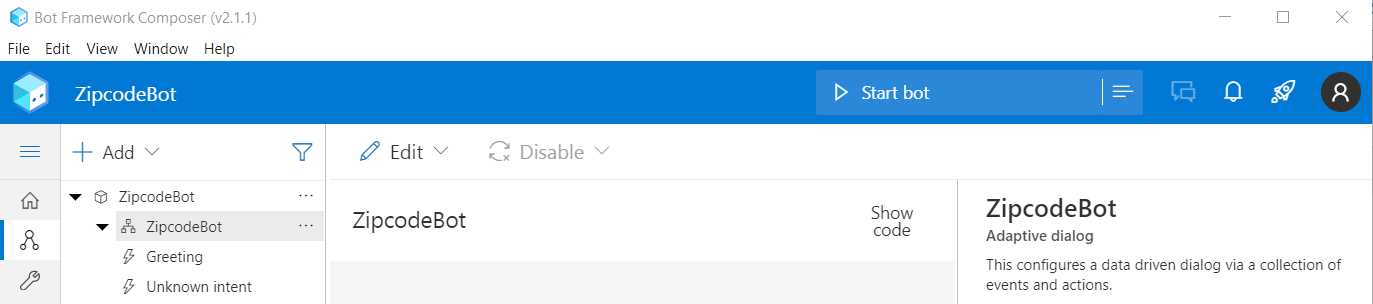
Figure 2-i: Composer – ZipcodeBot Created
Here we can see that we have an empty bot with a dialog called ZipcodeBot, and under that, there are two triggers (indicated by lightning icons): one called Greeting and another called Unknown intent.
The Greeting intent executes when the user connects to the bot, sending the user a greeting. On the other hand, the Unknown intent runs when the user sends a message, or the bot cannot recognize the user's request. In that case, the bot responds to the user, indicating that it cannot understand the user request.
To start giving our bot some personality, the first thing we need to do is change the Greeting intent. To do that, let's click the Greeting intent under ZipcodeBot, and then click the Send a response action.

Figure 2-j: Composer – Send a response Action Selected
Then, in the properties pane, find the Bot responses section and choose Welcome to your bot. After doing that, you'll be able to edit the intended response.

Figure 2-k: Composer – Editing a Bot Response
I'll type the following message: Welcome to ZipcodeBot. Please type the word 'zip' to start. However, you can customize this to your taste.
First-time bot execution
Let's run our bot for the first time. To do that, click the Start bot button found just below the menu bar.
![]()
Figure 2-l: Composer (Start bot Button)
Once the bot has successfully executed, you will see a dialog dropdown similar to the following.

Figure 2-m: Composer – Local bot runtime manager
Next, let's click the Open Web Chat option highlighted in Figure 2-m. After doing that, you will see the web chat to interact with the bot.

Figure 2-n: Composer – ZipcodeBot Web Chat
To test the bot, type the word zip, which will cause the bot to respond with the following message.

Figure 2-o: Composer – ZipcodeBot Web Chat – Response
As expected, the bot responds that it doesn't understand the intent provided because we haven't programmed this logic yet.
Now that we have executed the bot for the first time, let's stop its execution, which you can do by clicking on the stop icon highlighted in the following figure.
![]()
Figure 2-p: Composer – Stop Bot Icon
Clicking that will stop the execution of the bot and make it inactive until it executes again.
Adding a dialog
Bots consist of various components, and some of the most important are dialogs. In other words, most bots are structured as a sequence of dialogs.
A dialog includes specific bot functionality, such as asking the user for a response, sending a reply, or making a request to an API.
Let's create a dialog that can get a zip code from the user. Within Composer's bot explorer pane, select the ZipcodeBot top-level element. Next, click the ellipsis (…), and then the + Add a dialog menu item.

Figure 2-q: Composer – Add a dialog Menu Item
The Create a dialog window will appear. Here we can enter a name and description. I'll call this dialog get_zip, but you can call it something else.

Figure 2-r: Composer – Create a dialog Window
After entering those values, click OK. After that, you will see the get_zip dialog within the bot explorer pane.

Figure 2-s: Composer – Bot Explorer – get_zip Dialog
To continue, click BeginDialog, and then go to the authoring canvas to the right of the bot explorer.

Figure 2-t: Composer – Authoring Canvas – BeginDialog
Under BeginDialog, click the + button and click on the Send a response menu item in the authoring canvas.

Figure 2-u: Composer – BeginDialog – Send a response
Under Bot responses, let's type the following text: Let's check a zip code. What we have done is created a dialog called get_zip, and this dialog has a trigger called BeginDialog, and this trigger has an action called Send a response—which we can visualize as follows.

Figure 2-v: Dialog – Trigger – Action
The action, in this case, is the response that is sent to users when the get_zip dialog activates.
Tip: To be able to test this new dialog, it is necessary to have a trigger in ZipcodeBot—this will allow you to start the get_zip dialog.
Summary
We have taken the initial steps to create a bot, added some basic functionality, and explored Composer's UI characteristics throughout this chapter.
The cool thing is that nothing we have done and looked at has involved writing any code so far.
In the following chapter, we will continue to expand the bot's functionality by initially executing this dialog from a trigger.
- 1800+ high-performance UI components.
- Includes popular controls such as Grid, Chart, Scheduler, and more.
- 24x5 unlimited support by developers.