
Azure Bot Service Succinctly®

CHAPTER 6
Bot Code Structure
Overview
Composer does a lot for us. It acts as an abstraction layer that hides all the underlying code required to create and execute a bot.
Next, we will explore the bot project structure that Composer has bootstrapped and created for us.
Locating the project
If you have Composer running, close and reopen it to locate the folder where Composer has created the bot code. When Composer opens, you will see the name of your bot project and the location on the disk where the project resides.

Figure 6-a: Composer – Welcome Screen – Location of the Bot Project
Let's navigate to the project's folder (Location) and look at what Composer has created.
Project folder structure
Within the bot project folder, we can find a Visual Studio solution file called ZipcodeBot.sln. We can open it with the latest version of Visual Studio (in my case, the 2019 Community Edition).

Figure 6-b: Bot Folder Structure and Content
Double-click the ZipcodeBot.sln file to open it. Once it is open, go to Solution Explorer to look at the project structure and files.
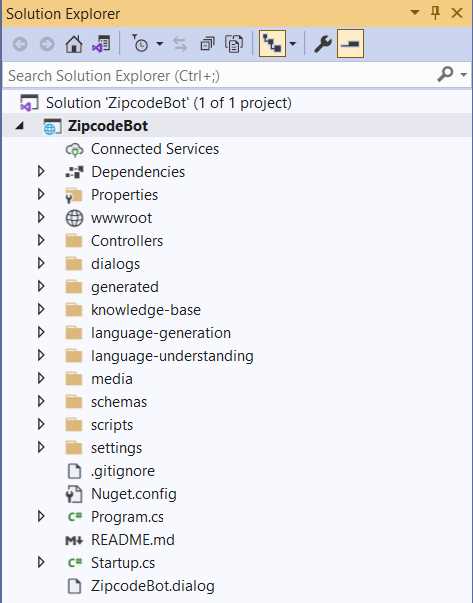
Figure 6-c: Bot Project Structure (Visual Studio)
As we can see, the ZipcodeBot project contains many folders, each with many files. If we had to create this project structure manually, this would be a significant task; however, Composer took care of this without us noticing.
We won't go through all the details or look at every folder and file. Let's just look at the most critical folders and files.

Figure 6-d: Bot Project Structure – Most Important Folders and Files
One of the critical elements of the bot is the controller. The controller—in this case, BotController.cs—is the core engine for processing bot requests to the appropriate route. Let's look at this file.
Code Listing 6-a: BotController.cs
using System; using System.Collections.Generic; using System.Linq; using System.Threading.Tasks; using Microsoft.AspNetCore.Mvc; using Microsoft.Bot.Builder; using Microsoft.Bot.Builder.Dialogs.Adaptive.Runtime.Settings; using Microsoft.Bot.Builder.Integration.AspNet.Core; using Microsoft.Extensions.Configuration; using Microsoft.Extensions.Logging; namespace ZipcodeBot.Controllers { [ApiController] public class BotController : ControllerBase { private readonly Dictionary<string, IBotFrameworkHttpAdapter> _adapters = new Dictionary<string, IBotFrameworkHttpAdapter>(); private readonly IBot _bot; private readonly ILogger<BotController> _logger; public BotController( IConfiguration configuration, IEnumerable<IBotFrameworkHttpAdapter> adapters, IBot bot, ILogger<BotController> logger) { _bot = bot ?? throw new ArgumentNullException(nameof(bot)); _logger = logger; var adapterSettings = configuration.GetSection( AdapterSettings.AdapterSettingsKey). Get<List<AdapterSettings>>() ?? new List<AdapterSettings>(); adapterSettings.Add(AdapterSettings.CoreBotAdapterSettings); foreach (var adapter in adapters ?? throw new ArgumentNullException(nameof(adapters))) { var settings = adapterSettings.FirstOrDefault( s => s.Enabled && s.Type == adapter.GetType().FullName); if (settings != null) { _adapters.Add(settings.Route, adapter); } } } [HttpPost] [HttpGet] [Route("api/{route}")] public async Task PostAsync(string route) { if (string.IsNullOrEmpty(route)) { _logger.LogError($"PostAsync: No route provided."); throw new ArgumentNullException(nameof(route)); } if (_adapters.TryGetValue(route, out IBotFrameworkHttpAdapter adapter)) { if (_logger.IsEnabled(LogLevel.Debug)) { _logger.LogInformation($"PostAsync: routed '{route}' to {adapter.GetType().Name}"); } // Delegating the processing of the HTTP POST to the // appropriate adapter. // The adapter will invoke the bot. await adapter.ProcessAsync(Request, Response, _bot).ConfigureAwait(false); } else { _logger.LogError($"PostAsync: No adapter registered and enabled for route {route}."); throw new KeyNotFoundException($"No adapter registered and enabled for route {route}."); } } } } |
Without delving into specific details, the BotController.cs code has two main functionalities. The first is to initialize BotFrameworkHttpAdapter adapters—this occurs within the BotController constructor.
The second functionality is to route incoming requests, which the Postasync method does, by delegating the HTTP request processing to the appropriate adapter.
ZipcodeBot dialog
In Solution Explorer, scroll down, and there you'll find the ZipcodeBot.dialog file, which contains the bot's main logic and rules.
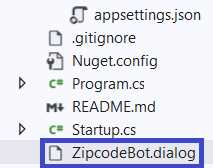
Figure 6-e: The Project Root Files
Behind the scenes, the ZipcodeBot.dialog file loads when the bot executes, and this file contains all the main settings that the bot uses to establish the conversation with the user. Let's inspect the contents of this file.
Code Listing 6-b: ZipcodeBot.dialog
{ "$kind": "Microsoft.AdaptiveDialog", "$designer": { "name": "ZipcodeBot", "description": "", "id": "A79tBe" }, "autoEndDialog": true, "defaultResultProperty": "dialog.result", "triggers": [ { "$kind": "Microsoft.OnConversationUpdateActivity", "$designer": { "id": "376720" }, "actions": [ { "$kind": "Microsoft.Foreach", "$designer": { "id": "518944", "name": "Loop: for each item" }, "itemsProperty": "turn.Activity.membersAdded", "actions": [ { "$kind": "Microsoft.IfCondition", "$designer": { "id": "641773", "name": "Branch: if/else" }, "condition": "string(dialog.foreach.value.id) != string(turn.Activity.Recipient.id)", "actions": [ { "$kind": "Microsoft.SendActivity", "$designer": { "id": "859266", "name": "Send a response" }, "activity": "${SendActivity_Greeting()}" } ] } ] } ] }, { "$kind": "Microsoft.OnUnknownIntent", "$designer": { "id": "mb2n1u" }, "actions": [ { "$kind": "Microsoft.SendActivity", "$designer": { "id": "kMjqz1" }, "activity": "${SendActivity_DidNotUnderstand()}" } ] }, { "$kind": "Microsoft.OnIntent", "$designer": { "id": "d5ER8p", "name": "zip" }, "intent": "zip", "actions": [ { "$kind": "Microsoft.BeginDialog", "$designer": { "id": "uvw6RC" }, "activityProcessed": true, "dialog": "get_zip" } ] }, { "$kind": "Microsoft.OnIntent", "$designer": { "id": "RkkXZi", "name": "cancel" }, "intent": "cancel", "actions": [ { "$kind": "Microsoft.BeginDialog", "$designer": { "id": "KM4gcW" }, "activityProcessed": true, "dialog": "CancelDialog" } ] } ], "generator": "ZipcodeBot.lg", "id": "ZipcodeBot", "recognizer": { "$kind": "Microsoft.RegexRecognizer", "intents": [ { "intent": "zip", "pattern": "zip" }, { "intent": "cancel", "pattern": "stop|quit|cancel" } ] } } |
Essentially, we can see that most of the dialog details we created using Composer are here. Notice that in one of the actions, there's a reference to the get_zip dialog. There are references to the Branch: if/else and also the cancel dialog.
The get_zip dialog
Going back to Solution Explorer, double-click the get_zip file to open and inspect it.
Code Listing 6-c: get_zip.dialog
{ "$kind": "Microsoft.AdaptiveDialog", "$designer": { "id": "dBaQjz", "name": "get_zip", "comment": "Get the zip code" }, "autoEndDialog": true, "defaultResultProperty": "dialog.result", "triggers": [ { "$kind": "Microsoft.OnBeginDialog", "$designer": { "name": "BeginDialog", "description": "", "id": "pCF5nd" }, "actions": [ { "$kind": "Microsoft.SendActivity", "$designer": { "id": "J7llQd" }, "activity": "${SendActivity_J7llQd()}" }, { "$kind": "Microsoft.TextInput", "$designer": { "id": "qJM9qX" }, "disabled": false, "maxTurnCount": 3, "alwaysPrompt": false, "allowInterruptions": true, "prompt": "${TextInput_Prompt_qJM9qX()}", "unrecognizedPrompt": "${TextInput_UnrecognizedPrompt_qJM9qX()}", "property": "user.zip", "outputFormat": "=trim(this.value)", "validations": [ "=length(this.value) == 5" ], "invalidPrompt": "${TextInput_InvalidPrompt_qJM9qX()}", "defaultValue": "33165" }, { "$kind": "Microsoft.HttpRequest", "$designer": { "id": "itxd2e" }, "method": "GET", "url": "https://app.zipcodebase.com/api/v1/search? apikey=03b1edc0-2883-11ec-8073-777a767aae15 &codes=${user.zip}&country=US", "headers": {}, "resultProperty": "dialog.api_response", "responseType": "json" }, { "$kind": "Microsoft.IfCondition", "$designer": { "id": "kOFBrL" }, "condition": "=dialog.api_response.statusCode == 200", "actions": [ { "$kind": "Microsoft.SetProperties", "$designer": { "id": "KhWRrn" }, "assignments": [ { "property": "dialog.postal_code", "value": "=dialog.api_response.content. results[user.zip][0]['postal_code']" }, { "value": "=dialog.api_response.content. results[user.zip][0]['country_code']", "property": "dialog.country_code" }, { "value": "=dialog.api_response.content. results[user.zip][0]['latitude'] ", "property": "dialog.latitude" }, { "value": "=dialog.api_response.content. results[user.zip][0]['longitude']", "property": "dialog.longitude" }, { "value": "=dialog.api_response.content. results[user.zip][0]['city']", "property": "dialog.city" }, { "value": "=dialog.api_response.content. results[user.zip][0]['state']", "property": "dialog.state" }, { "value": "=dialog.api_response.content. results[user.zip][0]['city_en']", "property": "dialog.city_en" }, { "value": "=dialog.api_response.content. results[user.zip][0]['state_en']", "property": "dialog.state_en" }, { "value": "=dialog.api_response.content. results[user.zip][0]['state_code']", "property": "dialog.state_code" }, { "value": "=dialog.api_response.content. results[user.zip][0]['province']", "property": "dialog.province" }, { "value": "=dialog.api_response.content. results[user.zip][0]['province_code']", "property": "dialog.province_code" } ] }, { "$kind": "Microsoft.SendActivity", "$designer": { "id": "Qmqx7A" }, "activity": "${SendActivity_Qmqx7A()}" } ], "elseActions": [ { "$kind": "Microsoft.SendActivity", "$designer": { "id": "tFVM0T" }, "activity": "${SendActivity_tFVM0T()}" }, { "$kind": "Microsoft.DeleteProperty", "$designer": { "id": "NSO8CP" }, "property": "user.zip" } ] } ] } ], "generator": "get_zip.lg", "recognizer": "get_zip.lu.qna", "id": "get_zip" } |
As you might have noticed, the highlights of this file are the HTTP request to the Zipcodebase API and the property assignments from the results obtained from the API.
Although this file is easy to read, its beauty is that Composer has abstracted the creation of this definition file by providing us with a pleasant and easy-to-use UI.
appsettings.json
Another important file for the bot to function correctly is appsettings.json. This file contains settings and definitions on how the project executes. Within Solution Explorer, under the settings folder, double-click the file to open it.
The most critical section is the runtime part, and as you will see in the listing that follows, it contains instructions on how to execute the project using the .NET Core run command.
You can verify this by right-clicking ZipcodeBot within Solution Explorer, then clicking Properties.
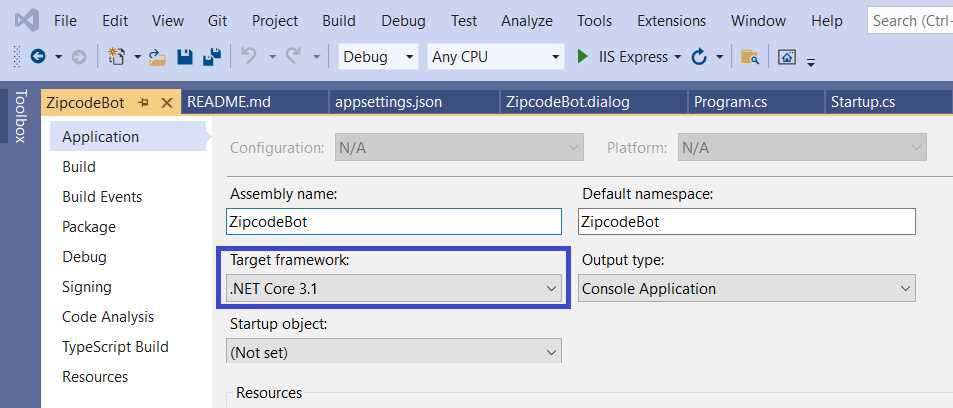
Figure 6-f: ZipcodeBot Properties – Visual Studio
Here is the code for appSettings.json.
Code Listing 6-d: appsettings.json
{ "customFunctions": [], "defaultLanguage": "en-us", "defaultLocale": "en-us", "importedLibraries": [], "languages": [ "en-us" ], "Logging": { "LogLevel": { "Default": "Information", "Microsoft": "Warning", "Microsoft.Hosting.Lifetime": "Information" } }, "luFeatures": { "enableCompositeEntities": true, "enableListEntities": true, "enableMLEntities": true, "enablePattern": true, "enablePhraseLists": true, "enablePrebuiltEntities": true, "enableRegexEntities": true }, "luis": { "authoringEndpoint": "", "authoringRegion": "", "defaultLanguage": "en-us", "endpoint": "", "environment": "composer", "name": "ZipcodeBot" }, "MicrosoftAppId": "", "publishTargets": [], "qna": { "hostname": "", "knowledgebaseid": "", "qnaRegion": "westus" }, "runtime": { "command": "dotnet run --project ZipcodeBot.csproj", "customRuntime": true, "key": "adaptive-runtime-dotnet-webapp", "path": "../" }, "runtimeSettings": { "adapters": [], "features": { "removeRecipientMentions": false, "showTyping": false, "traceTranscript": false, "useInspection": false, "setSpeak": { "voiceFontName": "en-US-JennyNeural", "fallbackToTextForSpeechIfEmpty": true } }, "components": [], "skills": { "allowedCallers": [] }, "storage": "", "telemetry": { "logActivities": true, "logPersonalInformation": false, "options": { "connectionString": "" } } }, "skillConfiguration": {}, "skillHostEndpoint": "http://localhost:3980/api/skills" } |
Summary
These .dialog files are the essence of the bot and contain its core logic. The C# code-behind then parses the content of both files and executes the bot.
Now that we understand what lies behind the scenes, we are ready to publish our bot to the Azure Bot Service, which we'll do in the next and final chapter.
- 1800+ high-performance UI components.
- Includes popular controls such as Grid, Chart, Scheduler, and more.
- 24x5 unlimited support by developers.