
Azure AI Services Succinctly®

CHAPTER 7
Azure AI Translator
Microsoft Azure AI Translator is a powerful, cloud-based machine translation service that enables businesses and developers to integrate multilingual translation capabilities into their applications, websites, and business workflows. This chapter describes Azure AI Translator, explaining the available services and providing different code examples.
Tip: The Azure AI Translator service supports many languages, represented by language codes. The full list of languages and their codes is available in the documentation. In this chapter, only the language codes that are relevant for the code examples will be explained.
Introducing Azure AI Translator
The Azure AI Translator service offers a wide range of features for text and document translation in real-time or batch processes. It supports numerous languages and allows for both generic and specialized translation scenarios, such as translating conversational text, technical documents, or entire websites. The service leverages advanced neural machine translation models that continuously improve, providing high-quality translations with better contextual understanding. The service is divided into two main offerings:
· Text translation: This is ideal for real-time scenarios where small text inputs need to be translated quickly and efficiently. It supports features such as transliteration (converting text from one script to another) and dictionary lookup (offering multiple translation options for individual words or phrases). Text translation is suitable for applications like live chat, email translation, and translating short text blocks on websites. This subservice is designed for speed and performance, making it a preferred choice for dynamic content.
· Document translation: This is designed to handle more complex translation scenarios involving entire files or sets of files. It supports a variety of formats, including Word documents, Excel spreadsheets, PowerPoint presentations, and PDFs. This subservice preserves the original document's structure, formatting, and layout during translation, making it ideal for legal contracts, research papers, and marketing materials. It operates on a batch processing model, where files are uploaded to Azure Blob Storage, and then processed in bulk. This makes it suitable for enterprise applications where large volumes of documents need to be translated efficiently.
Azure AI Translator can be accessed through REST APIs, SDKs (like in the case of this ebook), and integrations with other Microsoft products. It offers deployment flexibility with options for cloud-based use and containerization for on-premises environments. Azure AI Translator’s capabilities are designed to address various use cases, from simple text translation to handling complex documents requiring contextual translation. The service has a robust infrastructure that enables developers to build multilingual applications for diverse audiences. The primary deployment models include cloud-based translation, where all processes are handled on Azure's infrastructure, and containerized translation, allowing for local deployment and control. This service also supports the following scenarios:
· Transliteration: This allows converting text from one script to another. For instance, it can convert Arabic script to Latin script, or Devanagari script to Latin script, making the content readable by people who understand the language but use a different script.
· Dictionary Lookup: This feature provides detailed translation options for individual words or short phrases. Instead of translating a full sentence, the dictionary lookup service returns multiple translation options, definitions, and contextual meanings.
· Custom Translator: This allows users to fine-tune Azure's translation models with their own data. This is useful for businesses or applications that need domain-specific terminology, such as in legal, medical, or technical fields.
In the next sections, you will get examples about text and document translations, plus examples about transliteration and dictionary lookup. Custom translators would require an additional publication; for this reason, if you are interested in this topic, the official documentation is a great starting point.
Configuring the Azure resources
Before diving into the code, you need to set up the Azure AI Translator service on the Azure portal. Once logged in, and following the lesson learned in Chapter 3, click AI Services and locate the Translator service. Click Create under the service card and fill out the necessary details, such as subscription, resource group, and region, as you did for the previous services.
Assign translator-succinctly as the service name for consistency with the current example. If the name is not available, provide one of your choosing. Select the Free pricing tier and click Review + Create. Finally, click Create to deploy the service. Once the service is deployed, click Go to resource and retrieve your API key and endpoint URL, which will be required for the code examples.
Note: For the Azure AI Translator service, you will see two endpoints: one with a common URL that should be used for text translation, and one with a custom name, which should be used for document translation. However, using the common URL for text translation will result in a “Forbidden” error. You will then need to use the custom endpoint also for this scenario.
Actually, you will also need to set up an Azure Blob Storage account for the example about document translation, but this will be explained in the appropriate section.
Sample application: text translation
The goal of the first example is demonstrating how to translate text from English to Spanish using Azure AI Translator’s Text Translation service. For this particular scenario, it is enough to create a Console application.
Start VS Code and open a new instance of the Terminal. Then, type the following commands to create a new Console app inside the root folder for the ebook examples:
> md \AIServices\TextTranslationApp
> cd \AIServices\TextTranslationApp
> dotnet new console
> dotnet add package Azure.AI.Translation.Text
The last command installs the Azure.AI.Translation.Text NuGet package, a library from the Azure SDK that provides interaction with the Azure AI Translation service from .NET code. When ready, write the code shown in Code Listing 10 (comments will follow shortly).
Code Listing 10
using Azure.AI.Translation.Text; using Azure;
class Program { private static readonly string endpoint = "your-endpoint"; private static readonly string apiKey = "your-api-key";
static async Task Main(string[] args) { var client = new TextTranslationClient( new AzureKeyCredential(apiKey), new Uri(endpoint));
Console.WriteLine("Enter text to translate:"); string inputText = Console.ReadLine();
var response = await client.TranslateAsync("es", inputText);
foreach (TranslatedTextItem translation in response.Value) { Console.WriteLine( $"Detected languages of the input text: {translation?.DetectedLanguage?.Language} with score: {translation?.DetectedLanguage?.Confidence}.");
Console.WriteLine( $"Text was translated to: '{translation?. Translations?.FirstOrDefault().TargetLanguage}' and the result is: '{translation?.Translations?. FirstOrDefault()?.Text}'."); } } } |
Understanding the code should be quite simple. The TextTranslationClient class allows for interacting with Azure AI Translator's Text Translation API. You still pass an instance of the AzureKeyCredential class to provide authentication via the API key.
The TranslateAsync method translates text from one language to another; the first argument is the target language, whereas the second argument is the input text. The return type is an object of type Response<IReadOnlyCollection<TranslatedTextItem>>, and the actual collection is stored inside the Value property. Each item in the collection is a TranslatedTextItem object, which exposes the Translations property.
This is an IReadOnlyList<TranslationText> interface, and the TranslationText class actually contains the translated text and the detected language with the level of confidence. For simple translations like in the current example, it is sufficient to retrieve the string contained in the Text property of the first element in the collection.
It is worth mentioning that you are not limited to one language. In fact, the TranslateAsync method offers an overload that takes an object of type TextTranslationTranslateOptions as an argument. That allows for specifying multiple languages and multiple strings to be translated. Following is an example that translates a string into Czech, Spanish, and German:
TextTranslationTranslateOptions options =
new TextTranslationTranslateOptions(
targetLanguages: new[] { "cs", "es", "de" },
content: new[] { inputText });
var response = await client.TranslateAsync(options);
You can then iterate the result like you did previously to get the translation for each language, and you can pass multiple strings to the content named parameter.
Running the application
When you run a Console application in VS Code in debug mode, both the debugger output and the application result are shown in the DEBUG CONSOLE panel. This might create confusion, especially if the app is expecting input. For this reason, for this particular example, open an instance of the Terminal and run the application without the debugger, typing the following command:
> dotnet run
This will first build and then run the application in a clean Terminal window. Obviously, you will still be able to press F5 and start debugging if something is not working as expected. Type in some text in English and press Enter. After a few milliseconds, you will get the Spanish translation, as shown in Figure 24.
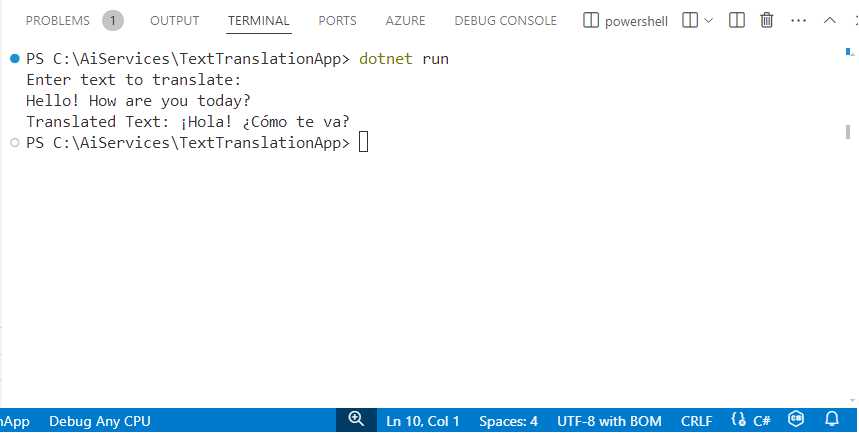
Figure 24: Text translation with Azure AI Translator
It is easy to understand the potential of this service, which can translate complex sentences from one language to another in milliseconds.
Sample application: transliteration
As mentioned at the beginning of this chapter, transliteration is the process of converting text from one script to another. Converting Arabic script to Latin script, or Devanagari script to Latin script, are examples of transliteration. This allows for making the content readable by people who understand the language but use a different script.
Now, use the well-known commands to create a new Console app called TextTransliterationApp and install the Azure.AI.Translation.Text NuGet package as you did for the first example. The goal of this example is transliterating text from Vietnamese script to Latin script using the Azure AI Translator service.
Note: To avoid mistakes due to language knowledge, the source script has been taken from the official Microsoft documentation.
To accomplish this, write the code shown in Code Listing 11. As usual, explanations will follow shortly.
Code Listing 11
using Azure.AI.Translation.Text; using Azure;
class Program { private static readonly string endpoint = "your-endpoint"; private static readonly string apiKey = "your-api-key";
static async Task Main(string[] args) { Console.OutputEncoding = System.Text.Encoding.UTF8;
var client = new TextTranslationClient( new AzureKeyCredential(apiKey), new Uri(endpoint));
// Vietnamese text taken from the MS documentation // Translates to "This is the problem" as per Google Translator. string inputText = "这是个测试。";
Response<IReadOnlyList<TransliteratedText>> response = await client.TransliterateAsync(language: "zh-Hans", fromScript: "Hans", toScript: "Latn", inputText); IReadOnlyList<TransliteratedText> transliterations = response.Value; TransliteratedText transliteration = transliterations.FirstOrDefault(); Console.WriteLine($"Transliterated Text: " + $"{transliteration.Text}"); Console.ReadLine(); } } |
The approach is very similar to what you saw for text translation. The TextTranslationClient class allows for interacting with Azure AI Translator's Text Translation API. You still pass an instance of the AzureKeyCredential class to provide authentication via the API key. The TransliterateAsync method transliterates from one script to another; the first argument is the source language, the second argument is the source script, the third argument is the target script, and the fourth argument is the input text.
The return type is an object of type Response<IReadOnlyCollection<TransliteratedText>>, and the actual collection is stored inside the Value property. For simple transliterations like in the current example, it is sufficient to retrieve the string contained in the Text property of the first element in the collection. For this scenario, as well as for text translation, you are not limited to one language and script. In fact, the TransliterateAsync method offers an overload that takes an object of type TextTranslationTransliterateOptions as an argument and that allows for specifying multiple strings to be transliterated. Following is an example:
TextTranslationTransliterateOptions options =
new TextTranslationTransliterateOptions(language: "zh-Hans",
fromScript: "Hans",
toScript: "Latn",
new string[] { inputText });
var transliteration = await client.TransliterateAsync(options);
You can then parse the result like you did previously to get the transliteration targets.
Tip: Notice how the code assigns the UTF-8 encoding to the console output. This ensures that text coming from other scripts is formatted properly.
Running the application
With the same purpose of avoiding confusion in the output panel as the first example, open an instance of the Terminal and run the application without the debugger, typing the following command:
> dotnet run
This will first build and then run the application in a clean Terminal window. You can always press F5 and start debugging if something is not working. The text to be transliterated is hard-coded, so you will directly get the result shown in Figure 25.
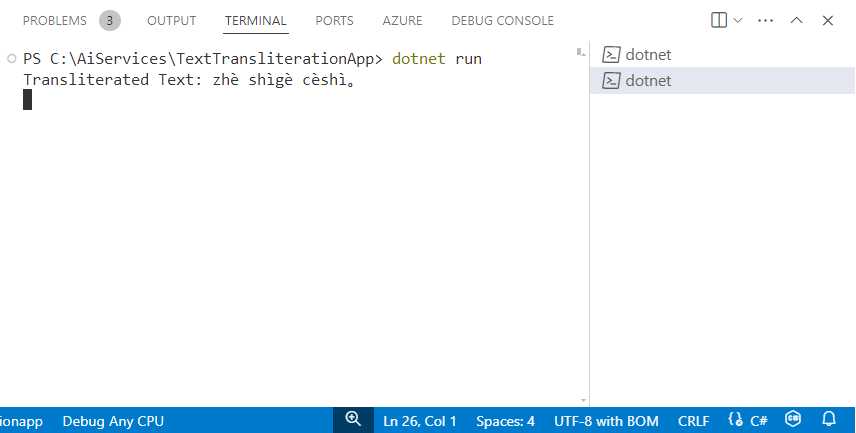
Figure 25: Text transliteration with Azure AI Translator
This is another very powerful feature, because it allows people with different linguistic backgrounds to better understand the context of a written conversation.
Sample application: dictionary lookup
At the beginning of this chapter, we mentioned that dictionary lookup is a feature that provides detailed translation options for individual words or short phrases. This feature is designed to provide these detailed translations along with example sentences and multiple translation options instead of translating a full sentence. The dictionary lookup is made of two parts: entry search, which allows for finding entries related to the given words, and example search, which finds examples based on the retrieved translations.
The goal of the next example is combining both parts by searching the Azure dictionary to find Spanish translations for a single English word and then to find sample sentences based on the most relevant translation. To accomplish this, open a new Terminal instance in VS Code and create a new Console application called DictionaryLookupApp with the following commands:
> md \AIServices\DictionaryLookupApp
> cd \AIServices\DictionaryLookupApp
> dotnet new Console
> dotnet add package Azure.AI.Translation.Text
As you can see, you still install the same NuGet package of the previous examples. When ready, enter the code shown in Code Listing 12, which contains comments and is followed by explanations.
Code Listing 12
using Azure; using Azure.AI.Translation.Text;
class Program { private static readonly string endpoint = "your-endpoint"; private static readonly string apiKey = "your-api-key";
static async Task Main(string[] args) { // Create a client for the Azure AI Translator Text service. var client = new TextTranslationClient( new AzureKeyCredential(apiKey), new Uri(endpoint));
string sourceLanguage = "en"; string targetLanguage = "es"; string inputText = "fly";
// Step 1: Look up dictionary entries for the // given word (from English to Spanish). Response<IReadOnlyList<DictionaryLookupItem>> entriesResponse = await client.LookupDictionaryEntriesAsync(sourceLanguage, targetLanguage, inputText).ConfigureAwait(false); IReadOnlyList<DictionaryLookupItem> dictionaryEntries = entriesResponse.Value; DictionaryLookupItem dictionaryEntry = dictionaryEntries.FirstOrDefault();
if (dictionaryEntry != null && dictionaryEntry.Translations.Any()) { Console.WriteLine($"For the given input '{inputText}', " + $"{dictionaryEntry.Translations.Count} " + $"entries were found in the dictionary.");
// Display the first entry and its confidence. var firstTranslation = dictionaryEntry. Translations.FirstOrDefault(); Console.WriteLine($"First entry: ' {firstTranslation?.DisplayTarget}', " + $"confidence: {firstTranslation?.Confidence}.");
// Step 2: Fetch example sentences for the first translation. IEnumerable<InputTextWithTranslation> inputTextElements = new[] { new InputTextWithTranslation(inputText, firstTranslation.DisplayTarget) };
Response<IReadOnlyList<DictionaryExampleItem>> examplesResponse = await client.LookupDictionaryExamplesAsync( sourceLanguage, targetLanguage, inputTextElements ).ConfigureAwait(false);
IReadOnlyList<DictionaryExampleItem> examples = examplesResponse.Value; DictionaryExampleItem exampleEntry = examples.FirstOrDefault(); if (exampleEntry != null && exampleEntry.Examples.Any()) { Console.WriteLine( $"\nExamples for translation ' {firstTranslation.DisplayTarget}':"); foreach (var example in exampleEntry.Examples) { Console.WriteLine($" - Source: $"{example.SourcePrefix} " + $"{inputText} {example.SourceSuffix}"); Console.WriteLine( $" -> Target: {example.TargetPrefix} " + $"{firstTranslation. DisplayTarget} {example.TargetSuffix}"); } } else { Console.WriteLine("No examples found."); } } else { Console.WriteLine("No translations found."); } Console.ReadLine(); } } |
Following is an explanation of the types and members used in Code Listing 12:
· The TextTranslationClient is the primary class for interacting with the Azure AI Translator service, and it works like in the previous examples, including authentication.
· The LookupDictionaryEntriesAsync method retrieves dictionary entries for a given word or phrase, translating it from one language to another. The method signature includes the following parameters: sourceLanguage, the language code of the input text (e.g., en for English); targetLanguage, the language code of the output text (e.g., es for Spanish); inputText, the word or phrase for which translations are requested. The method returns a Response<IReadOnlyList<DictionaryLookupItem>>, where DictionaryLookupItem contains the possible translations for the input text, along with additional information such as part of speech, confidence scores, and grammatical details. This allows the application to present multiple translation options for the user.
· The DictionaryLookupItem class represents a single dictionary entry returned by the LookupDictionaryEntriesAsync method. Each DictionaryLookupItem exposes the following properties: Translations, a list of possible translations, represented by a TranslationItem object. Each translation includes the translated text, part of speech, and confidence score; DisplaySource, the original word or phrase in the source language; DisplayTarget, the translated word or phrase in the target language. This class is essential for handling and organizing the translation results, which can include multiple translations for a single input word.
· The TranslationItem class represents a single translation within a DictionaryLookupItem. It exposes the following members: DisplayTarget, the translated word or phrase; PosTag, the part of speech of the translated word (such as noun, verb); Confidence, a numerical value indicating the confidence of the translation, typically ranging from 0 to 1. This class allows us to extract and display detailed information about each translation, including linguistic nuances like part of speech and the certainty of the translation.
· The LookupDictionaryExamplesAsync method retrieves example sentences for a given word or phrase, showing how the word is used in context. It requires the following arguments: sourceLanguage, the language code of the input text; targetLanguage, the language code of the translation; inputTextElements, a collection of InputTextWithTranslation elements that contain both the source text and its translation. The method returns a Response<IReadOnlyList<DictionaryExampleItem>>, where each DictionaryExampleItem contains examples of how the word and its translation are used in real sentences. This method helps provide context for the translation, which can be valuable in understanding nuances and proper usage.
· The InputTextWithTranslation class represents a pairing of a source text and its translation. When calling the LookupDictionaryExamplesAsync method, you provide an InputTextWithTranslation for the word you are querying and its corresponding translation. This ensures that the examples are specific to the chosen translation.
· The DictionaryExampleItem class represents a set of example sentences returned by the LookupDictionaryExamplesAsync method. Each DictionaryExampleItem exposes the following properties: Examples, a list of DictionaryExample objects, each representing an individual example sentence; SourcePrefix and SourceSuffix, representing text that appears before and after the target word in the source language; TargetPrefix and TargetSuffix, representing text that appears before and after the target word in the target language.
· The DictionaryExample class represents a single example sentence from the list in DictionaryExampleItem. It exposes the following properties: SourcePrefix, SourceSuffix, TargetPrefix, and TargetSuffix, with the same purpose as described in the previous point. This class allows you to see how a word or phrase is used in context, which can be particularly helpful when learning how to properly use a new language.
Now that you have a clear understanding of the objects used for dictionary lookup, it is time to run the application and see the result of this complex work.
Running the application
With the same purpose of avoiding mixing the debugger output with the application output, run the application by typing dotnet run inside an instance of the Terminal. Figure 26 shows the result of the previous code.
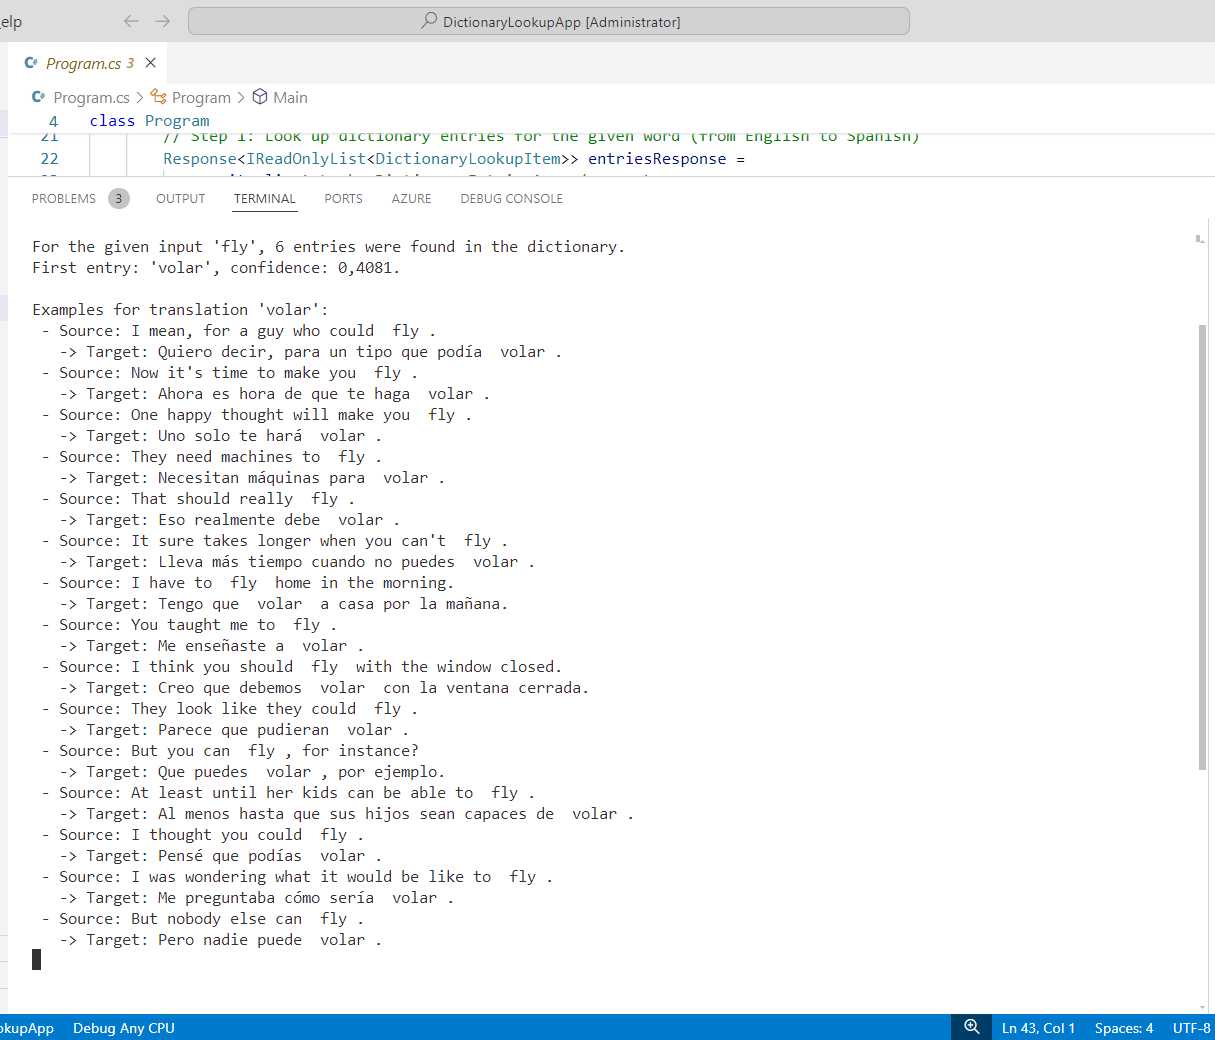
Figure 26: Dictionary lookup with Azure AI Translator
As you can see, the application provides possible translations for the English word “fly,” and then it shows example sentences for the most relevant translation.
Sample application: document translation
Document translation allows for translating entire documents while preserving the original formatting, structure, and images. It is particularly useful when you need to translate complex documents like contracts, reports, or presentations in various formats (such as .docx, .pdf, and .pptx). Document translation is powered by the same neural machine translation technology used in the text translation API, but it processes whole documents rather than individual pieces of text. The service is typically designed to work with Azure Blob Storage for uploading, storing, and processing documents. The process involves uploading source documents to a Blob Storage container and specifying the target languages. Then, the translated documents are stored in another container for efficiency purposes.
In this section, you will create a sample Console application that invokes the Azure AI Translator API to translate an English document into Spanish. For consistency with the example, you can use the Word document attached to the companion solution, which contains the unedited first page of Chapter 2 of this ebook with all the formatting. This allows for demonstrating how the translation process preserves the original formatting, other than translating the document. You will also learn to set up an Azure Blob Storage account as the document store. This is explained in the next paragraphs.
Brief introduction to Azure Blob Storage
Note: BLOB is the acronym for Binary Large Object, and it has become a common term in the information technology to represent complex binary data such as large files.
Azure Blob Storage is a cloud storage solution designed for storing large amounts of unstructured data, such as text or binary data. It is highly scalable, secure, and accessible via HTTP/HTTPS. Blob Storage is optimized for handling data like documents, images, video files, backups, and more. It's commonly used for scenarios such as storing files for distributed access, streaming video and audio, serving images or documents directly to a browser, and storing data for backup. Azure Blob Storage supports three main types of blobs:
· Block blobs: Used to store text and binary data. This is the most commonly used blob type for general-purpose storage.
· Append blobs: Optimized for append operations, making them ideal for logging.
· Page blobs: Used for storing virtual hard disk (VHD) files.
For document translations, you will use block blobs. For more information, visit the Azure Blob Storage documentation page.
Setting up the Azure Blob Storage
In order to take advantage of the document translation feature from Azure AI Translator, you need to create an Azure Blob Storage where documents are uploaded for translation and saved after translation. To accomplish this, open the Azure Portal, and in the dashboard, locate the Storage accounts service (see Figure 27).
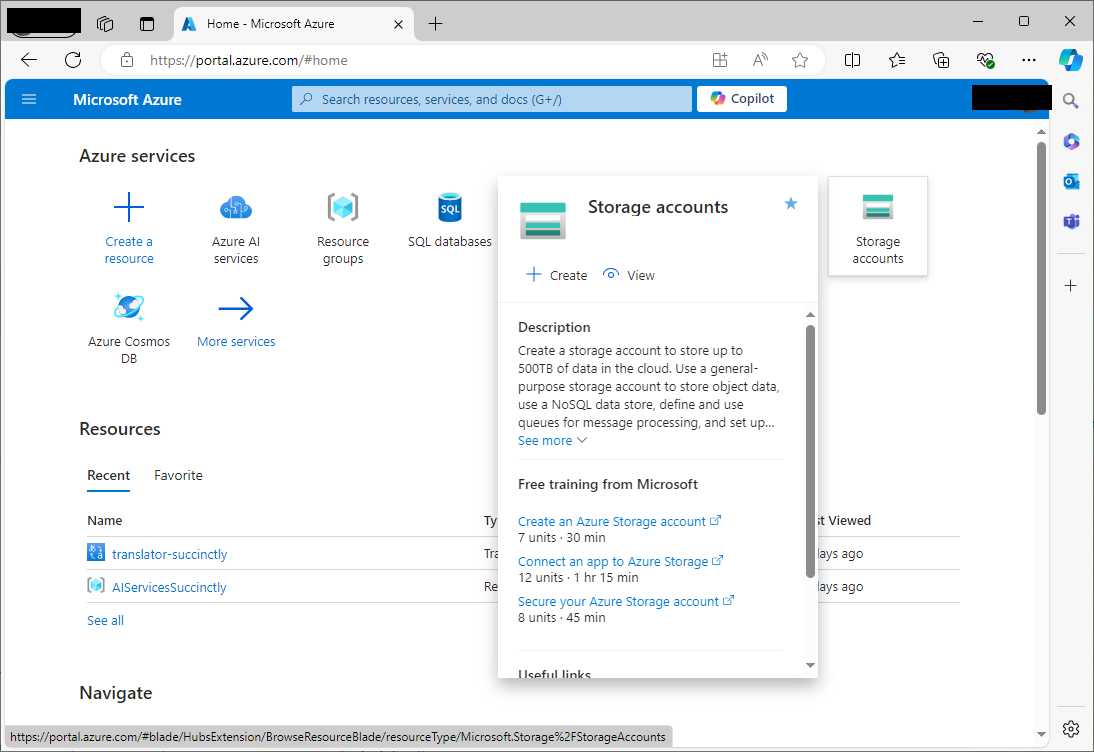
Figure 27: Locating the Storage accounts service in the Azure Portal dashboard
Click Create. When the Storage accounts page opens, click Create. At this point, keep Figure 28 as a reference and enter the following information:
· Subscription: Choose your subscription.
· Resource group: Select the existing resource group created previously.
· Storage account name: Enter a unique name, which must be lowercase and a maximum of 24 characters long.
· Region: Choose the region that is closest to you.
· Performance: Choose Standard for general-purpose usage.
· Redundancy: Select Locally-redundant storage (LRS) unless you need higher availability options, like geo-redundant storage (GRS).
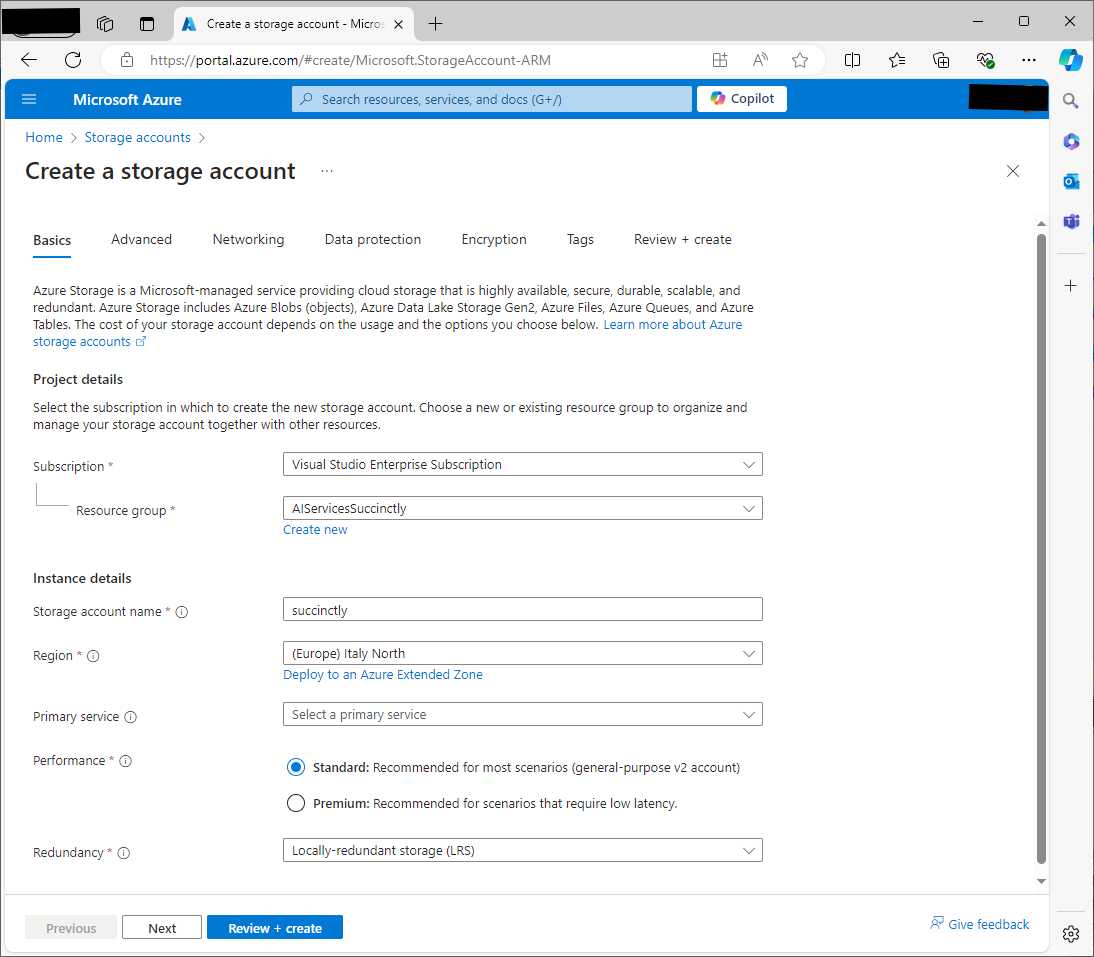
Figure 28: Assigning settings to the new Azure Storage account
When ready, click Review + Create > Create. After a few minutes, the service is deployed, so click Go to resource when the deployment completion page appears. At this point, expand the Security + networking node in the left-handed menu, and then click Access keys. When the Access keys page appears (see Figure 29), locate the Key text box, click Show, and then copy it to the clipboard for later reuse.
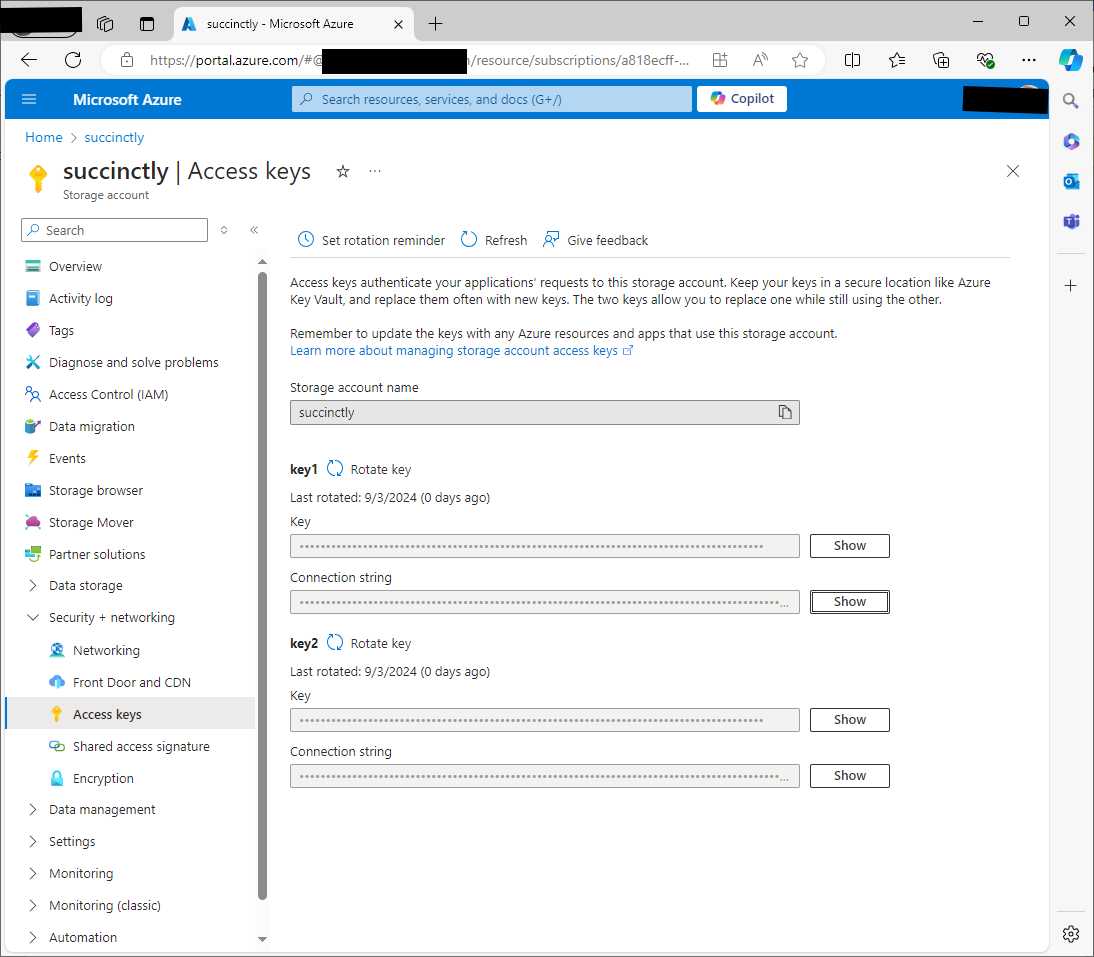
Figure 29: The security options for the Azure Blob Storage
The API key will be needed in the code example to connect to the Azure Blob Storage from C#. Now you need to create two additional resources: containers, which represent the actual storage for your documents, and shared access signatures (SAS) to grant temporary access to documents via tokens.
Creating containers
Containers in the Azure Blob Storage organize your blobs into logical units. For the document translation example, you need two containers: one for the source document, and one for the translated document. In the left-hand menu, navigate to Containers (see Figure 30) and click +Container.
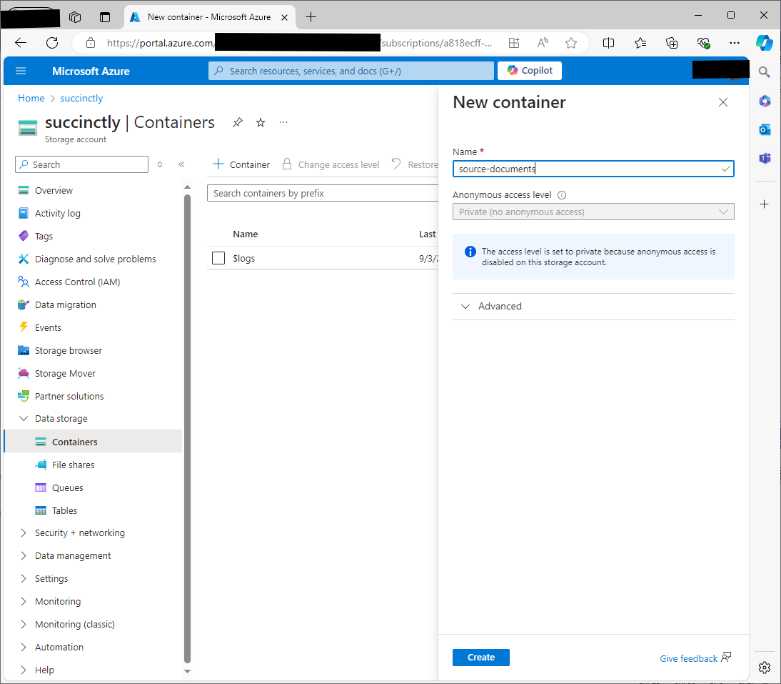
Figure 30: Creating a new container
Enter a name for the container that stores source documents, for example source-documents. Make sure that the access level is set as private (see Figure 30), and then click Create. When the new container appears in the list, click its name. At this point, you will be able to see its details and to upload files by clicking the Upload button.
A convenient user interface will help you upload the documents you want to translate. For consistency with this ebook, you can upload the sourcedoc.docx file included in the companion solution (see Figure 31).
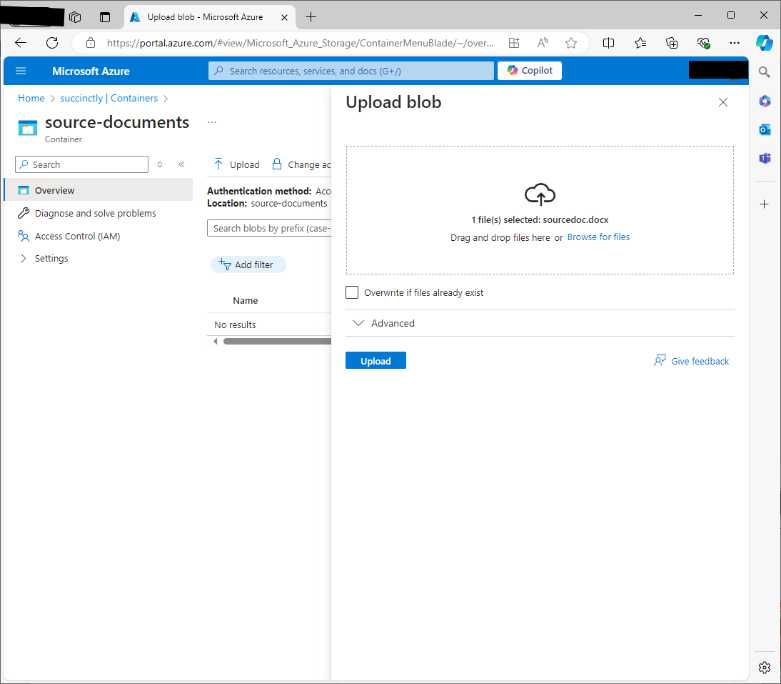
Figure 31: Uploading documents to the Blob Storage
Once uploaded, navigate back to the containers page and repeat the steps to create a new container called translated-documents. For now, this is all you need for file management. The next step is about setting up access keys.
Defining shared access signatures
To allow Azure AI Translator to access your containers, you will need to generate shared access signature (SAS) tokens for both containers. These tokens provide secure and temporary access to your blobs. In order to create SAS tokens, navigate again to the Containers page. Then, follow these steps:
- Click the source-documents container.
- When the container page appears, expand the Settings node and click Shared access tokens in the left-hand menu.
- In the Shared access tokens page (see Figure 32), leave unchanged the proposed options. More specifically, the source-documents container should have read-only permissions, and permissions should have limited time; with the default options, it is 24 hours.
- For the current example, do not enter any IP address. This is something that your network administrator will do in the real world.
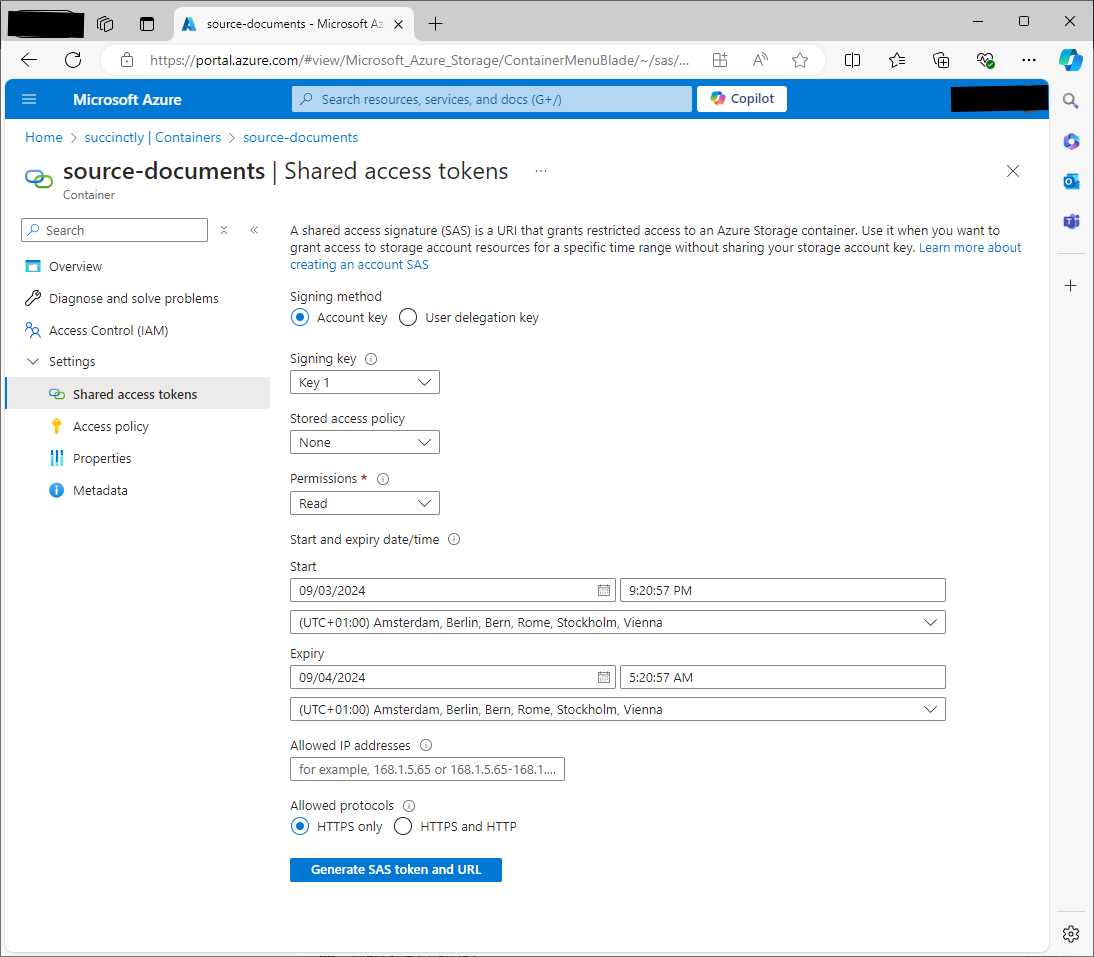
Figure 32: Creating SAS tokens
When finished, click Generate SAS token and URL. You will get a token and a service URL, which enable permissions over containers. You need to store the generated URL, as it will be needed in the source code to identify and reach the resource. Repeat the same steps for the translated-documents container, but make sure to also add the write permission. Now you have all the necessary resources, and you can create a sample application.
Creating a Console app
Open a new Terminal instance in VS Code and create a new Console app called DocumentTranslatorApp with the following commands:
> md \AIServices\DocumentTranslatorApp
> cd \AIServices\DocumentTranslatorApp
> dotnet new console
> dotnet add package Azure.AI.Translation.Document
The Azure.AI.Translation.Document NuGet package is required to work with document translation features. When ready, open the project folder in Visual Studio Code and add the code shown in Code Listing 13 to the Program.cs file. Comments will follow shortly.
Code Listing 13
using Azure; using Azure.AI.Translation.Document; class Program { // Define constants for your Azure Translator resource. private static readonly string endpoint = "your-ai-translator-endpoint"; private static readonly string apiKey = "your-ai-translator-api-key"; static async Task Main(string[] args) { // Create the Document Translation client. var client = new DocumentTranslationClient( new Uri(endpoint), new AzureKeyCredential(apiKey)); Uri sourceSasUri = new Uri("your-source-sas-url"); Uri targetSasUri = new Uri("your-target-sas-url"); // Create a translation operation. DocumentTranslationInput input = new DocumentTranslationInput(sourceSasUri, targetSasUri, "es"); // Translate to Spanish. Console.WriteLine("Translation started...");
DocumentTranslationOperation operation = await client.StartTranslationAsync(input); // Wait for the translation to complete. await operation.WaitForCompletionAsync(); Console.WriteLine("Document translation completed."); Console.ReadLine(); } } |
The DocumentTranslationClient class allows you to interact with the Azure Document Translation service, and it takes an instance of the AzureKeyCredential class as an argument to provide authentication. This client is responsible for initiating and managing translation operations. The DocumentTranslationInput class encapsulates all the essential information required to perform a document translation. It holds references to the source and target Blob Storage containers, specified as URIs, and the language into which the documents should be translated.
The sourceSasUri and targetSasUri variables represent the URLs of the source document container and translated document container, respectively. These variables will be filled with the URLs with the appended token that you generated previously in the Defining Shared Access Signatures paragraph.
The StartTranslationAsync method of DocumentTranslationClient initiates the translation by starting a long-running operation. It returns an object of type DocumentTranslationOperation that allows you to track the status of the translation as it progresses. The sample code invokes the WaitForCompletionAsync method to asynchronously wait for the translation operation to complete.
Running the application
The output of the sample application is very simple, as it shows two informational messages before and after the translation. You are then free to run the application by either pressing F5 (with the debugger), or by typing dotnet run in the Terminal. Figure 33 shows the simple output from the application.
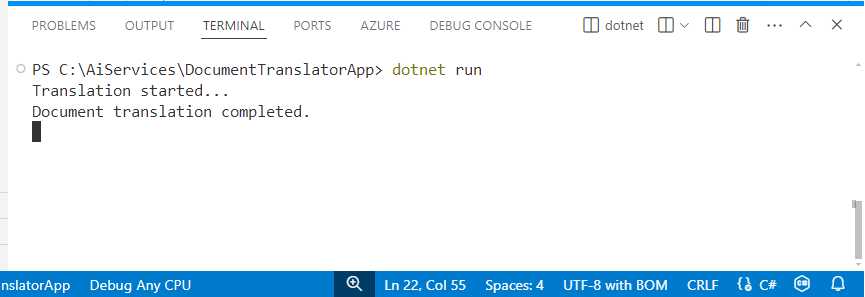
Figure 33: Running the sample application
If everything succeeds, you will find your translated document in the translated-documents container that you created previously. Figure 34 shows how to retrieve the translated document.
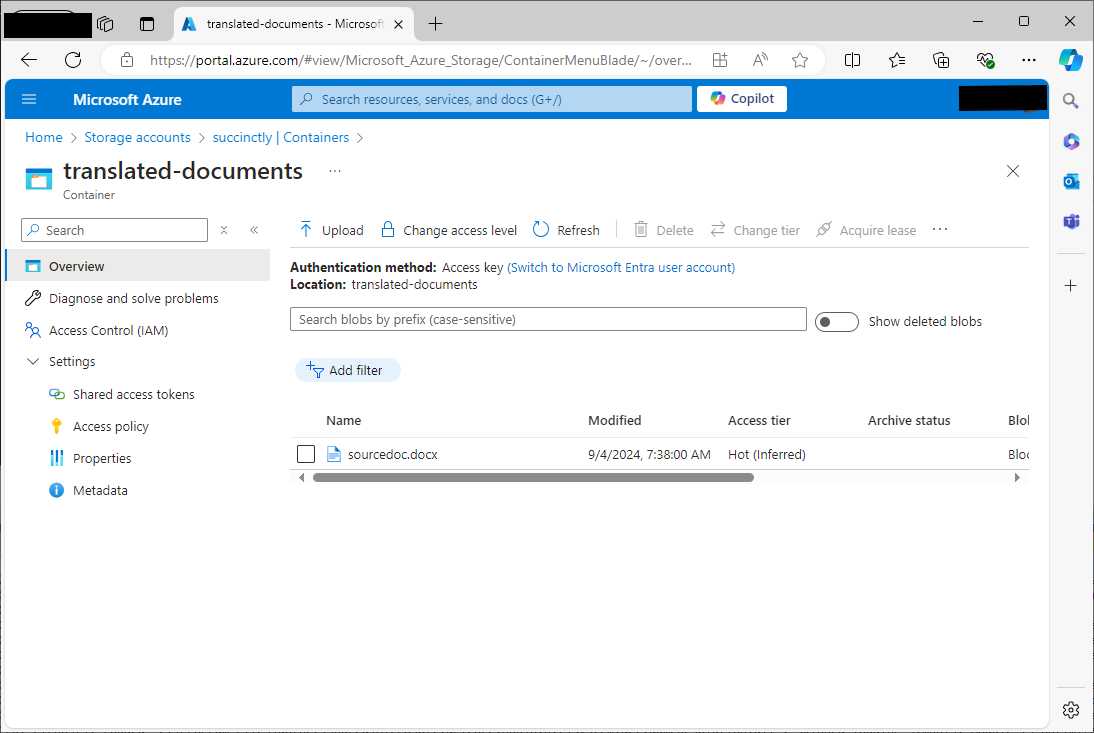
Figure 34: The translated document is available
You can click the file name to access a details page, where you will also find a Download button. The result of the document translation is shown in Figure 35.
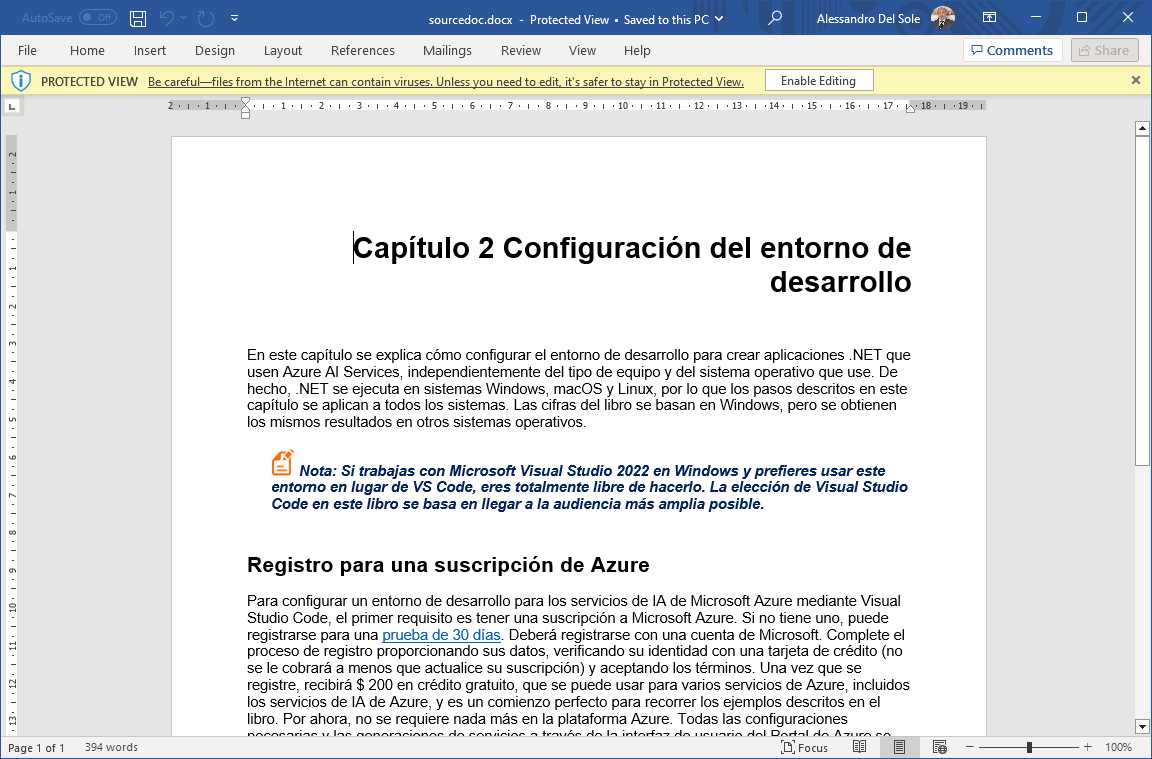
Figure 35: The translated document preserving formatting
As you can see, not only has the Azure document translator feature translated the document into a different language, but it also has preserved all the source formatting (including hyperlinks). As you can imagine, this is an extremely powerful feature that can literally revolutionize the way companies manage documents, especially if they have customers abroad.
Errors and exceptions
If translation fails, the Azure AI Translation service can throw the following exceptions:
· TranslationLanguageNotSupportedException: Raised when the language you are trying to translate to or from is not supported by the Translator service.
· QuotaExceededException: Thrown when the service usage exceeds the subscription's quota, such as the character or document limit for translation.
Do not forget to implement a try..catch block as a best practice for exception handling.
Chapter summary
In this chapter about Azure AI Translator, you have discovered two main services: text translation and document translation. Text translation is ideal for the real-time translation of small text snippets, while document translation is designed for translating larger documents while preserving their formatting.
The code examples showed practical implementations of text translation, transliteration, dictionary lookup, and document translation, all within Visual Studio Code. By using Azure AI Translator, developers can enhance their applications with advanced multilingual capabilities, making them accessible to a global audience.
- 1800+ high-performance UI components.
- Includes popular controls such as Grid, Chart, Scheduler, and more.
- 24x5 unlimited support by developers.