
Azure AI Services Succinctly®

CHAPTER 8
Azure AI Speech
Microsoft Azure AI Speech is a powerful service that focuses on delivering cutting-edge speech recognition, synthesis, and translation capabilities. In this chapter, you will learn about all the available services and how to implement them in your .NET projects so that you will be able to create voice-enabled applications.
Introducing Azure AI Speech
The Microsoft Azure AI Speech service leverages advanced machine learning models to convert speech into text, synthesize natural-sounding speech from text, and translate speech into various languages in real-time. This service is designed to integrate seamlessly into various applications, providing developers with the tools they need to build voice-enabled applications, create conversational AI experiences, and enhance accessibility with speech-to-text and text-to-speech functionalities.
The service supports a wide range of use cases, including voice-activated assistants, transcription services, real-time language translation, and the generation of audio content from textual data. Azure AI Speech offers high accuracy and is continually updated to support new languages, dialects, and scenarios, making it a versatile tool for global applications. The service is built on Microsoft’s proprietary deep neural networks, ensuring that it delivers fast, reliable, and high-quality results. Like for the other services, developers can use REST APIs, SDKs, and client libraries to interact with the service, enabling easy integration into existing workflows and applications.
Furthermore, Azure AI Speech supports customizable speech models, allowing businesses to fine-tune the service according to their specific needs, such as adapting to industry-specific terminology or enhancing recognition accuracy for certain accents. Azure AI Speech provides three primary functionalities: speech-to-text, text-to-speech, and speech translation, as described shortly.
Speech-to-text
This feature allows applications to convert speech into text. It supports real-time transcription and batch processing of audio files, making it suitable for various applications, including meeting transcriptions, voice command processing, and accessibility services. The speech-to-text service is highly accurate, benefiting from continuous improvements in Microsoft's AI models. It supports multiple languages and can be customized using custom models to improve accuracy in specific contexts, such as industry jargon or regional accents.
Text-to-speech
This capability synthesizes natural-sounding speech from text, making it ideal for generating spoken content dynamically. The text-to-speech service can be used in various scenarios, including creating voice responses in chatbots, generating audio ebooks, and providing vocal guidance in applications. It supports numerous languages and voices, including neural voices that provide more natural intonations and expressions. Custom voice fonts can also be created to match a brand's unique voice, ensuring consistency across various channels.
Speech translation
Azure AI Speech also offers real-time translation of speech into another language, enabling cross-lingual communication in applications. This service can be integrated into multilingual chat applications, global conferencing tools, and customer support systems to facilitate communication between speakers of different languages. It supports a wide range of language pairs and delivers translations with high accuracy and low latency, making it suitable for real-time communication scenarios.
Additional features
In addition to these core features, Azure AI Speech offers features such as profanity filtering, punctuation addition, and the ability to identify multiple speakers in a conversation (speaker diarization). The service also integrates with other Azure services, such as Azure AI Language, for enhanced functionality like sentiment analysis or key phrase extraction from transcribed text. These additional features will not be covered in this chapter, so you can refer to the provided documentation links.
Creating the required Azure resources
Before diving into three sample applications, one per feature, you need to create an Azure resource for the AI Speech service. The steps are exactly the same as for the previous services and can be summarized as follows:
- Log in to the Azure Portal and click AI Services in the dashboard.
- Locate the Speech service and click Create on its card to begin the setup.
- Choose your subscription and the resource group created at the beginning of this ebook.
- Select your closest region and provide a name for the service, for example, speech-succinctly for consistency with the current examples.
- Choose the Free pricing tier.
- Click Review + Create and then Create to deploy the service.
Also remember to copy the name of the selected region and the API key. These will both be required to authenticate against the service in C# code.
Sample application: speech-to-text
The goal of the first sample application is to demonstrate how to convert speech into text. This will be accomplished by creating a WPF application that loads an existing audio file containing spoken sentences. A .wav audio file is included with the companion solution and contains the following sentence: “Hey! How are you doing today? I hope you are doing great!” Obviously, feel free to select a different audio file.
Open a Terminal instance in Visual Studio Code and create a new project with the following commands:
> md \AIServices\AzureSpeechToText
> cd \AIServices\AzureSpeechToText
> dotnet new wpf
> dotnet add package Microsoft.CognitiveServices.Speech
The Microsoft.CognitiveServices.Speech Nuget package allows for interacting with the Azure AI Speech service from .NET and is common to all the examples described in this chapter. Open the folder containing the new project and get ready to write code.
Defining the user interface
The user interface for the first sample project is very simple. It contains a button that allows for loading an audio file, a label that displays the process status, and a text box that shows the result of the conversion. Code Listing 14 contains the XAML code that needs to be added to the MainPage.xaml file.
Code Listing 14
<Window x:Class="AzureSpeechToText.MainWindow" xmlns="http://schemas.microsoft.com/winfx/2006/xaml/presentation" xmlns:x="http://schemas.microsoft.com/winfx/2006/xaml" Title="Azure Speech to Text" Height="200" Width="400"> <Grid Margin="10"> <Grid.RowDefinitions> <RowDefinition Height="Auto" /> <RowDefinition /> <RowDefinition Height="Auto" /> </Grid.RowDefinitions> <Button Name="BtnOpenFile" Content="Open Audio File" Width="120" Height="30" Click="BtnOpenFile_Click"/> <TextBox Name="TxtTranscription" Width="360" Height="100" Margin="0,10,0,0" TextWrapping="Wrap" Grid.Row="1"/> <Label Name="LblStatus" Content="Status: Idle" Margin="0,10,0,0" Grid.Row="2" /> </Grid> </Window> |
Adding speech-to-text capabilities in C#
Code Listing 15 contains the code that allows for loading and analyzing the audio file. Comments will follow shortly.
Code Listing 15
using Microsoft.CognitiveServices.Speech; using Microsoft.CognitiveServices.Speech.Audio; using Microsoft.Win32; using System.Windows;
namespace AzureSpeechToText { public partial class MainWindow : Window { private string subscriptionKey = "your-api-key"; private string region = "your-region";
public MainWindow() { InitializeComponent(); }
private async void BtnOpenFile_Click( object sender, RoutedEventArgs e) { OpenFileDialog openFileDialog = new OpenFileDialog { Filter = "Audio Files (*.wav)|*.wav|All files (*.*)|*.*" }; if (openFileDialog.ShowDialog() == true) { LblStatus.Content = "Status: Processing"; string audioFilePath = openFileDialog.FileName; txtTranscription.Text = await TranscribeAudioAsync(audioFilePath); LblStatus.Content = "Status: Complete"; } }
private async Task<string> TranscribeAudioAsync(string audioFilePath) { var config = SpeechConfig.FromSubscription( subscriptionKey, region); using var audioInput = AudioConfig.FromWavFileInput(audioFilePath); using var recognizer = new SpeechRecognizer(config, audioInput);
var result = await recognizer.RecognizeOnceAsync(); return result.Text; } } } |
Following is a description of the types and members from the Azure SDK for AI Speech that are relevant to the example:
· The SpeechConfig class is crucial for setting up the connection to Azure AI Speech services. The FromSubscription method initializes the SpeechConfig with your Azure subscription key and region, which is necessary to authenticate the service. Additionally, the SpeechRecognitionLanguage property is used to specify the language in which speech will be recognized, such as en-US for English.
· The AudioConfig class manages audio inputs and outputs. In this case, the FromDefaultMicrophoneInput method is used to capture audio from the default microphone of the system. AudioConfig can also be initialized from other sources, such as FromWavFileInput, for reading audio from a WAV file, or FromStreamInput, for capturing audio from a stream.
· The SpeechRecognizer class connects your application to Azure AI Speech for real-time speech recognition. It requires both SpeechConfig and AudioConfig objects for initialization. The RecognizeOnceAsync method is used in the example to perform single-shot recognition, which means it listens for a single statement and returns the recognized text. The SpeechRecognizer class also supports continuous recognition via the StartContinuousRecognitionAsync method, which allows the application to keep listening and transcribing speech until explicitly stopped by StopContinuousRecognitionAsync. This can be useful for transcribing long conversations or speeches.
· The SpeechRecognitionResult class represents the outcome of a speech recognition operation. The Reason property is of type ResultReason and indicates whether the recognition was successful (RecognizedSpeech) or encountered issues like NoMatch or Canceled. The recognized text is typically accessed through the Text property. Table 3 summarizes possible values for the Reason property.
· The VoiceInfo class represents individual voices available for speech synthesis. Its ShortName property identifies each voice by a concise identifier (such as en-US-AriaNeural), which is used to set the SpeechSynthesisVoiceName in the SpeechConfig instance.
Table 3: Values from the ResultReason enumeration (source: Microsoft)
Description | |
|---|---|
NoMatch | Indicates speech could not be recognized. |
Canceled | Indicates the recognition was canceled. |
RecognizingSpeech | Indicates the speech result contains hypothesis text. |
RecognizedSpeech | Indicates the speech result contains final text that has been recognized. |
Indicates the intent result contains hypothesis text and intent. | |
RecognizedIntent | Indicates the intent result contains final text and intent. |
TranslatingSpeech | Indicates the translation result contains hypothesis text and its translations. |
TranslatedSpeech | Indicates the translation result contains final text and corresponding translations. |
SynthesizingAudio | Indicates the synthesized audio result contains a non-zero amount of audio data. |
SynthesizingAudioCompleted | Indicates the synthesized audio is now complete for this phrase. |
RecognizingKeyword | Indicates the speech result contains (unverified) keyword text. |
RecognizedKeyword | Indicates that keyword recognition completed recognizing the given keyword. |
SynthesizingAudioStarted | Indicates the speech synthesis is now started. |
TranslatingParticipantSpeech | Indicates the transcription result contains hypothesis text and its translations for other participants in the conversation. |
TranslatedParticipantSpeech | Indicates the transcription result contains final text and corresponding translations for other participants in the conversation. |
TranslatedInstantMessage | Indicates the transcription result contains the instant message and corresponding translations. |
TranslatedParticipantInstantMessage | Indicates the transcription result contains the instant message for other participants in the conversation and corresponding translations. |
EnrollingVoiceProfile | Indicates the voice profile is being enrolled and more audio is needed to complete a voice profile. |
EnrolledVoiceProfile | Indicates the voice profile has been enrolled. |
RecognizedSpeakers | Indicates successful identification of some speakers. |
RecognizedSpeaker | Indicates successful verification of a speaker. |
ResetVoiceProfile | Indicates a voice profile has been reset. |
DeletedVoiceProfile | Indicates a voice profile has been deleted. |
VoicesListRetrieved | Indicates the voices list has been retrieved successfully. |
Note: The official documentation contains the full list of synthesized voices and supported languages.
Running the application
You can now run the application by pressing F5 for debugging. This is useful in case something is not working as expected. When the application starts, select an audio file that contains spoken sentences, and then wait for the operation to be completed. Figure 36 shows the result based on the audio file attached to the companion solution.
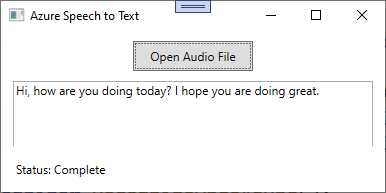
Figure 36: Speech has been converted to text
As you can see, with extremely limited effort, you were able to transcribe spoken sentences into text. Now you can take a step further by doing the opposite work: converting written text into speech.
Sample application: text-to-speech
In this example, you will create a WPF application that allows for entering text and converts this into speech using the Azure AI Speech text-to-speech functionality. The application will also allow users to select a voice and then play the synthesized speech. You will understand how to generate natural-sounding speech from text, which can be useful in scenarios such as generating audio content, creating voice interfaces, or assisting visually impaired users.
Having said this, in Visual Studio Code, open an instance of the Terminal and create a new WPF project with the following commands:
> md \AIServices\AzureTextToSpeech
> cd \AIServices\AzureTextToSpeech
> dotnet new wpf
> dotnet add package Microsoft.CognitiveServices.Speech
Now you are ready to define the user interface.
Defining the user interface
The user interface is very simple. It contains a text box where the user can enter input text, a combo box from which the user can select one of the available voices per language, and a button that starts the process. Code Listing 16 demonstrates this.
Code Listing 16
<Window x:Class="AzureTextToSpeech.MainWindow" xmlns="http://schemas.microsoft.com/winfx/2006/xaml/presentation" xmlns:x="http://schemas.microsoft.com/winfx/2006/xaml" Title="Azure Text to Speech" Height="250" Width="400"> <Grid Margin="10"> <Grid.RowDefinitions> <RowDefinition /> <RowDefinition Height="Auto"/> <RowDefinition Height="Auto"/> </Grid.RowDefinitions> <TextBox Name="TxtInput" Width="360" Height="100" TextWrapping="Wrap" AcceptsReturn="True"/> <ComboBox Name="CmbVoices" Width="360" Height="30" Margin="0,10,0,0" Grid.Row="1"/> <Button Name="BtnSpeak" Content="Convert to Speech" Width="150" Height="30" Margin="0,10,0,0" Grid.Row="2" Click="BtnSpeak_Click"/> </Grid> </Window> |
The next step is adding the logic that enables the user interface.
Adding text-to-speech capabilities in C#
In the MainPage.xaml.cs, add the code shown in Code Listing 17. As usual, comments will follow shortly. Also, you will notice some objects that were already discussed in the previous example.
Code Listing 17
using Microsoft.CognitiveServices.Speech; using System.Windows;
namespace AzureTextToSpeech { public partial class MainWindow : Window { private string subscriptionKey = "your-api-key"; private string region = "your-region";
public MainWindow() { InitializeComponent(); LoadVoicesAsync(); }
private async void LoadVoicesAsync() { var config = SpeechConfig. FromSubscription(subscriptionKey, region); var synthesizer = new SpeechSynthesizer(config);
var result = await synthesizer.GetVoicesAsync(); CmbVoices.ItemsSource = result.Voices.Select(v => v.ShortName).ToList(); CmbVoices.SelectedIndex = 0; }
private async void BtnSpeak_Click( object sender, RoutedEventArgs e) { if (string.IsNullOrWhiteSpace(TxtInput.Text)) return;
var config = SpeechConfig. FromSubscription(subscriptionKey, region); config.SpeechSynthesisVoiceName = CmbVoices.SelectedItem.ToString();
using var synthesizer = new SpeechSynthesizer(config); await synthesizer.SpeakTextAsync(TxtInput.Text); } } } |
Following is a description of the relevant types and members in the code:
· The SpeechConfig class has the same purpose as the previous example. In this case, it is worth mentioning the SpeechSynthesisVoiceName property, which allows for specifying the voice to use for synthesis. For instance, you might set this to en-US-JennyNeural for a specific American English voice.
· The SpeechSynthesizer class handles the conversion of text into spoken audio. It requires a SpeechConfig object for initialization. The SpeakTextAsync method is used to take a string of text and synthesize it into speech, which is then played through the configured audio output device. For more control, the SpeakSsmlAsync method can be used to synthesize speech from SSML (Speech Synthesis Markup Language) input, which allows for finer control over speech characteristics. Additionally, StartSpeakingAsync begins synthesis and returns immediately, allowing the app to perform other tasks while synthesis continues in the background.
· SpeechSynthesisResult: This class contains the result of the text-to-speech operation. The Reason property indicates whether the synthesis was successful (SynthesizingAudioCompleted) or encountered problems. Possible values are listed in Table 1. The AudioData property contains the synthesized audio data in raw bytes, which can be saved or further processed.
Running the application
At this point, you can finally run the application and see the result of the work. When running, enter some text, as shown in Figure 36. Select one of the available voices, depending on the language for your text, and then click Convert to Speech. Voice identifiers always start with a language code, so for example, the en-US-EmmaNeural voice used in Figure 37 relates to the en-US culture.

Figure 37: Converting text to speech
If everything is okay with the code, you will hear a voice speaking your text with a natural tone.
Sample application: speech translation
The last example for this chapter demonstrates how to create a WPF application that takes spoken input from the user (via the default microphone) and translates it into a different language using the Azure AI Speech translation service. This example is useful to reproduce the scenario of real-time communication in multilingual settings, such as global conferences or customer support.
With the usual approach, create a new WPF project called AzureSpeechTranslation with the following commands to be typed inside a Terminal instance in VS Code:
> md \AIServices\AzureSpeechTranslation
> cd \AIServices\AzureSpeechTranslation
> dotnet new wpf
> dotnet add package Microsoft.CognitiveServices.Speech
Open the folder containing the project. Now, you will write a simple user interface and the logic that translates the user input.
Defining the user interface
The user interface for this example is also very simple. It includes a ComboBox control to allow the target language selection, a button that will enable the microphone and send the speech to the Azure AI Speech service, and a text box that displays the translation result. Code Listing 18 demonstrates how to implement this simple user interface in the MainPage.xaml file.
Code Listing 18
<Window x:Class="AzureSpeechTranslation.MainWindow" xmlns="http://schemas.microsoft.com/winfx/2006/xaml/presentation" xmlns:x="http://schemas.microsoft.com/winfx/2006/xaml" Title="Azure Speech Translation" Height="200" Width="400"> <Grid Margin="10"> <Grid.RowDefinitions> <RowDefinition Height="Auto" /> <RowDefinition Height="Auto" /> <RowDefinition /> </Grid.RowDefinitions> <ComboBox Name="CmbLanguages" Width="360" Height="30" VerticalAlignment="Top" Margin="0,10,0,0"/> <Button Name="BtnTranslate" Content="Translate Speech" Width="150" Height="30" Grid.Row="1" Margin="0,10,0,0" Click="BtnTranslate_Click"/> <TextBox Name="TxtTranslation" Width="360" Height="80" Margin="0,10,0,0" Grid.Row="2" TextWrapping="Wrap" AcceptsReturn="True"/> </Grid> </Window> |
Now you can add the C# logic that enables the controls.
Adding speech translation capabilities in C#
In the MainPage.xaml.cs file, add the code shown in Code Listing 19. Some objects related to the AI Speech service will now be familiar, but explanations will follow shortly.
Code Listing 19
using Microsoft.CognitiveServices.Speech; using Microsoft.CognitiveServices.Speech.Audio; using Microsoft.CognitiveServices.Speech.Translation; using System.Windows;
namespace AzureSpeechTranslation { public partial class MainWindow : Window { private string subscriptionKey = "your-api-key"; private string region = "your-region";
public MainWindow() { InitializeComponent(); LoadLanguages(); }
private void LoadLanguages() { CmbLanguages.ItemsSource = new[] { "fr-FR", "de-DE", "es-ES", "zh-CN" }; CmbLanguages.SelectedIndex = 0; }
private async void BtnTranslate_Click( object sender, RoutedEventArgs e) { try { var config = SpeechTranslationConfig. FromSubscription(subscriptionKey, region); config.SpeechRecognitionLanguage = "en-US"; config.AddTargetLanguage(CmbLanguages. SelectedItem.ToString());
// Configure microphone input. using var audioInput = AudioConfig.FromDefaultMicrophoneInput(); using var recognizer = new TranslationRecognizer(config, audioInput);
var result = await recognizer.RecognizeOnceAsync();
if (result.Reason == ResultReason.TranslatedSpeech) { TxtTranslation.Text = result.Translations.FirstOrDefault().Value; } else { TxtTranslation.Text = "Translation failed: " + result.Reason.ToString(); } } catch (Exception ex) { MessageBox.Show($"Error accessing the microphone: {ex.Message}"); } } } } |
Following is a summary of the relevant objects used in the code:
· The AudioConfig class allows for interacting with audio devices. In particular, the FromDefaultMicrophoneInput method captures audio from the default audio input device.
· The TranslationRecognizer class creates a connection between the application and the Azure AI Speech translation service, and it requires the service configuration and the audio input configuration objects as arguments.
· The TranslationRecognizer.RecognizeOnceAsync method starts listening to the incoming audio and stops listening when there is no more signal. At this point, it sends the audio to the Azure AI Speech service. Alternative methods are StartContinuousRecognitionAsync and StartKeywordRecognitionAsync; the first method allows for continuous voice recognition, whereas the second one recognizes keywords rather than sentences. Recognition with these methods must be then explicitly stopped with the corresponding StopContinuousRecognitionAsync and StopKeywordRecognitionAsync methods.
· The result is an object of type TranslationRecognitionResult. This exposes the Result property, of type ResultReason, whose value will be TranslatedSpeech if the translation was successful. Other possible values are summarized in Table 1. It also exposes the Translations property, of type IReadonlyDictionary<string, string>, whose first item contains the translation result that is displayed in the user interface.
You can provide different messages and user interface behaviors, depending on the value returned by the Reason property. Now that you have an idea of the types and members, you can run the application.
Running the application
When you run the application (F5 or the dotnet run command from the Terminal), you will be able to select a language and click the button to start voice recognition. Figure 38 shows an example of speech translation using Azure AI Speech, where English speech has been translated to French text.
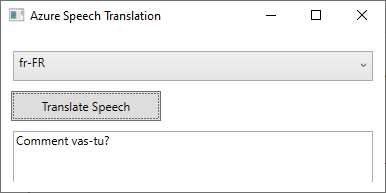
Figure 38: Demonstrating speech translation
As you can imagine, the opportunities offered by this service are enormous. You can also combine the three speech features together with Azure AI Translator to create powerful, language-oriented applications.
Errors and exceptions
If the requested service fails, the Azure AI Speech service can throw the following exceptions:
· AudioFormatException: Occurs when the provided audio file is in an unsupported format or the data is corrupted.
· SpeechRecognitionException: Happens when the speech-to-text engine cannot properly process the audio, often due to low quality or unrecognizable speech patterns.
Do not forget to implement a try..catch block as a best practice for exception handling.
Chapter summary
The Microsoft Azure AI Speech service offers robust and flexible speech capabilities that can be seamlessly integrated into .NET applications. You have seen how to use the speech-to-text functionality to convert speech into text; you have seen how to use text-to-speech to convert written text quickly into spoken, natural language; finally, you have seen how fast it is at translating speech into written text from one language to another.
This powerful service is extremely valuable for developers looking to build voice-enabled applications, enhance accessibility, or automate transcription processes. The example provided not only illustrates the ease of integration but also highlights the possible applications of Azure AI Speech in real-world scenarios.
- 1800+ high-performance UI components.
- Includes popular controls such as Grid, Chart, Scheduler, and more.
- 24x5 unlimited support by developers.