
Azure AI Services Succinctly®

CHAPTER 4
Azure AI Language
The Microsoft AI Language service focuses on natural language processing (NLP) and is designed to analyze unstructured text and provide deep insights, such as language detection, sentiment analysis, key phrase extraction, named entity recognition (NER), and text summarization. This chapter describes this service in detail, providing code examples that target all the language processing features.
Introducing Azure AI Language service
Azure AI Language specializes in the processing and understanding of human language, which makes it an essential tool for businesses seeking to extract actionable insights from large amounts of textual data. As companies accumulate vast amounts of unstructured text data, from social media interactions, emails, surveys, and documents, the challenge becomes turning this data into useful information. Azure AI Language allows businesses to automate and scale the analysis of this data by leveraging advanced NLP models built on Microsoft's extensive research in artificial intelligence. Azure AI Language offers several functionalities that cater to different aspects of language processing:
· Sentiment Analysis: This feature analyzes the sentiment of text data, classifying it as positive, neutral, or negative. This can be helpful in various scenarios, such as gauging customer satisfaction from feedback or analyzing public sentiment about a product.
· Key Phrase Extraction: This feature extracts the most important phrases from a document, highlighting the key concepts or ideas within the text. This can be particularly useful for summarizing large documents or extracting main topics from customer reviews.
· Named Entity Recognition (NER): NER identifies and classifies entities within text such as people, organizations, locations, and dates. This is useful for data categorization and enhancing search functionalities within applications.
· Language Detection: The service can automatically detect the language of the text input, which is helpful when dealing with multilingual data sources.
· Text Summarization: This advanced feature provides an automated summary of the content by distilling long documents into a concise summary that captures the essence of the text.
· Text Translation: Azure AI Language can translate text from one language to another, leveraging the same powerful models used in Microsoft Translator. This feature is actually empowered by the Azure AI Translator service, which is discussed thoroughly in Chapter 7.
The service is integrated into the Azure ecosystem, which allows seamless connection with other Azure resources like Blob Storage, Azure Cognitive Search, and Power BI, enhancing its capabilities in data-driven applications. Azure AI Language is designed to handle data privacy and security, adhering to stringent compliance standards, including GDPR and ISO/IEC certifications.
Note: Text summarization might not be available in all Azure regions. Make sure your region supports this feature when you create the AI Language service instance in the Azure Portal.
Creating a sample application
In this example, you will create a WPF (Windows Presentation Foundation) application using .NET that interacts with the Azure AI Language service to perform text analysis over a text file. The application will allow users to select a file from their local machine, read its content, and analyze text using Azure AI Language. The code example focuses on all the text analysis features described previously, so it is a comprehensive example. As it normally happens for Azure AI services, you will first set up the appropriate Azure resources, and then you will create an application with Visual Studio Code.
Tip: The companion code for this chapter ships with a text file that will be used for the coming discussions. This text file describes the story of Microsoft Corp. in English, and it has been generated with Azure OpenAI’s ChatGPT. It is written in a way that all the NLP features can be demonstrated here. It also includes some sentences in German to demonstrate the services’ ability to work over mixed languages. Figures for the sample application are based on this text file.
Setting up the Azure AI Language resources
To set up the Azure AI Language service, sign into the Azure Portal with your Microsoft account. Following the lesson learned in the previous chapter, click AI Services and locate the Language service. At this point, follow these steps:
- Click Create under the Language card.
- When the creation page appears, choose your subscription and the resource group created previously.
- Provide a name for your Language resource (for example, language-service-succinctly), choose a region, and select the Free price tier.
- Click Review + create > Create.
After the resource is created and deployed, click Go to resource. From the left-hand menu, select Keys and Endpoint. Copy the key and endpoint URL (either to the clipboard or to a text editor), which you will need for authentication in your application.
Creating a WPF sample project
The goal of the sample application is analyzing the text contained inside a .txt file, which is included in the companion solution that you can use as a reference. The application will leverage the Azure AI Language service to detect sentiment, extract key phrases and named entities, detect language, and perform text summarization.
Open Visual Studio Code and then open a new Terminal window. Type the following, self-explanatory commands:
> md \AIServices\TextAnalysisApp
> cd \AIServices\TextAnalysisApp
> dotnet new wpf
> dotnet add package Azure.AI.TextAnalytics
The Azure.AI.TextAnalytics NuGet package is the library from the Azure SDK that exposes all the necessary objects you will use to interact with the Azure AI Language service. When you’re ready, open the folder containing the new solution. The code will be now split into two parts: the user interface, and the code that interacts with the AI Language service.
Designing the user interface
In WPF, the user interface is defined via the eXtensible Application Markup Language (XAML). Code Listing 3 shows the definition of the user interface for the current sample application. Comments will follow shortly.
Code Listing 3
<Window x:Class="textanalysisapp.MainWindow" xmlns="http://schemas.microsoft.com/winfx/2006/xaml/presentation" xmlns:x="http://schemas.microsoft.com/winfx/2006/xaml" xmlns:d="http://schemas.microsoft.com/expression/blend/2008" xmlns:mc="http://schemas.openxmlformats.org/markup-compatibility/2006" xmlns:local="clr-namespace:textanalysisapp" mc:Ignorable="d" Title="MainWindow" Height="450" Width="800"> <Grid> <Grid.RowDefinitions> <RowDefinition Height="Auto" /> <RowDefinition Height="Auto"/> <RowDefinition Height="Auto" /> <RowDefinition Height="Auto"/> </Grid.RowDefinitions> <Button Content="Open File" HorizontalAlignment="Left" VerticalAlignment="Top" Width="100" Margin="10,10,0,0" Click="OpenFileButton_Click"/> <TextBox Grid.Row="1" Name="FileContentTextBox" HorizontalAlignment="Left" Height="100" Margin="10,50,0,0" VerticalAlignment="Top" Width="560" TextWrapping="Wrap"/> <TextBlock Grid.Row="2" Name="ResultLabel" Height="150" TextWrapping="WrapWithOverflow" Text="Result:" HorizontalAlignment="Left" Margin="10,10,0,0" VerticalAlignment="Top"/> <StackPanel Grid.Row="3" Orientation="Horizontal" HorizontalAlignment="Left" VerticalAlignment="Top" Margin="10,10,0,0"> <Button Content="Analyze Sentiment" Width="120" Click="AnalyzeSentimentButton_Click"/> <Button Content="Extract Key Phrases" Width="120" Margin="10,0,0,0" Click="ExtractKeyPhrasesButton_Click"/> <Button Content="Recognize Entities" Width="120" Margin="10,0,0,0" Click="RecognizeEntitiesButton_Click"/> <Button Content="Detect Language" Width="120" Margin="10,0,0,0" Click="DetectLanguageButton_Click"/> <Button Content="Summarize Text" Width="120" Margin="10,0,0,0" Click="SummarizeTextButton_Click"/> </StackPanel> </Grid> </Window> |
The user interface definition is very simple. At the top, there is a button that allows for loading a text file. A TextBox shows the content of the text file, while a TextBlock displays the analysis results. Finally, there are several button controls, one per analysis type. At this point, it is time to implement natural language analysis in C#.
Natural language processing in C#
Natural language processing in C# with the Azure AI Language service can be performed using the TextAnalyticsClient class and its members. Code Listing 4 shows the full implementation, and individual code blocks will be discussed next.
Code Listing 4
using Azure; using Azure.AI.TextAnalytics; using Microsoft.Win32; using System.IO; using System.Windows;
namespace TextAnalysisApp;
/// <summary> /// Interaction logic for MainWindow.xaml. /// </summary> public partial class MainWindow : Window { private static readonly string endpoint = "your-endpoint"; private static readonly string apiKey = "your-api-key"; private readonly TextAnalyticsClient _client;
public MainWindow() { InitializeComponent(); var credentials = new AzureKeyCredential(apiKey); _client = new TextAnalyticsClient( new Uri(endpoint), credentials); }
private void OpenFileButton_Click(object sender, RoutedEventArgs e) { OpenFileDialog openFileDialog = new OpenFileDialog(); openFileDialog.Filter = "Text files (*.txt)|*.txt"; if (openFileDialog.ShowDialog() == true) { string fileContent = File.ReadAllText(openFileDialog.FileName); FileContentTextBox.Text = fileContent; } }
private async void AnalyzeSentimentButton_Click(object sender, RoutedEventArgs e) { string fileContent = FileContentTextBox.Text; if (!string.IsNullOrEmpty(fileContent)) { DocumentSentiment sentiment = await _client.AnalyzeSentimentAsync(fileContent); ResultLabel.Text = $"Sentiment: {sentiment.Sentiment}"; } }
private async void ExtractKeyPhrasesButton_Click(object sender, RoutedEventArgs e) { string fileContent = FileContentTextBox.Text; if (!string.IsNullOrEmpty(fileContent)) { KeyPhraseCollection keyPhrases = await _client.ExtractKeyPhrasesAsync(fileContent); ResultLabel.Text = $"Key Phrases: {string.Join(", ", keyPhrases)}"; } }
private async void RecognizeEntitiesButton_Click(object sender, RoutedEventArgs e) { string fileContent = FileContentTextBox.Text; if (!string.IsNullOrEmpty(fileContent)) { CategorizedEntityCollection entities = await _client.RecognizeEntitiesAsync(fileContent); string entitiesResult = ""; foreach (var entity in entities) { entitiesResult += $"{entity.Text} ({entity.Category}), "; } ResultLabel.Text = $"Entities: {entitiesResult.TrimEnd(',', ' ')}"; } }
private async void DetectLanguageButton_Click(object sender, RoutedEventArgs e) { string fileContent = FileContentTextBox.Text; if (!string.IsNullOrEmpty(fileContent)) { DetectedLanguage language = await _client.DetectLanguageAsync(fileContent); ResultLabel.Text = $"Detected Language: {language.Name}"; } }
private async void SummarizeTextButton_Click(object sender, RoutedEventArgs e) { string fileContent = FileContentTextBox.Text;
if (!string.IsNullOrEmpty(fileContent)) { try { // Start the text summarization operation and wait // until it completes. var summaryOperation = await _client.ExtractiveSummarizeAsync( WaitUntil.Completed, new List<string> { fileContent });
// Initialize a string to store the summary. string summarizedText = "";
// Process the results asynchronously. await foreach (var document in summaryOperation.Value) { var firstDocument = document.FirstOrDefault();
if (firstDocument != null && !firstDocument.HasError) { foreach (var sentence in firstDocument.Sentences) { summarizedText += sentence.Text + " "; } } else { summarizedText = "An error occurred during text summarization."; } }
// Display the summarized text in the UI. ResultLabel.Text = $"Summarized Text: {summarizedText}"; } catch (Exception ex) { ResultLabel.Text = $"An error occurred: {ex.Message}"; } } } } |
At the top of the code implementation, you need to initialize the endpoint and apiKey variables with the service endpoint and API key that you previously stored from the Azure Portal. Following is a list of relevant objects from the Azure SDK used in the code for Azure AI Language:
· The TextAnalyticsClient client class is used for interacting with the Azure AI Language service. It provides various methods to analyze text data, such as ExtractiveSummarizeAsync to perform text summarization, AnalyzeSentimentAsync to perform sentiment analysis on text data, RecognizeEntitiesAsync to retrieve named entities, DetectLanguageAsync to detect the predominant language inside text, and ExtractKeyPhrasesAsync to extract key phrases from text.
· The ExtractiveSummarizeOperation object is returned by the ExtractiveSummarizeAsync method and represents the long-running summarization operation. The Value property contains the summarization results, which can be iterated over to access individual summarized documents. Additionally, methods like WaitForCompletionAsync can be used to await the completion of the operation, making it easier to manage asynchronous workflows.
· The ExtractiveSummarizeResultCollection holds the results of a text summarization operation. Each result in the collection corresponds to one document that was summarized. The Count property allows for iterating over the collection, and each document result can be accessed through its index.
· The ExtractiveSummarizeResult class represents the summarized result of a single document. It includes the Sentences property, which is a collection of SummarySentence objects representing the sentences that make up the summary. The HasError property indicates whether there was an error processing the document, and the Id property identifies the document in the collection.
· The SummarySentence class represents a single sentence in a summarized document. The Text property contains the actual text of the sentence, and the RankScore property indicates the sentence's relevance within the document, with higher values indicating greater importance. Other properties, like Offset and Length, provide information about the position of the sentence within the original document.
· The DocumentSentiment object is returned by the AnalyzeSentimentAsync method and represents the result of sentiment analysis. It contains the Sentiment property, which indicates the overall sentiment of the text, and ConfidenceScores, which provides confidence levels for each sentiment category (positive, neutral, and negative).
· The CategorizedEntityCollection collection is returned by the RecognizeEntitiesAsync method. It contains categorized entities recognized in the text, such as people, organizations, or locations. Each entity in the collection is described by its category, subcategory, and confidence score, allowing for detailed entity recognition and analysis.
· The DetectedLanguage object is returned by the DetectLanguageAsync method and represents the detected language in a document. It includes the Name property, which indicates the name of the detected language, and the ConfidenceScore property, which shows the confidence level of the detection. This is useful for determining the primary language of a document or set of documents in multilingual applications.
By combining these objects and methods, developers can extend their applications to include various text analytics capabilities such as summarization, sentiment analysis, entity recognition, key phrase extraction, and language detection using the Azure AI Language service. This enables more comprehensive text processing in real-world applications.
Errors and exceptions
If language analysis fails, the Azure AI Language service can throw the following exceptions:
· InvalidDocumentException: Thrown when the document provided for analysis (e.g., for sentiment or text analytics) doesn’t meet format or content requirements.
· DocumentLimitExceededException: Thrown when the batch size exceeds the limit allowed by the service for a single request.
Do not forget to implement a try..catch block as a best practice for exception handling.
Running the application
Press F5 to run the application. Click Open File and select a .txt file that contains some text suitable for a full language analysis. The companion source code contains a file called text.txt that you can use for simplicity; it’s the base for the next figures. The first analysis type is sentiment analysis. Click the Analyze Sentiment button, and you will get the result shown in Figure 15.
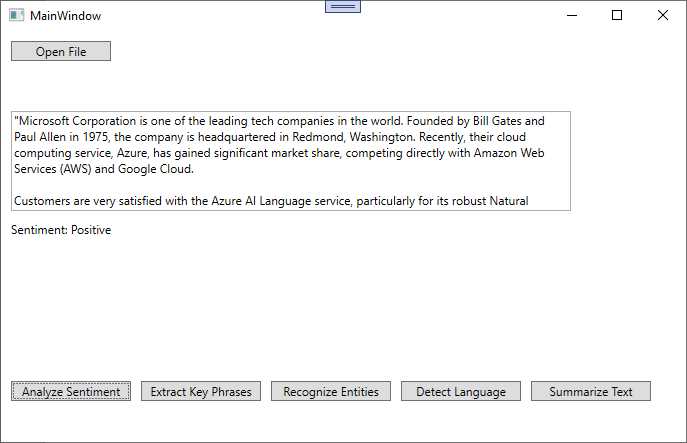
Figure 15: Analyzing the sentiment from the text
As you can see, the language analysis returned a positive sentiment. Now click Extract Key Phrases. You will get the result shown in Figure 16.
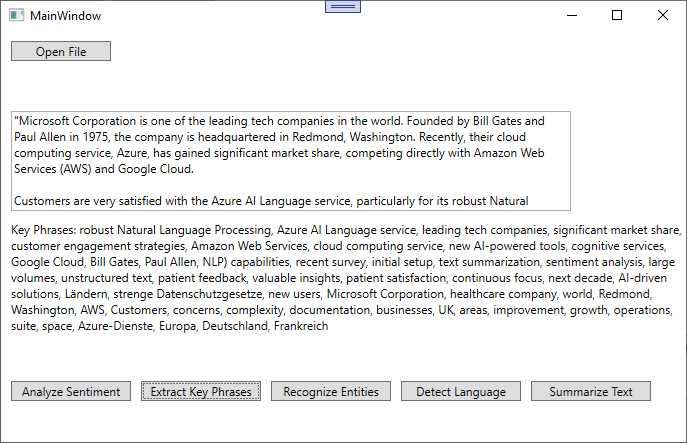
Figure 16: Extracting key phrases
As you can see, the list is quite long, but you can quickly understand the work done by the language analysis engine in collecting the relevant key phrases. Now, click Recognize Entities to get the result shown in Figure 17.
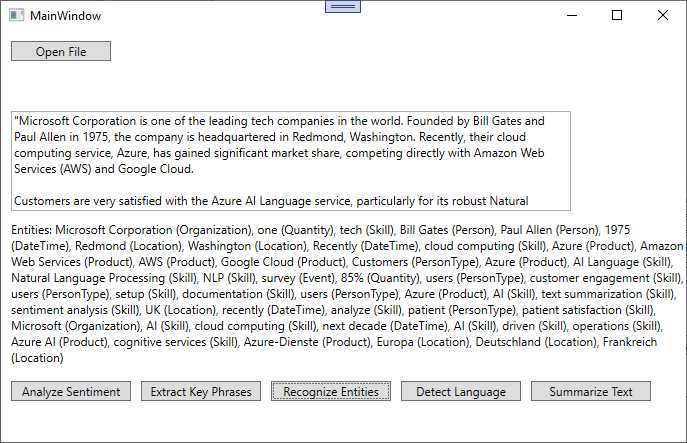
Figure 17: Extracting named entities
As you can see, the analysis engine returns a long list of named entities detected in the text, also specifying the type of entity (for example, person, quantity, DateTime). This is extremely valuable because it allows you to filter entities by type.
Now, click Detect Language. If you look at Figure 18, you can see that the language detected is English, even if there are some sentences in German. The reason is that the analysis engine returns the prominent language.
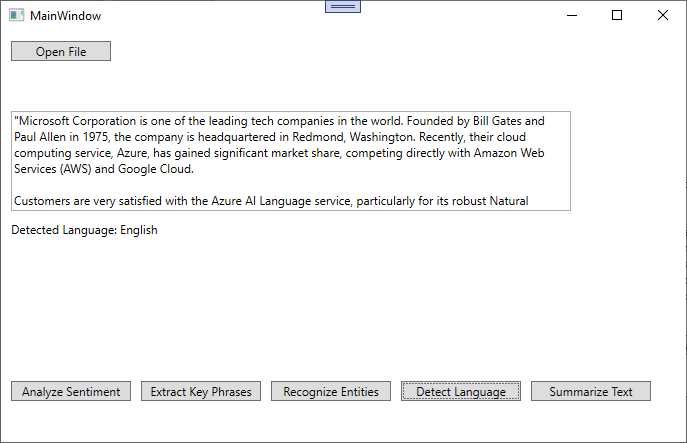
Figure 18: Detecting languages
Finally, click Summarize Text. As you can see in Figure 19, the AI Language service returns a summary of the original text.
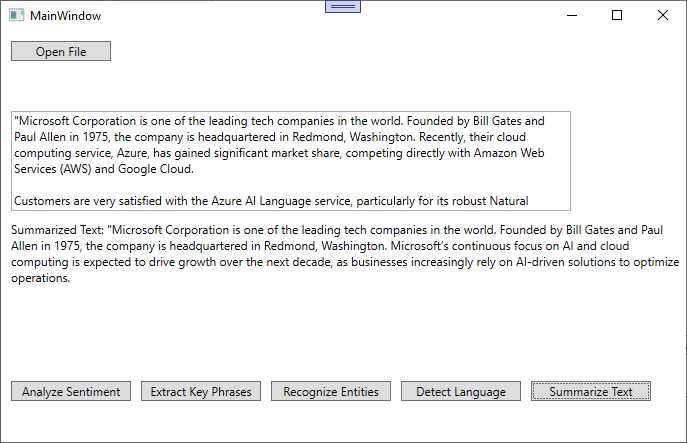
Figure 19: Extracting text summaries
With extremely limited effort, you have been able to perform advanced text analysis taking advantage of natural language processing.
Chapter summary
The Microsoft Azure AI Language service offers robust capabilities for processing and analyzing unstructured text data, enabling businesses to extract meaningful insights. This service integrates smoothly with applications using Azure SDKs, and by following the steps in this chapter, developers can create powerful applications that leverage these AI capabilities.
The sample application demonstrated how to use the Azure AI Language service in a WPF application, focusing on all the text analysis features for text files. By implementing this service, businesses can automate text analysis workflows and gain insights into customer sentiment, document summarization, and more, while benefiting from the scalability and security of Azure's cloud infrastructure.
- 1800+ high-performance UI components.
- Includes popular controls such as Grid, Chart, Scheduler, and more.
- 24x5 unlimited support by developers.