
Azure AI Services Succinctly®

CHAPTER 9
Azure AI Computer Vision Services
The AI Computer Vision services represent one of the most relevant technologies in the AI offerings from Microsoft, because they target advanced image and video analysis; therefore, they can be of extremely common application. This chapter describes how to perform image and OCR analysis with AI Computer Vision services, with examples that developers can immediately apply in their scenarios.
Introducing Azure AI Computer Vision services
Microsoft Azure AI Computer Vision, also referred to as Computer Vision, is a part of Azure's cognitive services that allows developers to integrate advanced computer vision capabilities into their applications. Leveraging state-of-the-art machine learning models, it enables the analysis and understanding of visual data, such as images, videos, and spatial information.
This service provides a range of features including image recognition, facial analysis, optical character recognition (OCR), and spatial analysis. With Azure AI Computer Vision, businesses can automate tasks that require visual data processing, such as extracting text from images, identifying objects, or analyzing movement in physical spaces.
Azure AI Computer Vision is cloud-based, which means that it allows businesses to scale and manage vision-related workloads without the need for on-premises infrastructure. The service supports a wide range of industries, from retail and manufacturing to healthcare, providing solutions that help automate and enhance business operations using AI-powered visual analytics.
Azure AI Computer Vision is a comprehensive service that provides several functionalities aimed at enabling businesses to extract insights from visual data. Some of the primary features include:
· Image analysis: The image analysis service provides a set of functionalities to analyze images and extract valuable insights. Using advanced algorithms, it detects objects, people, and scenes; categorizes images into thousands of predefined tags; and provides a summary of the image content in the form of a description. It also supports image moderation to detect explicit or unwanted content. This service can handle various image formats, and it provides analysis results in JSON format, making it easy to integrate with different types of applications.
· Facial recognition: The facial recognition service focuses on identifying and analyzing human faces in images or video feeds. It allows developers to detect and compare faces, determine facial attributes such as age and gender, and even recognize emotions. It is commonly used in security and identity verification systems. Additionally, it supports creating face databases to recognize individuals and track their interactions over time. Privacy and security are key concerns, and Azure AI Computer Vision offers encryption and compliance features to meet legal requirements.
· Spatial analysis: This service enables developers to derive insights from real-time video feeds. It uses AI models to detect and track movement in predefined spaces, identifying patterns and generating actionable insights. Common use cases include analyzing customer behavior in retail environments, monitoring safety protocols in workplaces, and ensuring social distancing in public areas. Spatial analysis leverages Azure's scalable architecture to handle large amounts of video data and can be integrated with IoT devices for enhanced automation.
· Optical character recognition (OCR): Azure’s OCR capability transforms images of text into machine-readable formats, supporting multiple languages and a wide range of image formats. OCR is commonly used in scenarios such as document scanning, data extraction from forms, and processing handwritten notes. The service can identify text in various fonts and styles and convert it into structured data that can be processed further or stored for future use.
As you can imagine, intelligent applications built on top of Azure AI Computer Vision can dramatically help companies automate and improve their processes. The aforementioned services are divided into two main groups: image analysis, spatial analysis, and OCR recognition are part of the Computer Vision group. Face recognition is exposed by the Face API group. Both go under the umbrella of the AI Computer Vision services. In the next sections, you will start using AI Computer Vision with specific code examples built on top of WPF with a convenient user interface.
Exclusions and limitations
The Azure AI Computer Vision services are extremely powerful, and for this reason they are strictly regulated. For example, the Face recognition service can detect biometric information and could help identify people and their physical characteristics. As you can imagine, this can lead to enormous risks if the collected data is obtained, stored, and retrieved without the appropriate permissions or outside scenarios specified by national and international laws.
Based on this, Microsoft decided to open Face API only to customers and organizations that submit a registration form and comply with specific legal requirements. All the necessary information can be found in the Limited Access to Face API page. As a consequence, this chapter will only describe how to set up an application and how to write the necessary code to work with Face API, but no image will be analyzed, and no screenshot will be provided.
Note: For some Azure regions, Microsoft could allow age estimation and gender detection without the need to submit a registration form.
Spatial analysis involves analyzing real-time videos via IP cameras and requires the presence of multiple people to provide an appropriate result. Therefore, only a description of the service and of the related .NET objects will be provided.
Configuring the Azure AI Computer Vision resources
Before diving into code examples, you need to set up the Azure AI Computer Vision service in the Azure Portal. To accomplish this, follow these steps based on what you learned in the previous chapters:
- Go to the Azure Portal and sign in with your Azure account.
- Click Azure AI services. Figure 39 shows where you can find both the Computer Vision and Face API services.
- Click Create on the Computer vision card.
- On the Create Computer Vision page, choose your Azure subscription and specify the resource group you created previously.
- Choose the region closest to your location and enter a unique name for your AI Computer Vision resource, for example, ai-vision-succinctly.
- In the Pricing Tier box, select the Free plan.
- Make sure you acknowledge that you have read the notice about responsible usage of AI. Carefully read the full note and then select the related checkbox.
- Click Review + Create > Create.
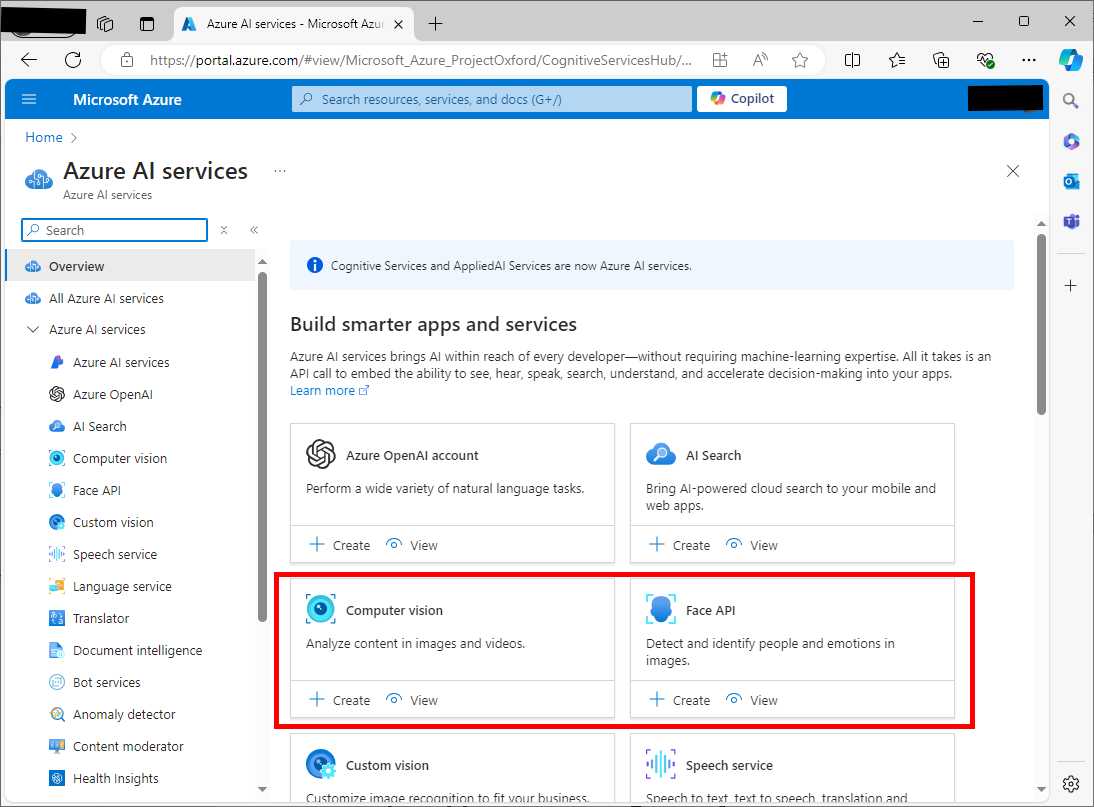
Figure 39: Locating the Computer Vision and Face API groups
Once the resource is created, go to the resource's overview page and locate your API key and endpoint. These will be required to interact with the Azure AI Computer Vision service in C# code.
Sample application: image analysis
The goal of the first sample application is to allow users to upload an image from the local machine and analyze it using the Azure AI Computer Vision’s image analysis service. The application will display detected objects, tags, and a description of the image.
Open Visual Studio Code and start a new instance of the Terminal. When ready, type the following sequence of commands:
> md \AIServices\ImageAnalysisApp
> cd \AIServices\ImageAnalysisApp
> dotnet new wpf
> dotnet add package Microsoft.Azure.CognitiveServices.Vision.ComputerVision
The Microsoft.Azure.CognitiveServices.Vision.ComputerVision NuGet package is required to work against image analysis and OCR recognition features. When you’re ready, open the project in VS Code. At this point, you can define a simple user interface.
Defining the user interface
In the MainPage.xaml file, add the code shown in Code Listing 20.
Code Listing 20
<Window x:Class="ImageAnalysisApp.MainWindow" xmlns="http://schemas.microsoft.com/winfx/2006/xaml/presentation" xmlns:x="http://schemas.microsoft.com/winfx/2006/xaml" xmlns:d="http://schemas.microsoft.com/expression/blend/2008" xmlns:mc="http://schemas.openxmlformats.org/markup-compatibility/2006" xmlns:local="clr-namespace:ImageAnalysisApp" mc:Ignorable="d" Title="MainWindow" Height="450" Width="800"> <Grid> <Grid.RowDefinitions> <RowDefinition Height="Auto"/> <RowDefinition Height="Auto"/> <RowDefinition Height="Auto"/> </Grid.RowDefinitions> <Button Content="Upload Image" HorizontalAlignment="Left" VerticalAlignment="Top" Width="120" Margin="10,10,0,0" Height="30" Click="UploadImage_Click"/> <Image Grid.Row="1" x:Name="UploadedImage" HorizontalAlignment="Left" VerticalAlignment="Top" Margin="10,10,0,0" Width="300" Height="300"/> <TextBlock Grid.Row="2" x:Name="AnalysisResult" HorizontalAlignment="Left" VerticalAlignment="Top" Margin="10,10,0,0" TextWrapping="Wrap" FontSize="16"/> </Grid> </Window> |
As you can see, the user interface is very simple: it contains a button that allows for uploading an image file of choice, an Image control to display the image, and a TextBlock that displays the analysis result. Now it is time to leverage the image analysis API in C#.
Image analysis in C#
The purpose of the code is to make the application analyze an image and display a description, tags, and detected objects. For instance, uploading an image of a car might result in the description "A red car on the road," tags such as "car" and "road," and object detection for the car itself. Code Listing 21 demonstrates how to accomplish this, with code that you need to write into the MainPage.xaml.cs file.
Code Listing 21
using System; using System.IO; using System.Windows; using System.Windows.Media; using System.Windows.Media.Imaging; using Microsoft.Azure.CognitiveServices.Vision.ComputerVision; using Microsoft.Azure.CognitiveServices.Vision.ComputerVision.Models;
namespace ImageAnalysisApp { public partial class MainWindow : Window { private readonly string subscriptionKey = "your-api-key"; private readonly string endpoint = "your-endpoint"; private readonly ComputerVisionClient client;
public MainWindow() { InitializeComponent(); client = new ComputerVisionClient( new ApiKeyServiceClientCredentials(subscriptionKey)) { Endpoint = endpoint }; }
private async void UploadImage_Click(object sender, RoutedEventArgs e) { var openFileDialog = new Microsoft.Win32.OpenFileDialog(); openFileDialog.Filter = "Image files (*.jpg, *.jpeg, *.png)|*.jpg;*.jpeg;*.png";
if (openFileDialog.ShowDialog() == true) { string filePath = openFileDialog.FileName; UploadedImage.Source = new BitmapImage(new Uri(filePath)); using (var imageStream = File.OpenRead(filePath)) { var features = new List<VisualFeatureTypes?> { VisualFeatureTypes.Tags, VisualFeatureTypes.Description, VisualFeatureTypes.Objects }; var analysis = await client. AnalyzeImageInStreamAsync(imageStream, features);
string result = $"Description: " + $"{analysis.Description.Captions[0].Text}\n"; result += "Tags: " + string.Join(", ", analysis.Tags.Select(tag => tag.Name)) + "\n"; result += "Objects:\n";
foreach (var obj in analysis.Objects) { result += $"- {obj.ObjectProperty} at " + $"{obj.Rectangle.X},{obj.Rectangle.Y}\n"; }
AnalysisResult.Text = result; } } } } } |
Following is a list of the relevant types and members used in the code:
· The ComputerVisionClient class provides access to the Azure Computer Vision API. It facilitates the analysis of images by interacting with the cloud service. In the sample, the AnalyzeImageInStreamAsync method is used to submit an image for analysis, but the class also supports other methods for different scenarios. These include AnalyzeImageAsync for image URLs, and ReadAsync for text extraction. The ComputerVisionClient class requires an instance of ApiKeyServiceClientCredentials to authenticate with the Azure service.
· The VisualFeatureTypes enumeration defines the types of visual features that can be extracted from an image. In the sample, Objects and Tags are requested, but other values are available for different use cases. For instance, Categories returns a hierarchical list of objects, while Description generates human-readable descriptions of the image content. The enumeration also includes values like Faces, ImageType, Color, and Adult, which provide information on the people in the image, the image's type, dominant colors, and the presence of adult content, respectively.
· The DetectedObject class represents objects detected in an image. It contains properties such as ObjectProperty, which holds the name of the detected object, and Confidence, which indicates the model's confidence level in the detection. The DetectedObject class also includes Rectangle, a property of type BoundingRect, which provides the coordinates of the bounding box around the detected object. This enables drawing or highlighting the detected objects in a user interface. The sample demonstrates the use of these properties to retrieve and display the name and bounding box of each detected object.
· The ImageTag class represents the tags generated from the image analysis. Each tag is associated with a specific object or concept identified in the image. The ImageTag class contains properties like Name, which represents the tag’s name, and Confidence, which indicates the model’s confidence level in the accuracy of the tag. In the sample, tags are extracted and listed along with their confidence values. Tags can be used for metadata generation, content categorization, or search indexing in various applications.
Now that you have more details about the relevant objects, it’s time to run the application.
Running the application
To run the application, you can either press F5 for debugging mode or type dotnet run in the Terminal. When the application starts, click Upload Image and select an image you want to analyze. The companion solution includes an image, whose analysis results are as shown in Figure 40.
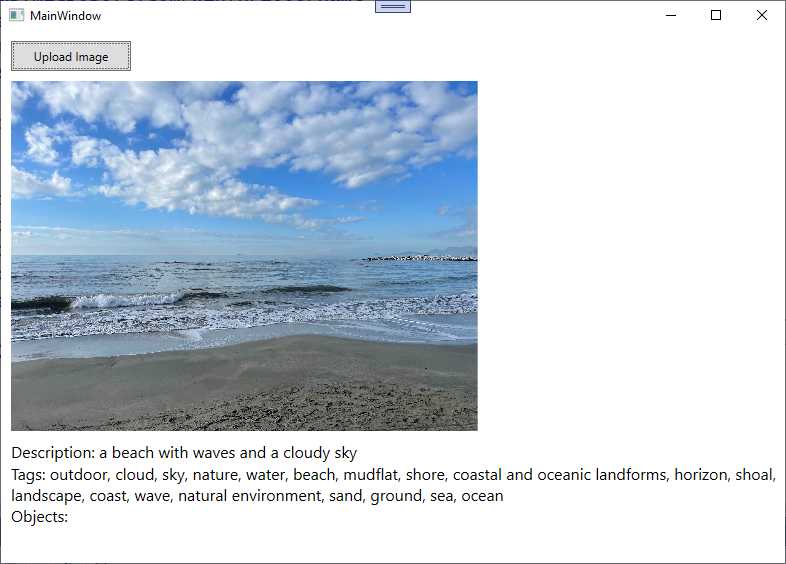
Figure 40: Image analysis result
As you can see, the Computer Vision service has returned a description in natural language, also providing tags. No objects are detected in the picture, so these are not described. You can easily imagine the potential of this feature, for example in helping visually impaired people.
Sample application: face detection
Note: Based on the limitations described at the beginning of this chapter, only the source code and explanation will be provided.
The Face API can not only detect faces inside an image or video, but also their attributes, including biometric characteristics. The purpose of the sample code is to detect faces in a locally stored image and analyze facial attributes such as age and emotions.
Follow the steps you already know to create a new WPF application called FaceAnalysisApp in Visual Studio Code. You also need to install the Microsoft.Azure.CognitiveServices.Vision.Face NuGet package, currently in preview, with the following command line:
> dotnet add package Microsoft.Azure.CognitiveServices.Vision.Face
At this point, you can configure the Azure resources.
Configuring the Azure resources
Face recognition relies on a dedicated Azure service called Face API, so you cannot reuse the resources created previously. In the Azure Portal, click AI Services. Locate the Face API service (see Figure 38) and click Create. Follow the same steps described for image analysis to set up the new service, which can be called face-succinctly-service. Review and create the Face API service and, when deployed, follow the steps you know to retrieve the endpoint and API key.
Defining the user interface
For the user interface, you can simply reuse the XAML shown in Code Listing 4, which allows you to upload an image and display the analysis results.
Face detection in C#
The sample application will detect faces in an uploaded image and display attributes such as estimated age and dominant emotions. For example, uploading an image of a person smiling may result in detecting a face with the emotion "Happiness." To accomplish this, write the code shown in Code Listing 22 in the code-behind file for the main page.
Code Listing 22
using System; using System.IO; using System.Linq; using System.Windows; using System.Windows.Media.Imaging; using Microsoft.Azure.CognitiveServices.Vision.Face; using Microsoft.Azure.CognitiveServices.Vision.Face.Models;
namespace FaceAnalysisApp { /// <summary> /// Interaction logic for MainWindow.xaml /// </summary> public partial class MainWindow : Window { private readonly string subscriptionKey = "your-key-here"; private readonly string endpoint = "your-endpoint-here"; private readonly FaceClient faceClient;
public MainWindow() { InitializeComponent(); faceClient = new FaceClient( new ApiKeyServiceClientCredentials(subscriptionKey)) { Endpoint = endpoint }; }
private async void UploadImage_Click(object sender, RoutedEventArgs e) { var openFileDialog = new Microsoft.Win32.OpenFileDialog(); openFileDialog.Filter = "Image files (*.jpg, *.jpeg, *.png)|*.jpg;*.jpeg;*.png";
if (openFileDialog.ShowDialog() == true) { string filePath = openFileDialog.FileName; UploadedImage.Source = new BitmapImage(new Uri(filePath)); using (var imageStream = File.OpenRead(filePath)) { var faceAttributes = new FaceAttributeType[] { FaceAttributeType.Age, FaceAttributeType.Emotion }; var faces = await faceClient. Face.DetectWithStreamAsync(imageStream, returnFaceAttributes: faceAttributes);
string result = "Detected faces:\n";
foreach (var face in faces) { result += $"- Face detected with age: {face.FaceAttributes.Age}, " + $"Emotion: {face.FaceAttributes.Emotion. ToRankedList(). FirstOrDefault().Key}\n"; }
AnalysisResult.Text = result; } } } } } |
Following is a list of relevant types and members used to perform face recognition:
· FaceClient: The main client class to interact with Azure’s facial recognition service.
· FaceAttributeType: Specifies the facial attributes to detect, such as age and emotions.
· DetectedFace: Represents a detected face, containing information about the face's attributes.
· DetectWithStreamAsync: A method that executes the actual analysis over a stream. As an alternative, you can use DetectWithUrlAsync if the image can be reached via URL.
· FaceAttributes: A collection of detected face attributes. Each attribute is represented by a property; for example, Age represents the estimated age, and Emotion represents the emotional attributes detected on the face. Properties like Age and Emotion contain collections of values, ordered by rank.
· ToRankedList: A method that returns an IEnumerable<KeyValuePair<string, double>>. Values in this collection are ordered by rank, from the highest match to the lowest.
As mentioned previously, you will be able to run face detection only if you submit a registration form to Microsoft and your application is approved.
Sample application: OCR
The goal of the third sample application is to show the optical character recognition (OCR) features provided by the Azure AI Computer Vision service. This will be demonstrated by retrieving text detected on a JPEG image. For the sake of simplicity, an image file with text is included with the companion source code and can be used for the next example. The good news is that you do not need to configure a new Azure resource, because OCR recognition is part of the image analysis API that you already configured and used for the first sample application. Having said this, open the Terminal in Visual Studio Code and create a new WPF app called OCRApp with the following commands:
> md \AIServices\OCRApp
> cd \AIServices\OCRApp
> dotnet new wpf
> dotnet add package Microsoft.Azure.CognitiveServices.Vision.ComputerVision
When you’re done, open the project folder in Visual Studio Code and open the MainPage.xaml file.
Defining the user interface
For the user interface, you can safely reuse the same XAML code shown in Code Listing 4. In fact, you need the same visual elements: a button to load the image file, an Image control to display the image, and a TextBlock that shows the analysis result. At this point, you can implement the C# code that performs the image analysis.
OCR in C#
The application will extract text from the uploaded image and display it in the text area. For example, uploading an image of a receipt will result in the display of its printed text. To accomplish this, open the MainPage.xaml.cs file and add the code shown in Code Listing 23 (an explanation is coming shortly). Notice that you use the same API key and service endpoint of the first sample project.
Code Listing 23
using Microsoft.Azure.CognitiveServices.Vision.ComputerVision; using System.IO; using System.Windows; using System.Windows.Media.Imaging;
namespace OCRApp { public partial class MainWindow : Window { private readonly string subscriptionKey = "your-api-key"; private readonly string endpoint = "your-endpoint"; private readonly ComputerVisionClient client;
public MainWindow() { InitializeComponent(); client = new ComputerVisionClient( new ApiKeyServiceClientCredentials(subscriptionKey)) { Endpoint = endpoint }; }
private async void UploadImage_Click(object sender, RoutedEventArgs e) { var openFileDialog = new Microsoft.Win32.OpenFileDialog(); openFileDialog.Filter = "Image files (*.jpg, *.jpeg, *.png)|*.jpg;*.jpeg;*.png";
if (openFileDialog.ShowDialog() == true) { string filePath = openFileDialog.FileName; UploadedImage.Source = new BitmapImage(new Uri(filePath)); using (var imageStream = File.OpenRead(filePath)) { var ocrResult = await client. RecognizePrintedTextInStreamAsync(true, imageStream);
string result = "Extracted text:\n";
foreach (var region in ocrResult.Regions) { foreach (var line in region.Lines) { result += string.Join(" ", line.Words.Select(word => word.Text)) + "\n"; } }
AnalysisResult.Text = result; } } } } } |
Following is a description of the relevant types and members used for OCR:
· The ComputerVisionClient class is the main entry point for accessing the Azure Cognitive Services Computer Vision API. In the example, the RecognizePrintedTextInStreamAsync method is used to perform OCR on an image stream. This method sends the image to the Azure service, where it recognizes printed text. The client requires authentication via the ApiKeyServiceClientCredentials class, which is initialized with the subscription key provided by Azure. Additionally, the Endpoint property must be set to the service's endpoint URL to establish the connection.
· The RecognizePrintedTextInStreamAsync method takes a Boolean parameter to specify whether to detect the text orientation and a stream containing the image data. The result of this method is an OcrResult object, which contains the recognized text broken down into regions, lines, and words. Alternative methods such as RecognizePrintedTextAsync can be used to perform OCR on images from a URL rather than a stream.
· The OcrResult class encapsulates the result of the OCR operation. It contains the Regions property, which is a collection of OcrRegion objects. Each OcrRegion represents a detected block of text within the image, typically corresponding to paragraphs or larger text areas. The OcrResult also includes the Language property, indicating the detected language of the text in the image. The Orientation property specifies the text orientation, such as up, down, or sideways.
· The OcrRegion class represents a region of detected text in the image. It contains the Lines property, which is a collection of OcrLine objects. Each OcrRegion corresponds to a larger block of text, like a paragraph, and within that region, text is further broken down into lines. The BoundingBox property provides the coordinates of the region, allowing for spatial analysis of where the text is located within the image.
· The OcrLine class represents a line of text within an OcrRegion. It contains the Words property, which is a collection of OcrWord objects. The OcrLine object also includes a BoundingBox property, which gives the coordinates of the line within the image. The sample code iterates through the Lines property of each OcrRegion to extract and display the recognized text.
· The OcrWord class represents an individual word recognized in a line of text. The Text property contains the actual word recognized by the OCR service. Like OcrRegion and OcrLine, the OcrWord object has a BoundingBox property that specifies the word's position within the image. The sample code demonstrates how to concatenate the recognized words in a line to form the complete text output.
The RecognizePrintedTextInStreamAsync method uses the TextRecognitionMode enumeration to distinguish between printed text and handwritten text. The enumeration has two values: Printed, which is used when recognizing printed text, and Handwritten, which is used when recognizing handwritten text, allowing for the identification of cursive or printed handwriting. Now that you have knowledge of the SDK types for OCR, it is time to start the application.
Running the application
You can now run the application, pressing F5 to start it in debugging mode or typing dotnet run in the Terminal. When you’re ready, click Upload Image. Select an image file that contains text, such as the sample image included with the companion solution. Figure 41 shows the result of the OCR processing on the companion image file.

Figure 41: Result of the AI-powered OCR
This is another extremely powerful feature: imagine the combination of OCR with translation services, and how this could help customers worldwide. Also, remember that OCR works with any image that contains text, not just plain text saved as image files.
Hints about Spatial Analysis
Azure Spatial Analysis, part of the Azure AI Computer Vision suite, is designed to analyze physical spaces by tracking objects (like people) in a given environment using live video feeds from connected cameras. The service provides capabilities such as monitoring room occupancy, social distancing, and tracking the movement of people in real-time. Spatial analysis can be highly valuable for businesses, security systems, and smart building management.
Azure Spatial Analysis relies on the Azure Cognitive Services Computer Vision SDK, which handles the interaction with the service. The main types and methods involved in setting up a spatial analysis application are summarized in Table 4.
Table 4: Relevant types used for spatial analysis
.NET Type | Description |
|---|---|
ComputerVisionClient | This class is the main entry point for interacting with the Computer Vision service, including spatial analysis features. It provides methods for sending video frames and receiving analyzed data. |
AnalyzeImageInStreamAsync | Used for analyzing images or video frames streamed to the API. While this is more commonly used for image analysis, spatial analysis often involves sending frames from a video stream for continuous evaluation. |
SpatialAnalysisConfiguration | Represents the configuration for a spatial analysis operation. It includes information such as the camera setup, spatial zones, and rules for triggering events (e.g., when a specific number of people enter a designated area). |
SpatialOperationResult | The result object returned after performing a spatial analysis operation. It contains the analyzed data from the video feed, including information like detected people, their positions, and any specific rule violations. |
PeopleCount | The number of people detected within the analyzed area. |
OccupancyStatus | Information about the occupancy in specific zones. |
PersonDetails | Detailed information about each detected person, such as their location, movement patterns, and proximity to others. |
Zone | Defines a specific area within the spatial environment that you want to monitor. A zone can represent rooms, aisles, or specific boundaries where you want the analysis to occur. |
Person | Represents an individual detected in the video feed. This object includes data like the person’s location, movement, and interaction with other people or objects within the defined zones. |
ProximityRule | A configuration object that defines rules for proximity analysis, such as checking whether two or more people are standing too close to each other. This is particularly useful for enforcing social distancing rules in a physical space. |
Further information and code examples about accessing IP (Internet Protocol) cameras can be found in the official documentation page.
Errors and exceptions
If any of the requested services fails, the Azure AI Vision service can throw the following exceptions:
· ImageFormatException: Thrown when the provided image for analysis is in an unsupported format (e.g., TIFF when only JPEG or PNG is allowed).
· OCRLanguageNotSupportedException: Thrown when the OCR service does not support the language in the image.
Do not forget to implement a try..catch block as a best practice for exception handling.
Chapter summary
Microsoft Azure AI Computer Vision provides powerful tools for integrating AI-driven image and video analysis into applications. From recognizing objects and faces to extracting text from images and analyzing spatial movement, these services can enhance a wide range of business applications.
The provided code examples demonstrate real-world use cases such as image tagging, face detection, and OCR, offering a practical starting point for developers seeking to leverage Azure AI Computer Vision in their applications. By integrating these services, businesses can improve automation, security, and data extraction processes, ultimately leading to more intelligent and efficient operations.
- 1800+ high-performance UI components.
- Includes popular controls such as Grid, Chart, Scheduler, and more.
- 24x5 unlimited support by developers.