
Avalonia UI Succinctly®

CHAPTER 2
Cross-Platform Development with Avalonia UI
Configuring the development environment for Avalonia UI is a fast and easy task. You will need to install the Avalonia UI project templates and a Visual Studio extension that enables the visual designer and the appropriate IntelliSense support. This chapter explains how to configure the development environment, how to create projects within Visual Studio, and how to generate cross-platform solutions for mobile devices. We will not cover setting up the environment for JetBrains Rider.
Setting up the development environment
Avalonia UI requires either .NET Core 3.1 or .NET 6.0 (or later) on your machine. Since you are working with Visual Studio, you might already have installed this prerequisite. You can check this in the Visual Studio Installer program.
When the current installation is listed, click the Modify button and open the Individual components tab (see Figure 1).
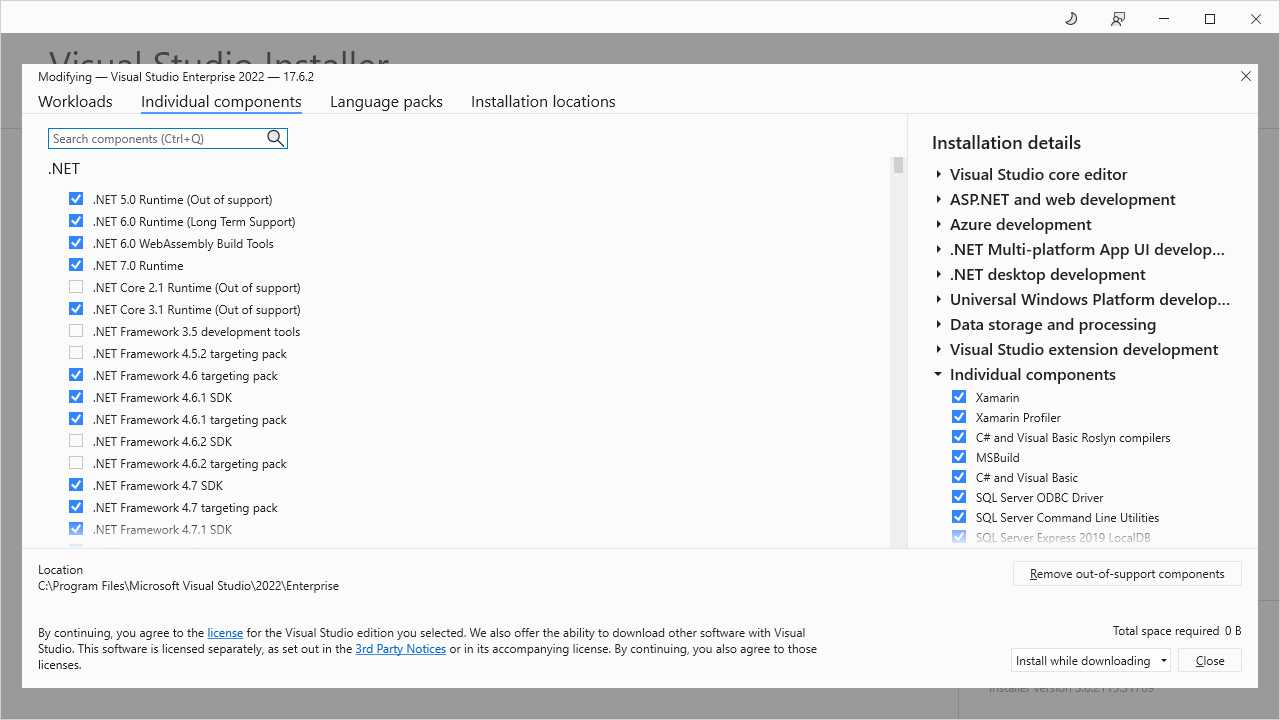
Figure 1: Checking the .NET availability on the development machine
The .NET group at the top shows the list of all the installed .NET components. If multiple versions are installed, the .NET CLI will use the most recent. Though Avalonia UI supports both .NET Core 3.1 and .NET 6.0, the recommendation is that you install .NET 7.0, which is the latest version available.
If this is not possible, make sure you install .NET 6.0: select the appropriate runtime in the list, click Modify, and wait for the installation to complete. Once the .NET prerequisite is installed, you can proceed with the Avalonia UI setup. This consists of two major blocks: specific project templates and a Visual Studio extension. These are described in the next paragraphs.
Installing Avalonia UI project templates
In order to install the Avalonia UI project templates, you need the .NET CLI. From the Windows’ Start menu, open the Developer Command Prompt for VS 2022. When you’re ready, type the following command:
> dotnet new install Avalonia.Templates
This command will install the project templates described in Table 1.
Table 1: Avalonia UI project templates
Project template | Description | Target platforms |
|---|---|---|
Avalonia .NET Core App | A blank Avalonia UI project | Windows, Linux, macOS |
Avalonia .NET Core MVVM App | An Avalonia UI project based on the MVVM pattern | Windows, Linux, macOS |
Avalonia Cross Platform Application | Cross-platform solution for mobile and desktop systems | Android, iOS, web, Windows, Linux, macOS |
Avalonia Resource Dictionary | Reusable collection of XAML resources | Android, iOS, web, Windows, Linux, macOS |
Avalonia Styles | Reusable collection of XAML styles | Android, iOS, web, Windows, Linux, macOS |
Avalonia TemplatedControl | Allows for restyling an existing control | Android, iOS, web, Windows, Linux, macOS |
Avalonia UserControl | A project template to create a new user control | Android, iOS, web, Windows, Linux, macOS |
Avalonia Window | Allows for creating an individual window | Windows, Linux, macOS |
The next step for setting up the development environment is installing the extension for Visual Studio.
Note: Installing the project templates from the command line is a required task because the Visual Studio extension will not install any templates. This also gives you the option to work with Avalonia UI projects outside of Visual Studio. You will also use this command line to update the Avalonia UI templates when a new version is released.
Installing the Visual Studio extension
Avalonia UI provides a convenient visual experience via the Visual Studio extension. This is available for Visual Studio 2017, 2019, and 2022, but this book discusses the latter. Having said this, open Visual Studio 2022. Select Extensions > Manage Extensions, and in the Manage Extensions dialog, search for Avalonia, as shown in Figure 2.
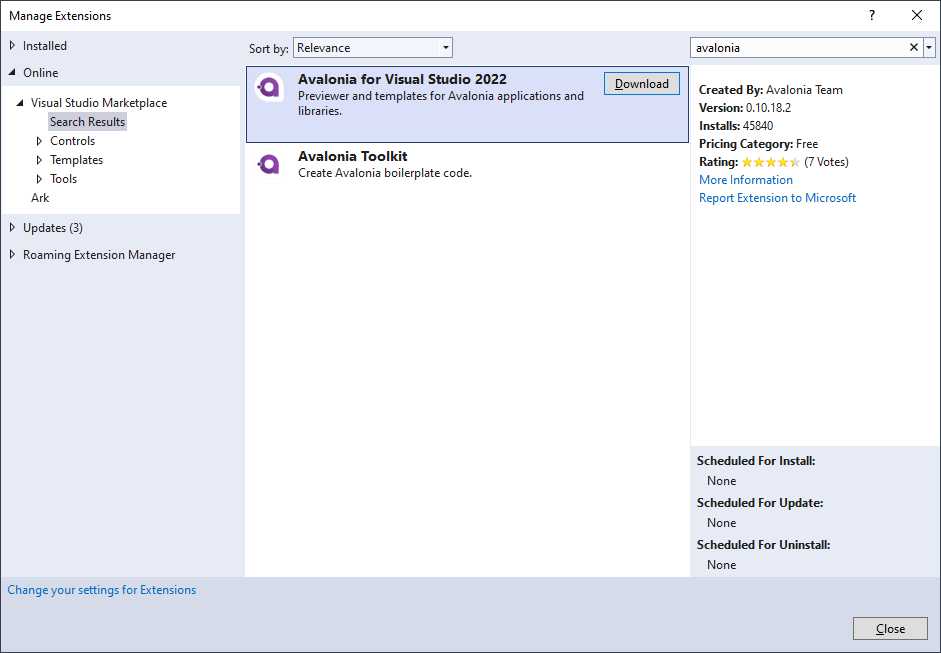
Figure 2: Locating the Avalonia UI extension for VS 2022
The official extension is called Avalonia for Visual Studio 2022. Click Download, then close Visual Studio so that the extension installer will start. The extension will add a visual designer for Avalonia UI, specific IntelliSense support, and the ability to create new projects from within the IDE.
Once the installation of the extension is complete, reopen Visual Studio 2022. You can choose the Continue without code option when the start page appears.
Creating Avalonia UI projects
In Visual Studio 2022, select File > New > Project. In the Create a new project dialog, you can filter the list of project types by selecting Avalonia, as highlighted in Figure 3.
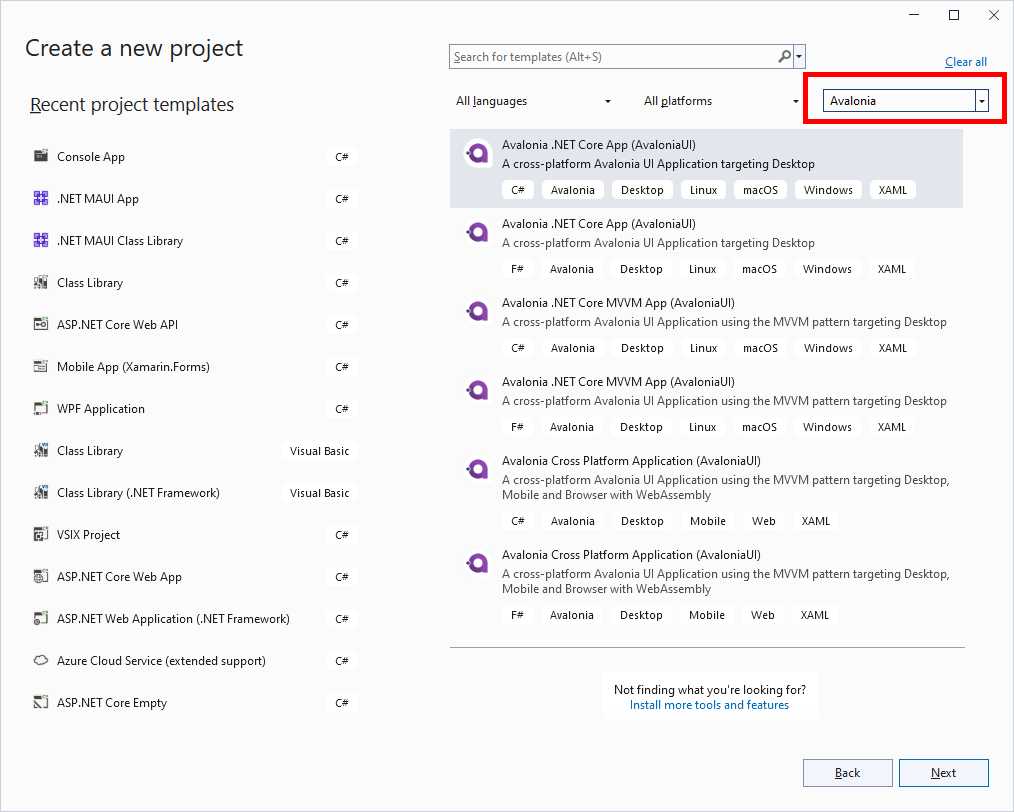
Figure 3: Displaying the list of Avalonia project templates
As you can see, the list of project templates targets both C# and F#, and it covers the templates related to desktop and cross-platform solutions.
Tip: Since there is no integrated option to create a resource dictionary and custom control projects, you will need to manually create projects using the .NET CLI for these particular scenarios.
You will now create two new empty projects with the goal of understanding the project structure of both desktop and cross-platform solutions.
Creating desktop solutions
Avalonia UI provides the following two templates that target desktop applications:
· Avalonia .NET Core App
· Avalonia .NET Core MVVM App
The first template generates an empty project with one window, and it is the best choice for now, so you can focus on understanding the project structure. The second template provides a more sophisticated solution based on a boilerplate implementation of the MVVM pattern, which is an advanced topic that we will touch upon later in the book.
Now, select the Avalonia .NET Core App (AvaloniaUI) template (see Figure 3) and click Next. With templates targeting the desktop, Visual Studio will ask you to specify both the framework and the Avalonia version, as shown in Figure 4.
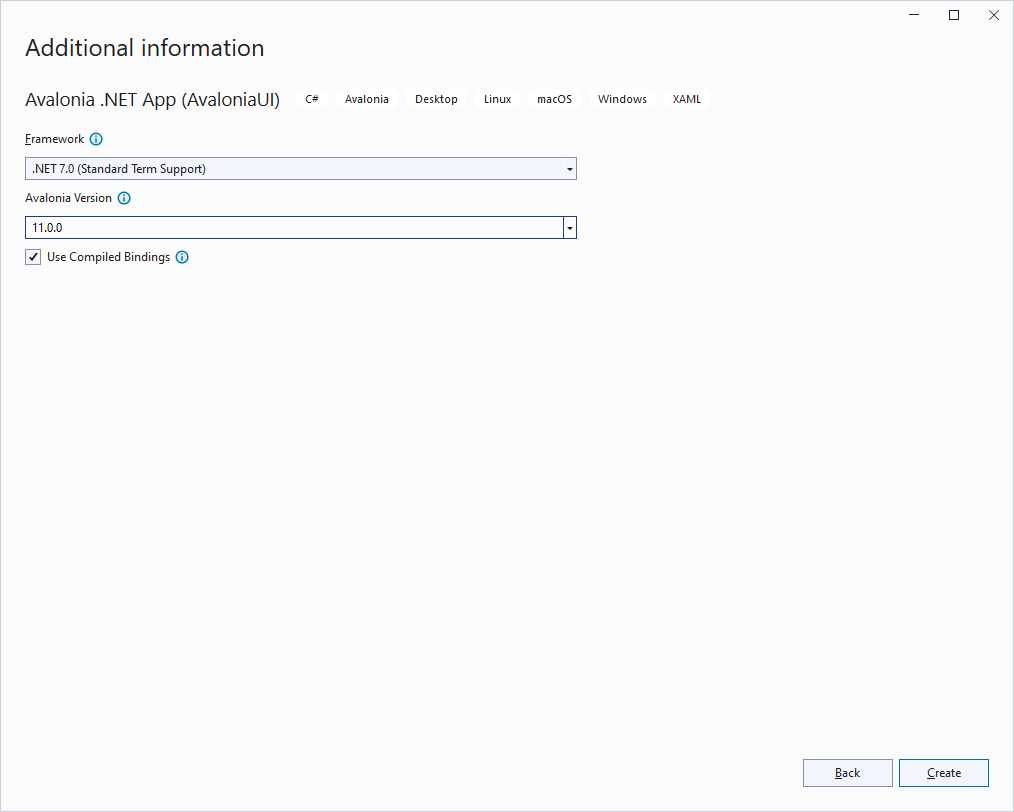
Figure 4: Selecting platform versions
In the Framework dropdown, make sure the highest version of .NET is selected. In the Avalonia Version dropdown, select the latest stable version. At this writing, the latest stable version is 11.0.0. You can leave the Use Compiled Bindings option checked, as this will compile XAML binding expressions at build time rather than at runtime.
When you’re ready, click Create. After a few seconds, the new project is created and available.
Tip: The first thing you must do when a project is created is build the solution. This will enable the full visual experience. You might also need to rebuild the solution when you manually add a new window.
Understanding the project structure
The structure of an Avalonia UI desktop project is very similar to a classic WPF project. Figure 5 shows how the project structure appears in Solution Explorer.
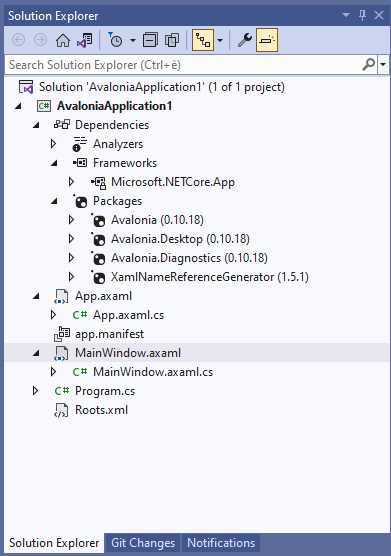
Figure 5: The structure of an Avalonia desktop project
The following is a list of the most relevant points, from top to bottom in Figure 5:
· The project is based on the .NET library (Dependencies node, Frameworks sub node).
· Avalonia UI ships via NuGet packages. More specifically, the Avalonia package provides the common runtime; the Avalonia.Desktop package provides support for desktop development; the Avalonia.Diagnostics package provides specific support for debugging and diagnosing problems.
· XAML files for Avalonia UI have the. axaml (Avalonia XAML) extension.
· Similarly to other XAML-based platforms, the App.axaml file contains shared resources available at the application level, and its C# code-behind file contains startup code.
· The MainWindow.axaml file represents a default, blank window together with its C# code-behind file.
· The Program.cs file represents the main entry point for the application.
· The Roots.xml file contains the list of assemblies that are part of the application bundle. By default, this includes the application assembly and the graphical theme.
· The app.manifest file is an XML file that contains a list of Windows versions that are supported by the application. You do not need to change this file for now.
As you can see, the structure of an Avalonia UI desktop project is very similar to a WPF one. In the next section, you will get to know the visual designer.
Working with the visual designer and the XAML editor
The user interface of an Avalonia UI project is defined via XAML, exactly like with other platforms such as WPF, UWP, Avalonia UI, and .NET MAUI. Every window or page is designed with a specific .axaml file.
By default, an Avalonia UI desktop project contains a file called MainWindow.axaml, which represents the main window of your application. When you open a .axaml file, the Visual Studio editor will look like Figure 6.
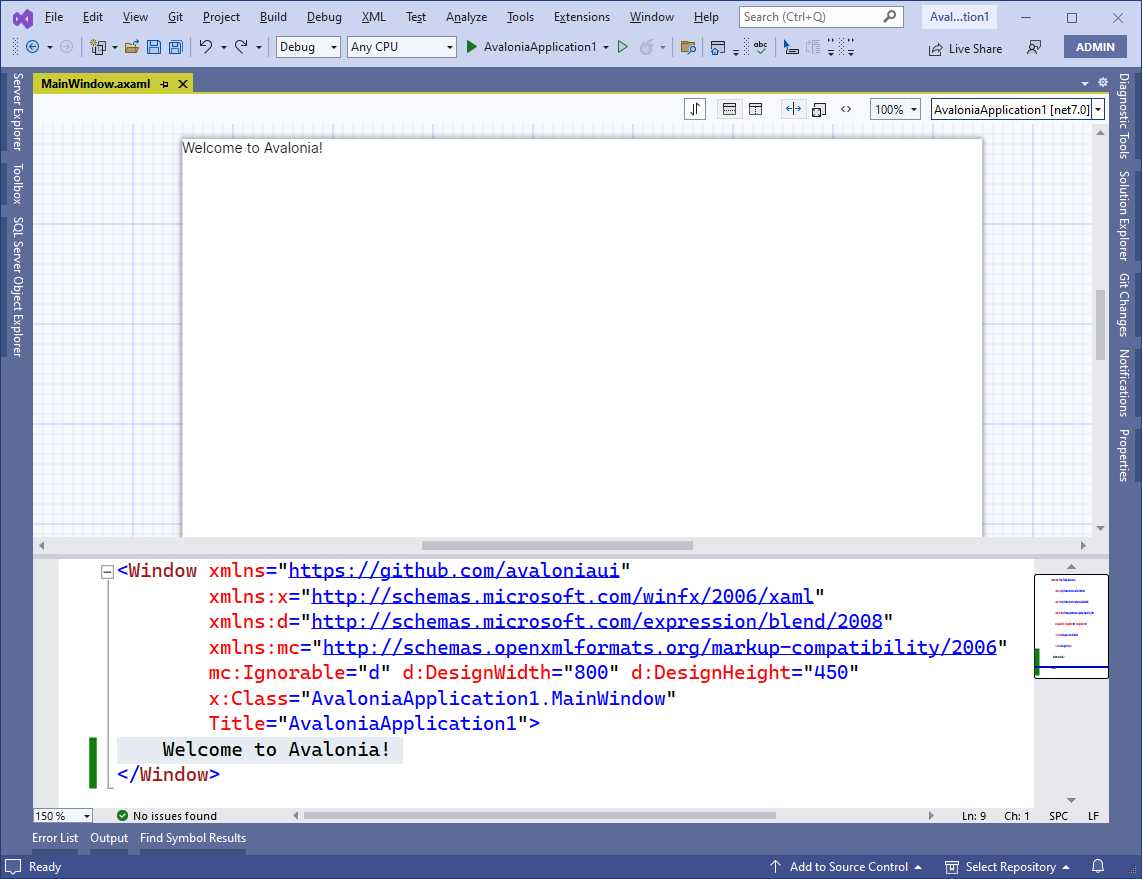
Figure 6: The XAML editor and visual designer for .axaml files
Note: The view might also be split vertically, so Figure 6 might not match what you see on your machine.
The active editor shows a visual designer and the XAML code editor. Actually, this works more as a previewer rather than a real designer, but the visual designer terminology is used for consistency with the official documentation. You can arrange the view using the toolbar at the upper-right corner via the following buttons (from left to right):
· Swap Preview and XAML panes: Allows you to swap the position of the designer and the XAML editor.
· Horizontal Layout: Arranges the designer and the XAML editor horizontally, like in Figure 6.
· Vertical Layout: Arranges the designer and the XAML editor vertically.
· Split View: Shows both the designer and the XAML editor in the active window. This is the default setting.
· Design View: Shows only the visual designer and hides the XAML editor.
· XAML View: Shows only the XAML editor and hides the visual designer.
Unlike other platforms, such as WPF, the Toolbox window shows no controls in Avalonia UI projects, which means that all of the user interface must be written manually in the XAML editor. However, the visual designer provides interaction with some controls once they are added to the design surface. For example, if you add a DatePicker as follows:
<Window xmlns="https://github.com/avaloniaui"
xmlns:x="http://schemas.microsoft.com/winfx/2006/xaml"
xmlns:d="http://schemas.microsoft.com/expression/blend/2008"
xmlns:mc="http://schemas.openxmlformats.org/markup-compatibility/2006"
mc:Ignorable="d" d:DesignWidth="800" d:DesignHeight="450"
x:Class="AvaloniaApplication1.MainWindow"
Title="AvaloniaApplication1">
<DatePicker />
</Window>
The visual designer displays the DatePicker and allows you to visually select a date, as you can see in Figure 7 (where the names of the month, day, and year are shown in Italian due to the localization options of my machine).
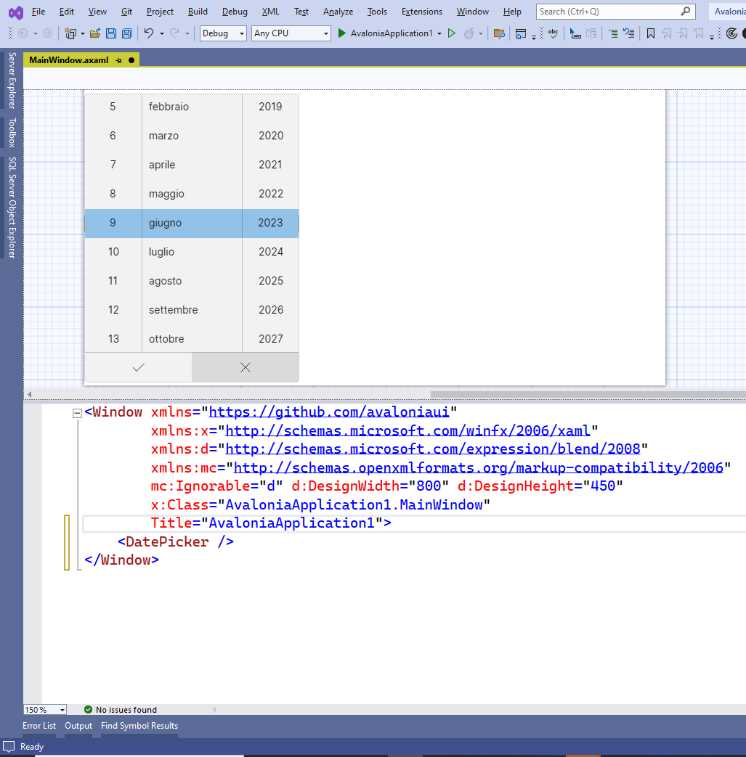
Figure 7: Working with views in the visual designer
It is not possible to move controls to a different position using the mouse pointer. This will be done by assigning the appropriate properties to each control. In general, the visual interaction with the designer is quite limited, but you still have the full possibilities in the XAML editor.
Creating cross-platform solutions
Creating cross-platform solutions is probably the real reason why you are interested in Avalonia UI, so this section describes how to accomplish this.
In Visual Studio, select File > New > Project, and then in the Create a new project dialog, select the Avalonia Cross Platform Application (AvaloniaUI) template, as shown in Figure 8.
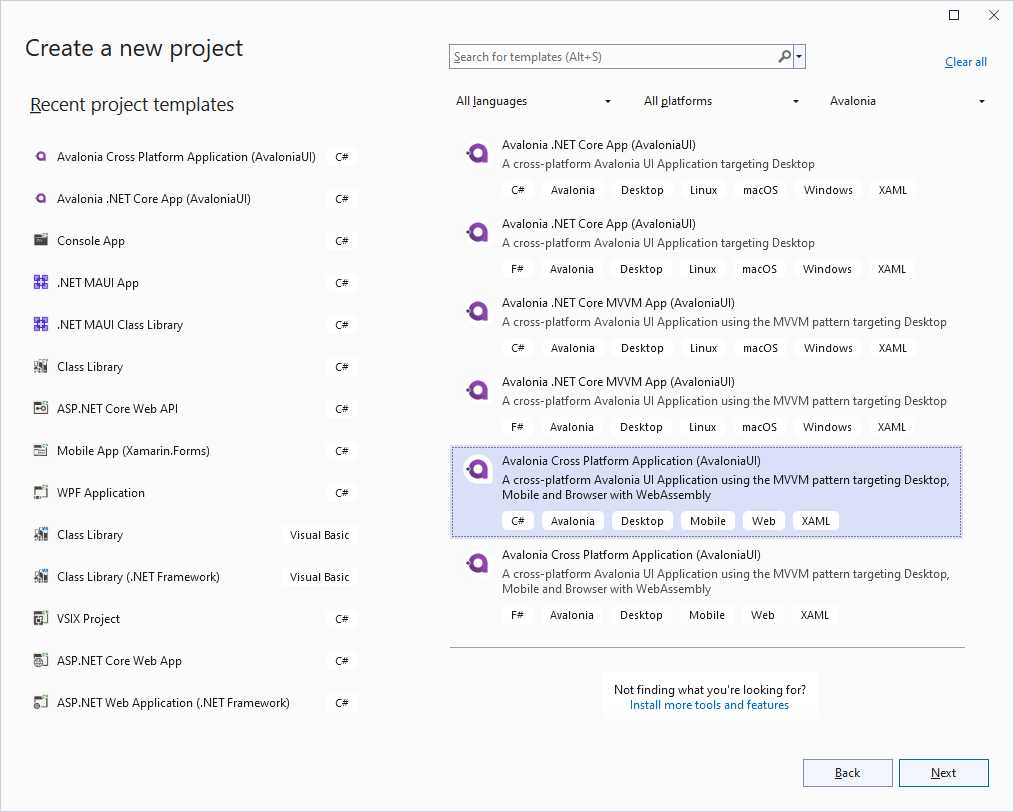
Figure 8: Creating a new cross-platform solution
When you click Next, you will first be asked to specify a name for the new solution, and then you will be asked to select the target framework (see Figure 4). In the case of cross-platform solutions, you will only see the list of stable .NET versions without previews.
At the end of the project creation, you will see the solution structure in Solution Explorer, which appears as in Figure 9.
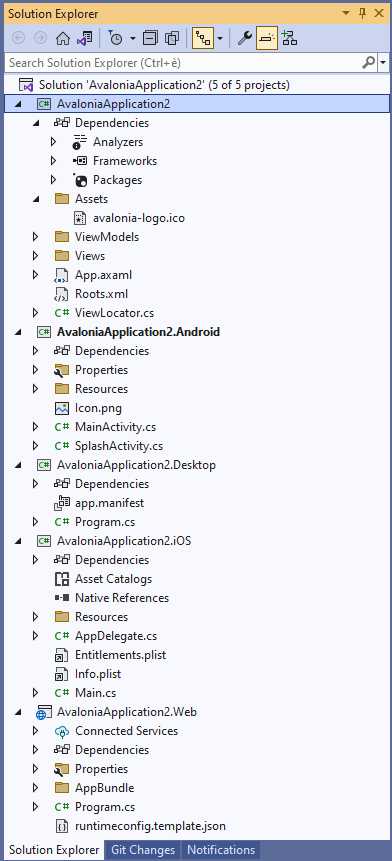
Figure 9: The structure of an Avalonia UI cross-platform solution
The solution is made of five projects: one for each target platform (Android, Desktop, iOS, and web), and at the top, a shared project where you will write all the cross-platform code once.
The purpose of an Avalonia UI cross-platform solution is to provide an option to define all the user interface inside the shared project. If you look at Solution Explorer and at the projects in the new solution, you can see that the platform projects do not contain anything but the startup code and specific assets, such as manifests and icons.
The sample solution provides boilerplate code based on the MVVM pattern, which you can replace with your code. Like for the desktop template, the cross-platform project provides a startup view called MainWindow, defined in the MainWindow.axaml file. When you open a XAML file for editing, the visual designer is shown and requires a solution rebuild the first time. With a cross-platform solution, you can select a different preview, depending on the target platform, by using the combo box at the upper-right corner of the designer, as shown in Figure 10.
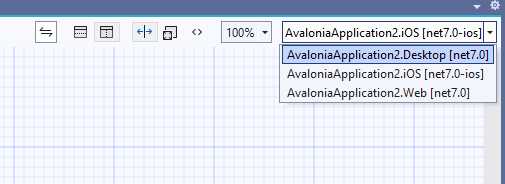
Figure 10: Previewer selection
When you do this, you will need to build the solution so that the designer can show the platform-specific view.
Troubleshooting the visual designer
The Avalonia UI visual designer is generally a stable tool, but there are two known issues that you might encounter:
· When you double-click an .axaml file, the WPF designer is opened instead of the Avalonia UI one. If this happens, simply close the active editor and reopen the file.
· The preview is empty. If this happens, rebuild the solution.
Rebuilding the solution might be required, especially when you select a different project for rendering.
Working with platform projects
The purpose of this book is to provide general guidance on building applications with Avalonia UI, but it is not possible to explain how individual platforms and OSes work. Though the biggest benefit of a cross-platform environment like Avalonia UI is that you code once using your existing .NET skills without the need to know languages such as Java for Android and Swift for iOS, configuring and publishing platform projects requires some specific knowledge.
For example, for Android you need to customize your application properties and permissions in the ApplicationManifest.xml file, located under the Properties node of the Android project. The official Avalonia documentation contains a group called Platforms, which is organized into pages that explain, among other things, how to configure the development machine for mobile app development, depending on the target OS. You cannot reach such a page directly, so you need to open the documentation root page and locate and expand the Platforms node under the How-To Guides group.
Next, you need to know how the Android and iOS applications work from a development point of view. For Android, the best starting point is the Android Developer portal, whereas for iOS, you can start from the Apple Developer portal. Here you will also find guides that explain how to prepare and package your app binaries for distribution.
Avalonia UI allows for running apps in the browser via WebAssembly, so you can look at the official WebAssembly portal for further information. As a general rule, you can test your code on different devices and OSes by selecting a platform project in Solution Explorer as the startup project, and then pressing F5, as you would do with any other type of project supported in Visual Studio.
Debugging Avalonia UI projects
There is actually no difference in the way you debug an Avalonia UI solution compared to other .NET solutions. You can still use full debugging tools in Visual Studio, such as (but not limited to) breakpoints, data tips, watch and local windows, and so on.
For desktop projects, you start an application for debugging by pressing F5. With cross-platform solutions, you need to first set the startup project and then press F5.
In addition, Visual Studio allows for debugging multiple instances of the same project targeting different devices. For example, look at Figure 11. You can see the previously created project running on the desktop and in an Android device.
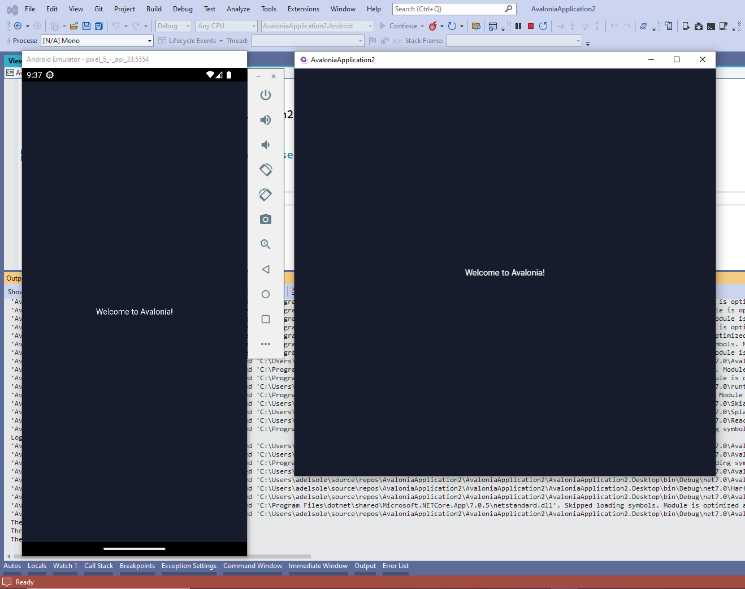
Figure 11: Debugging cross-platform solutions
To accomplish this, start debugging the current startup project. Then, in Solution Explorer, right-click the other project you would like to debug concurrently and select Debug > Start New Instance. This is very useful to compare the behavior of an application in real time. However, remember that debugging multiple instances requires a huge amount of system resources, so it might not be an optimal choice with older machines.
Understanding the application lifetime
The way the application is being initialized depends on the platform it is running on. If you create a cross-platform solution, you will find the following method inside the App.axaml.cs file:
public override void OnFrameworkInitializationCompleted()
{
if (ApplicationLifetime is
IClassicDesktopStyleApplicationLifetime desktop)
{
desktop.MainWindow = new MainWindow
{
DataContext = new MainViewModel()
};
}
else if (ApplicationLifetime is ISingleViewApplicationLifetime
singleViewPlatform)
{
singleViewPlatform.MainView = new MainView
{
DataContext = new MainViewModel()
};
}
base.OnFrameworkInitializationCompleted();
}
The Avalonia UI runtime first detects the current platform. The ApplicationLifetime object is of type IApplicationLifetime, and specialized types are IClassicDesktopStyleApplicationLifetime or ISingleViewApplicationLifetime. The first type represents desktop environments, whereas the second type represent platforms that work on a single view, such as mobile apps and the browser. Depending on the platform, the runtime creates an instance of the preferred startup object.
Chapter summary
Avalonia UI provides a convenient development environment via project templates and a Visual Studio Extension that simplify the approach to this platform. You can quickly create desktop and cross-platform solutions, and you can quickly define the user interface via the XAML editor, the visual designer, and IntelliSense. In the next chapter, you will start learning XAML and how the user interface is organized in Avalonia UI projects.
- 1800+ high-performance UI components.
- Includes popular controls such as Grid, Chart, Scheduler, and more.
- 24x5 unlimited support by developers.