
Aurelia Succinctly®

CHAPTER 17
Testing
Overview
Testing is an important part of the development process, and Aurelia fully embraces support for testing your code as well as its core components. The Skeleton Navigation project has some good examples of unit tests and end-to-end tests, and we will be following the way they have testing set up.
File structure
The following is the way the skeleton navigation has its file structure for testing:
Code Listing 138
skeleton-esnext-webpack/ node_modules/ src/ my-element.html my-element.js ... test/ e2e/ demo.spec.js skeleton.po.js ... unit/ my-element.spec.js setup.js ... index.html ... |
We have removed a lot of files to keep things simple. As you add screens or custom elements to your source, you should also add a corresponding unit and end-to-end test as necessary.
Unit tests
We should be able to test all of our views and view-models regardless of whether they are screens or custom elements. Let’s define a simple custom element and see what it takes to test it. First, consider the my-element.html file:
Code Listing 139
<template> <div class="username">${username}</div> </template> |
Next, let’s look at my-element.js to see the view-model:
Code Listing 140
import {customElement, bindable} from 'aurelia-framework'; @customElement('my-element') export class MyElement { @bindable username = ''; } |
Now, let’s look at how we would test this element:
Code Listing 141
import {MyElement} from '../../src/my-element'; describe('the MyElement component', () => { var sut; beforeEach(() => { sut = new MyElement(); }); it('default username value', () => { expect(sut.username).toEqual(''); }); }); |
As your views or custom elements get more complex, so will your tests.
Note: Aurelia also has the ability to test custom elements and custom attributes in a mini Aurelia application, but at the time of writing this, there is a bug with the WebPack version. The Aurelia team is working hard on getting this fixed.
Please refer to the following link to see more on testing.
End-to-end tests
End-to-end tests allow you to load and interact with pages and assert the results. End-to-end tests will always start with the demo.spec.js file. It is this file that will reference all other pages, referred to as page objects. The page objects are helper files per page that facilitate manipulating the page. Your tests will reside inside the demo.spec.js file, and you will evaluate your tests there.
The following is an example of the welcome.po.js file:
Code Listing 142
export class PageObjectWelcome { constructor() { } getGreeting() { return element(by.tagName('h2')).getText(); } setFirstname(value) { return element(by.valueBind('firstName')).clear().sendKeys(value); } setLastname(value) { return element(by.valueBind('lastName')).clear().sendKeys(value); } getFullname() { return element(by.css('.help-block')).getText(); } pressSubmitButton() { return element(by.css('button[type="submit"]')).click(); } openAlertDialog() { return browser.wait(() => { this.pressSubmitButton(); return browser.wait(ExpectedConditions.alertIsPresent(), 5000).then( browser.switchTo().alert().then( // use alert.accept instead of alert.dismiss which results in a browser crash function(alert) { alert.accept(); return true; }, function() { return false; } ) ); }); } } |
Let’s now look at the demo.spec.js file and see how this file is used:
Code Listing 143
import {PageObjectWelcome} from './welcome.po.js'; import {PageObjectSkeleton} from './skeleton.po.js'; describe('aurelia skeleton app', function() { let poWelcome; let poSkeleton; beforeEach(() => { poSkeleton = new PageObjectSkeleton(); poWelcome = new PageObjectWelcome(); browser.loadAndWaitForAureliaPage('http://localhost:19876'); }); it('should load the page and display the initial page title', () => { expect(poSkeleton.getCurrentPageTitle()).toBe('Welcome | Aurelia'); }); it('should display greeting', () => { expect(poWelcome.getGreeting()).toBe('Welcome to the Aurelia Navigation App!'); }); it('should automatically write down the fullname', () => { poWelcome.setFirstname('Rob'); poWelcome.setLastname('Eisenberg'); // For now there is a timing issue with the binding. // Until resolved we will use a short sleep to overcome the issue. browser.sleep(200); expect(poWelcome.getFullname()).toBe('ROB EISENBERG'); }); it('should show alert message when clicking submit button', () => { expect(poWelcome.openAlertDialog()).toBe(true); }); it('should navigate to users page', () => { poSkeleton.navigateTo('#/users'); expect(poSkeleton.getCurrentPageTitle()).toBe('Github Users | Aurelia'); }); }); |
As you can see, we are importing our page object files and initializing them for testing. Take care to note that we use the browser.sleep function in order to interrogate the values from the pages after we have updated certain elements. Without this, we would evaluate too soon.
View-spy and compile-spy
Most web developers use the debugger right in their favorite browsers to step through their code and make sense of any issues they may have. Aurelia has two special templating behaviors that can really help:
- view-spy–Provides a copy of the View object into the console.
- compile-spy–Emits the compiler’s TargetInstruction.
You need to be sure you have the aurelia-testing module installed. You can do this by executing the following:
Code Listing 144
npm install --save-dev aurelia-testing |
Let’s take a look at the welcome.html file from the Skeleton Navigation project:
Code Listing 145
<template> <require from="aurelia-testing/view-spy"></require> <require from="aurelia-testing/compile-spy"></require> <section class="au-animate" view-spy compile-spy> <h2>${heading}</h2> <form role="form" submit.delegate="submit()"> <div class="form-group"> <label for="fn">First Name</label> <input type="text" value.bind="firstName" class="form-control" id="fn" placeholder="first name"> </div> <div class="form-group"> <label for="ln">Last Name</label> <input type="text" value.bind="lastName" class="form-control" id="ln" placeholder="last name"> </div> <div class="form-group"> <label>Full Name</label> <p class="help-block">${fullName | upper}</p> </div> <button type="submit" class="btn btn-default">Submit</button> </form> </section> </template> |
We introduced the require tags to bring in the view-spy and compile-spy, respectively. Next, we added these custom attributes to the section tag. Let’s take a look at what we would see in the browser:
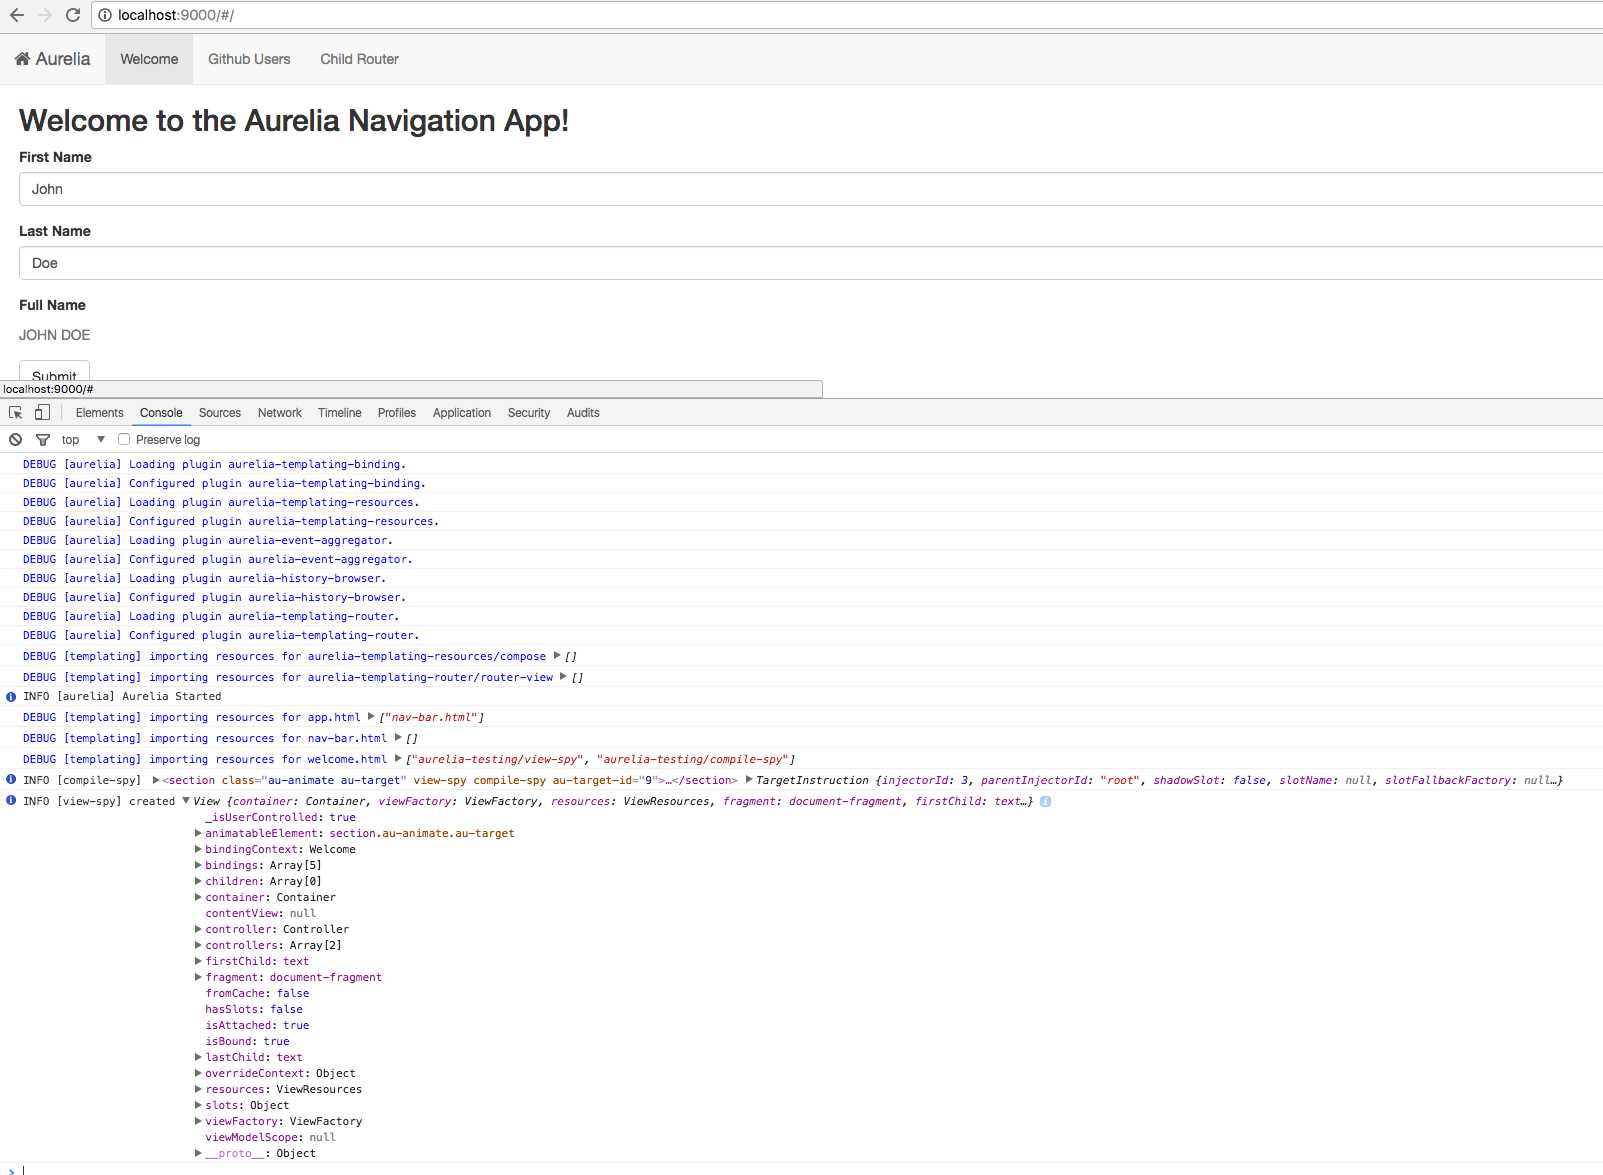
Figure 35: View-Spy and Compile-Spy
Once you learn this trick, you will find it a great debugging tool to further help you with your mastery of Aurelia.
- 1800+ high-performance UI components.
- Includes popular controls such as Grid, Chart, Scheduler, and more.
- 24x5 unlimited support by developers.