
Aurelia Succinctly®

CHAPTER 2
Getting Started
Getting set up
Sometimes the hardest part of learning a new framework is just getting started. It can be daunting when looking at all the ways to do things. Aurelia comes ready with a lot of implementations, and tries to allow developers to pick the route that best supports their programming paradigm. We will take a look at the options that are currently available. However, before we go further, we will look at some of the tools used in this book to allow you to follow along with a minimal number of questions about how something was achieved. In order to follow along with the code samples in this book, you will need to have the following on your development machine:
- Sublime Text–We will be setting up a custom build command so that you can simply transpile and execute your scripts using the default build command. You can get Sublime Text here.
- NodeJS–Please ensure that you have Node installed on your machine. You can get Node here.
- Git client–Please ensure that you have Git installed on your machine. You can get Git here.
- Gist.run–We will be using this website for most of our live examples. You can check it out here.
Most of the code samples will be building on skeleton n
avigation reference implementation or using Gist.run as our online playground.
Note: Unless otherwise indicated, we are going to use Sublime Text as our development IDE and Google Chrome as our browser for debugging.
Browser support
Aurelia works well with all modern browsers; take a look here at which versions are supported. Throughout this book, we will be using Google Chrome as our default browser for both rendering and debugging our Aurelia applications.
Code listings
All code listings in the book have been generated using Sublime Text 3. Most of the code examples and screenshots were created using Google Chrome. Once you have your Aurelia application running, you should be able to simply make changes to your source code and save the file. The development workflow will automatically refresh your browser with the changes so that you can focus on development and not all the tasks related to building a web application.
For the majority of the working samples, we will be using https://gist.run. This will give you the ability to test out the samples without needing to set up your own project. I do walk you through setting up your own project, but this gives you the ability to decide which to use.
Aurelia CLI
Aurelia CLI is a command-line interface that allows you to configure your application with simple commands. In order to use the CLI, you need to ensure that you have all the dependencies installed from the “Getting set up” section.
Let’s install Aurelia CLI by executing the following Node package manager command line to install it globally:
Code Listing 1
npm install –g aurelia-cli |
Once you have this completed, navigate to the folder where you created your new project and execute the following command:
Code Listing 2
au new |
You will see several prompts to help configure your new project. The following set of screenshots show what the interface looks like:
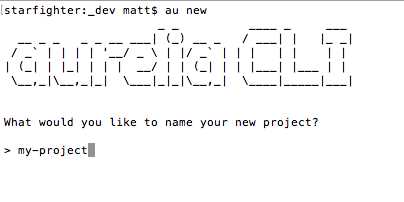
Figure 1: Aurelia CLI–au new
Enter a project name that you would like created.
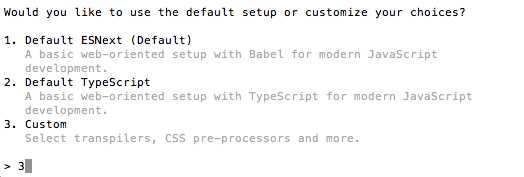
Figure 2: Aurelia CLI–setup type
You can choose any of the selections, but we will select the Custom option to show you all the choices you have.
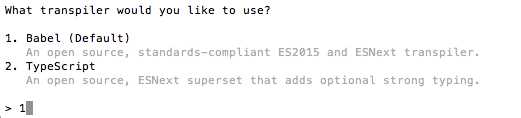
Figure 3: Aurelia CLI–transpiler type
Here we select Babel as the transpiler, but you can choose TypeScript if you like.

Figure 4: Aurelia CLI–CSS processor
You have the opportunity to choose a CSS processor, or simply use standard CSS, as we have selected here.
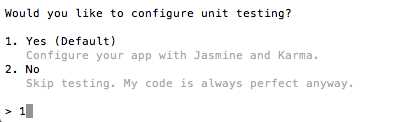
Figure 5: Aurelia CLI–Unit Testing
You also have the option to elect to configure your project for unit testing.

Figure 6: Aurelia CLI–code editor
Next, you are presented with the ability to select which code editor you will use for the project.
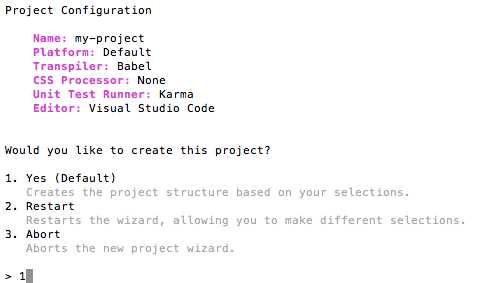
Figure 7: Aurelia CLI– review
Finally, you are presented with a project configuration and the ability to create the project, restart, or abort. After you press Enter, your project configuration is created. You should see something similar to the following screenshot:
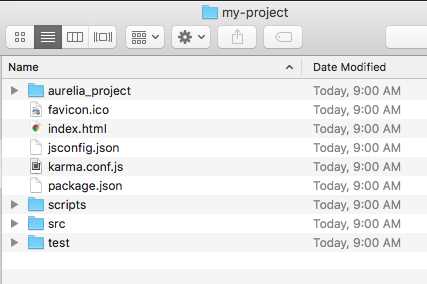
Figure 8: Aurelia CLI–Project creation
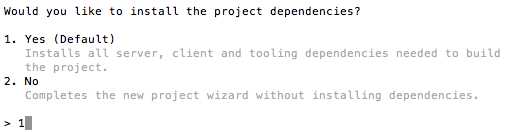
Figure 9: Aurelia CLI–Install project dependencies
Aurelia will ask you if you want to install the project dependencies. If you select Yes, it will go through and install all the dependencies for your project. If you select No, you can install them manually by entering the following command:
Code Listing 3
npm install |
That’s it! You can now run your new application by executing the following command:
Code Listing 4
au run |
Auto browser refresh
If want your browser to automatically refresh after you have made changes to your source, you can execute the following instead:
Code Listing 5
au new --watch |
Environments
The Aurelia CLI comes set up with three standard environments: dev, stage, and prod. If you wish to target a specific environment, you can do this by executing a command like the following:
Code Listing 6
au run --env stage --watch |
In this case above, we are targeting the stage environment, but we could easily target prod or dev.
Bundling
When you use the Aurelia CLI, take note that it always bundles your code. You can force a bundle without running the application by executing the following command and specifying a target environment:
Code Listing 7
au build --env stage |
Testing
If you have elected to include unit tests in your project, you can run your tests manually executing the following command:
Code Listing 8
au test |
If you want to have your test run automatically, you can execute the following command:
Code Listing 9
au test –watch |
Generators
Aurelia CLI comes with some great generators that help you with repetitive workflows. Execute the following command:
Code Listing 10
au generate <resource> |
You can use any of the following values for <resource>:
- element
- attribute
- value-converter
- binding-behavior
- task
- generator
ASP.NET Core
It is possible to use Visual Studio and create an ASP.NET Core project, and then allow the Aurelia CLI to target this existing project for setup. To accomplish this, you first would need to navigate to the web project folder that contains the .xproj file. Here you execute the following command:
Code Listing 11
au new –here |
Be sure to select ASP.NET Core when going through the prompts.
What else is there?
There are many more things you can do using the Aurelia CLI. The Aurelia team is rapidly updating the CLI to be even more friendly and powerful. Please refer to this link for more information on the Aurelia CLI.
If you get stuck or are not sure what version of the CLI you’re using, you can use the following command to get the current version:
Code Listing 12
au –v |
If you want to see which options are available using the CLI, execute the following command:
Code Listing 13
au help |
ESNext and TypeScript
Aurelia gives you the flexibility to develop your application using the technologies that are most comfortable to you. Whether you want to use ES6 and ES7 or use TypeScript, there is an example project for you to look at.
We will use the Aurelia Skeleton Navigation project to clone from GitHub. You can also download the latest version from here if you like. The following are the steps required to clone the project from GitHub. Navigate to a folder where you would like to have the project cloned and execute the following command:
Code Listing 14
This command assumes you have an SSH key and passphrase added to your account. Alternatively, if you’d rather use HTTPS, you can use the following command:
Code Listing 15
Either command will clone the project in the folder where you executed. You should see the following after you navigate to the skeleton-navigation directory:
Code Listing 16
skeleton-navigation/ circle.yml CONTRIBUTING.md ISSUE_TEMPLATE.md LICENSE README.md skeleton-esnext/ skeleton-esnext-aspnetcore/ skeleton-esnext-webpack/ skeleton-typescript/ skeleton-typescript-aspnetcore/ skeleton-typescript-webpack/ |
Let’s now take a look at the skeleton-esnext folder containing the JSPM implementation.
JSPM
JavaScript Package Manager (JSPM) is another means for configuring and setting up your Aurelia project.
Before you get started, you will need to ensure that you are in the skeleton-esnext folder. In order to use JSPM, you need to ensure that you have all the dependencies installed from the “Getting set up” section.
Let’s install JSPM by executing the following command line and installing it globally:
Code Listing 17
npm install –g jspm |
Now that we have JSPM installed and we have cloned the Skeleton Navigation project, we can navigate to either the skeleton-esnext or skeleton-typescript project. A quick way to tell if you are in a project that is configured to support JSPM is to look for the config.js file. Let’s navigate to the skeleton-esnext project and execute the following command:
Code Listing 18
npm install |
This will resolve all of our dependencies as specified in our package.json file.
Next, execute the following command to bring in all of our JSPM dependencies:
Code Listing 19
jspm install –y |
Note: The -y flag indicates to skip prompts and use default inputs during the installation.
You are now ready to start the application locally. Execute the following command to launch the server:
Code Listing 20
gulp watch |
Now, simply browse to the following URL: http://localhost:9000/.
Unit tests
You will need to be sure that you have Karma CLI installed before you can run any tests. Execute the following command to install it:
Code Listing 21
npm install –g karma-cli |
Now, you will be able to run your tests using the following command:
Code Listing 22
gulp test |
E2E tests
All integration tests utilize Protractor. You will need to be sure that you have the necessary webdriver installed before you can run any tests. Execute the following command to install it:
Code Listing 23
gulp webdriver-update |
Next, you will need to configure the path to the webdriver and adjust the seleniumServerJar property to the correct version number inside the protractor.conf.js file. Refer to the Protractor documentation for more information.
All of your tests need to reside in the following location from the root of your application:
Code Listing 24
test/e2e/src |
You are now ready to run your application and run tests. It takes two separate console instances to perform these. First, run your application by executing the following command:
Code Listing 25
gulp watch |
Next, execute your tests in another console:
Code Listing 26
gulp e2e |
That’s it!
Webpack
If you don’t want to have to deal with both npm and jspm, then webpack might be just what you are looking for. Be sure that you followed all the steps to get your dependencies installed from the “Getting set up” section.
Since we have already cloned the skeleton navigation project, we can navigate to either the skeleton-esnext-webpack or the skeleton-typescript-webpack project. Let’s navigate to the skeleton-esnext-webpack project and execute the following command:
Code Listing 27
npm install |
This will resolve all of our dependencies as specified in our package.json file.
You are now ready to start the application locally. Execute the following to launch the server:
Code Listing 28
npm start |
Now, simply browse to the following URL: http://localhost:9000/.
Bundling
To create a bundle, execute the following command:
Code Listing 29
npm run build |
If you would like your bundle to be production-ready, execute the following:
Code Listing 30
npm run build:prod |
To test either of your builds, execute the following:
Code Listing 31
npm run server:prod |
If you’re watching your project file structure, you might have noticed that a new folder was created during this process. You now have a dist folder that contains all the dependencies for deployment.
Unit tests
To run unit tests, you can execute the following command:
Code Listing 32
npm test |
E2E tests
All of the integration tests use Protractor.
All of your tests need to reside in the following location from the root of your application:
Code Listing 33
test/e2e/src |
You are now ready to run your application and run tests, so execute the following command:
Code Listing 34
npm run e2e |
There may be times when you want to run your tests manually. You can do this using the following command:
Code Listing 35
WEBPACK_PORT=19876 npm start |
This gets the server running and ready for tests to be called from another console instance.
Execute the following command in another console instance once you have a bundle ready:
Code Listing 36
npm run e2e:start |
That’s it!
ASP.NET Core
If you come from a Microsoft background and find Visual Studio to be your best friend, then you are not alone. We have already learned that we can use Aurelia CLI to accomplish this, but the skeleton navigation doesn’t leave us wanting, either.
Because we have already cloned the skeleton navigation project, we can navigate to either the skeleton-esnext-aspnetcore or skeleton-typescript-aspnetcore project. Let’s navigate to the skeleton-esnext-aspnetcore project. You will notice that this folder contains a Visual Studio solution, and there is another folder named src/skeleton.
Let’s navigate to the src/skeleton and see what it takes to get our application ready for development. First, we are going to need to ensure that we have both gulp and jspm installed. We can achieve this by executing the following command:
Code Listing 37
npm install –g jspm gulp |
Running in Visual Studio 2015
You will need to have Visual Studio 2015 with Update 3 or later in order to run the application.
You will also need to have ASP.NET Core downloaded and installed. You can find instructions on how to do this here.
- Open the solution file skeleton-esnext-aspnetcore.sln. Visual Studio will automatically run npm install and jspm install when you first open the solution. It is possible to rerun the commands at any time using a command prompt inside the src/skeleton folder.
- Inside Visual Studio, open the Task Runner Explorer, and you should see the tasks runner report that the gulp watch command is running.
- Press F5 or click Run, and Visual Studio will launch your default browser and navigate to the correct URL.
Running without Visual Studio 2015
It is possible to develop your Aurelia application using ASP.NET Core without Visual Studio 2015. For example, you could develop your application using Visual Studio Code.
You will also need to have the ASP.NET Core downloaded and installed. You can find instructions on how to do this here.
The following are the steps required to get your application running:
- Resolve your npm and jspm dependencies.
Code Listing 38
npm install |
This handles all of the dependencies in your package.json as well as executing the following command as identified by the postinstall entry:
Code Listing 39
jspm install –y |
Note: Some Windows users have experienced an error, “unknown command unzip.” This can be resolved by executing the following: npm install –g unzip. Next, rerun the following command: jspm install.
- Build the project using the following command:
Code Listing 40
gulp build dotnet build |
- Next, execute the following command:
Code Listing 41
dotnet restore |
- Run the application by executing the following:
Code Listing 42
dotnet run |
- If you wish to have your coding changes reflected in the browser automatically, execute the following command in a second console instance:
Code Listing 43
gulp watch |
- Now, simply browse to the following URL: http://localhost:5000.
Bundling
Bundling is performed by the Aurelia Bundler. A gulp task has already been configured, and you can create a bundle by executing the following command:
Code Listing 44
gulp bundle |
It is possible to unbundle using the following command:
Code Listing 45
gulp unbundle |
To test the bundled application, execute the following:
Code Listing 46
gulp serve-bundle |
If you are curious as to how the bundles are configured, you can look at the bundles.js file.
Unit tests
You will need to be sure that you have Karma CLI installed before you can run any tests. Execute the following command to install it:
Code Listing 47
npm install –g karma-cli |
Next, you will need to install Aurelia libs for test visibility. Execute the following command:
Code Listing 48
jspm install aurelia-framework jspm install aurelia-http-client jspm install aurelia-router |
Now, you will be able to run your tests using the following command:
Code Listing 49
karma start |
E2E (End-to-End) tests
All integration tests utilize Protractor. You will need to be sure that you have the necessary webdriver installed before you can run any tests. Execute the following command to install it:
Code Listing 50
gulp webdriver-update |
Next, you will need to configure the path to the webdriver and adjust the seleniumServerJar property to the correct version number inside the protractor.conf.js file. Refer to the Protractor documentation for more information.
All of your tests need to reside in the following location from the root of your application:
Code Listing 51
test/e2e/src |
You are now ready to run your application and run tests. It takes two separate console instances to perform this. First, run your application by executing the following command:
Code Listing 52
gulp watch |
Next, execute your tests in another console:
Code Listing 53
gulp e2e |
That’s it!
Exporting your bundled production version
A gulp task is already configured to allow you to export your application bundled and ready for production. Execute the following command:
Code Listing 54
gulp export |
This will export your application into the Export folder ready for deployment.
- 1800+ high-performance UI components.
- Includes popular controls such as Grid, Chart, Scheduler, and more.
- 24x5 unlimited support by developers.