
Aurelia Succinctly®

CHAPTER 13
Compose
When designing an effective user experience, you may need to choose a certain component based on data on the screen. For example, let’s say we are building an operations monitoring screen. One of the facets of the screen is that we would like to have a different view displayed based on individual data items. We will simply make several views and have them show based on a specific data property. The following is a simple screenshot of what we are going to build using compose:
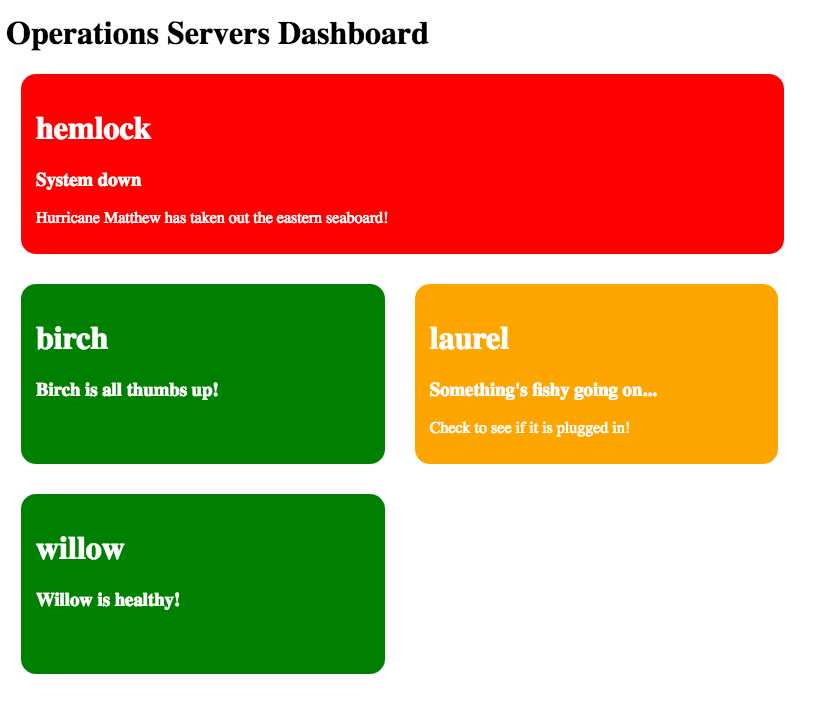
Figure 31: Using compose
In Figure 31, we have an array that holds server information. We then use the compose element to target which view-model to load for a given server. Let’s look at our operations-monitor.js file:
Code Listing 115
export class OperationsMonitor { title = 'Operations Servers Dashboard' servers = [ { name: 'hemlock', status: 'red', message: 'System down', error: 'Hurricane Bob has taken out the eastern seaboard!' }, { name: 'birch', status: 'green', message: 'Birch is all thumbs up!' }, { name: 'laurel', status: 'orange', message: 'Something\'s fishy going on...', warning: 'Check to see if it is plugged in!' }, { name: 'willow', status: 'green', message: 'Willow is healthy!' }, ]; } |
You should start to see the pattern emerging just by looking at the code alone. Let’s look at the corresponding operations-monitor.html file:
Code Listing 116
<template> <h1>${title}</h1> <compose repeat.for="server of servers" view-model.bind="server.status" model.bind="server"></compose> </template> |
We see now that we are repeating over every item in the servers array. We are binding our view-model to the status property of each server, and we are also setting the model context to the server object.
Following the convention Aurelia has set up, we should be able to deduce that the first item in the array has a status of red. Aurelia will try to look up a corresponding red.js view-model. In turn, red.html will also load. Let’s look at red.js:
Code Listing 117
export class Red {
} |
As you can see, we don’t have any custom business logic. Let’s now look at red.html:
Code Listing 118
<template> <div class="server ${server.status}"> <h1>${server.name}</h1> <h3>${server.message}</h3> <p>${server.error}</p> </div> </template> |
As you can see, we are binding specific information for the red status. If we were to look at the green and orange view-model files, they would be exactly the same. However, let’s look at the difference in the views. Let’s look at the orange.html file:
Code Listing 119
<template> <div class="server ${server.status}"> <h1>${server.name}</h1> <h3>${server.message}</h3> <p>${server.warning}</p> </div> </template> |
As you can see, the only difference here is we are binding to warning instead of error. Let’s look at the green.html view:
Code Listing 120
<template> <div class="server ${server.status}"> <h1>${server.name}</h1> <h3>${server.message}</h3> </div> </template> |
Again, this one is slightly different. You should have an idea as to how you could use this, and the different kinds of dynamic scenarios you could solve using the compose element.
Although this is a contrived example, it does show what you can do and the power it affords to building rich applications. If you are curious about the styles used in this example, the following is the CSS we used:
Code Listing 121
.server { color: white; height: 150px; padding: 15px; margin: 15px; border-radius: 15px; } .red { background: red; width: 90%; } .green { background: green; } .orange { background: orange; } .green, .orange { width: 41%; float: left; } |
You can see this example in action here.
- 1800+ high-performance UI components.
- Includes popular controls such as Grid, Chart, Scheduler, and more.
- 24x5 unlimited support by developers.