
Asynchronous Programming Succinctly®

CHAPTER 5
Unit Tests and async and await
An overview of unit testing async methods
Unit testing async methods can be a challenge if you don’t approach the unit tests with an “async” mindset. In other words, you can’t approach unit testing async methods as you would synchronous methods.
There are mountains of resources on the Internet regarding async and await, and there are some excellent, concise articles and blog posts written by qualified individuals on unit testing async methods. At the end of this e-book, I’ll expand more on some useful resources for learning async and await.
For now, however, getting unit testing set up and configured for async methods might vary depending upon which unit-testing framework you’re using. For this demonstration, I will use the built-in MS Test framework.
Create a unit test in Visual Studio
Let’s start by creating a new class to our Windows Forms project called TimeMachine. Notice that the namespace is AsyncSuccinctly. Add the System.Threading.Tasks namespace to the class. Also, take note that throughout this class we will be setting the Task.Delay values to two seconds.
Code Listing 82
Add two properties called Year and TimeMachineEnabled.
Code Listing 83
namespace AsyncSuccinctly { public class TimeMachine { public int Year { get; private set; } public bool TimeMachineEnabled { get; private set; } |
In the constructor, simply initialize the Year property to the current year. If you’re using C# 6.0, you can use an auto-implemented property by writing the property as follows: public int Year { get; private set; } = DateTime.Now.Year;.
Code Listing 84
public TimeMachine() { Year = DateTime.Now.Year; } |
Create an async method called GetDaysInMonth() that accepts two integer parameters called year and month.
Code Listing 85
public async Task<int> GetDaysInMonth(int year, int month) { await Task.Delay(2000); return DateTime.DaysInMonth(year, month); } |
Create a second async method called GoBackInTime() that takes an integer parameter called yearsBack. This async method also sets the TimeMachineEnabled property to true.
Code Listing 86
public async Task GoBackInTime(int yearsBack) { await Task.Delay(2000); Year = DateTime.Now.Year - yearsBack; TimeMachineEnabled = true; } |
Lastly, create an async method called ResetTimeMachine() that sets the Year property back to the current year.
Code Listing 87
Next, we need to add a Unit Test project to the solution. We do this by right-clicking on the solution and selecting Add, New Project… from the context menu. Select the Unit Test Project from the project templates screen.
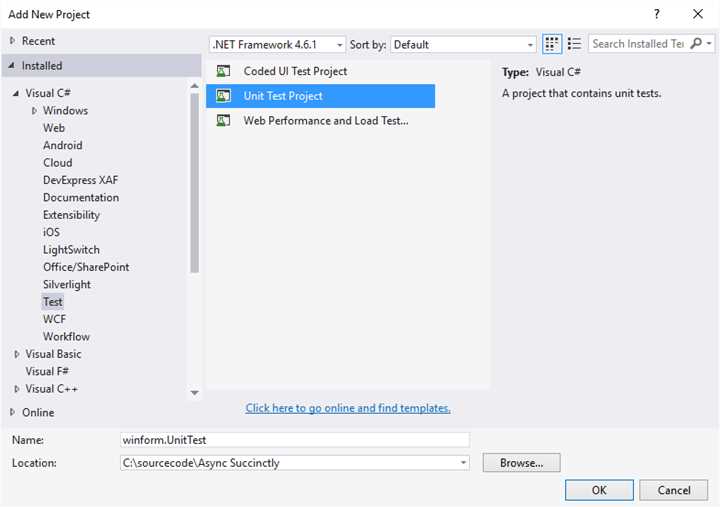
Figure 37: Create Unit Test Project
After the unit test project has been added, you will see it in your Solution Explorer with a default class added called UnitTest1.cs.
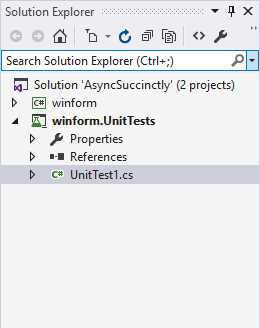
Figure 38: Unit Test Project in Solution Explorer
When you view the generated code for the UnitTest1 class, you will notice that the first test method has already been added. For those of you not yet familiar with unit tests, I want to point out a few things here.
The structure of a unit test consists of:
- The Microsoft.VisualStudio.TestTools.UnitTesting namespace being imported.
- The attribute [TestClass] denoting that this class may contain unit test methods. If this attribute isn’t added, the test methods are ignored.
- The unit test methods having the [TestMethod] attribute applied. This is essential for the unit test to be run.
Tip: Have a look at the following article, which is a good primer to unit testing. https://msdn.microsoft.com/en-us/library/ms182517(v=vs.100).aspx
Code Listing 88
using System; using Microsoft.VisualStudio.TestTools.UnitTesting; namespace winform.UnitTests { [TestClass] public class UnitTest1 { [TestMethod] public void TestMethod1() { } } } |
In the unit test project, right-click the References section in the solution explorer and click Add Reference… from the context menu.
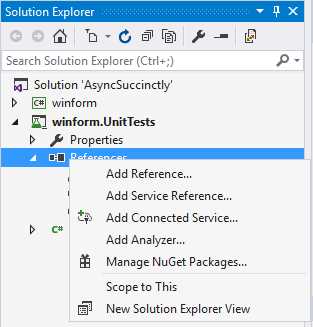
Figure 39: Solution Explorer—Add Reference
The Reference Manager is displayed, which means you must add the Windows Forms project as a project reference to your unit test project.
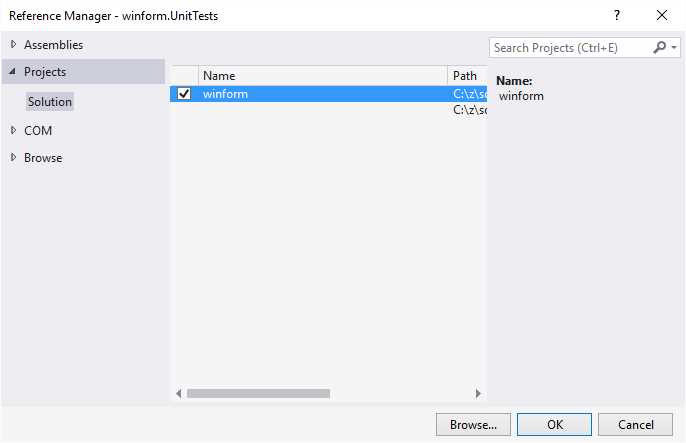
Figure 40: Select winform as Reference
After you have added the reference, import the namespace AsyncSuccinctly to your unit test class UnitTest1.
Code Listing 89
|
using AsyncSuccinctly; using Microsoft.VisualStudio.TestTools.UnitTesting; using System.Threading.Tasks; |
Next, delete the default unit test that was added to the UnitTest1 class. After doing all that, your unit test class UnitTest1 should look like Code Listing 90.
Code Listing 90
using System; using AsyncSuccinctly; using Microsoft.VisualStudio.TestTools.UnitTesting; using System.Threading.Tasks; namespace winform.UnitTests { [TestClass] public class UnitTest1 {
} } |
We now need to add the unit test methods for our async methods in the TimeMachine class. Be sure to note that test methods must have the async keyword applied to them. And never make your test methods void—they must always return the type Task or Task<T>.
If you cannot avoid using a void test method, there are workarounds. It is, however, best practice to never have a void async method.
I try to name my unit tests exactly the same as the methods under test while adding the word Test to the end of the method name. In Code Listing 91, I am creating a unit test for the ResetTimeMachine() async method in the TimeMachine class. I instantiate the class and, because the unit test ResetTimeMachineTest() is an async method, it requires me to specify an await in my method. I therefore await the ResetTimeMachine() method. The method is a Task return type method.
Code Listing 91
[TestMethod] public async Task ResetTimeMachineTest() { TimeMachine tm = new TimeMachine(); await tm.ResetTimeMachine(); } |
Note that the GetDaysInMonthTest()returns a Task<int>, and we need to follow the same logic as before. The unit test method must be async, and it must specify a return type of Task.
Code Listing 92
[TestMethod] public async Task GetDaysInMonthTest() { int year = 2017; int month = 1; TimeMachine tm = new TimeMachine(); int days = await tm.GetDaysInMonth(year, month); } |
The third unit test we will create is for the GoBackInTime() async method. Follow the same rules as with the first Task returning async method.
Code Listing 93
[TestMethod] public async Task GoBackInTimeTest() { int yearsBack = 150; TimeMachine tm = new TimeMachine(); await tm.GoBackInTime(yearsBack); } |
Save all the code you just wrote and perform a rebuild of both the Windows Forms project and the unit test project. Then open up the Test Explorer window. From the main menu in Visual Studio, select Test, Windows, Test Explorer.
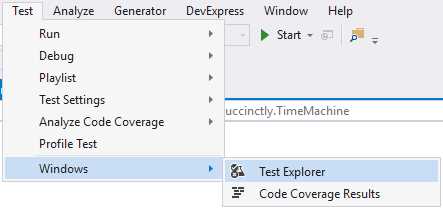
Figure 41: Open Test Explorer
The Test Explorer window will be displayed. You will see that it lists the unit test methods you created earlier.
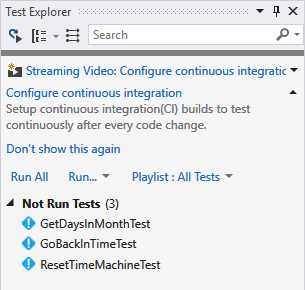
Figure 42: Test Explorer
Tip: It is very important that you always perform a rebuild of your unit test project or project under test when you make changes. I have found that sometimes unit tests don’t “see” the changes I have made to a unit test or a method under test unless I perform a rebuild.
In your unit test class UnitTest1, right-click the editor and select Run Tests from the context menu. You can also click the Run All link in the Test Explorer window to run the unit tests.
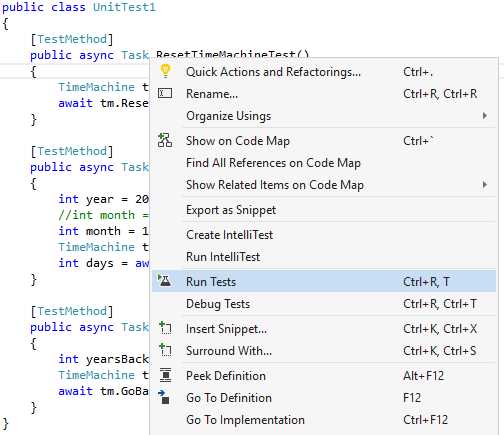
Figure 43: Run Tests
The unit test will be run and the results will be displayed in the Test Explorer window. Notice how each method under test has 2 sec displayed next to the results in the Test Explorer window. This happens because we have set all the async methods in the TimeMachine class to delay by setting the Task.Delay to two seconds.
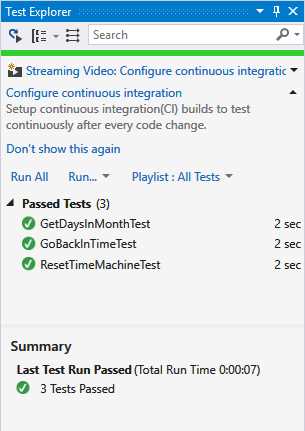
Figure 44: Unit Tests Passed
This is all well and good, but if you implement your unit tests incorrectly (by not adding the Task and async keywords to the unit test method), you might have the unit test report a test passed when in actual fact it has thrown an exception. This is why it is essential that you add async Task or async Task<T> to your unit test methods so that you can properly test your async methods.
Let’s have a look at what happens when some of these methods fail. In the unit test method GetDaysInMonthTest(), change the month value to 0.
Code Listing 94
[TestMethod] public async Task GetDaysInMonthTest() { int year = 2017; int month = 0; TimeMachine tm = new TimeMachine(); int days = await tm.GetDaysInMonth(year, month); } |
In the TimeMachine class, modify the GetDaysInMonth() method and add code to cause a DivideByZeroException. Simply add int iCauseZeroException = year / month; directly after the await Task.Delay(2000);.
Code Listing 95
public async Task<int> GetDaysInMonth(int year, int month) { await Task.Delay(2000); int iCauseZeroException = year / month; return DateTime.DaysInMonth(year, month); } |
Next, for the ResetTimeMachine() method, force a new Exception to be thrown. You can give the exception a custom message.
Code Listing 96
public async Task ResetTimeMachine() { await Task.Delay(2000); Year = DateTime.Now.Year; throw new Exception("Async Method threw an Exception"); } |
Remember to rebuild your solution after saving these changes and run your unit tests again by clicking on the Run All link in the Test Explorer window. This time you will see that the two methods we modified in the TimeMachine class have failed. This is good—we now know that our async unit tests are working correctly.
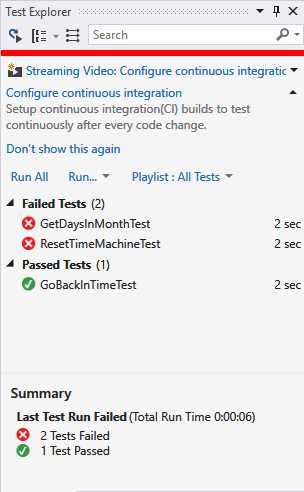
Figure 45: Test Failures
In order to see the specific error returned by the unit test, click the test in the Failed Tests node in the Test Explorer window.
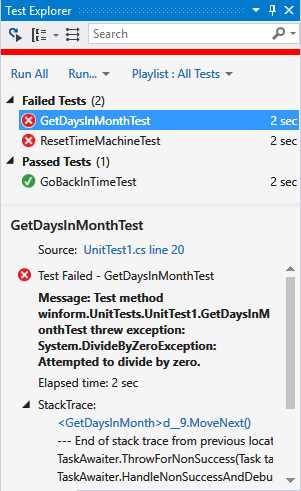
Figure 46: View Failed Tests
You can see that the unit test GetDaysInMonthTest() reported a DivideByZeroException as expected. If you click the unit test ResetTimeMachineTest(), you will see the custom exception message we added earlier.
Note: While I have shown the very basics of unit testing async methods, you will probably want to add more functionality by using Assert to test return values from a Task<T> async method.
Avoiding deadlocks in unit tests
Deadlocks can arise while we do unit testing on async methods. A nice way to avoid this is to specify a timeout on your individual unit tests by using the [Timeout] attribute. In order to do this, modify your [TestMethod] attribute to include the [Timeout] attribute as follows [TestMethod, Timeout(3000)].
Code Listing 97
[TestMethod, Timeout(3000)] public async Task ResetTimeMachineTest() { TimeMachine tm = new TimeMachine(); await tm.ResetTimeMachine(); } [TestMethod, Timeout(3000)] public async Task GetDaysInMonthTest() { int year = 2017; int month = 1; TimeMachine tm = new TimeMachine(); int days = await tm.GetDaysInMonth(year, month); } [TestMethod, Timeout(3000)] public async Task GoBackInTimeTest() { int yearsBack = 150;
TimeMachine tm = new TimeMachine(); await tm.GoBackInTime(yearsBack); } |
Next, set all the delays in your TimeMachine class to Task.Delay(4000).
Code Listing 98
public async Task<int> GetDaysInMonth(int year, int month) { await Task.Delay(4000); return DateTime.DaysInMonth(year, month); } public async Task GoBackInTime(int yearsBack) { await Task.Delay(4000); Year = DateTime.Now.Year - yearsBack; TimeMachineEnabled = true; } public async Task ResetTimeMachine() { await Task.Delay(4000); Year = DateTime.Now.Year; } |
Rebuild and run your unit tests and see that all the unit tests fail because the async methods under test exceeded the timeout defined in the unit test [Timeout] attribute.
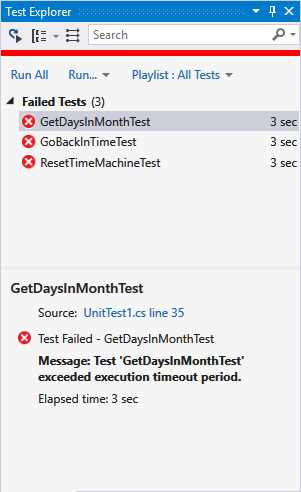
Figure 47: Unit Test Exceeded Timeout
Final thoughts
I have come across instances where the added unit tests do not show up in the Test Explorer. I’m not sure why this happens, but it seems to be a common issue—there are numerous threads on the Internet discussing this very issue.
Here are some things you can try if you encounter this:
- Ensure that you have rebuilt your solution, including the test project.
- Make sure that the Default Processor Architecture matches the solution. If your solution is 64-bit, select from the main Visual Studio menu Test, Test Settings, Default Processor Architecture, and set it to x86 or x64.
- If all else fails, I’m sorry to say that you will probably have to restart Visual Studio.
Additional resources—where to learn more
Two names that stand out here: Stephen Cleary and Stephen Toub. If you want to learn more about async and await, start with the following resources.
Stephen Cleary
http://blog.stephencleary.com/
https://stackoverflow.com/search?q=user:263693+[async-await]
https://github.com/StephenCleary
Stephen Toub
- 1800+ high-performance UI components.
- Includes popular controls such as Grid, Chart, Scheduler, and more.
- 24x5 unlimited support by developers.