
Assembly Language Succinctly®

CHAPTER 1
Assembly in Visual Studio
There would be little point in describing x64 assembly language without having examined a few methods for coding assembly. There are a number of ways to code assembly in both 32‑bit and 64-bit applications. This book will mostly concentrate on 64-bit assembly, but first let us examine some ways of coding 32-bit assembly, since 32-bit x86 assembly shares many characteristics with 64-bit x86.
Inline Assembly in 32-Bit Applications
Visual C++ Express and Visual Studio Professional allow what is called inline assembly in 32-bit applications. I have used Visual Studio 2010 for the code in this book, but the steps are identical for newer versions of the IDE. All of this information is applicable to users of Visual Studio 2010, 2012, and 2013, both Express and Professional editions. Inline assembly is where assembly code is embedded into otherwise normal C++ in either single lines or code blocks marked with the __asm keyword.
Note: You can also use _asm with a single underscore at the start. This is an older directive maintained for backwards compatibility. Initially the keyword was asm with no leading underscores, but this is no longer accepted by Visual Studio.
You can inject a single line of assembly code into C++ code by using the __asm keyword without opening a code block. Anything to the right of this keyword will be treated by the C++ compiler as native assembly code.
int i = 0; _asm mov i, 25 // Inline assembly for i = 25 cout<<"The value of i is: "<<i<<endl; |
You can inject multiple lines of assembly code into regular C++. This is achieved by placing the __asm keyword and opening a code block directly after it.
float Sqrt(float f) { __asm { fld f // Push f to x87 stack fsqrt // Calculate sqrt } } |
There are several benefits to using inline assembly instead of a native 32-bit assembly file. Passing parameters to procedures is handled entirely by the C++ compiler, and the programmer can refer to local and global variables by name. In native assembly, the stack must be manipulated manually. Parameters passed to procedures, as well as local variables, must be referred to as offsets from the RSP (stack pointer) or the RBP (base pointer). This requires some background knowledge.
There is absolutely no overhead for using inline assembly. The C++ compiler will inject the exact machine code the inline assembly generates into the machine code it is generating from the C++ source. Some things are simply easier to describe in assembly, and it is sometimes not convenient to add an entire native assembly file to a project.
Another benefit of inline assembly is that it uses the same commenting syntax as C++ since we have not actually left the C++ code file. Not having to add separate assembly source code files to a project may make navigating the project easier and enable better maintainability.
The downside to using inline assembly is that programmers lose some of the control they would have otherwise. They lose the ability to manually manipulate the stack and define their own calling convention, as well as the ability to describe segments in detail. The most important compromise is in Visual Studio’s lack of support for x64 inline assembly. Visual Studio does not support inline assembly for 64-bit applications, so any programs with inline assembly will already be obsolete because they are confined to the legacy 32-bit x86. This may not be a problem, since applications that require the larger addressing space and registers provided by x64 are rare.
Native Assembly Files in C++
Inline assembly offers a good deal of flexibility, but there are some things that programmers cannot access with inline assembly. For this reason, it is common to add a separate, native assembly code file to your project.
Visual Studio Professional installs all the components to easily change a project's target CPU from 32-bit to 64-bit, but the express versions of Visual C++ require the additional installation of the Windows 7 SDK.
Note: If you are using Visual C++ Express, download and install the latest Windows 7 SDK (version 7.1 or higher for .NET 4).
You will now go through a guide on how to add a native assembly to a simple C++ project.
- Create a new Empty C++ project. I have created an empty project for this example, but adding assembly files to Windows applications is the same.
- Add a C++ file to your project called main.cpp. As mentioned previously, this book is not about making entire applications in assembly. For this reason, we shall make a basic C++ front end that calls upon assembly whenever it requires more performance.
- Right-click on your project name in the Solution Explorer and choose Build Customizations.... The build customizations are important because they contain the rules for how Visual Studio deals with assembly files. We do not want the C++ compiler to compile .asm files, we wish for Visual Studio to give these files to MASM for assembling. MASM assembles the .asm files, and they are linked with the C++ files after compilation to form the final executable.

Figure 1
- Select the box named masm (.targets, .props). It is important to do this step prior to actually adding an assembly code file, because Visual Studio assigns what is to be done with a file when the file is created, not when the project is built.

Figure 2
- Add another C++ code file, this time with an .asm extension. I have used asmfunctions.asm for my second file name in the sample code). The file name can be anything other than the name you selected for your main program file. Do not name your assembly file main.asm because the compiler may have trouble identifying where your main method is.

Figure 3
Note: If your project is 32-bit, then you should be able to compile the following 32-bit test program (the code is presented in step six). This small application passes a list of integers from C++ to assembly. It uses a native assembly procedure to find the smallest integer of the array.
Note: If you are compiling to 64-bit, then this program will not work with 32-bit MASM, since 64-bit MASM requires different code. For more information on using 64-bit MASM, please read the Additional Steps for x64 section where setting up a 64-bit application for use with native assembly is explained.
- Type the 32-bit sample code into each of the source code files you have created. The first listing is for the C++ file and the second is for assembly.
|
.xmm .model flat, c .data .code FindSmallest proc export mov edx, dword ptr [esp+4] ; edx = *int mov ecx, dword ptr [esp+8] ; ecx = Count mov eax, 7fffffffh ; eax will be our answer cmp ecx, 0 ; Are there 0 items? jle Finished ; If so we're done MainLoop: cmp dword ptr [edx], eax ; Is *edx < eax? cmovl eax, dword ptr [edx] ; If so, eax = edx add edx, 4 ; Move *edx to next int jnz MainLoop ; Loop if there's more Finished: ret ; Return with lowest in eax FindSmallest endp end |
Additional Steps for x64
Visual Studio 2010, 2012, and 2013 Professional come with all the tools needed to quickly add native assembly code files to your C++ projects. These steps provide one method of adding native assembly code to a C++ project. The screenshots are taken from Visual Studio 2010, but 2012 is almost identical in these aspects. Steps one through six for creating this project are identical to those described for 32-bit applications. After you have completed these steps, the project must be changed to compile for the x64 architecture.
- Open the Build menu and select Configuration Manager.

Figure 4
- In the configuration manager window, select <New...> from the Platform column.

Figure 5
- In the New Project Platform window, select x64 from the New Platform drop-down list. Ensure that Copy Settings from is set to Win32, and that the Create new solution platforms box is selected. This will make Visual Studio do almost all the work in changing our paths from 32-bit libraries to 64-bit. The compiler will change from ML.exe (the 32-bit version of MASM) to ML64.exe (the 64-bit version) only if the create new solutions platforms is selected, and only if the Windows 7 SDK is installed.

Figure 6
If you are using Visual Studio Professional edition, you should now be able to compile the example at the end of this section. If you are using Visual C++ Express edition, then there is one more thing to do.
The Windows 7 SDK does not set up the library directories properly for x64 compilation. If you try to run a program with a native assembly file, then you will get an error saying the compiler needs kernel32.lib, the main Windows kernel library.
LINK : fatal error LNK1104: cannot open file 'kernel32.lib' |
You can easily add the library by telling your project to search for the x64 libraries in the directory that the Windows SDK was installed to.
- Right-click on your solution and select Properties.

Figure 7
- Select Linker, and then select General. Click Additional Library Directories and choose <Edit…>.

Figure 8
- Click the New Folder icon in the top-right corner of the window. This will add a new line in the box below it. To the right of the box is a button with an ellipsis in it. Click the ellipsis box and you will be presented with a standard folder browser used to locate the directory with kernel32.lib.
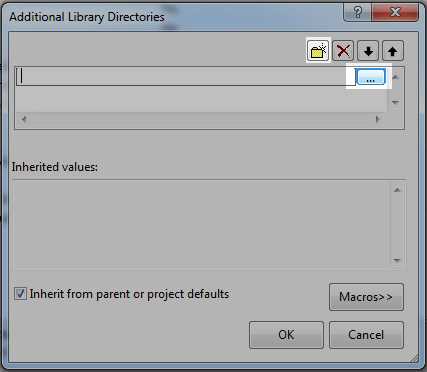
Figure 9
The C:\Program Files\Microsoft SDKs\Windows\v7.1\Lib\x64 directory shown in the following figure is the directory where Windows 7 SDK installs the kernel32.lib library by default. Once this directory is opened, click Select Folder. In the Additional Library Directories window, click OK. This will take you back to the Project Properties page. Click Apply and close the properties window.
You should now be able to compile x64 and successfully link to a native assembly file.

Figure 10
Note: There is a kernel32.lib for 32-bit applications and a kernel32.lib for x64. They are named exactly the same but they are not the same libraries. Make sure the kernel32.lib file you are trying to link to is in an x64 directory, not an x86 directory.
64-bit Code Example
Add the following two code listings to the C++ source and assembly files we added to the project.
// Listing: Main.cpp #include <iostream> using namespace std; // External procedure defined in asmfunctions.asm extern "C" int FindSmallest(int* i, int count); int main() { int arr[] = { 4, 2, 6, 4, 5, 1, 8, 9, 5, -5 }; cout<<"Smallest is "<<FindSmallest(arr, 10)<<endl; cin.get(); return 0; } |
; Listing: asmfunctions.asm .code ; int FindSmallest(int* arr, int count) FindSmallest proc ; Start of the procedure mov eax, 7fffffffh ; Assume the smallest is maximum int
cmp edx, 0 ; Is the count <= 0? jle Finished ; If yes get out of here MainLoop: cmp dword ptr [rcx], eax ; Compare an int with our smallest so far cmovl eax, dword ptr [rcx] ; If the new int is smaller update our smallest add rcx, 4 ; Move RCX to point to the next int dec edx ; Decrement the counter jnz MainLoop ; Loop if there's more Finished: ret ; Return whatever is in EAX FindSmallest endp ; End of the procedure end ; Required at the end of x64 ASM files, closes the segments |
- 1800+ high-performance UI components.
- Includes popular controls such as Grid, Chart, Scheduler, and more.
- 24x5 unlimited support by developers.