
ASP.NET WebHooks Succinctly®

CHAPTER 2
Working with WebHooks
One of my favorite aspects of ASP.NET WebHook is that it is open source, and you can easily get its source code to customize and update as per your own requirements.
As we will see shortly, getting started with WebHooks is easy. But before we dive into that, we need to first understand a few concepts like WebHook receivers, WebHook receiver URIs, and WebHook Handler.
WebHook receivers
A package/module created to receive WebHooks from others is called a WebHook receiver. Some senders might require simple configurations, while others ask for complex configurations. There might be some extra steps involved during configuration, like registration and verification. This also depends upon the security model that the sender is using. This is a choice that is to be made by the sender.
Some senders work on the push-to-pull model, where the HTTP POST request does not contain any data, but contains reference to the event triggered. In this scenario, we might require additional data such a, a separate request on the basis of triggered event to pull the data separately for our use.
Microsoft ASP.NET WebHooks are meant to both accept and verify the WebHooks from a particular sender. A single WebHook receiver can support more than one WebHook based on their own configuration settings. In other words, we can say that if we configured 10 Bitbucket repositories for WebHook, then our one Bitbucket WebHook receiver can accept WebHook from all 10 of these repositories.
WebHook receiver URI
All WebHook providers need different information at the time of configuration for the WebHooks; you might require a different URI for different WebHook receivers. Table 1 describes the different URI formats for various WebHook receivers.
Table 1: URI formats – WebHook receivers
URI formats for various WebHook receivers | |
|---|---|
Receiver | URI format |
Bitbucket | https://<host>/api/webhooks/incoming/bitbucket/?code=secret_key |
Dropbox | https://<host>/api/webhooks/incoming/bitbucket/?{id} |
GitHub | https://<host>/api/webhooks/incoming/bitbucket/{id}?code=secret_key |
https://<host>/api/webhooks/incoming/instagram/{id} | |
MailChimp | https://<host>/api/mailchimp/?code=secret_key |
MyGet | https://<host>/api/webhooks/incoming/myget?code=secret_key |
Slack | https://<host>/api/webhooks/incoming/slack/{id} |
Stripe | https://<host>/api/webhooks/incoming/stripe/{id}?code=secret_key |
VSTS | https://<host>/api/webhooks/incoming/vsts?code=secret_key |
Zendesk | https://<host>/api/webhooks/incoming/zendesk/{id}?code=secret_key |
A typical URI would be in the form of:
https://<host>/api/webhooks/incoming/<receiver>/{id}
Where:
- <host> is the public URL of your application
- <receiver> is the name of the receiver (in our example, it is bitbucket)
- {id} is an identifier (and optional in most of cases), which can be used to identify a particular WebHook receiver configuration
WebHook handler
A WebHookHandler is an abstract class and implements IWebHookHandler interface. While creating the application or our handler, like the Bitbucket handler in our case, do not use IWebhookhandler interface, but directly use WebHookHandler abstract class.
WebHook requests can be processed by one or more handlers, which are called in order based with the use of their own order property from lowest to highest (between 1 to 100).
Tip: Order is an integer, and DefaultOrder value is 50.
Importance of setting a response for WebHook handler
There might be some scenario where we have to send back a response to the originating API. In order to do so, we can set the Response property for the handler. A good example to set Response property would be HTTP status code 410 – Gone. This indicates that WebHook is not active, and no further requests can be entertained.
Tip: The Response property is optional for the handler, so if a response is not required by the business case, leave it out.
Consuming WebHooks
Now let’s put it all together. There are two ways for you to get started with this technology and start consuming the WebHooks.
- NuGet – Add a reference, and you are all set to go
- The examples provided can be an entry point for you. However, you would need to set up up the WebHook source repository to get these examples to compile correctly. The reason for this requirement is that the samples use the source code, and not the NuGet packages.
Creating a sample application using NuGet packages
All WebHooks are available in NuGet packages; you just need to get the package from the NuGet resource.
Tip: All NuGet packages are available at: Microsoft.AspNet.WebHooks.
Note: You can also get the advantage of Visual Studio Extension—refer here for details.
Parts of NuGet packages
The NuGet packages have three modules:
- A module named Common, which is shared between senders and receivers. It can be found here.
- A module specifically developed for a scenario where you want to send your own WebHooks to others and named as Sender. It can be found here.
- A module named Receivers, which provides support to receive WebHooks from others. It can be found here.
Creating a WebHook receiver
In this section, we will discuss in detail how to use Bitbucket WebHook receivers in your own application. We will refer to a sample application and use NuGet packages instead of referring directly to our projects.
First, let’s create a receiver project; in this application we are going to use Visual Studio 2015.
- Create new project from within Visual Studio.
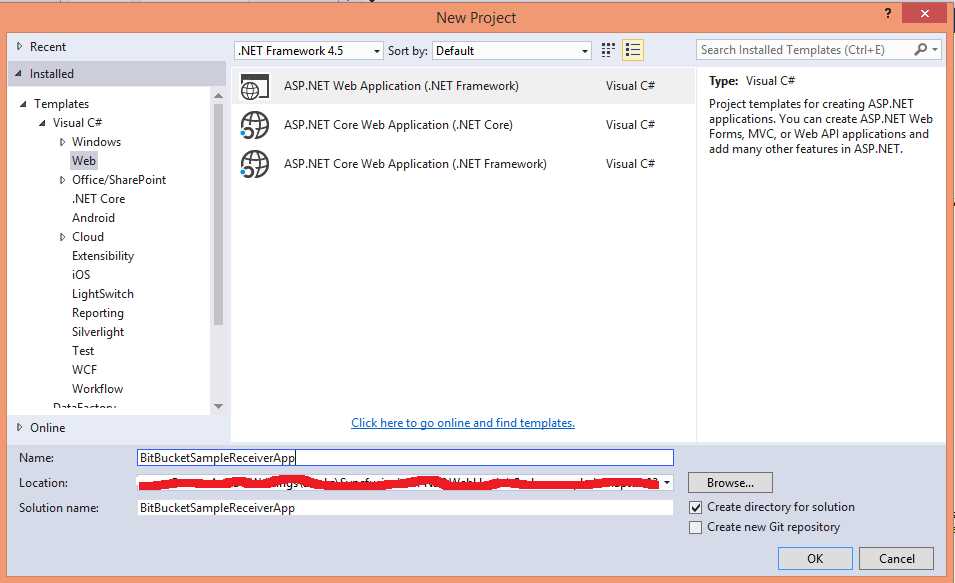
Figure 4: Create new project
- Choose an empty project with the Web API template, as shown in Figure 5.
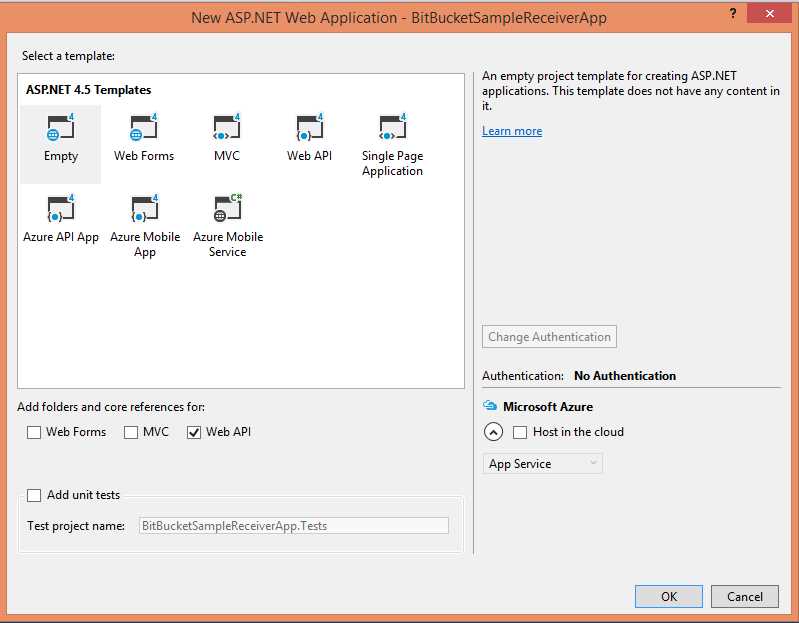
Figure 5: Select project template
- Install the NuGet package using either the Manage NuGet Package Manager dialog box or the Package Manager console.

Figure 6: NuGet package manager dialog

Figure 7: NuGet package manager console
- Search Microsoft.AspNet.WebHooks.Receivers.BitBucket and make sure you have checked the Include prerelease option.
- Type Install-Package Microsoft.AspNet.WebHooks.Receivers.BitBucket -Pre if you are using the Package Manager console.
Note: You will notice new assemblies added in the project: Microsoft.AspNet.WebHooks.Common, Microsoft.AspNet.WebHooks.Receivers, Microsoft.AspNet.WebHooks.Receivers.Bitbucket
Unique config key
A unique config key is nothing but a unique key for every WebHook receiver. It contains a secret_key, which should be between 32 and 128 characters long. This key is nothing but a HMAC.
There are plenty of tools available to generate the secret key. In all examples in this book, we have used the tool available here to generate HMAC (or in other words, our WebHook receiver’s secret_key).
Table 2 lists the key of every receiver.
Table 2: Unique config key
Unique Config key | |
|---|---|
Receiver | Key |
Bitbucket | MS_WebHookReceiverSecret_Bitbucket |
Dropbox | MS_WebHookReceiverSecret_Dropbox |
GitHub | MS_WebHookReceiverSecret_GitHub |
It required two keys: MS_WebHookReceiverSecret_InstagramId – Client ID MS_WebHookReceiverSecret_Instagram – Client Secrete | |
MailChimp | MS_WebHookReceiverSecret_MailChimp |
MyGet | MS_WebHookReceiverSecret_MyGet |
Slack | MS_WebHookReceiverSecret_Slack |
Stripe | MS_WebHookReceiverSecret_Stripe |
VSTS | MS_WebHookReceiverSecret_VSTS |
Zendesk | MS_WebHookReceiverSecret_Zendesk |
Set up unique config key
To set up a unique config key with a secret_key value, we need to add a config key with a unique name. In our case, we are going to add the unique key MS-WebHookReceiverSecret_Bitbucket
To set up our application for successfully receiving the intended notification, we must add a unique config key containing the secret_key value. For this, just open up the Web.Config field of our newly created application. Add a key here; as already discussed, every WebHook receiver has a unique key. Code Listing 2 shows how to set this up for Bitbucket. If you are planning to create the new application based upon the WebHook receiver other than the Bitbucket receiver, please refer to Table 3, listing all the unique keys for the respective WebHook receivers.
Code Listing 2
<appSettings> <add key="MS_WebHookReceiverSecret_Bitbucket" value="a5bfbf7b2d2c4ec07757183a61e9570611112ddc2724bde63ba85c0664c75403"/> </appSettings> |
Initializing or configuring a WebHook receiver
So far, we have created a small application to consume a Bitbucket WebHook receiver, and configured it with a unique key to get event notifications from a particular WebHook.
The next step is to initialize a WebHook receiver. To do that, open the WebAPIConfig file from your project and modify it by adding: config.InitializeReceiveBitbucketWebHooks(), as shown in Code Listing 3.
WebHook receivers are configurable using the IWebHookReceiveConfig interface, and can be implemented by using any dependency injection.
Code Listing 3
namespace BitBucketSampleReceiverApp { public static class WebApiConfig { public static void Register(HttpConfiguration config) { // Web API configuration and services // Web API routes config.MapHttpAttributeRoutes(); config.Routes.MapHttpRoute( name: "DefaultApi", routeTemplate: "api/{controller}/{id}", defaults: new { id = RouteParameter.Optional } ); // Initialize Bitbucket WebHook receiver config.InitializeReceiveBitbucketWebHooks(); } } } |
Note: InitializeReceiveBitbucketWebHooks() is an extension method that is defined in Microsoft.AspNet.WebHooks.Receivers.Bitbucket.dll. For more information, refer here.
Creating a WebHook handler
A WebHook handler is just a simple class with a special operation.
The next step is to create a handler for receiving the event notifications from Bitbucket. In order to achieve this, we need to do the following:
- Add new folder and name it WebHooks. You can put any kind of WebHook handlers under this folder.
- Add new class under folder WebHooks and name it: BitBucketWebHookhandler.cs. It should be inherited from WebHookHandler.
- In this sample, we are going to track push notifications. Let’s write our code to receive the push notifications (although we can write code to receive any other kind of event notification as well).
Tip: We can write our application to receive any kind of event notification from Bitbucket, provided we have added the appropriate settings for those event notifications.
Note: Documentation of Bitbucket push notifications can be found here.
Code Listing 4
public class BitBucketWebHookhandler : WebHookHandler { public BitBucketWebHookhandler() { Receiver = BitbucketWebHookReceiver.ReceiverName; } public override Task ExecuteAsync(string receiver, WebHookHandlerContext context) { var dataJObject = context.GetDataOrDefault<JObject>(); var action = context.Actions.First(); switch (action) { case BitBucketAction.Push: var repository = dataJObject["repository"].ToObject<BitbucketRepository>(); var actor = dataJObject["actor"].ToObject<BitbucketUser>(); AssessChanges(dataJObject); break; default: var data = dataJObject.ToString(); break; } return Task.FromResult(true); } private static void AssessChanges(JObject dataJObject) { foreach (var change in dataJObject["push"]["changes"]) { var previousValue = change["old"]["target"].ToObject<BitbucketTarget>(); var newValue = change["new"]["target"].ToObject<BitbucketTarget>(); } } } |
In Code Listing 4, we are have our handler, which specifically handles Bitbucket events. If you see a receiver in the constructor, this receiver will return BitBucket only.
Our BitBucketWebHookHandler class is inheriting WebHookHandler (an abstract class). Here, we are overriding the ExecuteAsync method, which is actually having the receiver and WebHookhandlerContext (context of incoming) method.
In the preceding code listing, we are getting data as per the documentation of Bitbucket mentioned here.
When we have a single generic handler for multiple WebHook receivers, we check for a particular receiver like: if(“BitBucket”.Equals(receiver, StringComparison.CurrentCultureIgnoreCase)). Our modified code would be look like the following:
Code Listing 5
namespace BitBucketSampleReceiverApp.WebHooks { public class BitBucketWebHookhandler : WebHookHandler { public BitBucketWebHookhandler() { Receiver = BitbucketWebHookReceiver.ReceiverName; } public override Task ExecuteAsync(string receiver, WebHookHandlerContext context) { if ("BitBucket".Equals(receiver, System.StringComparison.CurrentCultureIgnoreCase)) { ReceivefromBitbucket(context); } return Task.FromResult(true); } |
In the preceding code listing, we have extracted our main method to a small method ReceivefromBitbucket(); similarly, we can add more conditions for different WebHook receivers while working with a generic receiver.
Publishing the application
We have created a receiver application with a Bitbucket handler. Our small application is now capable of communicating with Bitbucket, or in other words, it can now listen or receive event notifications from the Bitbucket repository for which we have configured the WebHook.
Importance of SSL support with public URI
Due to security reasons, almost all WebHook providers require that the URI is public and with SSL support so it can use the ‘https’ protocol. In other words, if our URI is not public, then how can a Bitbucket repository connect to your local URI?
Getting the public URI
As we discussed in the preceding section, our application should have a public URI with https protocol—in other words, it should be SSL-enabled. There are lot of ways to make your application public with SSL:
- Purchase a domain
- Purchase a hosting
- Purchase a SSL certificate
- Deploy your application
- Bind your domain with SSL
These steps require money and plenty of time. The easiest way to achieve our deployment is by using Azure. Azure URLs have SSL enabled internally, so we can use those for our application. We are not going to discuss Azure deployment in detail here.
Note: Refer to Windows Azure Websites Succinctly for more details.

Figure 8: Publish dialog
Configure the Bitbucket repository
We’ve now gone through the entire cycle of consuming WebHooks with the help of NuGet packages. Let’s now look at how to configure the Bitbucket repository, in case you wanted to use the second option of going through the samples provided. As these samples use the source code and not the NuGet packages, you must perform the following steps. If you are not interested in performing the exercise outlined here, you can skip to the next chapter.
Since we have already created a BitbucketWebHook receiver application that can talk to the Bitbucket repository and listen for the event notifications, let’s move to our next step.
The next step would be to configure our Bitbucket repository, which will send event notifications to our BitBucketWebHook receiver.
- Go to your Bitbucket (https://bitbucket.org) account, login with valid credentials or create one, in case you do not have account with Bitbucket.
- Go to your repository (we are using this one).
- Click on Setting Under Navigation.
- Click WebHooks in the Integrations section.
- On the WebHook page, click Add webhook (for more information, go here).
- Enter a meaningful title (for example, BitbucketWebHook)
- Enter the correct URI (in the format of https://<host>/api/webhooks/incoming/bitbucket/?code=secret_key) of the public application we have just deployed with the URL: http://bitbucketsamplereceiverapp.azurewebsites.net/. So, our actual WebHook URI would be: https://bitbucketsamplereceiverapp.azurewebsites.net/api/webhooks/incoming/bitbucket/?code=secret_key
Note: Please refer to the next section for a better understanding of this part.
- Our secret_key would be a generated HMAC—refer to preceding section on how to generate the secret_key.
- Customize your choices. You can bypass SSL/TLS certificate verification.
- Triggers:
- Choose Repository push or
- Select the triggers of your choice from the complete trigger list.
- Once done, click Save.

Figure 9: Add new webhook
Tip: The WebHook URI format is: https://<host>/api/webhooks/incoming/bitbucket/?code=secret_key
Note: secret_key should contain the same value as the MS_WebHookReceiverSecret_bitbucket key in configurations,
Assigning a secret_key value
We are all set to go with just one exception, we still need to set secret_key in our webconfig.cs. We have already added the key MS_WebHookReceiverSecret_Bitbucket, but without any value, so our next step is to assign a value to our config key.
There is no need to add value in our application (you can also add value to your webconfig at the time of creation of the application), as we have already deployed the application. If we are going to edit the webconfig file, then we need to re-deploy our application, which really makes no sense. Here, we can use the power of Azure to add our config key. To do so, go over to your Azure portal and access the Application settings, and add the key and value, as shown in following image.

Figure 10: Configuring app settings
A quick note about the WebHooks process
As soon as the WebHook receiver validate the WebHooks request, it tells the application or user code to process. In other words, first WebHook receiver validates the WebHook requests and WebHook handlers start processing.
Verifying WebHook receiver application
Finally, we are ready to test our WebHook receiver. Go and make few changes to any of your files locally from your Bitbucket repository, for which you have configured WebHook, and then push it over to remote repository. We can verify the event notification in two ways:
- Verification from the Bitbucket View request page
- Verify the incoming data on application (can debug remotely)
Verification from Bitbucket
To make it easier let us edit event notifications, go back to the WebHook settings of your Bitbucket repository, and set them to receive events/notifications for Push and Issues.

Figure 11: Edit existing WebHook
Now, go back to the repository and create a new issue or edit few changes in an existing issue. This will trigger a particular event notification.
You can verify this by visiting Settings > WebHook > View from within your Bitbucket repository.

Figure 12: WebHook request logs
I have created one issue and then commented. In Figure 12, you can see what event triggered and what the details are. For more details, you can click on the View details link.
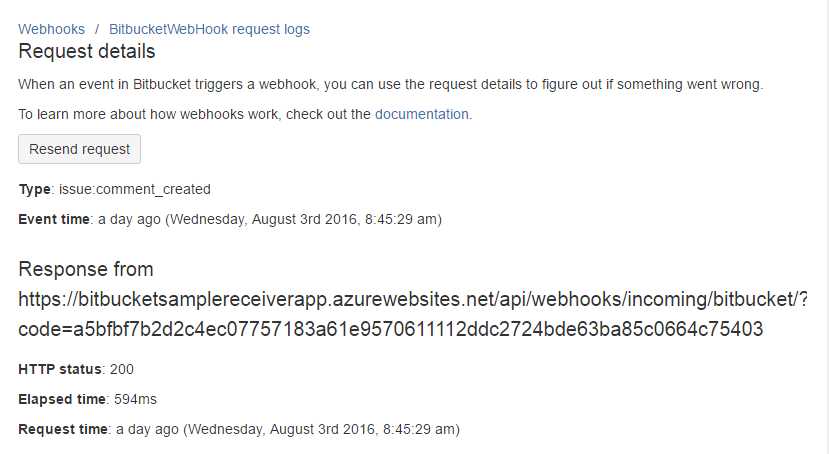
Figure 13: WebHook request details
On the Details page, you can get all details of the request (HTTP status, elapsed time, request time, etc.) You can also get the request and body details.
Debugging your application
We have verified that our WebHook is working fine by using the Bitbucket settings page, where we saw which event triggered and what we received. When such an application is being developed, the primary focus is on the end result rather than the configured settings. So if there is an analysis required to troubleshoot a probable bug, one would like to immediately debug the application.
So, let’s check whether or not our application is receiving the data as expected. Attach the debugger to your application and make a few changes in your repository.
Note: We are not going to discuss how to debug an Azure application—this is beyond the scope of this book. Refer to this article to learn more about debugging an Azure application.
To verify our app, I have just modified the ReadMe file, and then pushed the changes back to the remote repository. Here, the Push notification gets triggered and notifies our WebHook receiver, so our application should hit the Debug point shown in Figure 14. We should get the triggered data.

Figure 14: Debugging WebHook receiver application
Here, we received everything as required—our WebHook is working fine. In this application, we verified and understood how our WebHook receiver talks with the Bitbucket repository and how we get the requested data back to our subscribing application.
In this application we did not use the data, but in the actual environment where we would be using hooks, the data would be put to a more prudent use. In the next section, we will create a simple application to consume and process the data received.
Setting up a WebHook source repository
If you have decided to use the samples provided, then you already know that you need to set up your WebHook source repository as it is used these samples. This section will guide you through just that.
To create or customize a WebHook, one should have the complete source code. In this section, we will discuss how to set up your WebHook source repository and get ready for creating or customizing WebHooks.
Setting up a source code repository
ASP.NET WebHook is open source, and its source code is available from the GitHub repository here. If you are planning to add or customize the WebHook, you should follow these steps to set up the repository:
- Access https://github.com and log in to your account.
- Go to the ASP.NET WebHook repository URL.
- Fork the repository and follow the instructions.
- Use your favorite GUI or CLI to start, locally. I prefer to use GitBash or GitExtensions for Windows.
- Clone the repository to your local system on your preferred location.
- Check out the dev branch for any additions or modifications.
- After any modifications, make a pull request (PR) to the main repository from which you forked your repository.
To create a new pull request, you just need to have a valid GitHub account, and most importantly, you have to sign the cla for open source contribution. For more information about cla, please refer here.

Figure 15: ASP.NET WebHook repository
Note: Please refer to GitHub Succinctly to learn how to work with GitHub repositories.
There are a lot of WebHook senders and receivers available; you can get started with one of these WebHooks using repository samples or creating your own custom application using NuGet packages.
WebHook receiver samples
WebHook receiver samples are available in the GitHub repository. To use samples, you just need to go this site and select your sample. Currently, available samples (for receivers) are:
Note: All samples are referring to actual WebHook receiver projects, and are part of the ASP.NET WebHook solution. These are important when you are going to debug actual source code.
Conclusion
In this chapter we have discussed all ASP.NET WebHooks. We have looked at WebHook receivers, WebHook senders, and URI formats.
- 1800+ high-performance UI components.
- Includes popular controls such as Grid, Chart, Scheduler, and more.
- 24x5 unlimited support by developers.