
ASP.NET MVC Succinctly®

CHAPTER 3
The World Says Hello Back
A web app involves a two-way conversation with the user. The web app will ask questions in the form of input controls and the user will respond by clicking buttons or links. Sometimes the user may ask a question by clicking a link or selecting a drop-down value and MVC will respond with a new view or a similar ActionResult.
To facilitate this conversation, we will need a new model.
|
{ public DateTime? When { get; set; } public string Description { get; set; } public int? Duration { get; set; } } |
Code Listing 10: Our first model
We will build on this model, adding additional features throughout the rest of this chapter.
Adding a Controller
Now that we have this model, let’s add a new ItineraryController. Let’s start with an empty controller. In the Solution Explorer, right-click the Controller folder, and then select Add > Controller.
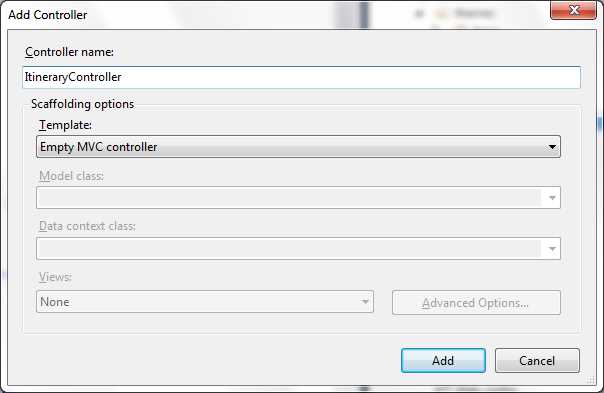
- Add a new controller
In the Create action, we will allow the user to create a new ItineraryItem. Our Create action will be simple. See Code Listing 11.
Note: There are other options by selecting different values in the template drop-down menu; you can let the framework automatically fill in more of the pieces for you. We will explore these options later but, for now, we will use an empty controller.
Because we are creating a new ItineraryItem, we do not need to initialize it or worry about data mapping.
|
namespace MVCSuccinctly.Controllers { public class ItineraryController : Controller { public ActionResult Create() { var model = new ItineraryItem(); return View(model); } } } |
Code Listing 11: The Create action
Adding the View
Right-click anywhere in the action definition in the code editor. In the context menu, select Add View. This will open the Add View window.
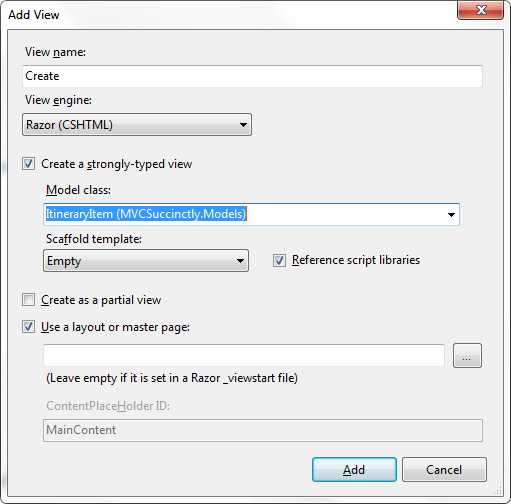
- Add View window
We want to create a strongly typed view, and we will specify the model that we just created by selecting it from the Model class drop-down. For now, ignore the Scaffold template field; we will explore the options that it provides later. Here, we will stick with an empty template.
We will work through a few iterations of the view, showcasing different features and allowing the framework to do more of the work for us.
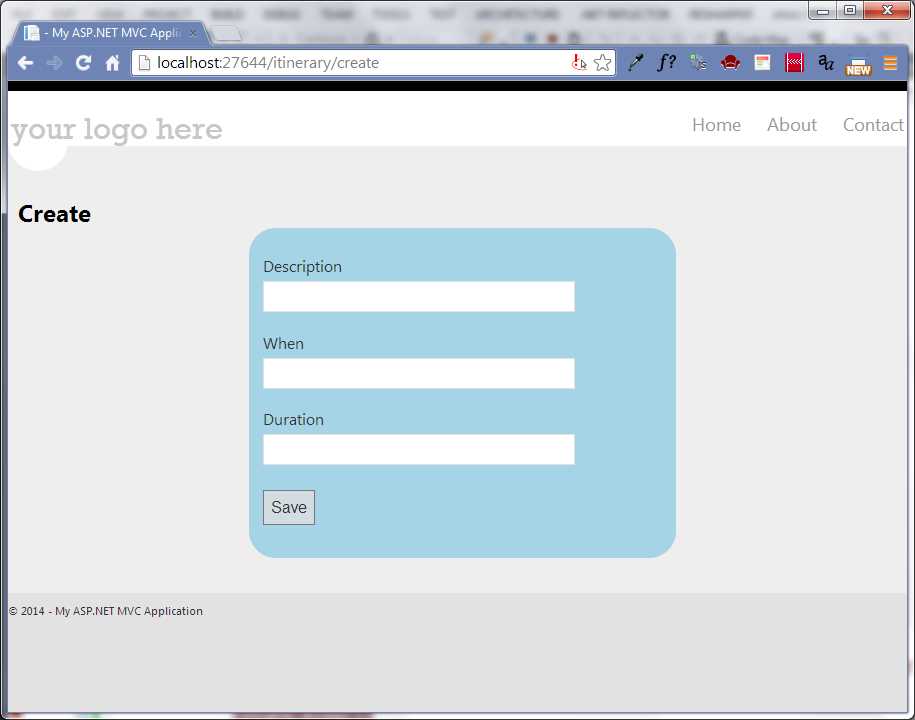
In its simplest form, our view should look like the following code listing.
@model MVCSuccinctly.Models.ItineraryItem <h2>Create</h2> <div class="editor"> @using (Html.BeginForm()) { <p> @Html.LabelFor(m => m.Description) @Html.TextBoxFor(m => m.Description) @Html.ValidationMessageFor(m => m.Description) </p> <p> @Html.LabelFor(m => m.When) @Html.TextBoxFor(m => m.When) @Html.ValidationMessageFor(m => m.When) </p> <p> @Html.LabelFor(m => m.Duration) @Html.TextBoxFor(m => m.Duration) @Html.ValidationMessageFor(m => m.Duration) </p> <p><input type="submit" value="Save"/></p> } </div> |
Code Listing 12: Simple editor for itinerary items
With this markup, our view will look like the following when we run the app.
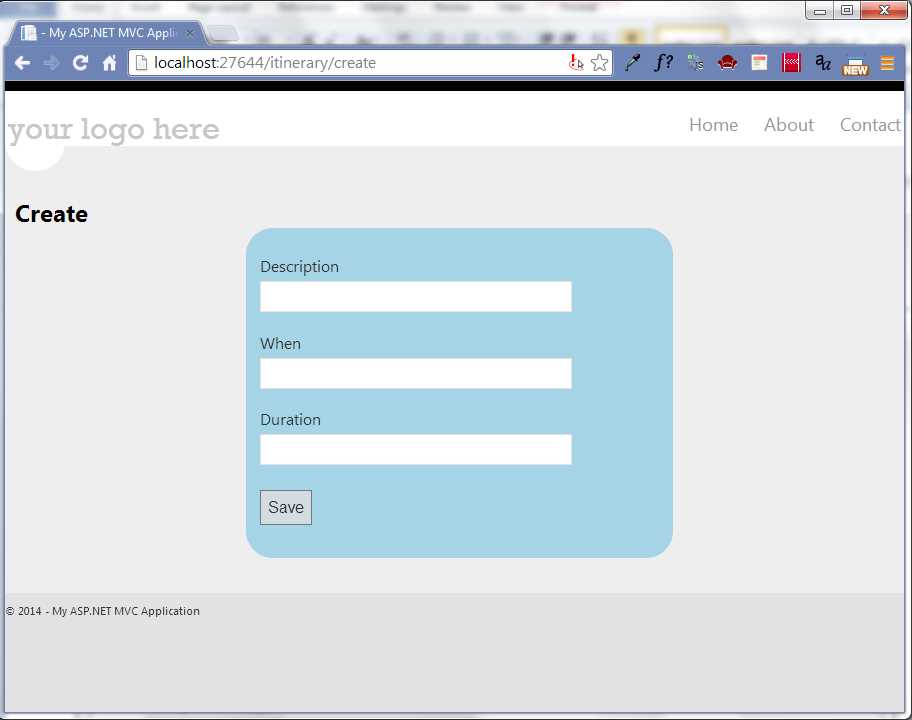
- Our first input form
You will notice a few new things in the code sample. The using statement is the same using statement that you are familiar with from C#. This will wrap the markup in the code block in the form element created by the BeginForm HTML helper. With no parameters, the resulting form element will post back. This is the most common usage; however, there are overloads to allow you to specify the controller, the action, POST versus GET methods, as well as specify HTML attributes to be added to the form tag.
Model Binding
Lambda expressions are a succinct way to express an anonymous function. The lambda operator => can be read as “goes to”. So the expression m => m.When can be read as "m goes to m dot When". m, the value to the left of the lambda operator, is the parameter passed to the function. In this case it will be the model passed to the view. So m=>m.When is specifying which property of the model to act on. |
LabelFor, TextBoxFor, and ValidationMessageFor are also new and their syntax may seem a bit strange at first. These helper methods use lambda expressions to specify which property to use from the model. Once you become familiar with this syntax, you will discover that it does a great deal for us. By using helpers and extension lambda expressions, we get great IntelliSense that shows us what functionality is and is not available. Many refactoring tools will also catch when a property is renamed and automatically clean up the markup—something that would not be possible if we simply specified the property as an inline string.
By using the TextBoxFor HTML helper, we will get markup with the necessary IDs to make it easy to put the values back into the model. Yes, you read that correctly. As long as the view is properly structured, the framework will put the data from the input controls back into your model. This is key to making model binding work.
LabelFor will generate an appropriate label for the property specified. We will soon see that this does a bit more than simply output the property name.
TextBoxFor will output a text box, starting off with the current value for the specified property and allow the user to edit the value as needed.
ValidationMessageFor will output the markup to display any validation messages associated with the specified property. Don’t worry about validation messages for now. We will cover them in detail later. For now, the only responsibility the view has is to provide a location for displaying the message.
Let’s now turn our attention to the action that will process the response from the user.
Code Listing 13: Method signature for a basic Create action
We do not care what you do with the data the user entered; you can save it in a database, an XML file, or just persist it in memory. The focus here is on using MVC to interact with the user; however, this simple action will get a bit more complicated before we are done.
Filters
Filters are attributes that you can add to the controller or individual actions in the controller. Attributes are pieces of metadata that we can associate with pieces of code (classes, methods, properties, etc.). This metadata can be retrieved at run time through reflection and change the way the program behaves. The MVC framework uses filters and attributes a lot. |
The HttpPost attribute in Code Listing 13 is an example of a filter. This attribute instructs the framework that this action be called only as a POST and not as a GET. This is necessary for the framework to distinguish between the two Create actions. Without it, we would get an error message about an ambiguous action reference. Also, if there is only one action and it has an HttpPost filter, you will get a 404 error if you try to navigate to it with a GET.
When added to the controller, filters affect every action in the class. When added to a specific method, only that action will be affected.
The HttpPost filter is part of a collection of attributes intended to influence when an action is available. These attributes include:
- AjaxOnly
- HttpDelete
- HttpGet
- HttpHead
- HttpPost
- HttpPut
- RequireHttps
AjaxOnly, HttpGet, and HttpPost will be the ones you will use most often. These filters come in handy for helping the framework tell the difference between actions with the same name since differences in the method signature can be difficult to determine because of the way the model binder works. There are also some nice security implications for these filters as well. It is a good practice to use HttpPost for data modifications such as creates, updates, and deletes. Posting data requires a form submission, so it prevents users from clicking a nefarious link in email messages and changing data by mistake.
Filters are not limited to method selection. We also have action filters such as:
- Timeout
- Cache
- Authorize
- HandleError
Filters provide an easy way to add security, limit access, or add performance enhancements such as caching and timeouts. There are also a couple of interfaces that you can implement to add your own arbitrary logic through filters.
Validations
Let's go back to our controller and set a breakpoint in the Create action to which we will post back. Run the app and click Save. When you hit the breakpoint, you will find that the data parameter has the data from the user when you click Save. This is because the model binder did its job. The model binder examined the forms collection, query string, cookies, etc., looking for IDs that matched the property names of the model. The model binder also handles type conversions and, as we will soon see, carries out input validations.
At this point, we have not explicitly stated any validation rules but the framework has inferred some basic rules based on data type. Because When is of type DateTime, any value that cannot be converted to a DateTime will fail validation. We get similar validations for Duration. Soon, we will add more validation rules.
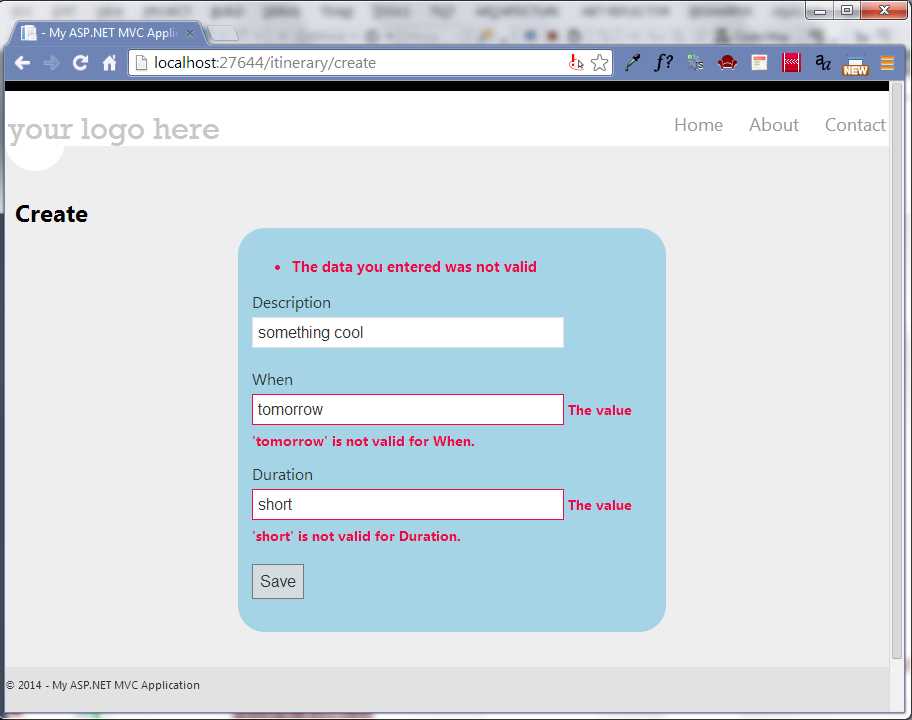
Spend some time playing around with the HttpPost Create action. Enter values that are not valid for the data types in the model. For instance, enter “tomorrow” for When and “short” for Duration. When you click Save, the view returned will look like the following figure.
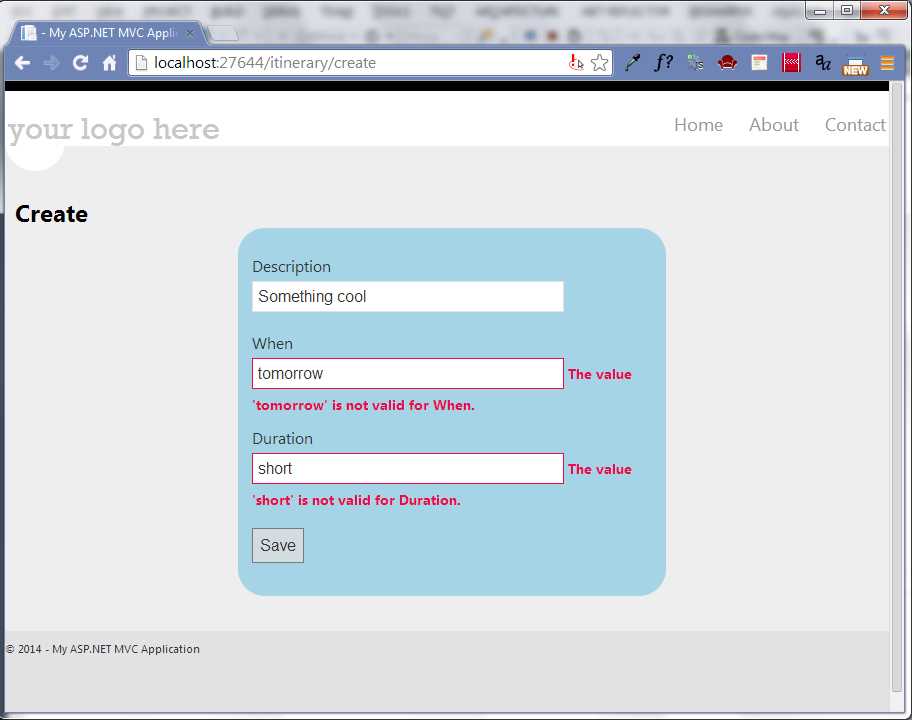
- Validation messages
The messages come from the ValidationMessageFor calls that we added to the view in Code Listing 10. The text for the validation messages comes from the model binder, strictly based on the data types.
Additionally, if you check the breakpoint when you click Save, you will see that the properties without valid values will have null values. By poking around in the debugger, you may also notice that the model state complains about bad input.

- Quick watch showing invalid model state
This gives us a clue as to the next enhancement we will need to make to our action. We will need to make sure that the model state is valid before making any changes. Our updated action will now look like the following code listing.
[HttpPost] public ActionResult Create(ItineraryItem data) { if (ModelState.IsValid) { // Handle saving the data only if // the model state is valid } else { ModelState.AddModelError("", "The data you entered was not valid"); } return View(); } |
Code Listing 14: Action checking that the model is valid
In addition to checking the model state, we now add our own error message to the mix. The AddModelError method expects two parameters. The first one will specify where the message should be displayed and the second one will specify the message to be displayed. This first parameter should refer to the property from the model that caused problems, but because we are leaving it blank, our message will not be associated with any input control and will not be shown on the page until we modify the view to include a ValidationSummary. Add the following line to the top of the “editor” div tag in Create.cshtml.
Code Listing 15: Adding a validation summary to the view
Passing true to the method will instruct the framework to not show error messages associated with properties. You will want this if you have validation messages associated with each property. With these changes in place, our view will look like the following figure after being submitted back to the controller.
- Editor with validation summary
Had we passed false to the ValidationSummary, then the property-specific messages would have appeared as well. In this case, they would be duplicated since they are also shown alongside each property’s editor. We could leave off the individual calls to ValidationMessageFor and just rely on the summary to display all of the validation messages, but then we would lose context for the validation messages.
We will explore adding our own validations in greater detail in the next chapter.
Editors
Now, let’s go back to the view and explore what else the framework can do for us to make the forms more intuitive. Consider this simple change:
@model MVCSuccinctly.Models.ItineraryItem <h2>Create</h2> <div class="editor"> @using (Html.BeginForm()) { @Html.ValidationSummary(true) <p> @Html.LabelFor(m => m.Description) @Html.EditorFor(m => m.Description) @Html.ValidationMessageFor(m => m.Description) </p> <p> @Html.LabelFor(m => m.When) @Html.EditorFor(m => m.When) @Html.ValidationMessageFor(m => m.When) </p> <p> @Html.LabelFor(m => m.Duration) @Html.EditorFor(m => m.Duration) @Html.ValidationMessageFor(m => m.Duration) </p> <p><input type="submit" value="Save"/></p> } </div> |
Code Listing 16: Editor using EditorFor
We have replaced the calls to TextBoxFor with calls to EditorFor. When we run the app, we will see that it looks exactly the same.
- Output for EditorFor
So, what is the difference? In our original version, we explicitly state that we want a text box for the editor. In this second version, we allow the framework to determine which editor to use. As it turns out, the framework chose a text box as well, but that will not always be the case.
In fact, if you look closely, you will see a subtle difference in the Duration field when it has focus, as shown in the following figure.
![]()
- Custom editor for integers
If you look at the generated markup, you will see that the text box used specifies one of the new HTML 5 types and, as long as the browser supports the number type, you will get a bit smarter text box. We get this new functionality because the Duration property is an integer.
<input class="text-box single-line" data-val="true" data-val-number="The field Duration must be a number." id="Duration" name="Duration" type="number" value=""> |
Code Listing 17: Input element with HTML 5 attributes
The framework has its own logic for determining which editor to use, taking into account the data type and attributes associated with the property. This makes it easier to write our view. We do not have to worry about which editor to use; we can always use the more generic EditorFor and let the framework figure it out. |
With this in mind, let’s return to our model.
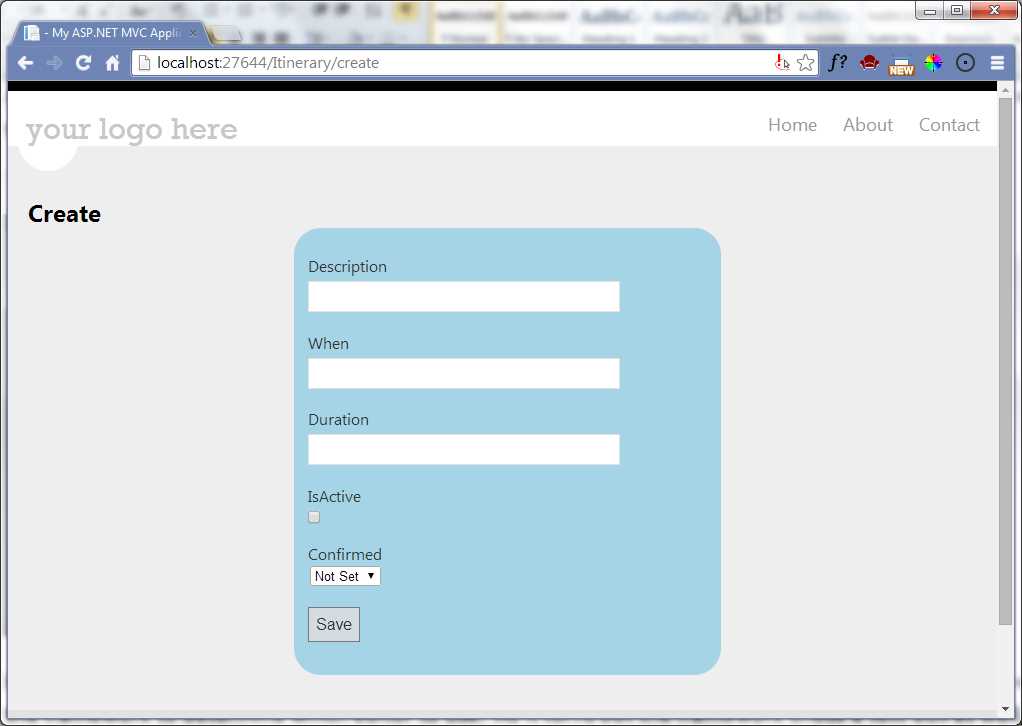
We will add a few new properties to showcase some built-in templates based on the type of the property. Let’s add a Boolean and a nullable Boolean property.
public class ItineraryItem { public DateTime? When { get; set; } public string Description { get; set; } public int? Duration { get; set; } public bool IsActive { get; set; } public bool? Confirmed { get; set; } } |
Code Listing 18: Extended itinerary item
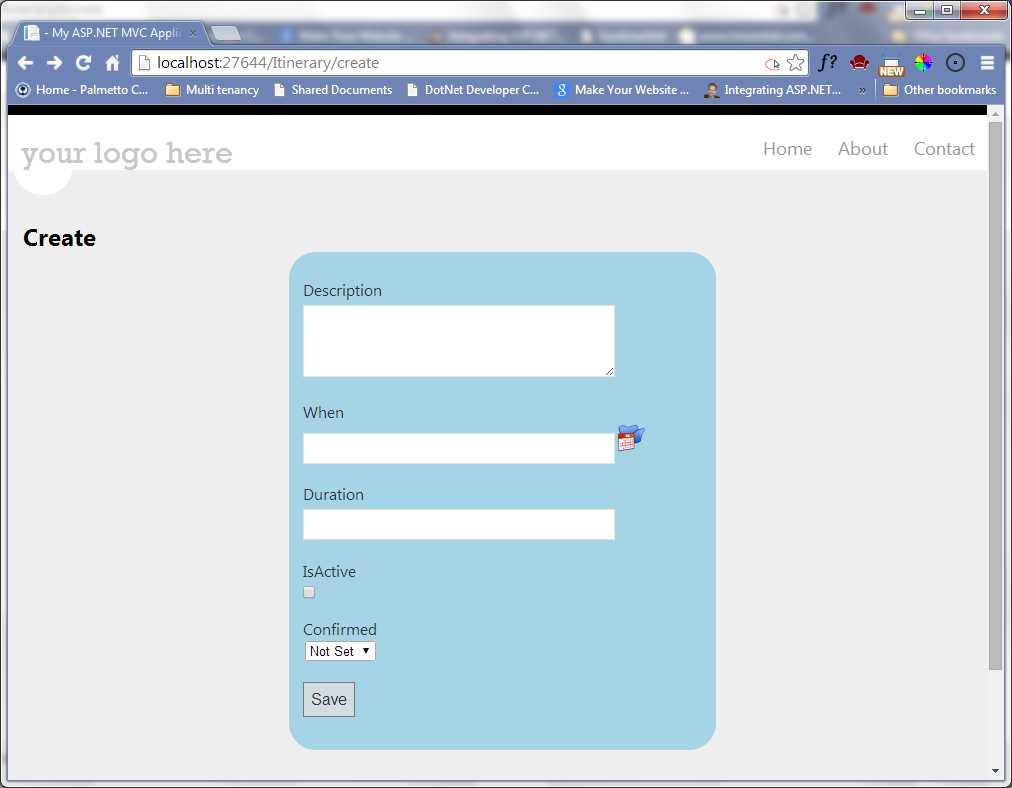
IsActive will need to have a value of true or false. Confirmed will also have a true or false value but could also not be set.
Now, if we add these new properties to the existing view in the same way as the previous properties (see Code Listing 15), we will get a view that looks like the following figure.
- A Boolean and nullable Boolean editor in action
The framework knows that if the property is a Boolean, then there are only two values—a check box is the appropriate editor. But if the property can be null, then we have a third option—it switches to a drop-down menu with options for Not Set, True, and False. In our application, we did not have to do anything extra to get the drop-down menu.
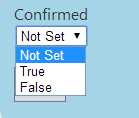
- Nullable Boolean options
Beyond the built-in templates that MVC already knows about, we can easily add our own templates.
Editors Based on Type
It would be nice to have a standard editor for dates. To make MVC treat properties of DateTime as it does Booleans, all we have to do is provide an editor template with the same name as the data type. To let MVC know about an editor template, simply place it in the folder \Views\Shared\EditorTemplates.
Our initial DateTime.cshtml should look like the following code sample.
@model DateTime? @Html.TextBox("", (Model.HasValue ? Model.Value.ToShortDateString() : string.Empty), new { @class = "datePicker" , @readonly = "readonly"}) |
Code Listing 19: Custom Editor for DateTime
Once you get this basic editor working, play with it to make it your own. You may do this often. Being able to create your own editors is a substantial productivity boost. You can keep the markup simple as we have done so far, yet still have the resulting view be as sophisticated as you want.
This will create a text box. By leaving the first parameter blank, we allow the framework to fill it in and it will do so with the appropriate values to support data binding. The second parameter specifies the initial value for the text box. Here, we use the ternary operator to evaluate a conditional. If the value passed to it is set, we will display the result of calling ToShortDateString on the value. If the value is not set, we will display an empty string. We could just as easily display something such as “No Date Entered” or any other default value. The final parameter is an anonymous object whose properties will be treated as HTML attributes for the text box. In this case, we specify the CSS class and make it read-only.
I will often partner this with some JavaScript to add a jQueryUI date picker based on the class being datePicker. Dates are difficult to validate. Also, they are often difficult for a user to properly enter. To simplify this data entry and validation on the client side, it is a good idea to provide an editor that will help steer the user toward providing the right input.
$(".datePicker").datepicker( { showOn: "button", gotoCurrent: true, showAnim: 'fold', buttonImage: "/Content/calendar.png", buttonImageOnly: true }) |
Code Listing 20: jQuery code to activate the date picker
Our rendered view will now look like the following figure.
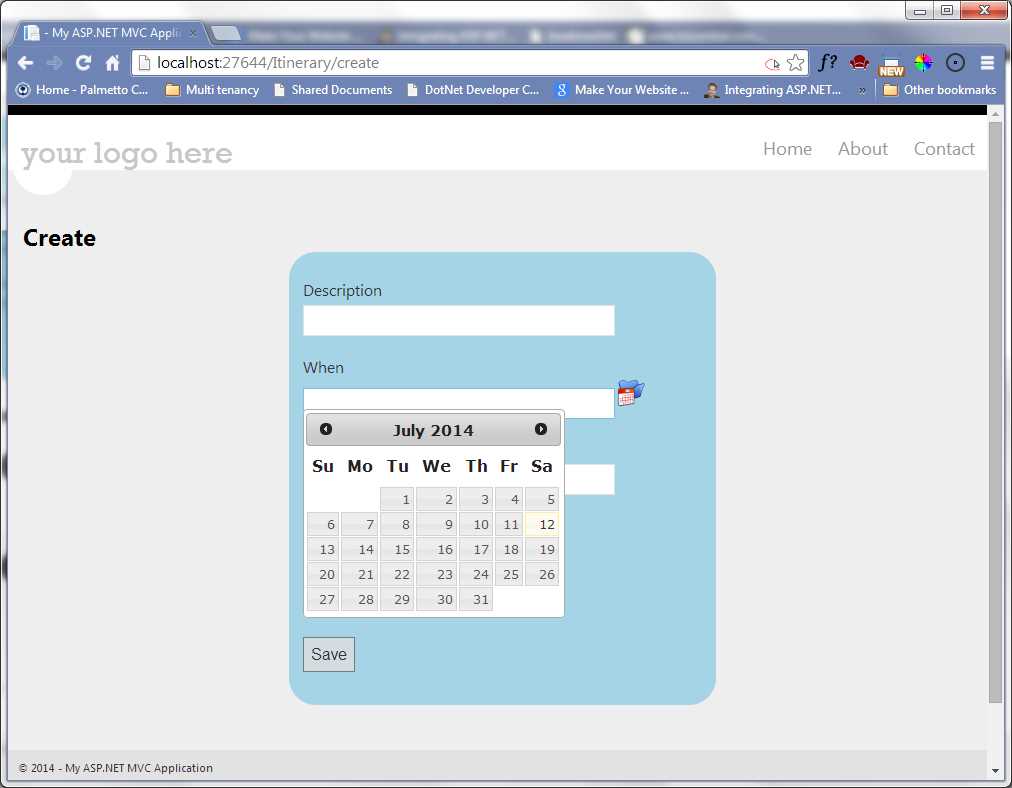
- Custom editor for date picker
With this in place, any property of type DateTime will automatically get a nice date picker as its editor.
Editors Based on DataType
We are not limited to the data type to associate an appropriate editor. We can also use the DataType attribute on any property to specify an appropriate editor. This attribute, along with many others that we will be interested in, can be found in the System.ComponentModel.DataAnnotations namespace. This attribute allows us to draw distinctions within the same type in .NET.
For instance, we could redefine our ItineraryItem as in the following code listing.
public class ItineraryItem { public DateTime? When { get; set; } [DataType(DataType.MultilineText)] public string Description { get; set; } public int? Duration { get; set; } public bool IsActive { get; set; } public bool? Confirmed { get; set; } } |
Code Listing 21: Forcing the Description to support multiple text lines
Now the Description will be rendered as a text area instead of a text box.
- Text area as an Editor
The DataTypeAttribute provides several options to specify built-in templates that cannot be inferred from the data type. The DataType enumeration provides the following options:
- CreditCard: Represents a credit card number.
- Currency: Represents a currency value.
- Custom: Represents a custom data type.
- Date: Represents a date value.
- DateTime: Represents an instant in time, expressed as a date and time of day.
- Duration: Represents a continuous time during which an object exists.
- EmailAddress: Represents an email address.
- Html: Represents an HTML file.
- ImageUrl: Represents a URL to an image.
- MultilineText: Represents multiline text.
- Password: Represents a password value.
- PhoneNumber: Represents a phone number value.
- PostalCode: Represents a postal code.
- Text: Represents text that is displayed.
- Time: Represents a time value.
- Upload: Represents file upload data type.
- Url: Represents a URL value.
Most of these map directly to the new text types defined for HTML 5, so the default implementation will only work for browsers that support the new HTML 5 syntax.
Editors Based on UIHint
Finally, we have one more option for specifying an editor template; we can use something called a UIHintAttribute. Here, we explicitly give the name of a custom editor template to use. For example, we could define a custom editor template for phone numbers and associate it to a ContactNumber property as in the following code listing.
public class ItineraryItem { public DateTime? When { get; set; } [DataType(DataType.MultilineText)] public string Description { get; set; } public int? Duration { get; set; } public bool IsActive { get; set; } public bool? Confirmed { get; set; } [UIHint("Phone")] public string ContactNumber { get; set; } } |
Code Listing 22: View model with a UIHint
Now, we can define an editor template, Phone.cshtml, and describe how the phone number should be edited.
@model string @{ var areaCode = string.Empty; var firstNumber = string.Empty; var secondNumber = string.Empty; if (Model != null) { areaCode = Model.Substring(0, 3); firstNumber = Model.Substring(3, 3); if (Model.Length >= 10) { secondNumber = Model.Substring(6, 4); } } } <input type="text" name="area_code" id="area_code" maxlength="3" size="3" value="@areaCode"/> - <input type="text" name="number1" id="number1" maxlength="3" size="3" value="@firstNumber"/> - <input type="text" name="number2" id="number2" maxlength="4" size="5" value="@secondNumber"/> <input type="hidden" name="@ViewData.TemplateInfo.HtmlFieldPrefix" id="@ViewData.TemplateInfo.HtmlFieldPrefix"value="@Model"/> <img src="../../../Content/images/Edit32.png" id="phoneNumberEdit"/> <input type="text" name="unparsed" id="unparsed"/> <script type="text/javascript"> $(document).ready(function () { $("#unparsed").hide(); var edit = $("#phoneNumberEdit"); edit.click(function () { $("#unparsed").toggle(); }); var phone = $('#area_code, #number1, #number2'); phone.autotab_magic().autotab_filter('numeric'); $("#unparsed").change(function () { var unparsed = $("#unparsed"); var value = unparsed.val(); value = value.replace(/\(|\)|\s|\-/gi, ''); value = value.replace(/[a-zA-Z]+/gi, ''); unparsed.val(value); $("#area_code").val(value.substring(0, 3)); $("#number1").val(value.substring(3, 6)); $("#number2").val(value.substring(6, 10)); if (value.length == 10) unparsed.hide(); var result = ($('#area_code').val() + $("#number1").val() + $("#number2").val()); $("#@ViewData.TemplateInfo.HtmlFieldPrefix") .val(result); }); phone.blur(function () { var result = ($('#area_code').val() + $("#number1").val() + $("#number2").val()); $("#@ViewData.TemplateInfo.HtmlFieldPrefix") .val(result); }); }); </script> |
Code Listing 23: Phone.cshtml editor template
Note: This example illustrates how these editor templates can become as complex as we need them to be. No matter how complex or simple the template is, we still access it by associating the appropriate attributes to the properties in the model, and always by using the EditorFor HTML helper.
Editors Based on Complex Types
Associating editor templates with data types is not limited to simple types. We can easily define new editor templates for any data type, including view models such as our ItineraryItem.
If we decided to move the markup for our current view into an editor template, our ItineraryItem.cshtml would look like the following code sample.
<p> @Html.LabelFor(m => m.Duration) @Html.EditorFor(m => m.Duration) @Html.ValidationMessageFor(m => m.Duration) </p> <p> @Html.LabelFor(m => m.IsActive) @Html.EditorFor(m => m.IsActive) @Html.ValidationMessageFor(m => m.IsActive) </p> . . . <p> @Html.LabelFor(m => m.Confirmed) @Html.EditorFor(m => m.Confirmed) @Html.ValidationMessageFor(m => m.Confirmed) </p> |
Code Listing 24: Custom editor template
Our view can then be reduced to something as simple as this:
@model MVCSuccinctly.Models.ItineraryItem <h2>Create</h2> <div class="editor"> @using (Html.BeginForm()) { @Html.ValidationSummary(true) @Html.EditorFor(m=>m) <p><input type="submit" value="Save"/></p> } </div> |
Code Listing 25: Using the editor template
This is useful when a particular view model is a property of another view model, making interface composition easy for us.
Summary
We covered a lot of ground in this chapter and introduced several concepts that will be explored in greater detail later.
We have seen how the HtmlHelper functions work together to facilitate model binding. We saw our first filter used by the framework to mark an action as being accessible only as a POST or a GET.
We also went through a gentle introduction explaining how to show validation messages.
Finally, we delved into some subtle nuances for MVC’s concept of editor templates. These templates are an exciting feature of MVC that make it easier to put together consistent input forms that are full of engaging functionality—without causing any headaches.
In the next chapter, we will take a closer look at the validation features made available in the framework.
- 80+ high-performance ASP.NET MVC controls, including DataGrid, Charts, and Scheduler.
- Feature demos teach you how to make the most of the controls.
- Lightweight and user-friendly.
- Stunning built-in themes.