
ASP.NET Multitenant Applications Succinctly®

CHAPTER 10
Security
Introduction
All applications need security enforcing. Multitenant applications have additional requirements, in the sense that something that is allowed for some tenant maybe shouldn’t be for other tenants. This chapter talks about some of the security mechanisms to consider when writing multitenant applications.
Authentication
The authentication mechanism that will be used should be capable of:
- Logging in users associated with the current tenant
- Denying login to users coming from a tenant with which they are not associated
Let’s see how we can implement these requirements.
ASP.NET Membership and Role Providers
The venerable ASP.NET Membership and Role providers are part of the extensible provider model introduced in ASP.NET 2.0. The Membership provider takes care of authenticating and managing users, and the Role provider associates these users to groups. This framework has aged over the years, but because it might be necessary to support it (brownfield development), I decided it was worth mentioning.
The framework includes two implementations of these providers: one for using Windows facilities for authentication and group membership, and one for using SQL Server-based objects.
You can imagine that the SQL Server versions are more flexible, in that they do not force us to use Windows (or Active Directory) accounts for our users and groups. The schema they use is this:
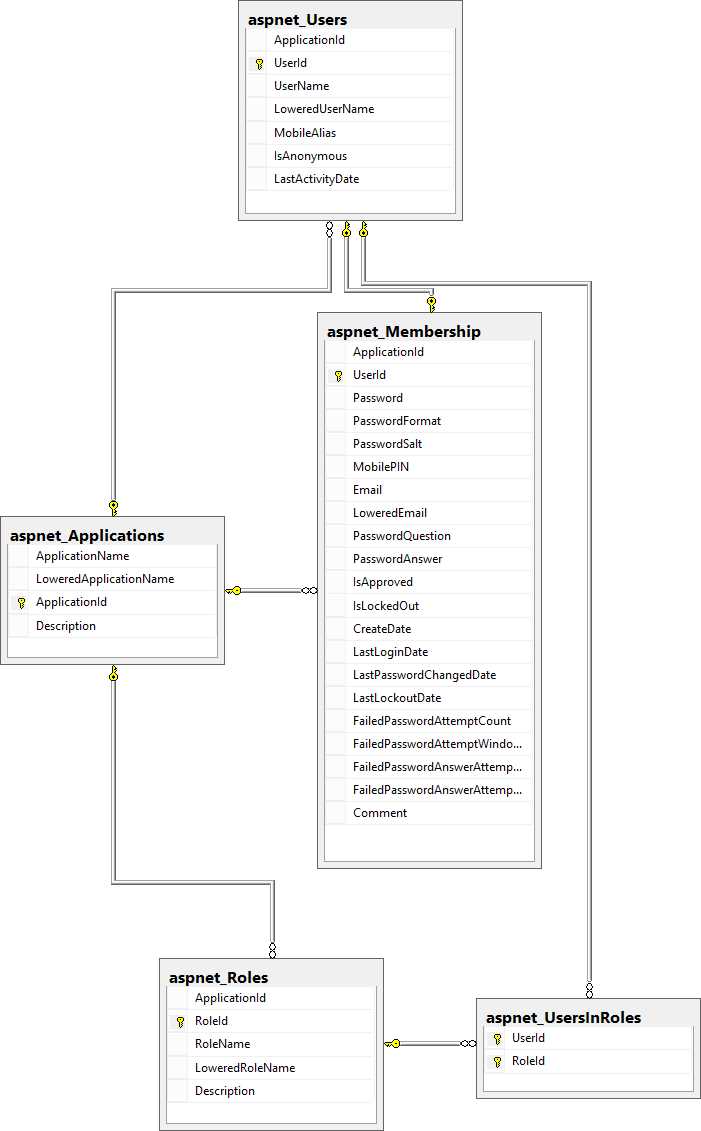
- ASP.NET Membership and Role provider schema
Key to understanding this schema are these tables:
Table 7: ASP.NET Membership and Role provider tables and their purposes
Table | Purpose |
|---|---|
aspnet_Applications | Stores all the applications that the Membership and Role providers know of |
aspnet_Users | Stores all the registered users, associated with an application |
aspnet_Roles | Stores all of the roles |
aspnet_Membership | Additional information about registered users |
aspnet_UsersInRoles | Association of users to roles |
Both the users tables and the roles tables are dependant of the application table, meaning different applications can have different users and roles. A single database can hold several registered users and roles, maybe for different web sites, each acting as a separate application; in this case, each web site will be identified by a different application name. The configuration is normally defined statically in the global ASP.NET configuration file, Machine.config, the related part of which is shown here, a bit simplified:
Code Sample 126
<membership defaultProvider="AspNetSqlMembershipProvider"> <providers> <add name="AspNetSqlMembershipProvider" applicationName="/" type="System.Web.Security.SqlMembershipProvider" connectionStringName="LocalSqlServer" /> </providers> </membership> <roleManager enabled="true" defaultProvider="AspNetSqlRoleProvider"> <providers> <add name="AspNetSqlRoleProvider" connectionStringName="LocalSqlServer" applicationName="/" type="System.Web.Security.SqlRoleProvider" /> <add name="AspNetWindowsTokenRoleProvider" applicationName="/" type="System.Web.Security.WindowsTokenRoleProvider" /> </providers> </roleManager> |
It’s easy to see that the “application” concept of the Membership and Role providers matches closely that of “tenants.” The problem is that the application (applicationName attribute) is hardcoded in the Web.config file. However, because its associated property (ApplicationName) in the provider implementation class is virtual, we can have classes that inherit from the included ones (SqlMembershipProvider and SqlRoleProvider) and override this property so that it returns the proper value each time it is called:
Code Sample 127
//Membership provider public class MultitenantSqlMembershipProvider : SqlMembershipProvider { public override String ApplicationName { get { return TenantsConfiguration.GetCurrentTenant().Name; } set { /*nothing to do here*/ } } } //Role provider public class MultitenantSqlRoleProvider : SqlRoleProvider { public override String ApplicationName { get { return TenantsConfiguration.GetCurrentTenant().Name; } set { /*nothing to do here*/ } } } |
Note: There are provider implementations for other RDBMs, such as Oracle and MySQL. Because the implementation would be exactly the same, I only show the SQL Server version.
Now, we need to register our new implementations to either the Machine.config (for machine-wide availability) or Web.config files:
Code Sample 128
<membership defaultProvider="MultitenantSqlMembershipProvider"> <providers> <add name="MultitenantSqlMembershipProvider" type="MyNamespace.MultitenantSqlMembershipProvider, MyAssembly" connectionStringName="LocalSqlServer" /> </providers> </membership> <roleManager enabled="true" defaultProvider="MultitenantSqlRoleProvider"> <providers> <add name="MultitenantSqlRoleProvider" connectionStringName="LocalSqlServer" type="MyNamespace.MultitenantSqlRoleProvider, MyAssembly" /> </providers> </roleManager> |
Tip: Even if I opted to talk about the Membership provider, by no means do I think that you should be using it in new (Greenfield) developments. The future according to Microsoft is ASP.NET Identity (at least, for the moment), and I strongly urge you to get into it. There’s a good post here on how to migrate from the Membership provider to ASP.NET Identity.
ASP.NET Identity
A much better way to provide authentication to your ASP.NET applications is the ASP.NET Identity framework. Microsoft designed this framework to complement the shortcomings and problems of the old provider model, and to offer support for new authentication standards, such as OAuth. Unfortunately, the Microsoft architects that designed it left out built-in support for multitenancy. All is not lost, however, because it has already been implemented for us by the community, in the person of James Skimming and the AspNet.Identity.EntityFramework.Multitenant package, among others. ASP.NET Identity is provider-agnostic, which means it can use, for example, Entity Framework or NHibernate as its persistence engine, but James’ implementation relies on the Entity Framework.
Note: There’s a package called NHibernate.AspNet.Identity, by Antonio Bastos, that provides an implementation of ASP.NET Identity with NHibernate. You can get the NuGet package here, and the source code here.
So, after you add the ASP.NET Identity package using NuGet, you will need to add the AspNet.Identity.EntityFramework.Multitenant package:

- ASP.NET Identity EntityFramework with multitenancy support
After you do, we need to make a couple of changes to the ASP.NET Identity classes in our project. The class that interests us is ApplicationUser, which should be changed so as to inherit from MultitenantIdentityUser instead of IdentityUser:
Code Sample 129
public class ApplicationUser : MultitenantIdentityUser { //rest goes here } |
The class MultitenantIdentityUser already provides a property called TenantId, which is used to distinguish between different tenants. This property is mapped to the TenantId column of the AspNetUserLogins table. The model looks like this:
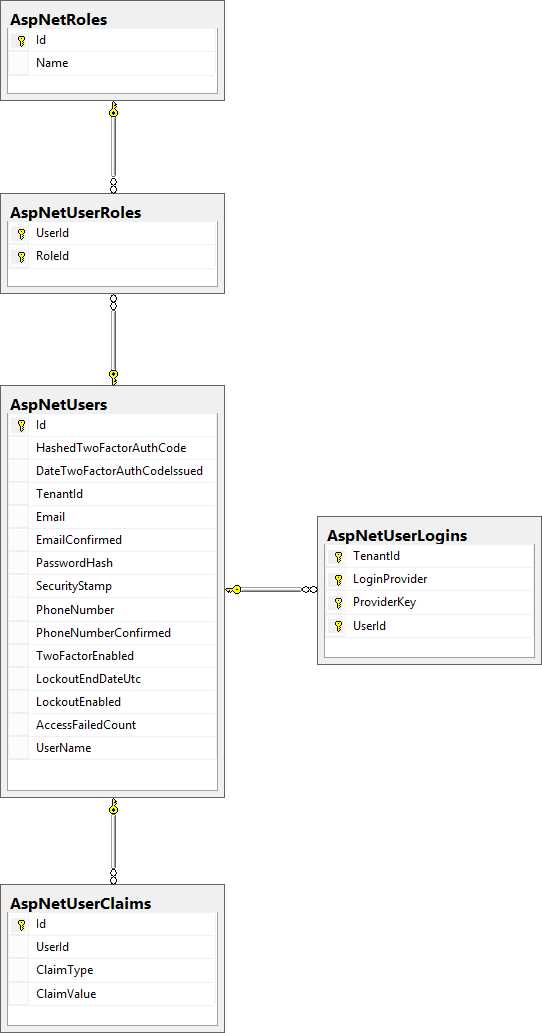
- ASP.NET Identity model
Other than that, we need to change our DbContext-derived class to make it inherit from MultitenantIdentityDbContext<ApplicationUser> as well:
Code Sample 130
public class ApplicationDbContext : MultitenantIdentityDbContext<ApplicationUser> { //rest goes here } |
Finally, we need to teach ASP.NET Identity how to get the current tenant. In order to do that, we need to change the Create method of the ApplicationUserManager class like this:
Code Sample 131
public static ApplicationUserManager Create( IdentityFactoryOptions<ApplicationUserManager> options, IOwinContext context) { var tenant = TenantsConfiguration.GetCurrentTenant(); var manager = new ApplicationUserManager( new MultitenantUserStore<ApplicationUser>( context.Get<ApplicationDbContext>()) { TenantId = tenant.Name }); //rest goes here } |
The ApplicationUserManager.Create method is registered as the factory method for our user store. Whenever it is called, it will use the current tenant name. That’s all there is to it—ASP.NET Identity can be used in exactly the same way as it would be without the multitenant support.
Note: James Skimming made available the source code for his AspNet.Identity.EntityFramework.Multitenant package in GitHub here. The actual commit where these changes are outlined is here
HTTPS
If we are to follow the host header approach, and we would like to use HTTPS, we will need to supply a certificate for each of the named tenants. Now, we have two options:
- Acquire a certificate from a root authority
- Generate our own (dummy) certificate in IIS Manager, if we don’t care about getting a message about an invalid root authority
For development purposes, we can go with a dummy certificate. We need to tell IIS to use it:
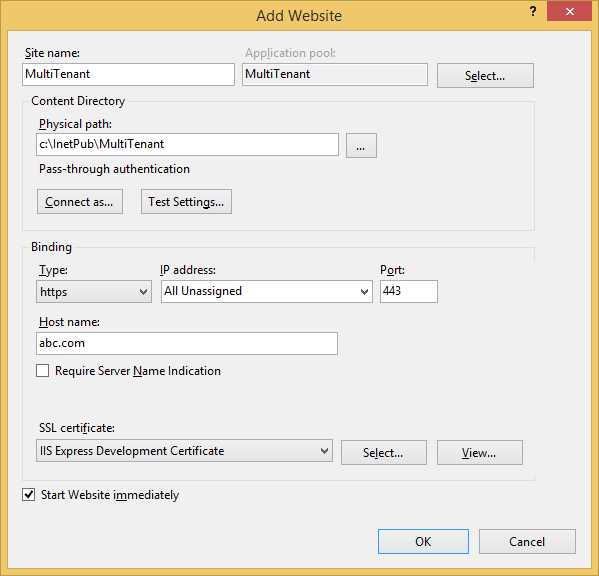
- Creating a new site
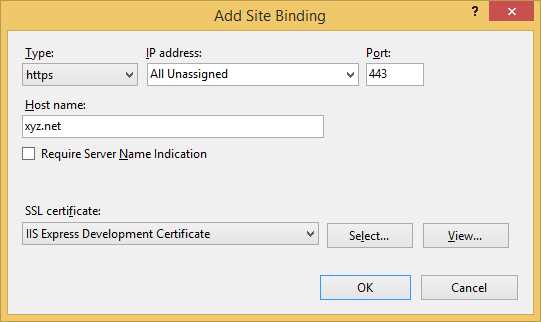
- Adding a binding to a site
Note: In the unlikely case that all our tenants will share at least part of the domain, we can use a wildcard certificate; otherwise, we will need one for each tenant, which might prove costly.
Application pools
As mentioned earlier, having different application pools per tenant allows us to have the application running under different accounts. This can prove helpful, for example, if each user has different default databases on the server, and you don’t specify the initial database on the connection string. Each tenant will land on its own database, according to the database server configuration. It is wiser, however, to not trust the default database assigned to a user, and to use a database partitioning or selection strategy, as will be outlined in the next chapter.
Cookies
Cookies are stored on the client side, in the browser’s own store. By default, they are bound to the domain from which they originated, which is fine if we are to use the Host header strategy, but not so much if we want to use another tenant identification strategy. For example, if we don’t do anything about it, a cookie sent in the context of a tenant will also be available if the user decides to browse another tenant’s site. Cookies don’t really offer many options, other than the path (relative part of the URL), the domain, and the availability for non-HTTPS sites. The only thing that we can play with are the names of the keys: we can add, for example, a prefix that identifies the tenant to which the cookie applies, something like:
Code Sample 132
var tenantCookies = HttpContext.Current.Request.Cookies.OfType<HttpCookie>() .Where(x => x.Name.StartsWith(String.Concat(tenant, ":"))); var cookie = new HttpCookie(); cookie.Name = String.Concat(tenant, ":", key); cookie.Value = value; HttpContext.Current.Response.Cookies.Add(cookie); |
- 1800+ high-performance UI components.
- Includes popular controls such as Grid, Chart, Scheduler, and more.
- 24x5 unlimited support by developers.