
ASP.NET Core 6 Succinctly®

CHAPTER 2
Working with ASP.NET Core 6.0
With the release of .NET 6.0, there have been many improvements to existing features in ASP.NET Core 6.0. There have also been a few new features added. This chapter will take a peek at some of these.
Debug running code with Hot Reload
Traditionally, before a developer made a change to an application, they had to stop debugging, modify the code, save it, and recompile it before debugging it again.
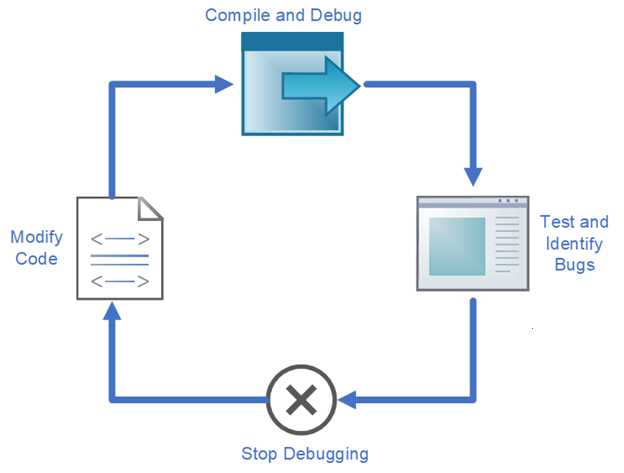
Figure 12: Traditional Debug Process
This is fine, I suppose, when you are dealing with a small application. But if you are debugging a large application consisting of multiple projects, Hot Reload becomes a welcome addition to your developer tool belt.
This is especially true when the debug startup takes several seconds. There are some limitations, and we will see them shortly.
To demonstrate Hot Reload, take a look at the BookRepository API we upgraded to .NET 6.0 in Chapter 1. In the BookController.cs file, there is a method called GetBooks_1_1. The code is illustrated in Code Listing 10.
Code Listing 10: The GetBooks_1_1 Controller Action
|
[MapToApiVersion("1.1")] public async Task<ActionResult<List<BookModel>>> GetBooks_1_1() { try { var books = await _service.ListBooksAsync(); return (from book in books let model = new BookModel() { Author = book.Author, Description = book.Description, Title = book.Title, Publisher = book.Publisher, ISBN = book.ISBN + " - for version 1.1" } select model).ToList(); } catch (Exception) { return StatusCode(StatusCodes.Status500InternalServerError, "There was a database failure"); } } |
Run the API and view the result in Postman by calling the URL https://localhost:44371/api/v1.1/book. This will result in the output illustrated in Figure 13.

Figure 13: The Postman Result
Don’t stop your debugging session just yet. Modify the GetBooks_1_1 action and change the text version 1.1 to API version 1.1, as shown in Code Listing 11.
Code Listing 11: The Modified GetBooks_1_1 Action
|
[MapToApiVersion("1.1")] public async Task<ActionResult<List<BookModel>>> GetBooks_1_1() { try { var books = await _service.ListBooksAsync(); return (from book in books let model = new BookModel() { Author = book.Author, Description = book.Description, Title = book.Title, Publisher = book.Publisher, ISBN = book.ISBN + " - API version 1.1" } select model).ToList(); } catch (Exception) { return StatusCode(StatusCodes.Status500InternalServerError, "There was a database failure"); } } |
As illustrated in Figure 14, click Save (I know what you’re thinking, you will see how to change this behavior shortly), and then click the little flame icon for Hot Reload.
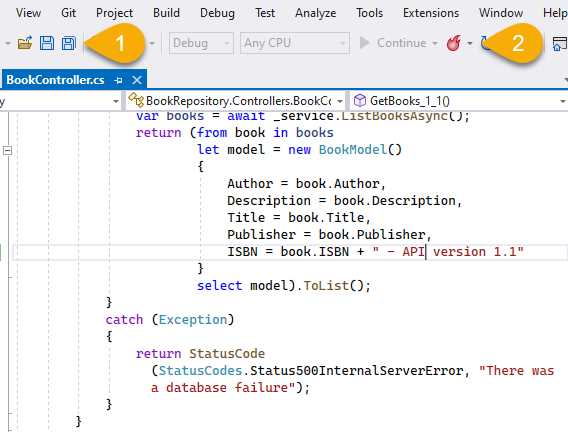
Figure 14: Save and Click on Hot Reload
Switch back to Postman, send a request to the endpoint https://localhost:44371/api/v1.1/book, and look at the result. You should see the result illustrated in Figure 15.
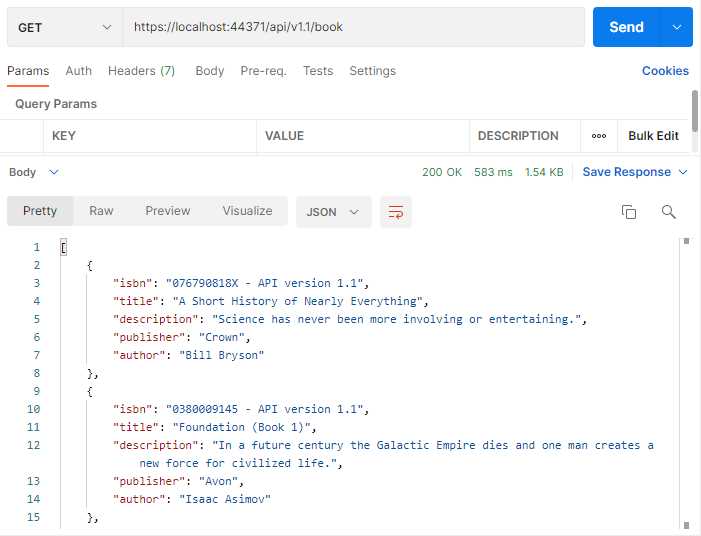
Figure 15: The Updated API Result in Postman
You can change the behavior of Visual Studio so that you won’t have to click Save and then manually start the Hot Reload. In the dropdown menu next to the Hot Reload button, select Hot Reload on File Save (Figure 16).
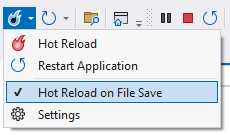
Figure 16: Check Hot Reload on File Save
With this option selected, there will automatically be a Hot Reload of your project whenever you save your code changes. Now you can save a button click before doing a Hot Reload—and you can save two button clicks by using just the keyboard shortcut Ctrl+S. This makes using Hot Reload very convenient.
Limitations of Hot Reload
Hot Reload is not, unfortunately, a magic bullet; it does have some limitations. To illustrate this, consider the code contained in the Models folder inside the BookModel class. The code is illustrated in Code Listing 12.
Code Listing 12: The BookModel Class
using System.ComponentModel.DataAnnotations; namespace BookRepository.Models { public class BookModel { [Required] public string ISBN { get; set; } [Required] public string Title { get; set; } public string Description { get; set; } public string Publisher { get; set; } public string Author { get; set; } } } |
Ensure that you have selected Hot Reload on File Save as shown in Figure 16 and run your Book Repository API.
Make a change to the Author property and mark it as Required, as seen in Code Listing 13. After you have made the change, save it.
Code Listing 13: Changing the BookModel Class
using System.ComponentModel.DataAnnotations; namespace BookRepository.Models { public class BookModel { [Required] public string ISBN { get; set; } [Required] public string Title { get; set; } public string Description { get; set; } public string Publisher { get; set; } [Required] public string Author { get; set; } } } |
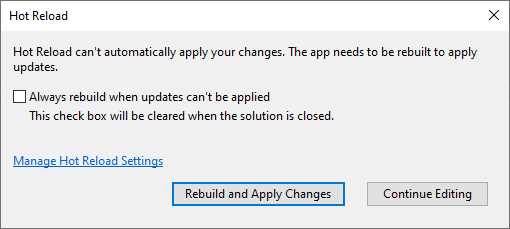
Figure 17: Limitations of Hot Reload
Visual Studio will display a message informing you that Hot Reload can’t be applied against the changes you made (Figure 17). You can then rebuild and apply the changes or continue editing. For the most part, Hot Reload is a great new feature, even with the limitations of not being able to apply certain changes.
Looking at a few C# 10 features
.NET 6.0 and C# 10 bring with them a lot of new features. While this book is not a deep dive into C# 10, I will briefly touch on several of the new features. To see if the application you created is running C# 10, have a look at the project’s properties. You will notice in Figure 18 that the properties have changed somewhat from previous versions of Visual Studio.

Figure 18: Checking the Available Language Version
Under Build > Advanced, you will see the Language version available. Here you will see that C# 10.0 is the version of C# that will be available to your project. Next, let’s have a look at some of the new features introduced.
Global using statements
In C# 10, using directives have been simplified. You can now implement the new global using directive, and in doing so, reduce the number of usings required at the top of each file.
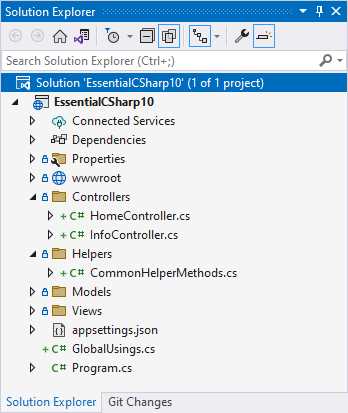
Figure 19: The Project Structure
Looking at the project in Figure 19, you will notice that I just added a file called GlobalUsings. I also want to use a helper class called CommonHelperMethods in my controllers. This means that I need to add the using EssentialCSharp10.Helpers; directive to each controller I want to use my helper methods in. With global using directives, I can add this in a single place and have it applied throughout my project.
This means that by adding the directive global using EssentialCSharp10.Helpers; to my GlobalUsings class, I can use the methods of my helper class throughout my project.
Tip: It is important to note that you can put global usings in any .cs file. This includes the Program.cs file. I just added a specific file called GlobalUsings to make the intent clear.
That being said, the global using directive can be added to the beginning of any source code file. It must appear:
· Before using directives without the global modifier.
· Before namespace and type declarations in the file.
It is also worth noting that you can combine the global modifier and the static modifier. This means you can add global using static System.Console; to your GlobalUsings file. You can also apply the global modifier to aliases in the case of global using Env = System.Environment;.
Implicit using statements
This feature automatically adds often-used global using directives for the project type that you are building. To enable this, set the ImplicitUsings property in your csproj file as illustrated in Code Listing 14.
Code Listing 14: Implicit Usings Defined in the csproj File
<Project Sdk="Microsoft.NET.Sdk.Web"> <PropertyGroup> <TargetFramework>net6.0</TargetFramework> <Nullable>enable</Nullable> <ImplicitUsings>enable</ImplicitUsings> </PropertyGroup> </Project> |
Now you can use the types in often-used namespaces without having to add the using directives yourself. You can see the generated file in your project’s obj directory. In my case, the file generated in the obj directory was called EssentialCSharp10.GlobalUsings.g.cs, and looking inside the file reveals the global using directives implicitly added for my project type.
Code Listing 15: The Generated GlobalUsings File
// <auto-generated/> global using global::Microsoft.AspNetCore.Builder; global using global::Microsoft.AspNetCore.Hosting; global using global::Microsoft.AspNetCore.Http; global using global::Microsoft.AspNetCore.Routing; global using global::Microsoft.Extensions.Configuration; global using global::Microsoft.Extensions.DependencyInjection; global using global::Microsoft.Extensions.Hosting; global using global::Microsoft.Extensions.Logging; global using global::System; global using global::System.Collections.Generic; global using global::System.IO; global using global::System.Linq; global using global::System.Net.Http; global using global::System.Net.Http.Json; global using global::System.Threading; global using global::System.Threading.Tasks; |
If you don’t see the file, rebuild your solution and it will be generated.
File-scoped namespaces
Another very welcome feature is the addition of file-scoped namespaces. Consider the extremely complex helper class I created, which is illustrated in Code Listing 16.
Code Listing 16: The CommonHelperMethods Helper Class
namespace EssentialCSharp10.Helpers { public static class CommonHelperMethods { public static string SanitizeString(string sInput) { // Do some string sanitization here return sInput; } } } |
With file-scoped namespaces, I can add the namespace statement, followed by a semicolon, and remove the curly braces as illustrated in Code Listing 17.
Code Listing 17: The Helper Class Using a Namespace Statement
namespace EssentialCSharp10.Helpers; public static class CommonHelperMethods { public static string SanitizeString(string sInput) { // Do some string sanitization here return sInput; } } |
This simplifies my code and negates an unnecessary level of nesting. You need to remember, however, that file-scoped namespaces are only available in files with a single namespace. You can’t add additional namespace declarations (nested or file-scoped).
Constant interpolated strings
Developers can now create constants using string interpolation. Consider the code in Code Listing 18.
Code Listing 18: Create a Constant from Constants in C# 9
const string SupportEmail = "[email protected]"; const string SupportNumber = "011-1234567"; const string SupportMessage = "Please contact support at " + SupportNumber + " or email " + SupportEmail; |
The SupportMessage constant is created by adding the other constants to the string that you build up. In C# 10, you can use string interpolation to create a constant.
Code Listing 19: Create a Constant from Constants in C# 10
const string SupportEmail = "[email protected]"; const string SupportNumber = "011-1234567"; const string SupportMessage = $"Please contact support at {SupportNumber} or email {SupportEmail}"; |
The only thing you need to remember is that all the values you add in the braces {} must also be constant strings. You can’t use other types, such as numeric or date values. This is because they are sensitive to Culture.
Razor pages, MVC, and web API improvements
There have been a few updates to Razor pages, MVC, and web APIs in .NET 6. CSS isolation is a new feature that makes it convenient to organize and structure your CSS files to a single page instead of throughout your entire project. This means that you effectively have a scoped CSS page. The benefit of this is that you have a single place to modify styles for a specific page in specific use cases.
Figure 20 illustrates the way developers included styles in their projects before CSS isolation. Developers defined the styles in one or more CSS files that would apply them throughout the application. To target specific elements, however, classes were used. This would result in a rather large and unwieldy CSS file, especially when the site grew in complexity and functionality. It also led to styling conflicts.
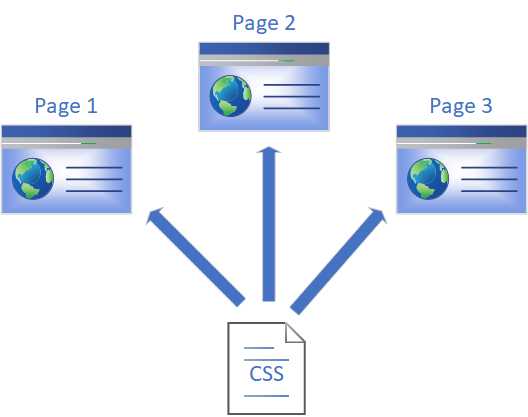
Figure 20: CSS Before CSS Isolation
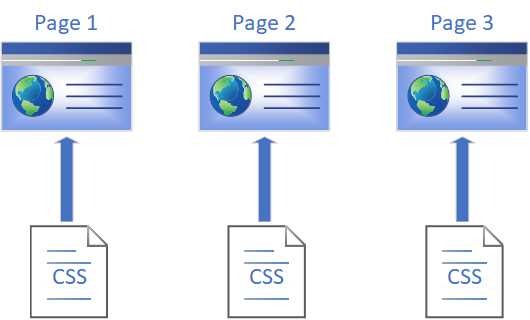
Figure 21: CSS After CSS Isolation
With CSS isolation, developers can create CSS pages scoped to specific Razor pages in the application. A global, site-wide CSS file can still be used, but developers can be more granular in their styling approach. The global CSS file can handle general styling throughout the site, while the isolated CSS files handle the styles specific to their page.
ASP.NET Core 6.0 also adds support for HTTP logging. By adding a specific middleware component to the pipeline, developers can view raw logs of the incoming and outgoing HTTP traffic. Let’s have a look at these two features in the next sections.
Using CSS isolation
Let’s see an example. The project illustrated in Figure 22 uses a single site.css file to apply some styling throughout the application.
Figure 22: The Project Demonstrating a Site-Wide CSS
Looking at the CSS contained inside this file (Code Listing 20), you will see that apart from the boilerplate CSS, I have added a specific style for H2 elements that will underline the text.
Code Listing 20: The site.css File
|
font-size: 14px; } @media (min-width: 768px) { html { font-size: 16px; } } html { position: relative; min-height: 100%; } body { margin-bottom: 60px; } h2 { text-decoration: underline; } |
Running the web application, you will see that I have an H2 element on the Home page (Figure 23). It is underlined because the site.css file specifies that all H2 elements need to be underlined.

Figure 23: The Home Page Using the site.css
Heading over to then Privacy page (Figure 24), you will see that this same site-wide styling has been applied to its H2 element.
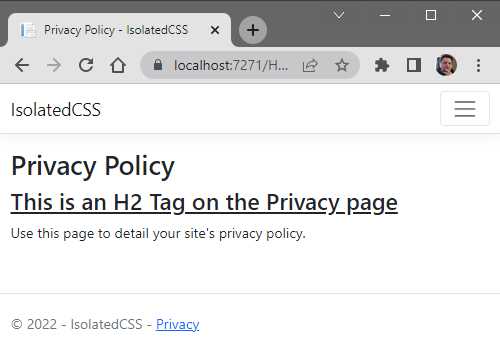
Figure 24: The Privacy Page Using the site.css
I do, however, want to style the H2 element differently on the Privacy page. Right-click the Home folder and select Add New Item from the context menu.
Choose a style sheet and name the file Privacy.cshtml.css, as seen in Figure 25. The naming of this file is important. As you can see in Figure 26, when the file is added, it is nested under the Privacy.cshtml file.
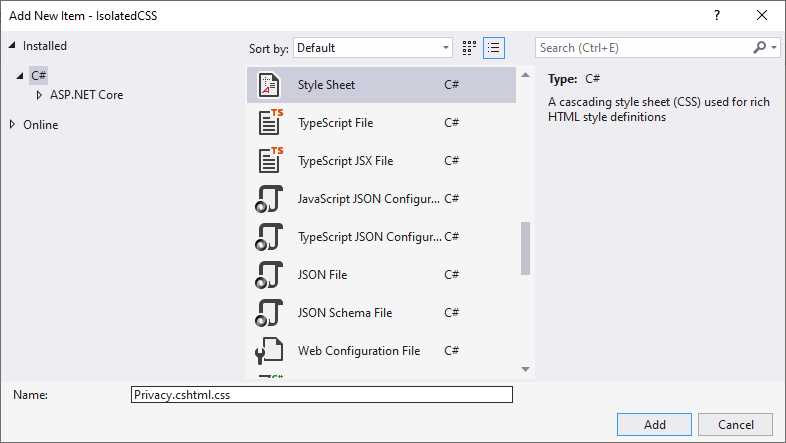
Figure 25: Adding the Isolated CSS File
It is therefore isolated to the Privacy page only, and any styles that you add to this CSS file will only apply to the Privacy page.
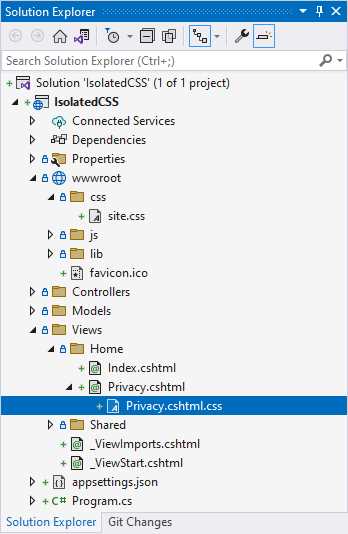
Figure 26: Added Privacy.cshtml.css Isolated File
Edit the Privacy.cshtml.css file and add the code in Code Listing 21.
Code Listing 21: The Privacy.cshtml.css Isolated File
h2 { text-decoration: line-through; } |
You should now have CSS in the site.css file that adds text-decoration: underline to H2 elements, and CSS in the Privacy.cshtml.css file that adds text-decoration: line-through to H2 elements on the Privacy page only.
Run your web application, and you will see that the Home page still applies the CSS for H2 elements as defined in the site.css file, as illustrated in Figure 27.
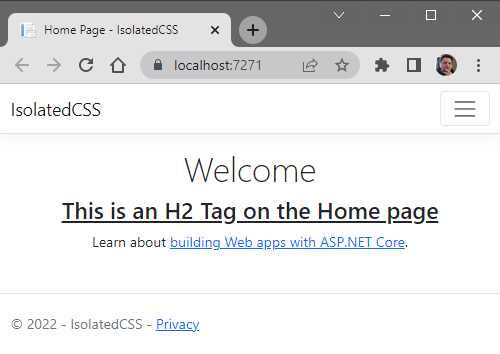
Figure 27: The Home Page Still Using the site.css
If you navigate to the Privacy page, you will see, as illustrated in Figure 28, that the isolated CSS style has been applied only to the Privacy page.
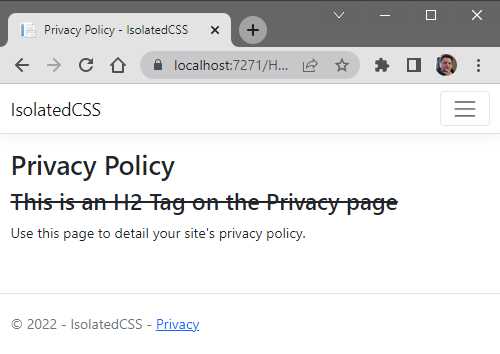
Figure 28: The Privacy Page Using the Isolated CSS File
If you view the source in the browser developer tools, you will see that ASP.NET has generated a styles.css file for you as shown in Figure 29.
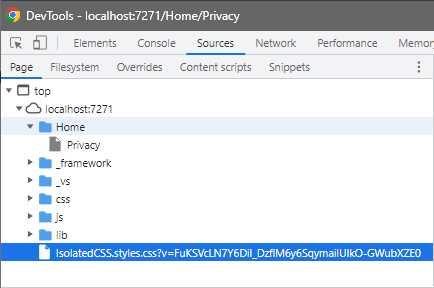
Figure 29: The Generated styles.css File
Looking at the contents of this generated file in Figure 30, you will notice that the style you added for the H2 element in the isolated Privacy page’s CSS file is contained in this generated styles.css file with a specific selector.
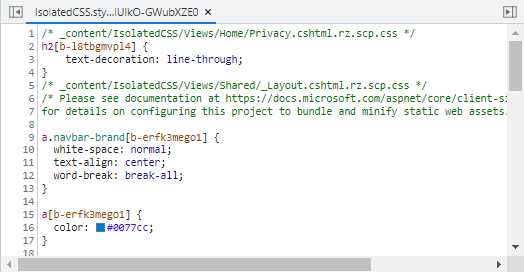
Figure 30: The Generated styles.css File Contents
The generated selector h2[b-l8tbgmvpl4] is applied to the H2 element on the Privacy page, as seen in Figure 31.
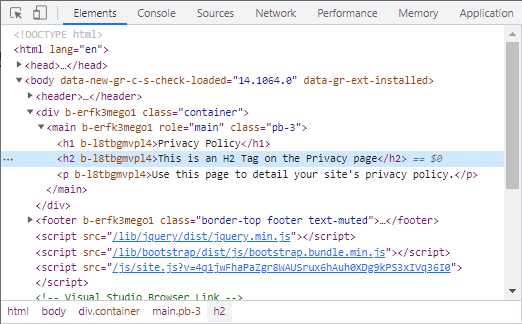
Figure 31: The Elements Seen in Developer Tools
This ensures that styles you add to isolated CSS files are always applied to only that specific page and will not conflict with other styles on your site.
HTTP logging improvements
ASP.NET Core 6.0 has added some useful features that allow developers to manage HTTP requests. In this section, you will use the BookRepository API project and add HTTP logging to it.
Note: The book repository API project was upgraded from ASP.NET Core 5.0 to ASP.NET Core 6.0 in Chapter 1. If you haven’t done so yet, ensure that you have completed the upgrade.
By adding HTTP logging, we can monitor the requests and responses coming into the API. To start, we will need to add some middleware to our Startup.cs file. Adding one line of code, app.UseHttpLogging();, will allow ASP.NET Core 6.0 to log the requests and responses.
Your Configure method will look like the code in Code Listing 22.
Code Listing 22: Add HTTP Logging Middleware
public void Configure(IApplicationBuilder app, IWebHostEnvironment env) { if (env.IsDevelopment()) { _ = app.UseDeveloperExceptionPage(); _ = app.UseSwagger(); _ = app.UseSwaggerUI(c => c.SwaggerEndpoint("/swagger/v1/swagger.json", "BookRepository v1")); } _ = app.UseHttpLogging(); _ = app.UseHttpsRedirection(); _ = app.UseRouting(); _ = app.UseAuthorization(); _ = app.UseEndpoints(endpoints => { _ = endpoints.MapControllers(); }); } |
This adds the logging to our middleware pipeline with default settings.
Note: Because we upgraded an ASP.NET Core 5.0 application to ASP.NET Core 6.0, it still uses an explicit Program class and Main method instead of top-level statements.
The only other change we need to make is to ensure that the appsettings.json file specifies the appropriate logging level of Information.
In Solution Explorer, edit the appsettings.json file and ensure that the log levels are set to Information, as illustrated in Code Listing 23.
Code Listing 23: The LogLevel Set to Information
{ "Logging": { "LogLevel": { "Default": "Information", "Microsoft.AspNetCore": "Information" } }, "AllowedHosts": "*", "ConnectionStrings": { "BookConn": "Data Source=(localdb)\\MSSQLLocalDB;Initial Catalog=BookRepo;Integrated Security=True" } } |
The log level determines the severity of errors that are logged out to the console. In this instance, we have lowered it to the value of Information instead of Warning.
Note: When logging output like this, there are performance and security considerations to keep in mind. The danger here is that you might log sensitive request data in some instances. Therefore, these settings need to be disabled or configured correctly when moving to a production environment.
Run your API and in Postman make a GET request to the URL https://localhost:44371/api/v1.1/book, keeping in mind that your URL port could be different.
As you will see in Visual Studio’s Output window (Figure 32), the logs are displayed for the GET request you sent from Postman.
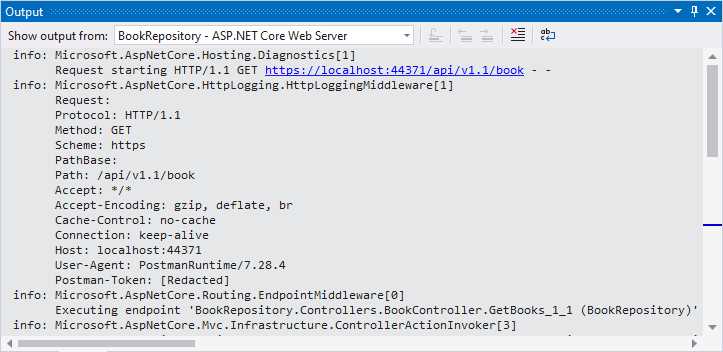
Figure 32: The HTTP Logs
Further down the Output window, you will see the 200 response info (Figure 33).

Figure 33: The 200 Response Information
The next request that I want to illustrate is a POST. By default, HTTP logging will not include body information in the output. We need to explicitly change this behavior by configuring some settings in the API.
Inside the ConfigureServices method, add the code as illustrated in Code Listing 24.
Code Listing 24: Configure Logging to Log All Fields
_ = services.AddHttpLogging(log => { log.LoggingFields = Microsoft.AspNetCore.HttpLogging.HttpLoggingFields.All; }); |
This will log everything to the Output window, including the body information. Back in Postman, construct a POST calling the URL https://localhost:44371/api/v1.1/book, passing it the JSON body in Code Listing 25.
Code Listing 25: JSON to Add a New Book
{ "isbn": "978-1-61268-019-4", "title": "Rich Dad Poor Dad", "description": "What the Rich Teach Their Kids About Money That the Poor and Middle Class Do Not!", "publisher": "Plata Publishing", "author": "Robert T. Kiyosaki" } |
Your POST in Postman should look as illustrated in Figure 34.
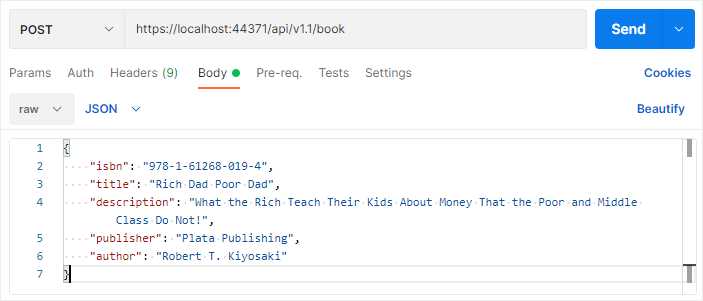
Figure 34: Add a New Book in Postman
When you perform the request, you will see it come through in the Output window of Visual Studio with a method of POST (Figure 35).
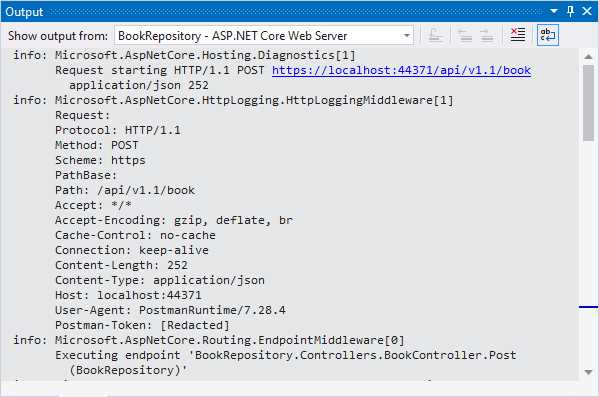
Figure 35: The POST Request
When you scroll down a bit, you will see the request body sent through (Figure 36). This will be the same as the JSON in Code Listing 25.
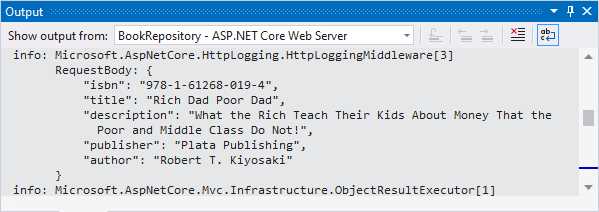
Figure 36: The POST Request Body
If all goes well, you will receive a 201 Created response (Figure 37).
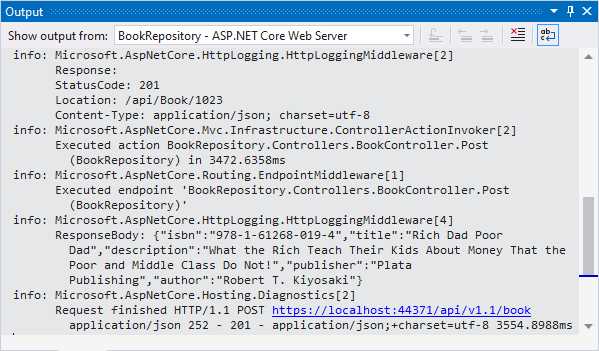
Figure 37: The 201 Response
To test if the book was created, perform a GET request using the URL https://localhost:44371/api/v1.1/book/search?Isbn=978-1 and inspect the Output window in Visual Studio (Figure 38).
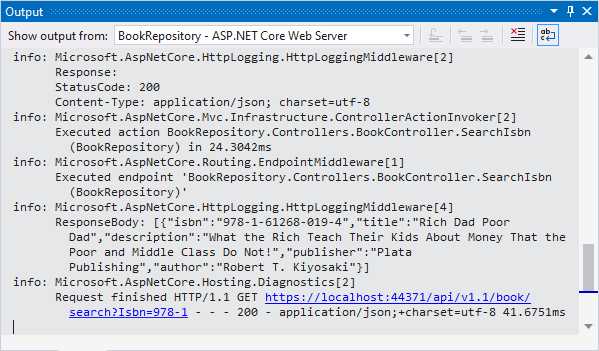
Figure 38: The 200 Response from the GET Request
You will see that the book we just added is returned in the response body. ASP.NET Core 6.0 also adds better support for managing request and response headers in a strongly typed way. Modify the Configure method as illustrated in Code Listing 26 and add the AcceptLanguage of en-US.
Code Listing 26: Adding a Request Header
public void Configure(IApplicationBuilder app, IWebHostEnvironment env) { if (env.IsDevelopment()) { _ = app.UseDeveloperExceptionPage(); _ = app.UseSwagger(); _ = app.UseSwaggerUI(c => c.SwaggerEndpoint("/swagger/v1/swagger.json", "BookRepository v1")); } _ = app.Use(async (context, next) => { context.Request.Headers.AcceptLanguage = "en-US"; await next.Invoke(context); }); _ = app.UseHttpLogging(); _ = app.UseHttpsRedirection(); _ = app.UseRouting(); _ = app.UseAuthorization(); _ = app.UseEndpoints(endpoints => { _ = endpoints.MapControllers(); }); } |
Performing a simple GET request and looking at the Output window in Visual Studio, you will see the Accept-Language header is set to en-US.
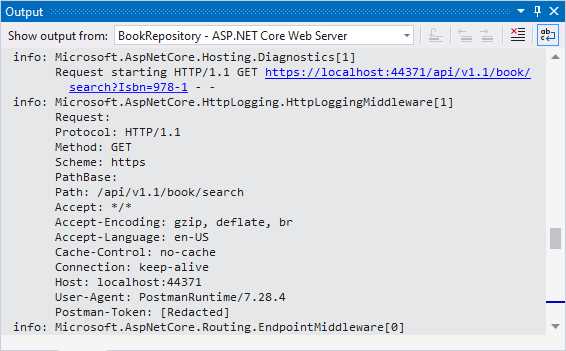
Figure 39: The Accept-Language Set in the Request Header
These logging features improve the experience of analyzing the requests and responses going in and out of your applications.
- 80+ high-performance ASP.NET Core controls, including DataGrid, Charts, and Scheduler.
- Lightweight and responsive.
- Modular and touch-friendly.
- Built-in themes.