
ASP.NET Core 3.1 Succinctly®

CHAPTER 5
Beyond the Basics: Application Frameworks
HTTP isn’t just for serving up webpages; it’s also for serving APIs that expose services and data over HTTP protocol. This chapter will gently introduce you to managing these scenarios using ASP.NET MVC, which hasn't changed much from the previous version.
You’ll manage controllers, views, APIs, and the newest and coolest tag helper, and you’ll play with the view components. But before proceeding, it’s important to know that the part related to MVC is just a small introduction. A complex framework like this would easily require its own book.
Web API
A web API (application programming interface) is a set of subroutine definitions with the scope of managing data between clients and servers. Over the last few years, the trend has been to build APIs over HTTP protocol, allowing third-party apps to interact with a server with the help of the application protocol.
Probably the most well-known example is Facebook, which allows users to share content and posts, manage pages, and do more from any client, such as a mobile app or desktop. This is due to a set of APIs and HTTP, but how does it work?
The good thing about using HTTP protocol is that there are no major differences from classic web navigation, except for the result. In normal HTTP navigation, when we use a browser to call www.tostring.it, the server returns HTML. For APIs, it returns data using JSON format.
The result could also be XML or any other type of structured data. The point is that the result doesn't contain any information about the layout or interaction, like CSS and JavaScript.
With the previous version of ASP.NET, a specific library managed APIs, called Web API. This library doesn’t exist with the newest version, and you can handle APIs and classic requests using the same framework, because Web API has merged into the MVC framework. This is the primary difference between the old and new ASP.NET.
When you think about what we were using in the previous version, it makes absolute sense. Most of the code between the two frameworks was similar. Think about the controller, attributes, and dependency injection—same code, different namespaces.
Installation
ASP.NET MVC Core is not different from what we saw in the previous chapters; you don't have to install it because it is included in Microsoft.AspNetCore.App.
Once it’s installed (using either the project templates or the dotnet CLI), register the service and configure it within your web application like this.
This is actually done for you by the template. Notice the important lines are the ones that configure the controllers. In ConfigureServices, the controllers are registered in the DI system, and at the end of the Configure method, the controllers are mapped via the endpoint routing system.
Code Listing 5-1
using Microsoft.AspNetCore.Builder; using Microsoft.AspNetCore.Hosting; using Microsoft.Extensions.DependencyInjection; using Microsoft.Extensions.Logging; namespace Syncfusion.Asp.Net.Core.Succinctly.WebApi { public class Startup { public void ConfigureServices(IServiceCollection services) { services.AddControllers(); } public void Configure(IApplicationBuilder app, IWebHostEnvironment env) { if (env.IsDevelopment()) { app.UseDeveloperExceptionPage(); } app.UseHttpsRedirection(); app.UseRouting(); app.UseAuthorization(); app.UseEndpoints(endpoints => { endpoints.MapControllers(); }); } } } |
Playing around with URLs and verbs
Because you are managing data and not HTML pages, HTTP verbs are key to understanding what the client needs. There is a kind of convention that almost all API implementations respect, which uses different HTTP verbs according to the type of action needed.
Suppose we have the request api/users.
Table 1: Handling the Request api/users
Resource Sample | Read | Insert | Update (PUT) | Partially Update (PATCH) | Delete (DELETE) |
|---|---|---|---|---|---|
Action | Gets a list of users | Creates a user | Update users with batch update | Batch-updates users only with the attributes present in the request | Errors or deletes all users, depending on what you want |
Response | List of users | New user or redirect to the URL to get the single user | No payload; only HTTP status code | No payload; only HTTP status code | No payload; only HTTP status code |
If we want to manage a single user, the request should be api/users/1, where 1 is the ID of the user we want to work with.
Table 2: Handling the Request api/users/1
Resource Sample | Read | Insert | Update | Partially Update | Delete |
|---|---|---|---|---|---|
Action | Gets a single user | Return an error because the user already exists | Update the specified user | Partially updates the user only with the attributes present in the request | Deletes the specified user |
Response | Single user | No payload; only HTTP status code | Updated user or redirect to the URL to get the single user | The updated user (complete object) or redirect to the URL to get the single user | No payload; only HTTP status code |
To summarize, the URL combined with the HTTP verb allows you to understand what has to be done:
- /api is the prefix indicating that the request is an API request and not a classic web request.
- users is the MVC controller.
- verb identifies the action to execute.
Return data from an API
Now that everything is correctly configured, you can create your first MVC controller. Not deviating too much from what you used in the previous version, let's create a folder called Controllers.
Although not mandatory, the best practice is to create a folder for all the API controllers to separate the APIs from the standard controllers.
Code Listing 5-2
using System.Linq; using Microsoft.AspNetCore.Mvc; namespace Syncfusion.Asp.Net.Core.Succinctly.WebApi.Controllers.APIs { [ApiController] [Route("[controller]")] public class UsersController : Controller { [HttpGet] public User[] Get() { return new[] { new User() {Id = 1, Firstname = "Ugo", Lastname = "Lattanzi", Twitter = "@imperugo"}, new User() {Id = 2, Firstname = "Simone", Lastname = "Chiaretta", Twitter = "@simonech"}, }; } [HttpGet("{id}")] public User Get(int id) { var users = new[] { new User() {Id = 1, Firstname = "Ugo", Lastname = "Lattanzi", Twitter = "@imperugo"}, new User() {Id = 2, Firstname = "Simone", Lastname = "Chiaretta", Twitter = "@simonech"}, }; return users.FirstOrDefault(x => x.Id == id); } } public class User { public int Id { get; set; } public string Firstname { get; set; } public string Lastname { get; set; } public string Twitter { get; set; } } } |
As you can see, the controller is simple and the code is not so different from the previous version.
Let’s analyze this step by step.
[ApiController]
This attribute configures the behavior of the controller in a way that is more suited for web APIs, like automatically returning HTTP code 400 for invalid requests.
[Route("[controller]")]
This says that this controller can manage all the requests whose URL is named like the controller. Requests to the URL /users will be handled by this controller. If you want the more standard behavior where web APIs are always under a /api path, you can change the attribute to [Route("api/[controller]")].
[HttpGet]
This attribute specifies the verb for the action it is decorating. You could use all the possible verbs: HttpGet, HttpPost, HttpPut, and so on.
Update data using APIs
You just saw how to return data as well as partially read input information from the query string. Unfortunately, this is not so useful when you have to send a lot of data from the client to the server because there is a limit related to the number of characters you can add to the URL. For this reason, you have to move to another verb.
Hypertext Transfer Protocol (HTTP/1.1) doesn't specify limits for the length of a query string, but limits are imposed by web browsers and server software. You can find more info here.
This approach is not so different from what you saw before. The only difference that the data comes from the body instead of the query string.
Code Listing 5-3
// Adding user [HttpPost] public IActionResult Update([FromBody] User user) { var users = new List<User>(); users.Add(user); return new CreatedResult($"/api/users/{user.Id}", user); } //Deleting user [HttpDelete] public IActionResult Delete([FromQuery] int id) { var users = new List<User> { new User() {Id = 1, Firstname = "Ugo", Lastname = "Lattanzi", Twitter = "@imperugo"}, new User() {Id = 2, Firstname = "Simone", Lastname = "Chiaretta", Twitter = "@simonech"}, }; var user = users.SingleOrDefault(x => x.Id == id); if (user != null) { users.Remove(user); return new EmptyResult(); } return new NotFoundResult(); } |
As you can see, the only differences are the following:
- [FromBody]: This specifies that data comes from the payload of the HTTP request.
- return new CreatedResult($"/api/users/{user.Id}", user);: This returns the created object and the URL where the client can get the user again. The status code is 201 (created).
- return new EmptyResult();: Basically, this means status code 200 (OK). The response body is empty.
- return new NotFoundResult();: This is the 404 message that is used when the requested client can’t be found.
Testing APIs
A browser can be used to test the API because APIs are being implemented over HTTP, but there are other applications that can help with this, too. One popular application is Postman, which you can download for free here.
The following screenshots show how to test the code we used previously.
Retrieve users (/api/users using GET).
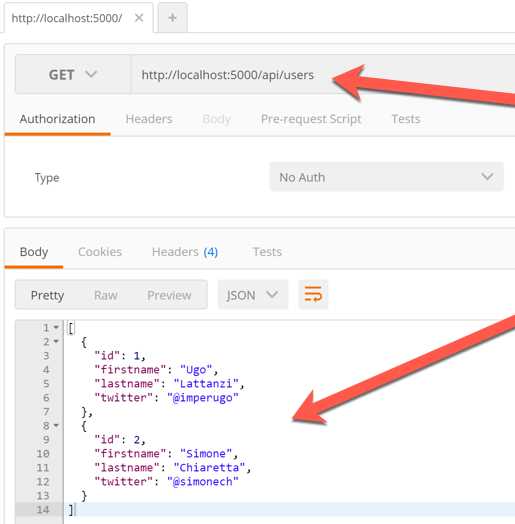
Figure 5-1: Using Postman to Test REST Endpoint-1
Retrieve one user (/api/users/1 using GET).
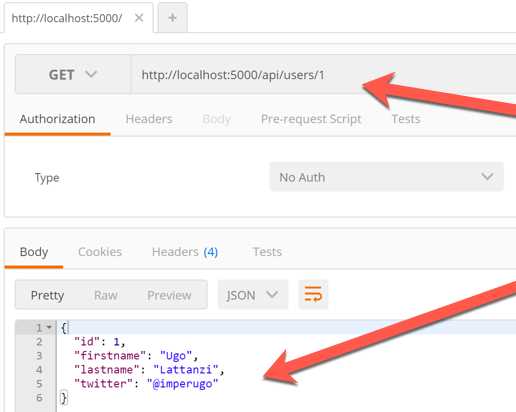
Figure 5-2: Using Postman to Test REST Endpoint-2
Create user (/api/users using POST).

Figure 5-3: Using Postman to Test REST Endpoint-3
Delete user (/api/users?id=2 using DELETE).

Figure 5-4: Using Postman to Test REST Endpoint-4
Documenting APIs
Another interesting feature of web APIs is the ability to “self-document” the methods. This can be done using a standard called OpenAPI or Swagger.
ASP.NET Core doesn’t come with a library for Swagger, but as usual you can add the functionality using a third-party NuGet package. There are two main libraries available, Swashbuckle and NSwag, and they are configured in the same way. The following examples use NSwag.
Here are the steps to enable NSwag in a Web API project:
- Install the NSwag.AspNetCore NuGet package.
- Configure the services needed inside the ConfigureServices method, with services.AddSwaggerDocument().
- Register the Swagger API middleware, in the Configure method with app.UseOpenAPI().
- Register the Swagger UI middleware in the Configure method app.UseSwaggerUi3().
You can now browse to http://localhost:<port>/swagger and see the specification of your APIs.
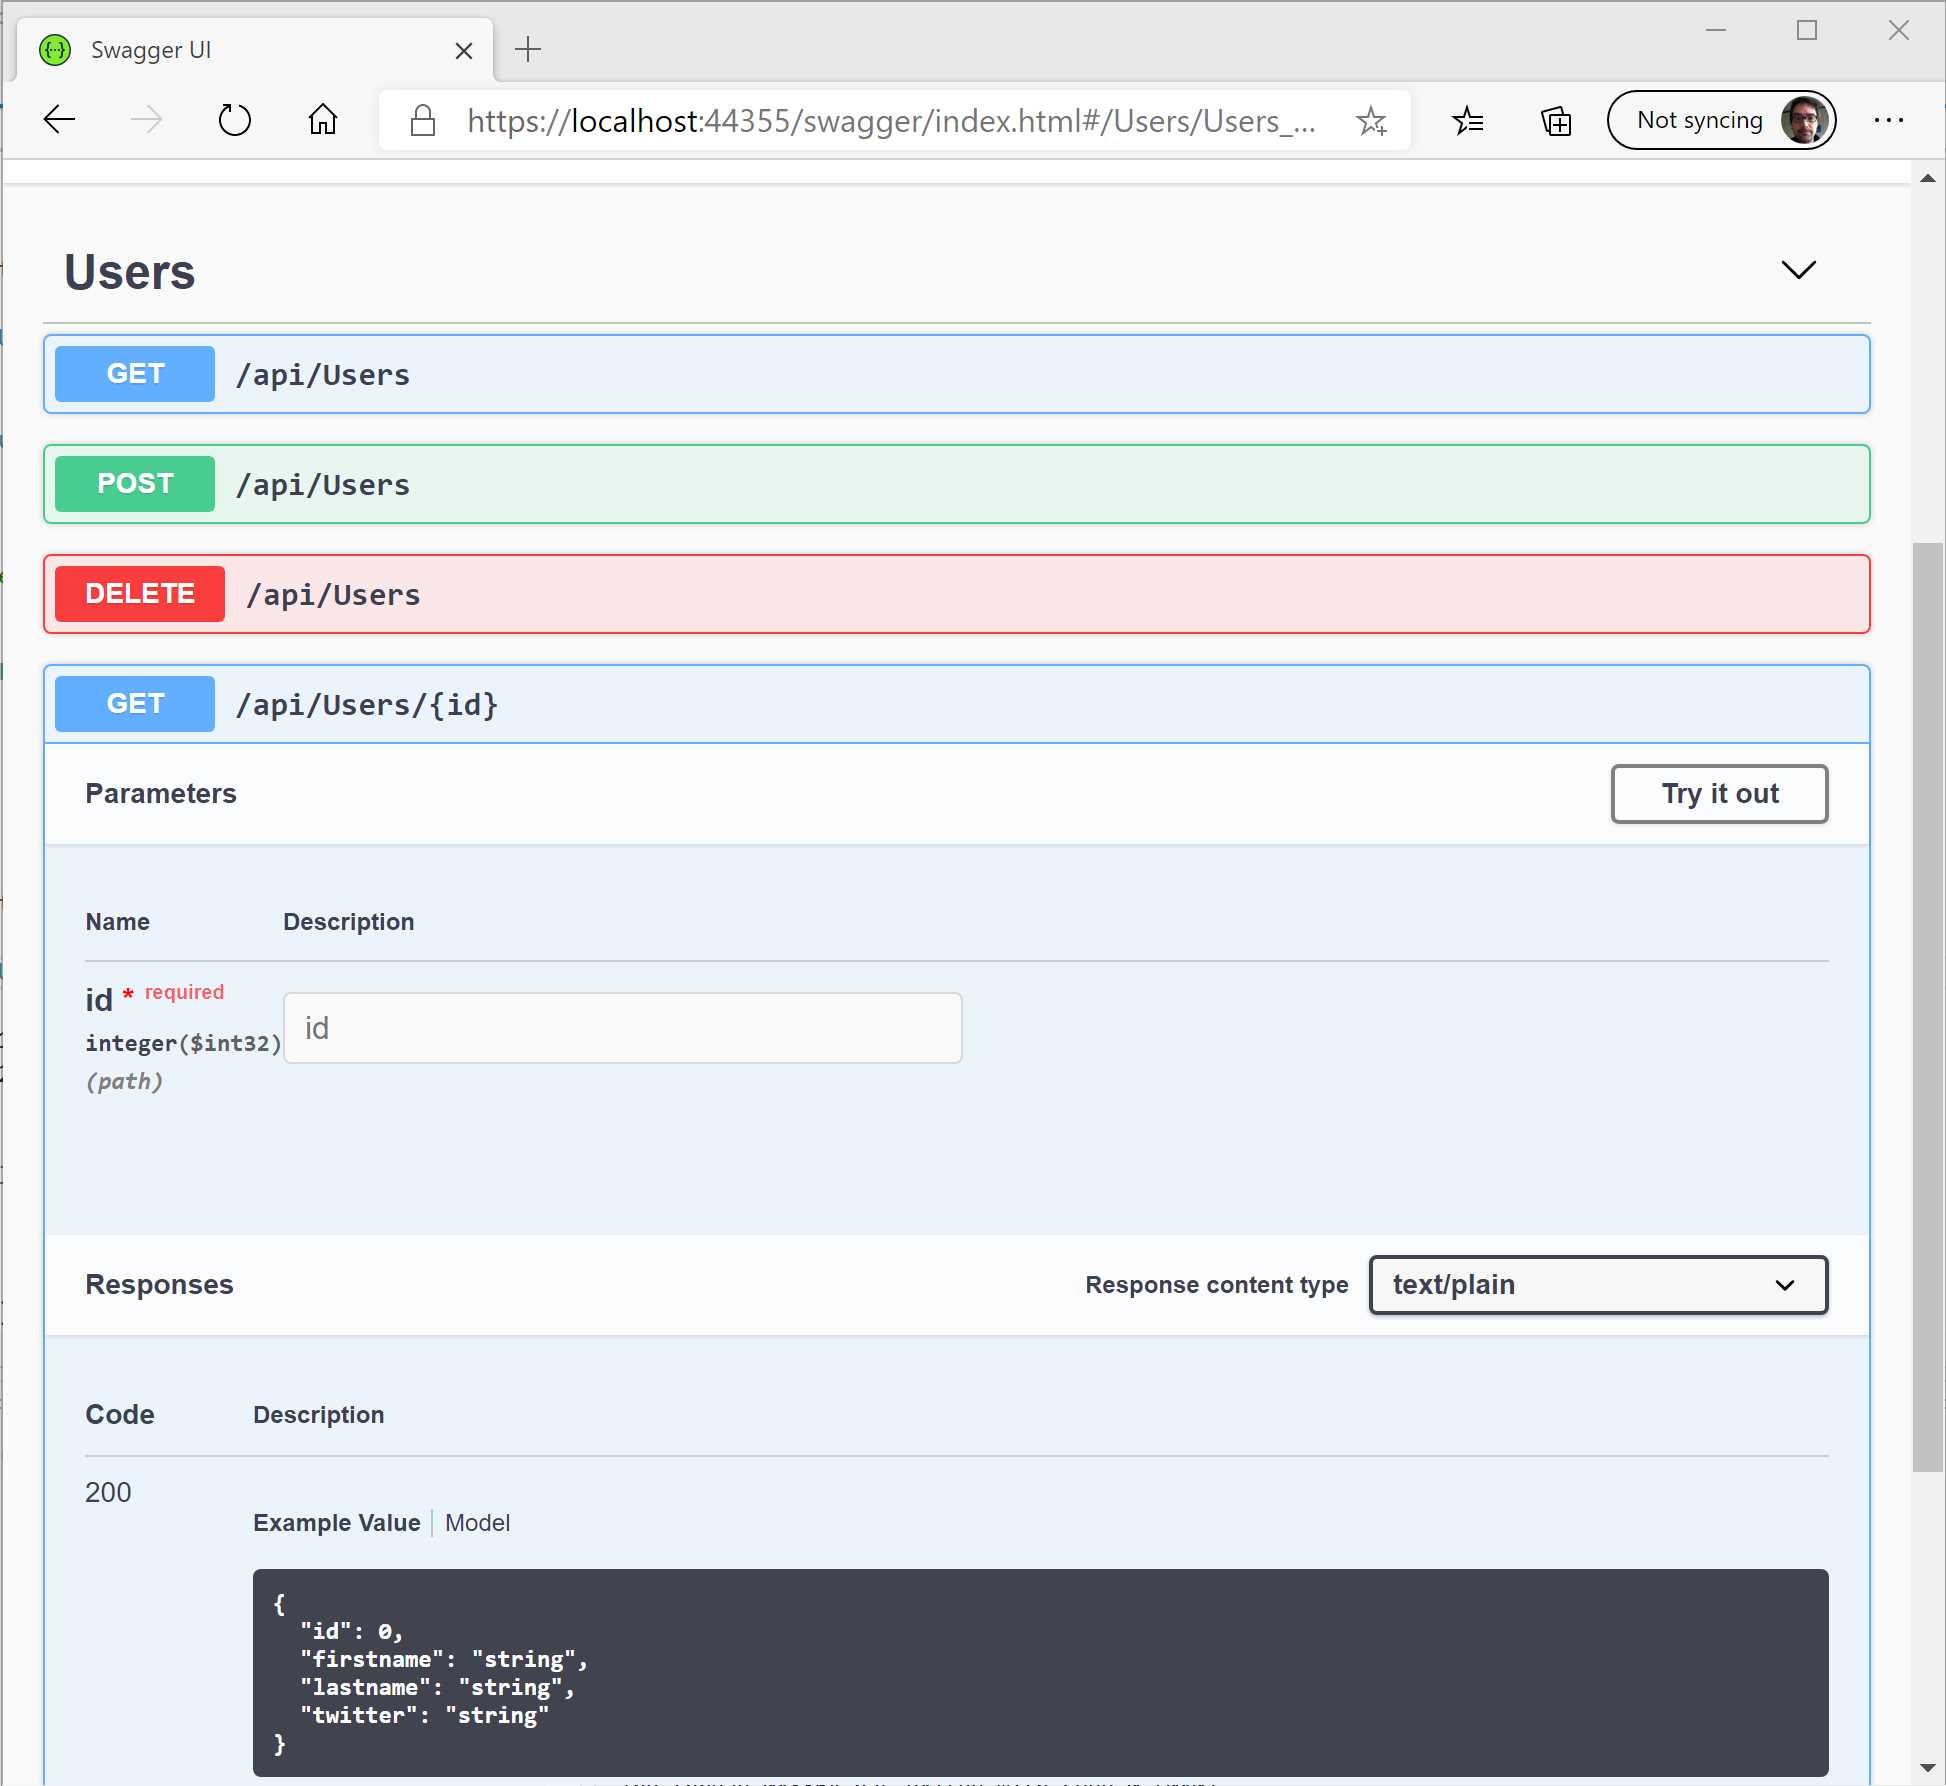
Figure 5-5: Swagger Documentation
gRPC
The trend of recent years, with regard to application architecture, is to develop microservice applications. This kind of architecture offers several advantages:
- Highly maintainable and testable.
- Loosely coupled.
- Independently deployable.
- Organized around business capabilities.
- Owned by a small team.
The microservice architecture enables the rapid, frequent, and reliable delivery of large, complex applications. It also enables organizations to evolve their technology stack more easily.
As you can see, the number of advantages offered is really high, but let's see an example.
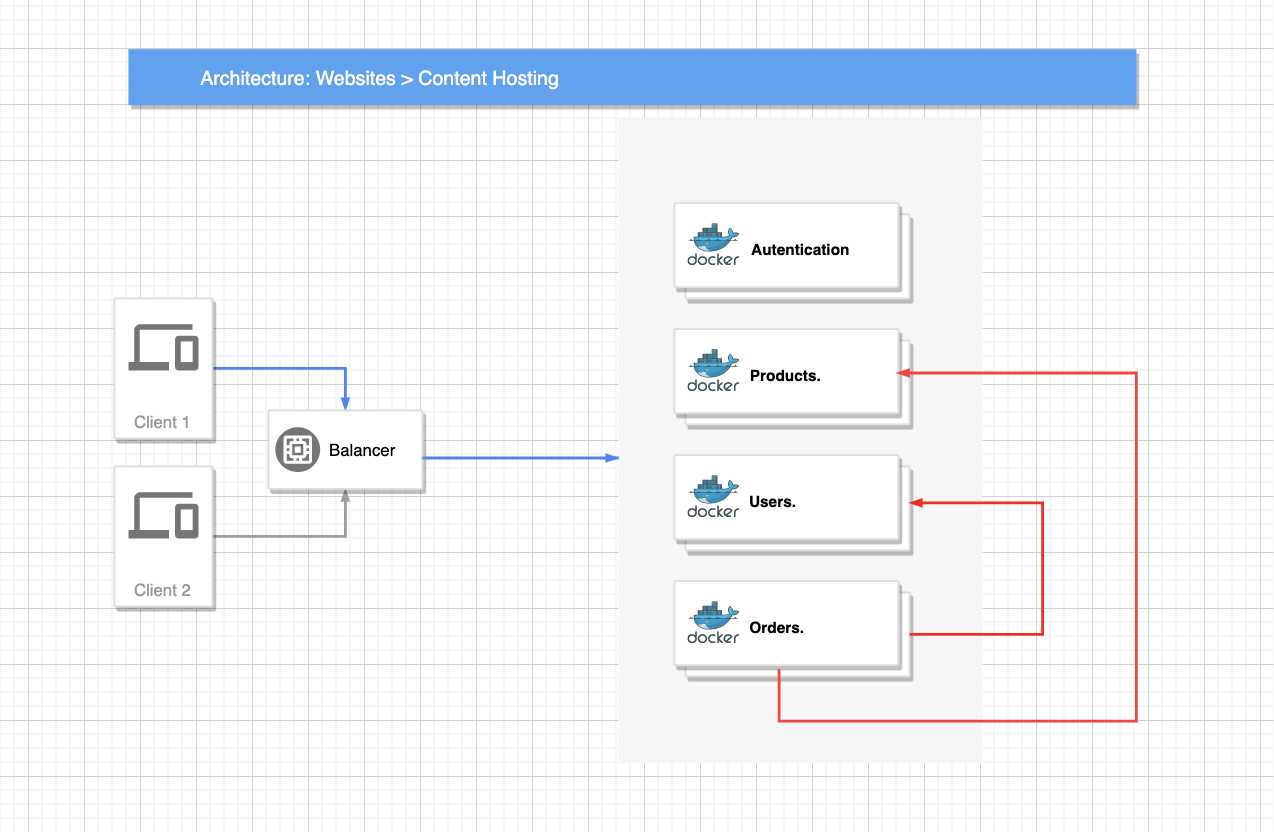
Figure 5-6: A Typical Microservice-Oriented Application
In Figure 5-6, there are four different microservices, each of them with a specific domain and scope and developed by four different teams, probably with different programming languages.
The team that is managing the authentication probably doesn't know where the products are, their structure in the database, or how to retrieve them. The same applies also for orders, users, and so on. This doesn't mean that the microservice managing the orders doesn't need the user information or the product information.
In fact, if you think of a real scenario, the order probably has knowledge of the user who created it and the products bought.
The question here is: what is the best way to retrieve the product information from the order microservice?
Retrieving the data directly from the database isn't a solution because it breaks all the benefits we discussed. The team needs to know where the production information is, its structure into the database, and so on.
It is clear that the order's microservice should ask of the product microservice what it needs, but how? A possible solution is to expose a set of REST APIs used to share the information. This would work perfectly, but it would negatively affect performance.
REST is perfect for the browser, but it has a performance cost that would be too large for internal communication. First of all, the size of the bytes transferred through the request, and then the REST over HTTP, isn't bidirectional. This means that the microservice A needs to create a request to microservice B in order to retrieve the information, and vice versa: two connections and two requests.
In 2015, Google started to develop a protocol that solves the REST problems, and named it gRPC (Google Remote Procedure Call). You can see its definition directly on the official site.
gRPC is a modern, open-source, high-performance RPC framework that can run in any environment. It can efficiently connect services in and across data centers with pluggable support for load balancing, tracing, health checking, and authentication. It is also applicable in the last mile of distributed computing to connect devices, mobile applications, and browsers to backend services.
The important thing to know now is that gRPC is built on top of HTTP2 (so it can use bidirectional communication), and the serialization is based on Protobuf in order to reduce the amount of data transferred on each request.
If you browse the website, you can see that almost all important languages are supported (Android Java, C#, C++, Go, Kotlin, Node, Python, and so on). This proves that gRPC can be used in mixed scenarios where each microservice could be developed with a different programming language.
gRPC and ASP.NET Core
.NET, starting from version 3, supports gRPC. The same way we do for other types of projects, here we have to install a specific package into your project. The needed package depends on which side you are working on because, exactly as it happens for the REST over HTTP, there is a client (the microservice that is asking for the information) and a server (the microservice that is returning the information).
Let's start with the server part.
First of all, install in your application the package called Grpc.AspNetCore from NuGet. Your .csproj file should have the following line.
Code Listing 5-4
<PackageReference Include="Grpc.AspNetCore" Version="2.29.0" /> |
Now that you have all your packages available in your project, the first step is to create the signature of the service that will expose the data to another microservice.
Because gRPC is strongly related to Protobuf, we need to create a proto file in our project.
Tip: A good practice is to create a file for each service, for example products.proto, users.proto, and so on.
We want to expose our product to another microservice, so our proto file would look like this.
Code Listing 5-5
syntax = "proto3"; package products; // The product service definition. service Products { // Sends a product rpc GetProduct (ProductRequest) returns (ProductReply); } // The request message containing the id of the requested product. message ProductRequest { string productId = 1; } // The response message containing the product information. message ProductReply { string productName = ""; string price = ""; } |
The proto syntax is not a part of this book, so please read the reference here.
The package Grpc.AspNetCore includes some tools to generate all the needed C# classes at build time, so you have to edit the .csproj file and add these lines.
<ItemGroup> <Protobuf Include="**/*.proto" /> </ItemGroup> |
Now build your project and create your first gRPC service.
Code Listing 5-7
using System.Threading.Tasks; using Products; using Grpc.Core; using Microsoft.Extensions.Logging; namespace Server { public class ProductsService : Products.ProductsBase { private readonly ILogger _logger; public ProductsService(ILoggerFactory loggerFactory) { _logger = loggerFactory.CreateLogger<ProductsService>(); } public override Task<ProductReply> GetProduct(ProductRequest request, ServerCallContext context) { _logger.LogInformation($"Sending product with id {request.productId }"); return Task.FromResult(new ProductReply { ProductName = "Bike", Price = "5000€"}); } } } |
With the service implemented, now it needs to be registered in the application by modifying the Startup.cs file.
Code Listing 5-8
namespace Server { public class Startup { public void ConfigureServices(IServiceCollection services) { services.AddGrpc(); } public void Configure(IApplicationBuilder app, IWebHostEnvironment env) { if (env.IsDevelopment()) { app.UseDeveloperExceptionPage(); } app.UseRouting(); app.UseEndpoints(endpoints => { endpoints.MapGrpcService<ProductsService>(); }); } } } |
The Client
Now that the server is ready to return data over gRPC protocol, let's see how to invoke a request and read data.
First of all, we have to copy the product.proto file we created for the server in the client (a good way would be to share that file among all the needed microservices) and install all the needed packages.
Like you did for the server part, modify the .csproj, including all .proto files.
Code Listing 5-9
<ItemGroup> <Protobuf Include="**/*.proto" /> </ItemGroup> |
Once all packages are installed, the .csproj file contains the following lines.
Code Listing 5-10
<PackageReference Include="Google.Protobuf" Version="3.12.3" /> <PackageReference Include="Grpc.Net.Client" Version="2.29.0" /> <PackageReference Include="Grpc.Tools" Version="2.30.0"> <PrivateAssets>all</PrivateAssets> <IncludeAssets>runtime; build; native; contentfiles; analyzers</IncludeAssets> </PackageReference> |
In order to demonstrate that gRPC is not related only to the web world, you are going to invoke the service from a console application.
Code Listing 5-11
using System; using System.Threading; using System.Threading.Tasks; using Grpc.Core; using Grpc.Net.Client; namespace Client { public class Program { static async Task Main(string[] args) { var channel = GrpcChannel.ForAddress("https://localhost:5001"); var client = new Products.ProductsClient(channel); await UnaryCallExample(client); Console.WriteLine("Shutting down"); Console.WriteLine("Press any key to exit..."); Console.ReadKey(); } private static async Task UnaryCallExample(Products.ProductsClient client) { var reply = await client.GetProduct(new ProductRequest {PproductId = "12345" }); Console.WriteLine("Product: " + reply.ProductName); } } } |
Notes
gRPC is easy to use, offers good performance, and allows you also to stream information between the server and the client thanks to the HTTP/2 protocol.
On the gRPC Google repo, there are tons of examples for any scenario, starting from a classic server to client iteration like the previous examples, to using gRPC over Blazor, thanks to the gRPC Web.
ASP.NET MVC Core
As mentioned in the previous section, ASP.NET MVC isn't different than Web API, so the code you are going to see here will be very similar, except for the result.
However, the registration in the Startup class must be slightly changed.
The AddControllers must be replaced with AddControllersWithViews, which also registers the services to handle views, and all the other concerns that were not needed in the APIs.
Also, the MapControllers inside the Configure method must be changed. It registers endpoints based on attribute routing and is not suited for the standard routing of ASP.NET MVC. In order to use the conventional routing, you need to replace it with (or add in addition) the controller route method.
Code Listing 5-12
app.UseEndpoints(endpoints => { endpoints.MapControllerRoute( name: "default", pattern: "{controller=Home}/{action=Index}/{id?}"); }); |
With these changes, you can start creating a controller. In the same folder (Controller) where you created UserController, you can create another controller with the scope of serving the main page of the website. In this case, call it HomeController.
Code Listing 5-13
using Microsoft.AspNetCore.Mvc; namespace Syncfusion.Asp.Net.Core.Succinctly.Mvc.Controllers.MVC { public class HomeController : Controller { [HttpGet] public IActionResult Index() { return View(); } } } |
This code is similar to the API controller; the only differences are the missing route attribute on the controller and the View method used to return the action.
The first one is not needed because you don't have to override the default routing configuration (we will discuss this later in the chapter), and the second one indicates to the controller that it has to render a view, not JSON.
If you try to run this code, you'll get an error like this.
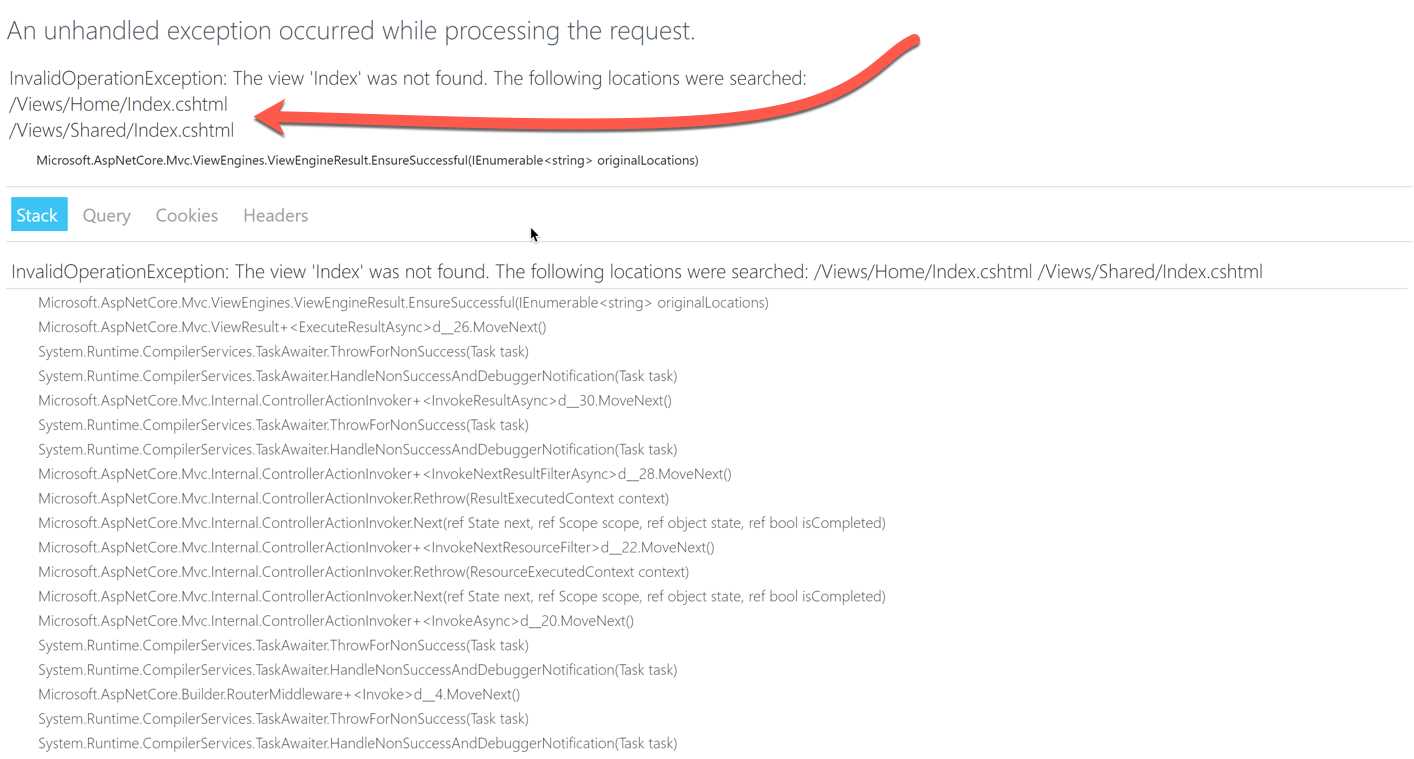
Figure 5-7: Unable to Find the MVC View
This happens because the MVC framework cannot find the view file, but how does it locate the file? The logic behind it is very simple: if you don't specify any information about the view, everything happens using conventions.
First, it is important to know that all the views are placed in the folder Views in the root of the project, as you can see in the following screenshot.
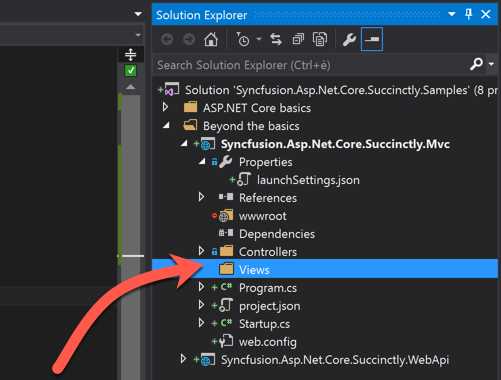
Figure 5-8: The Views Folder
Inside, there must be a folder for each MVC controller you created. In this case, you have just one controller called HomeController, so you must create the folder Home inside Views.
Finally, it's time to create our views. Visual Studio 2019 makes it really simple to do.

Figure 5-9: The Views Folder for the Home Controller
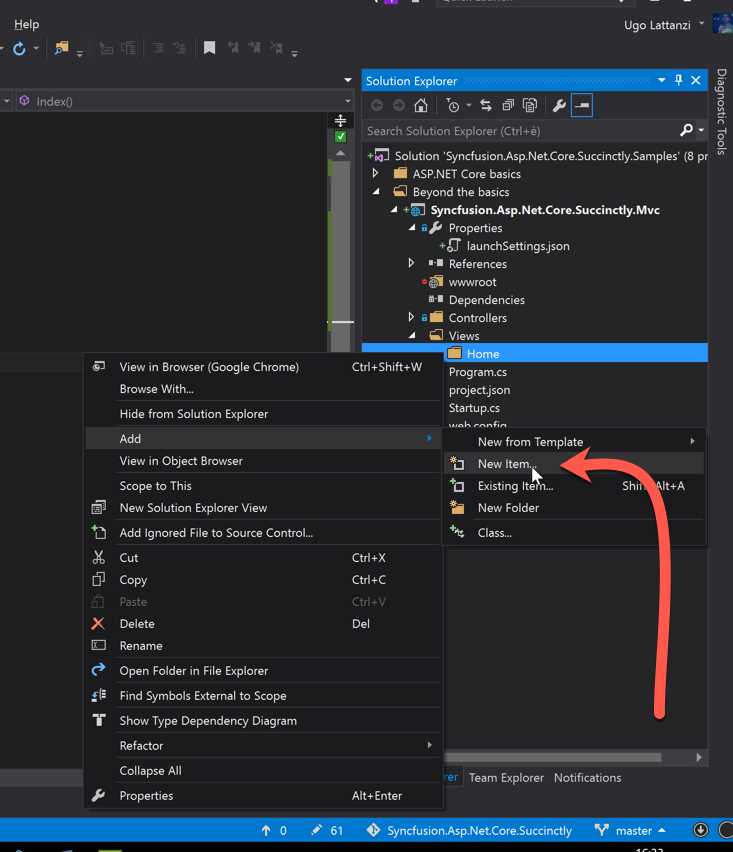
Figure 5-10: Adding the View-1
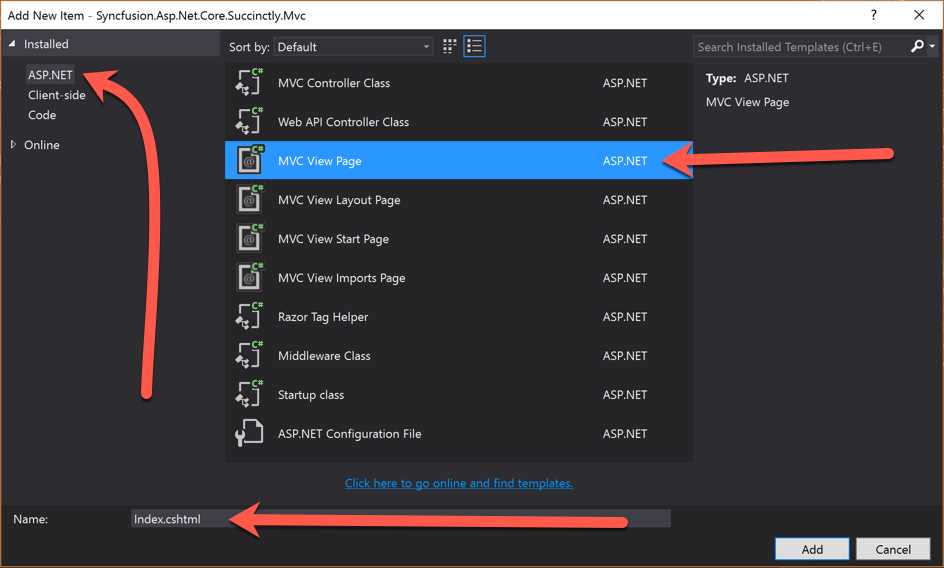
Figure 5-11: Adding the View-2
Now, if you open the newest file, you’ll see that it is almost empty. It contains just a few strange sections that you’ll recognize because they have different colors and use @ in the beginning.
These parts are managed server-side and contain instructions on how to change the output to render the final HTML. Everything is possible thanks to Razor, the view engine embedded within ASP.NET MVC Core.
A good introduction to Razor syntax is available here.
Because you have to render a webpage, you first have to create the right markup, so let's add the following code to our view.
Code Listing 5-14
<!DOCTYPE html> <html lang="en"> <head> <meta charset="utf-8"> <title>Hello World</title> </head> <body> <h1>Hello World</h1> </body> </html> |
When you run the application again, the result should not be an error, but a simple HTML page.
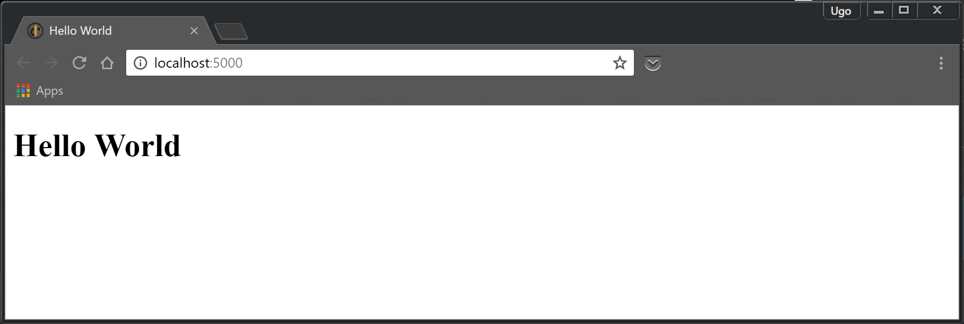
Figure 5-12: Server-Side Page Rendered Using MVC
This is definitely an improvement, but you’re returning just a static file; there isn’t any kind of transformation. But that isn’t needed to use MVC, because you already have a specific middleware component to manage static files.
To make the view more elaborate and to use something from the server, you have to go back to the controller and send the data to the view.
Code Listing 5-15
using Microsoft.AspNetCore.Mvc; using Syncfusion.Asp.Net.Core.Succinctly.Mvc.Models; namespace Syncfusion.Asp.Net.Core.Succinctly.Mvc.Controllers.MVC { public class HomeController : Controller { [HttpGet] public IActionResult Index() { var users = new[] { new User() {Id = 1, Firstname = "Ugo", Lastname = "Lattanzi", Twitter = "@imperugo"}, new User() {Id = 2, Firstname = "Simone", Lastname = "Chiaretta", Twitter = "@simonech"}, }; return View(users); } } } |
Notice that we have reused the class User previously created for the API response. This code doesn't need explanation; you’re just sending an array of users as a model to a View method.
In our view, it’s time to get users from the controller and print the data to the page. The first thing to do is to specify what kind of model the view is using. In our case, it’s IEnumerable<User>.
Code Listing 5-15
@model IEnumerable<Syncfusion.Asp.Net.Core.Succinctly.Mvc.Models.User> <!DOCTYPE html> <html lang="en"> <head> <meta charset="utf-8"> <title>Hello World</title> </head> <body> <h1>Hello World</h1> </body> </html> |
Now you have to iterate all the users from the model and show the data.
Code Listing 5-16
@model IEnumerable<Syncfusion.Asp.Net.Core.Succinctly.Mvc.Models.User> <!DOCTYPE html> <html lang="en"> <head> <meta charset="utf-8"> <title>Hello World</title> </head> <body> <h1>Users</h1> <div> @foreach(var user in Model) { <hr /> <p>Firstname: @user.Firstname</p> <p>Lastname: @user.Lastname</p> <p>Twitter: <a href="http://www.twitter.com/@user.Twitter"> @user.Twitter</a></p> } </div> </body> </html> |
The output should be something like this.
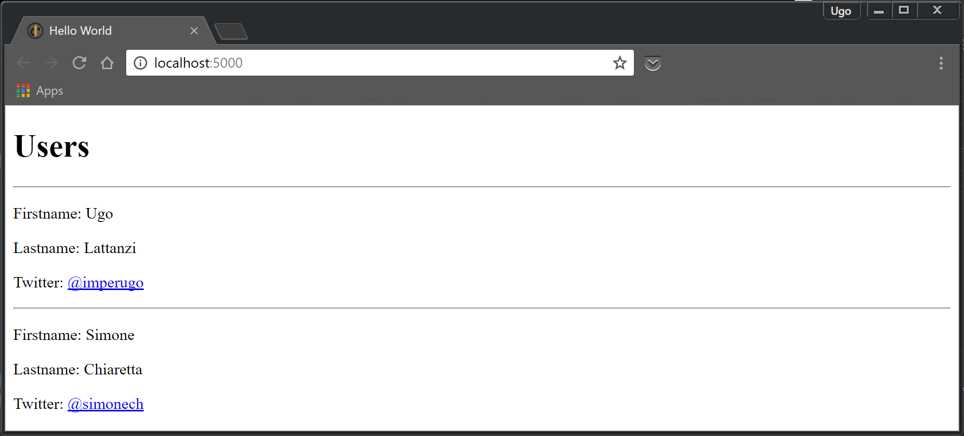
Figure 5-13: Server-Side Page Rendered Using MVC for a List
Routing
You just saw a small introduction to ASP.NET MVC. Notice that HomeController, combined with the Index action, handles the root domain (http://localhost:5000 in our case). But why?
To get the answer, you have to go back to the MVC configuration where we wrote the following code.
Code Listing 5-17
using Microsoft.AspNetCore.Builder; using Microsoft.AspNetCore.Hosting; using Microsoft.Extensions.DependencyInjection; using Microsoft.Extensions.Logging; namespace Syncfusion.Asp.Net.Core.Succinctly.Mvc { public class Startup { public void ConfigureServices(IServiceCollection services) { services.AddControllersWithViews(); } public void Configure(IApplicationBuilder app, IWebHostEnvironment env) { if (env.IsDevelopment()) { app.UseDeveloperExceptionPage(); } app.UseEndpoints(endpoints => { endpoints.MapControllerRoute( name: "default", pattern: "{controller=Home}/{action=Index}/{id?}"); }); } } } |
This part of code says to split the URL into segments, where the first is the controller, the second is the action, and the third (optional) is the parameter. If they are all missing, use the action Index of HomeController.
In fact, if you run the application again and write the following URL, the output should be the same:
http://localhost:5000/home/index
In you want to manage a URL like http://localhost:5000/products, it’s enough to create a ProductController with an Index action.
View-specific features
After seeing the general features of ASP.NET Core MVC, it is time to see two new features that are specific to the view side of ASP.NET MVC applications:
- Tag helpers
- View components
Tag helpers are a new way of exposing server-side code that renders HTML elements. They bring the same features of HTML Razor helpers to the easier-to-use syntax of standard HTML elements.
View components can be seen as either a more powerful version of partial views, or a less convoluted way to develop child actions. Let's look in detail at both of these new features.
Tag helpers
Compared to HTML Razor helpers, tag helpers look very much like standard HTML elements—no more switching context between HTML and Razor syntax.
Let's see an example to make things a bit clearer. If you want to make an editing form with ASP.NET MVC, you have to display a text box that takes the value from the view model, renders validation results, and so on.
Using the HTML Razor helpers, you would have written:
@Html.TextBoxFor(m=>m.FirstName)
But now with tag helpers, you can directly write <input asp-for="FirstName" /> without introducing the Razor syntax. Notice that it's just a normal HTML <input> tag enhanced with the special attribute asp-for.
It doesn't look like such a big change, but the advantage becomes clear when you add more attributes. One example of this is the class attribute. This is how you add the class using the HTML Razor syntax:
@Html.TextBoxFor(m=>m.FirstName, new { @class = "form-control" })
Using the tag helper, it's just this:
<input asp-for="FirstName" class="form-control" />.
Basically, you write the tag like you were writing a static HTML tag, with the addition of the special asp-for. This new syntax retains the support of Visual Studio IntelliSense. As soon as you start typing an HTML element that is somehow enhanced via tag helpers, you see in the IntelliSense menu that the tag is represented with an icon that is different from normal HTML tags.
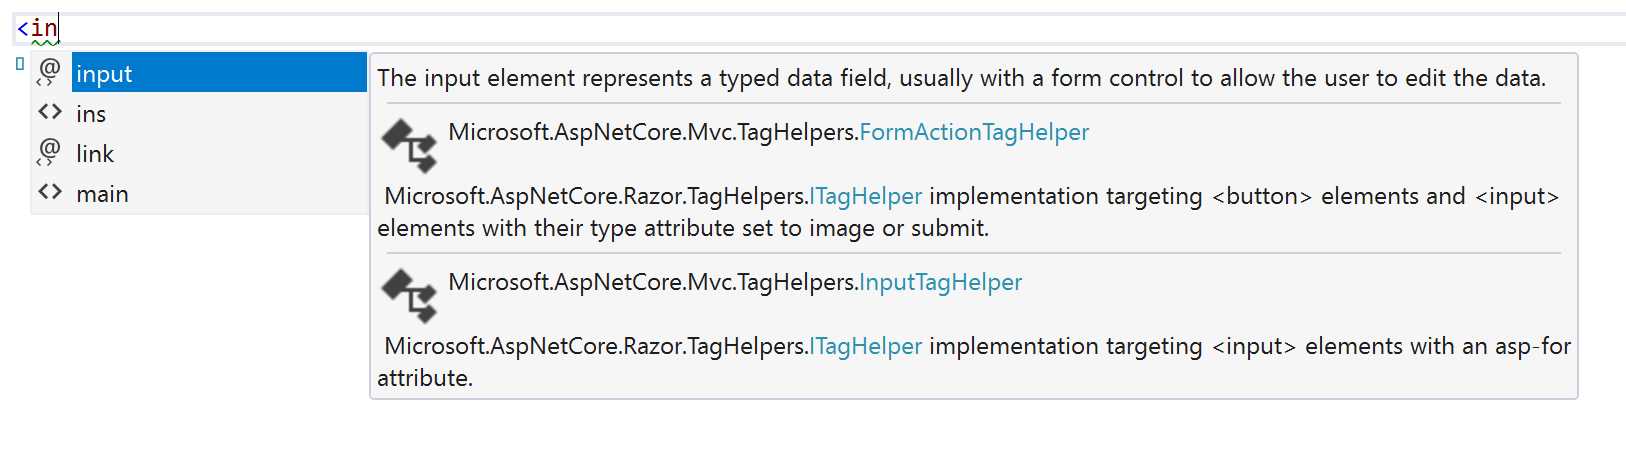
Figure 5-14: Visual Studio IntelliSense for HTML Tags
If you then trigger the IntelliSense menu to see all the available attributes, only one has the same icon again: the asp-for attribute. Once you add this attribute and open the IntelliSense menu again, you’ll see all methods and properties of the page model.
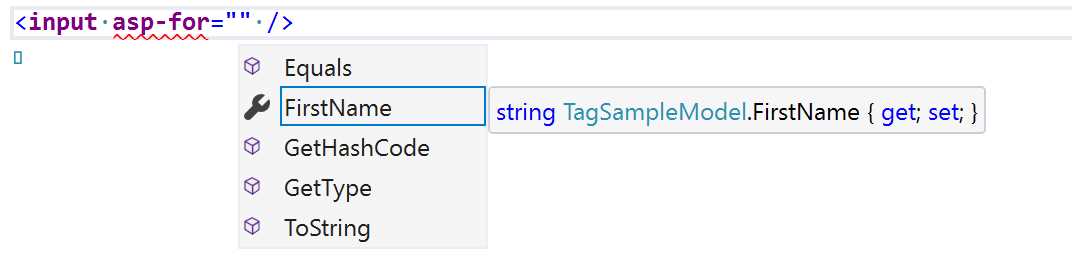
Figure 5-15: Visual Studio IntelliSense for MVC Model
Look at the two previous screenshots carefully. You'll notice that the <input> tag has changed color. The following figure highlights the difference.
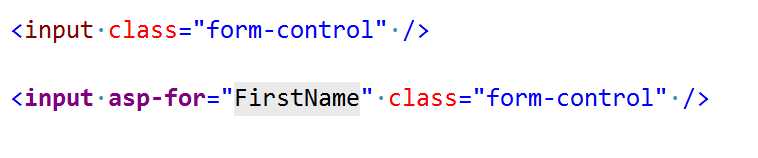
Figure 5-16: Difference Between the Two Tags
In the first line, the element is brown with attributes in red. In the second, the element is purple with the special attribute also in purple (the normal attribute is still red). Visual Studio recognizes both normal HTML tags and attributes, and tag helpers. This avoids confusion when editing a view.
ASP.NET Core MVC comes with a lot of tag helpers; most of them are just re-implementing the same HTML Razor helpers used to edit forms, like the input, form, label, and select elements. But there are other tag helpers used to link to controllers and actions, manage cache, render different HTML elements based on the environment, and manage script fallback or CSS files. You can see some of these tag helpers used in the View\Shared\_Layout.cshtml file in the default project template.
Code Listing 5-18
<!DOCTYPE html> <html lang="en"> <head> <meta charset="utf-8" /> <meta name="viewport" content="width=device-width, initial-scale=1.0" /> <title>@ViewData["Title"] - ViewHelpers</title> <link rel="stylesheet" href="~/lib/bootstrap/dist/css/bootstrap.min.css" /> <link rel="stylesheet" href="~/css/site.css" /> </head> <body> <header> <nav class="navbar navbar-expand-sm navbar-toggleable-sm navbar-light bg-white border-bottom box-shadow mb-3"> <div class="container"> <a class="navbar-brand" asp-area="" asp-controller="Home" asp-action="Index">ViewHelpers</a> <button class="navbar-toggler" type="button" data-toggle="collapse" data-target=".navbar-collapse" aria-controls="navbarSupportedContent" aria-expanded="false" aria-label="Toggle navigation"> <span class="navbar-toggler-icon"></span> </button> <div class="navbar-collapse collapse d-sm-inline-flex flex-sm-row-reverse"> <ul class="navbar-nav flex-grow-1"> <li class="nav-item"> <a class="nav-link text-dark" asp-area="" asp-controller="Home" asp-action="Index">Home</a> </li> <li class="nav-item"> <a class="nav-link text-dark" asp-area="" asp-controller="Home" asp-action="Privacy">Privacy</a> </li> </ul> </div> </div> </nav> </header> <div class="container"> <main role="main" class="pb-3"> @RenderBody() </main> </div> <footer class="border-top footer text-muted"> <div class="container"> © 2020 - ViewHelpers - <a asp-area="" asp-controller="Home" asp-action="Privacy">Privacy</a> </div> </footer> <script src="~/lib/jquery/dist/jquery.min.js"></script> <script src="~/lib/bootstrap/dist/js/bootstrap.bundle.min.js"></script> <script src="~/js/site.js" asp-append-version="true"></script> @RenderSection("Scripts", required: false) </body> </html> |
Building custom tag helpers
Tag helpers are easy to create, so it's worth seeing how to create your own. Writing a custom tag helper is especially useful when you want to output an HTML snippet that is long and repetitive, but changes very little from one instance to another, or when you want to somehow modify the content of an element.
As an example, you are going to create a tag helper that automatically creates a link by just specifying the URL.
Something that takes the following.
Code Listing 5-19
<url>https://www.syncfusion.com/resources/techportal/ebooks</url> |
And creates a working a tag, like this.
Code Listing 5-20
<a href="https://www.syncfusion.com/resources/techportal/ebooks">https://www.syncfusion.com/resources/techportal/ebooks</a> |
Start by creating a UrlTagHelper file inside the MVC project. The name is important, as it is what defines the name of tag (in this case, url). A good convention is to put the file inside a TagHelpers folder.
A tag helper is a class that inherits from TagHelper and defines its behavior by overriding the method Process, or its asynchronous counterpart, ProcessAsync. These methods have two arguments:
- context: Contains information on the current execution context (even if it is rarely used).
- output: Contains a model of the original HTML tag and its content, and it is the object that has to be modified by the tag helper.
To use a tag helper in the views, you have to tell both Visual Studio and the .NET Core framework where to find it. This is done by adding a reference in the _ViewImports.cshtml file.
Code Listing 5-21
@addTagHelper *, Microsoft.AspNetCore.Mvc.TagHelpers @addTagHelper "*, MvcSample" |
To make sure all the basic steps are done, copy the following code into the UrlTagHelper file.
Code Listing 5-22
using Microsoft.AspNetCore.Razor.TagHelpers; namespace MvcSample.TagHelpers { public class UrlTagHelper: TagHelper { public override void Process(TagHelperContext context, TagHelperOutput output) { output.TagName = "a"; } } } |
This tag helper, at the moment, is useless. It only replaced the tag used when calling the helper from whatever it was (url in our example) to a tag, but it doesn't create an href attribute pointing to the specified URL. To do so, you have to read the content of the element and create a new attribute. Since the content could also be a Razor expression, the method to do so is an Async method, output.GetChildContentAsync(). You also have to change the method you implemented from Process to ProcessAsync.
The complete tag helper is shown in the following code listing.
Code Listing 5-23
using Microsoft.AspNetCore.Razor.TagHelpers; using System.Threading.Tasks; namespace MvcSample.TagHelpers { public class UrlTagHelper: TagHelper { public override async Task ProcessAsync(TagHelperContext context, TagHelperOutput output) { output.TagName = "a"; var content = await output.GetChildContentAsync(); output.Attributes.SetAttribute("href", content.GetContent()); } } } |
Tag helpers can also have attributes. You can extend the URL tag helper to specify the target of the link. To add an attribute to a tag helper, add a property to the class. In the case of the target, you just need to add public string Target { get; set; } to the class. But having a string parameter is not a nice experience because IntelliSense doesn't show which values are allowed. You can define the property as an enum whose values are only the ones allowed for the target HTML attribute. Then, you have nice IntelliSense.
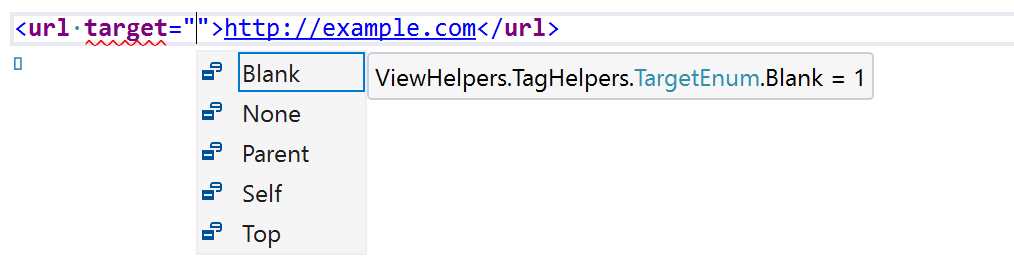
Figure 5-17: HTML Property Suggestion
This is the code of the updated tag helper.
Code Listing 5-24
using Microsoft.AspNetCore.Razor.TagHelpers; using System.Threading.Tasks; namespace MvcSample.TagHelpers { public enum TargetEnum { None = 0, Blank, Parent, Self, Top } public class UrlTagHelper: TagHelper { public TargetEnum Target { get; set; } public override async Task ProcessAsync(TagHelperContext context, TagHelperOutput output) { output.TagName = "a"; var content = await output.GetChildContentAsync(); output.Attributes.SetAttribute("href", content.GetContent()); if (Target!=TargetEnum.None) { output.Attributes.SetAttribute("target", "_"+Target.ToString().ToLowerInvariant()); } } } } |
Now, <url target="Blank">http://example.com</url> is rendered as <a href="http://example.com" target="_blank">http://example.com</a>.
View components
View components are the next view-related feature. In a way, they are similar to partial views, but they are much more powerful, and are used to solve different problems.
A partial view is typically used to simplify complex views by splitting them into reusable parts. Partial views have access to the view model of the parent page, and don't have complex logic.
On the other hand, view components don't have access to the page model; they only operate on the arguments that are passed to them, and they are composed of both view and class with the logic.
If you used a child action in previous versions of ASP.NET MVC, view components more or less solve the same problem in a more elegant way, as their execution doesn’t go through the whole ASP.NET MVC execution pipeline starting from the routing.
Typically, view controllers are used to render reusable pieces of pages that also include logic that might involve hitting a database—for example, sidebars, menus, and conditional login panels.
How to write a view component
As mentioned, a view component is made of two parts. The class containing the logic extends the ViewComponent class and must implement either the Invoke method or the InvokeAsync method. This returns IViewComponentResult with the model that has to be passed to the view. Conventionally, all view components are located in a folder named ViewComponents in the root of the project.
The view is just like any other view. It receives the model passed by the component class that is accessed via the Model variable. The view for a view component has to be saved in the Views\Shared\Components\<component-name>\Default.cshtml file.
As an example, let's build a view component that shows the sidebar of a blog. The component class just calls an external repository to fetch the list of links.
Code Listing 5-25
using System.Threading.Tasks; using Microsoft.AspNetCore.Mvc; using MvcSample.Services; namespace MvcSample.ViewComponents { public class SideBarViewComponent: ViewComponent { private readonly ILinkRepository db; public SideBarViewComponent(ILinkRepository repository) { db = repository; } public async Task<IViewComponentResult> InvokeAsync(int max=10) { var items = (await db.GetLinks()).Take(max); return View(items); } } } |
Notice that it receives the dependency in the constructor, as shown for controllers in ASP.NET Core MVC. In this case, since the operation of retrieving the links goes to a database, you implement the Async version of the component.
The next step is implementing the view. Nothing special to mention here, just a simple view that renders a list of links.
Code Listing 5-26
@model IEnumerable<MvcSample.Models.Link> <h3>Blog Roll</h3> <ul> @foreach (var link in Model) { <li><a href="@link.Url">@link.Title</a></li> } </ul> |
The important thing to remember is where this view is located. Following convention, it must be saved as Views\Shared\Components\Sidebar\Default.cshtml.
Now it’s time to include the component in a view. This is done by simply calling the view component using the Razor syntax.
Code Listing 5-27
@await Component.InvokeAsync("SideBar", new {max = 5}) |
This is a bit convoluted, especially the need to create an anonymous class just for passing the arguments. But there is also another way of calling a view component as if it were a tag helper. All view components are also registered as tag helpers with the prefix vc.
Code Listing 5-28
<vc:side-bar max="5"></vc:side-bar> |
Apart from being easier to write, this also implements IntelliSense in the HTML editor.

Figure 5-18: IntelliSense for Tag Helpers
Razor Pages
If you have to create dynamic pages but you don't want to use MVC, or you are looking to use a different approach, ASP.NET Core 2.x introduced a new way to create dynamic markup. It is called Razor Pages, and it uses the powerful Razor engine, without the part related to the model and controller that you already saw in the MVC section.
It is built on top of MVC, but its services must be registered specifically, similarly to how the registration of Web API was different from ASP.NET MVC.
Code Listing 5-29
public class Startup { public void ConfigureServices(IServiceCollection services) { services.AddRazorPages (); } public void Configure(IApplicationBuilder app) { app.UseEndpoints(endpoints => { endpoints.MapRazorPages(); }); } } |
Now the application is almost ready to host some Razor pages, but in order to do so, you have to follow some conventions.
The first one is where the pages are located. You have to put them into a folder called Pages in the root of your application. To help with this, if you are using Visual Studio, you have a helpful context menu when you right-click on the folder.
Follow these steps to create your first Razor page.
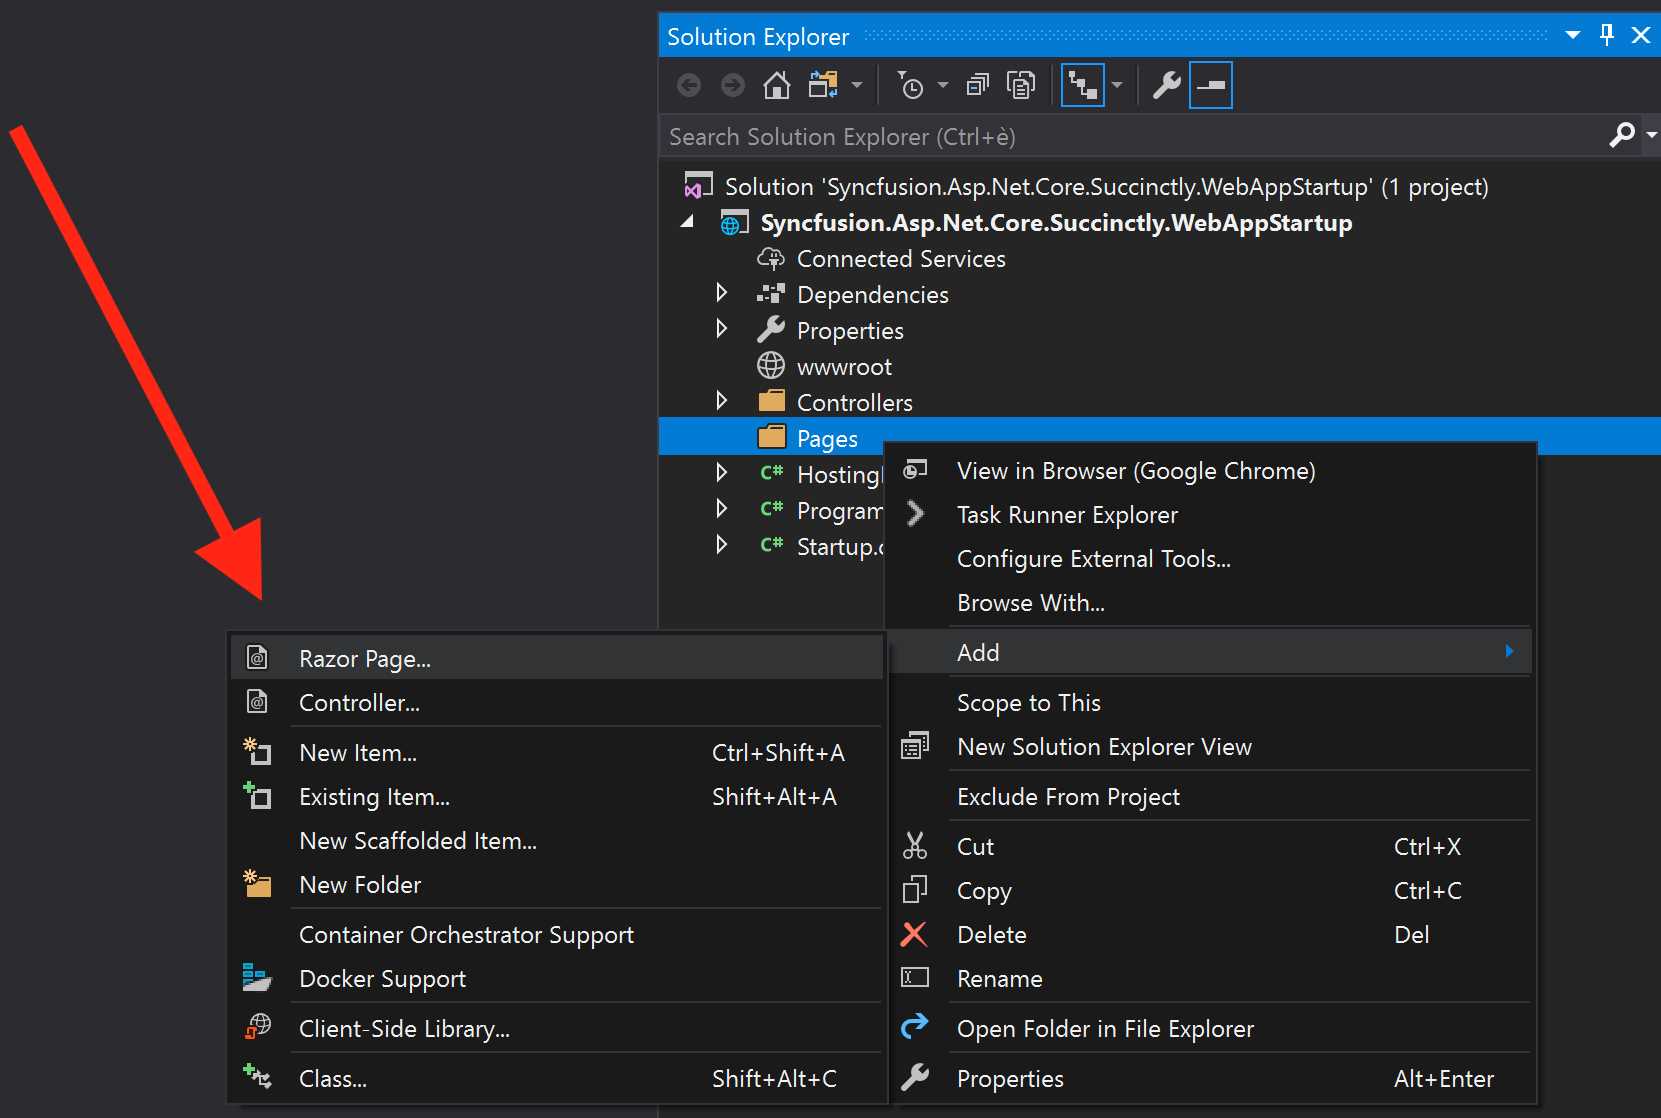
Figure 5-19: “Add Razor Page” Menu Item
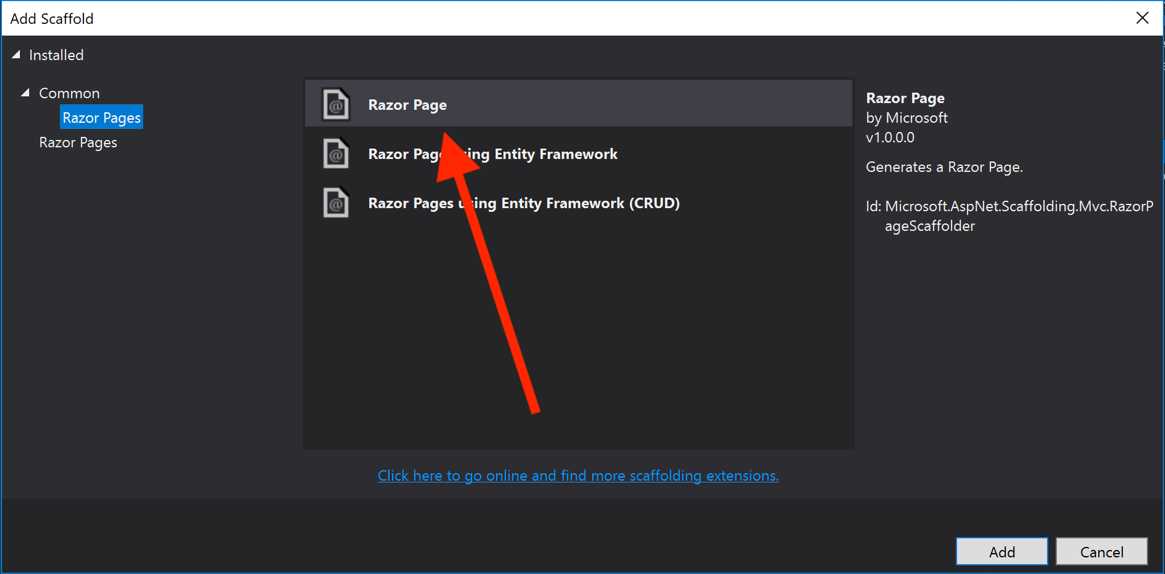
Figure 5-20: Add Scaffold Page Dialog
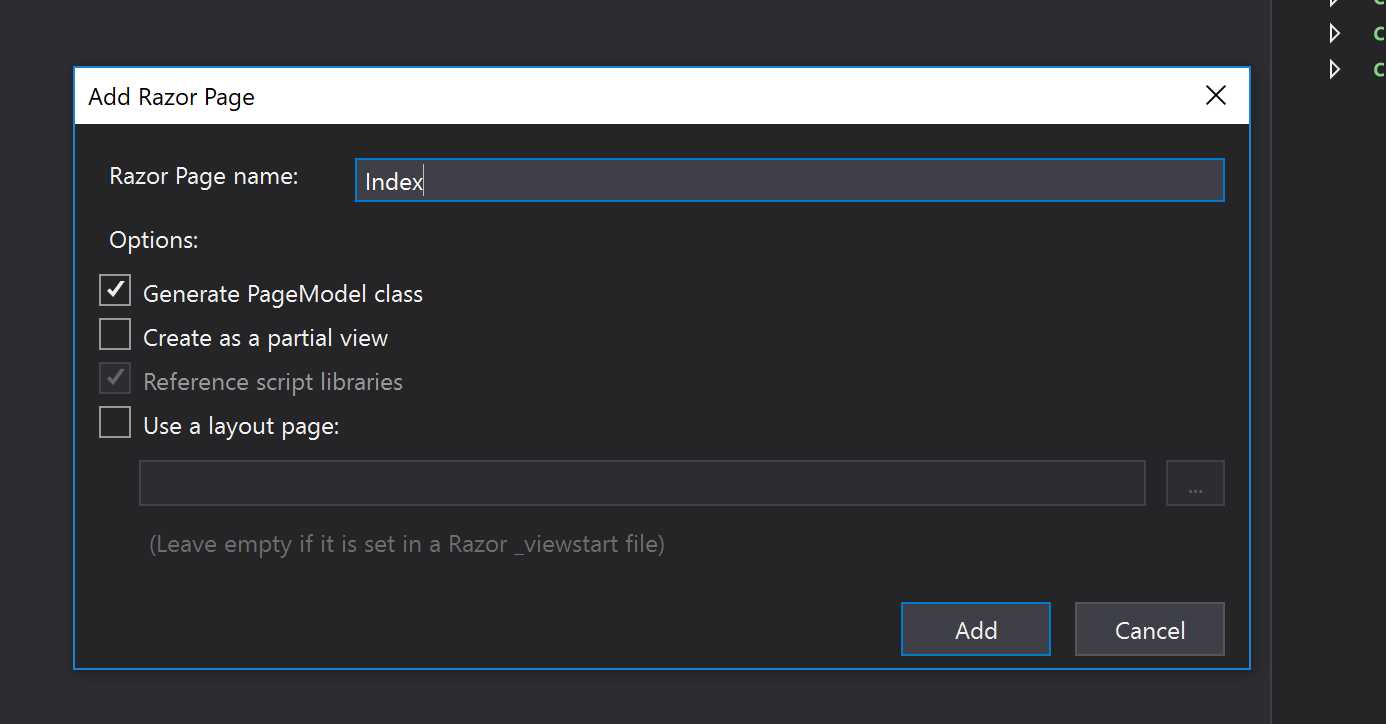
Figure 5-21: Add Razor Page Dialog
After going through these steps, an empty page is created in the Pages folder. If you now run the project, you can see your page in the browser. The Index page shows up by default; otherwise, you have to write the name of your page without the extension in the URL http://localhost:5000/myRazorPage.
Before going on and creating something more useful than a blank page, go back to the Solution Explorer and take a look at the file called Index.cshtml.cs.
It is somewhat reminiscent of the code-behind used with Web Forms, but it is not the same. In fact, if you open the .cs file, you don't have all the things you had with Web Forms (Page_Load and so on). This .cshtml.cs file contains the PageModel class.

5-22: PageModel class
If we have to make a comparison, we could say that this file is like a combo between the MVC controller and its model. If you read the MVC part, you surely remember the logic behind the controller, where you create an array of users and return that model to the view. With a Razor page, it’s not much different.
Code Listing 5-30
using Microsoft.AspNetCore.Mvc.RazorPages; namespace Syncfusion.Asp.Net.Core.Succinctly.WebAppStartup.Pages { public class IndexModel: PageModel { public User[] Users {get;set;}
public void OnGet() { Users = new[] { new User() {Id = 1, Firstname = "Ugo", Lastname = "Lattanzi", Twitter = "@imperugo"}, new User() {Id = 2, Firstname = "Simone", Lastname = "Chiaretta", Twitter = "@simonech"}, };; } } } |
Now go back a few pages and compare it to the code in Code Listing 5-6; you will notice a few changes. The code is inside an OnGet method, while with MVC it is implemented in the Index action method of the HomeController. Also, the Index method had the attribute [HttpGet] to indicate which action has to be executed for an HTTP GET verb. As you can imagine, with Razor Pages, the name of the method serves the same function as the attribute used with ASP.NET MVC. The OnGet method is executed for GET requests. If you have to handle POST, the method would be OnPost, and so on for all other verbs.
So, the name of the method changes, as well as the way to pass the model to the view. In MVC, you create a ViewModel object and return it with the View method, while with a Razor page, you just assign it to a property of the PageModel.
The Razor markup is exactly the same because the only difference between the two frameworks is how the view is instantiated.
Code Listing 5-31
@page @model Pages.IndexModel @{ Layout = null; } <!DOCTYPE html> <html lang="en"> <head> <meta charset="utf-8"> <title>Hello World</title> </head> <body> <h1>Users</h1> <div> @foreach (var user in Model.Users) { <hr /> <p>Firstname: @user.Firstname</p> <p>Lastname: @user.Lastname</p> <p>Twitter: <a href="http://www.twitter.com/@user.Twitter"> @user.Twitter</a></p> } </div> </body> </html> |
The routing is based on the physical location of the file inside the Pages folder, so it’s slightly different from how it works in ASP.NET MVC.
Table 3: Sample Files and Their URLs
File name and path | Matching URL |
|---|---|
/Pages/Index.cshtml | / or /Index |
/Pages/Contact.cshtml | /Contact |
/Pages/Products/Index.cshtml | /Products or /Products/Index |
/Pages/Info/Contact.cshtml | /Info/Contact |
We can summarize by saying that the folder Pages never appears in the URL, and the structure of the URL is made by the structure of folders and files created inside the Pages folder.
This is only an introduction to Razor Pages, just like it was for ASP.NET MVC. If you want to go more in depth into the topic, you can do so with the official documentation.
Single-page applications
Single-page applications (SPAs) are a very hot topic, and it is now possible to create both Angular-based and React-based applications directly from within Visual Studio, and also from the dotnet CLI.
With Visual Studio you have the option of choosing the template inside the New ASP.NET Core Web Application window, as shown in Figure 5-23.
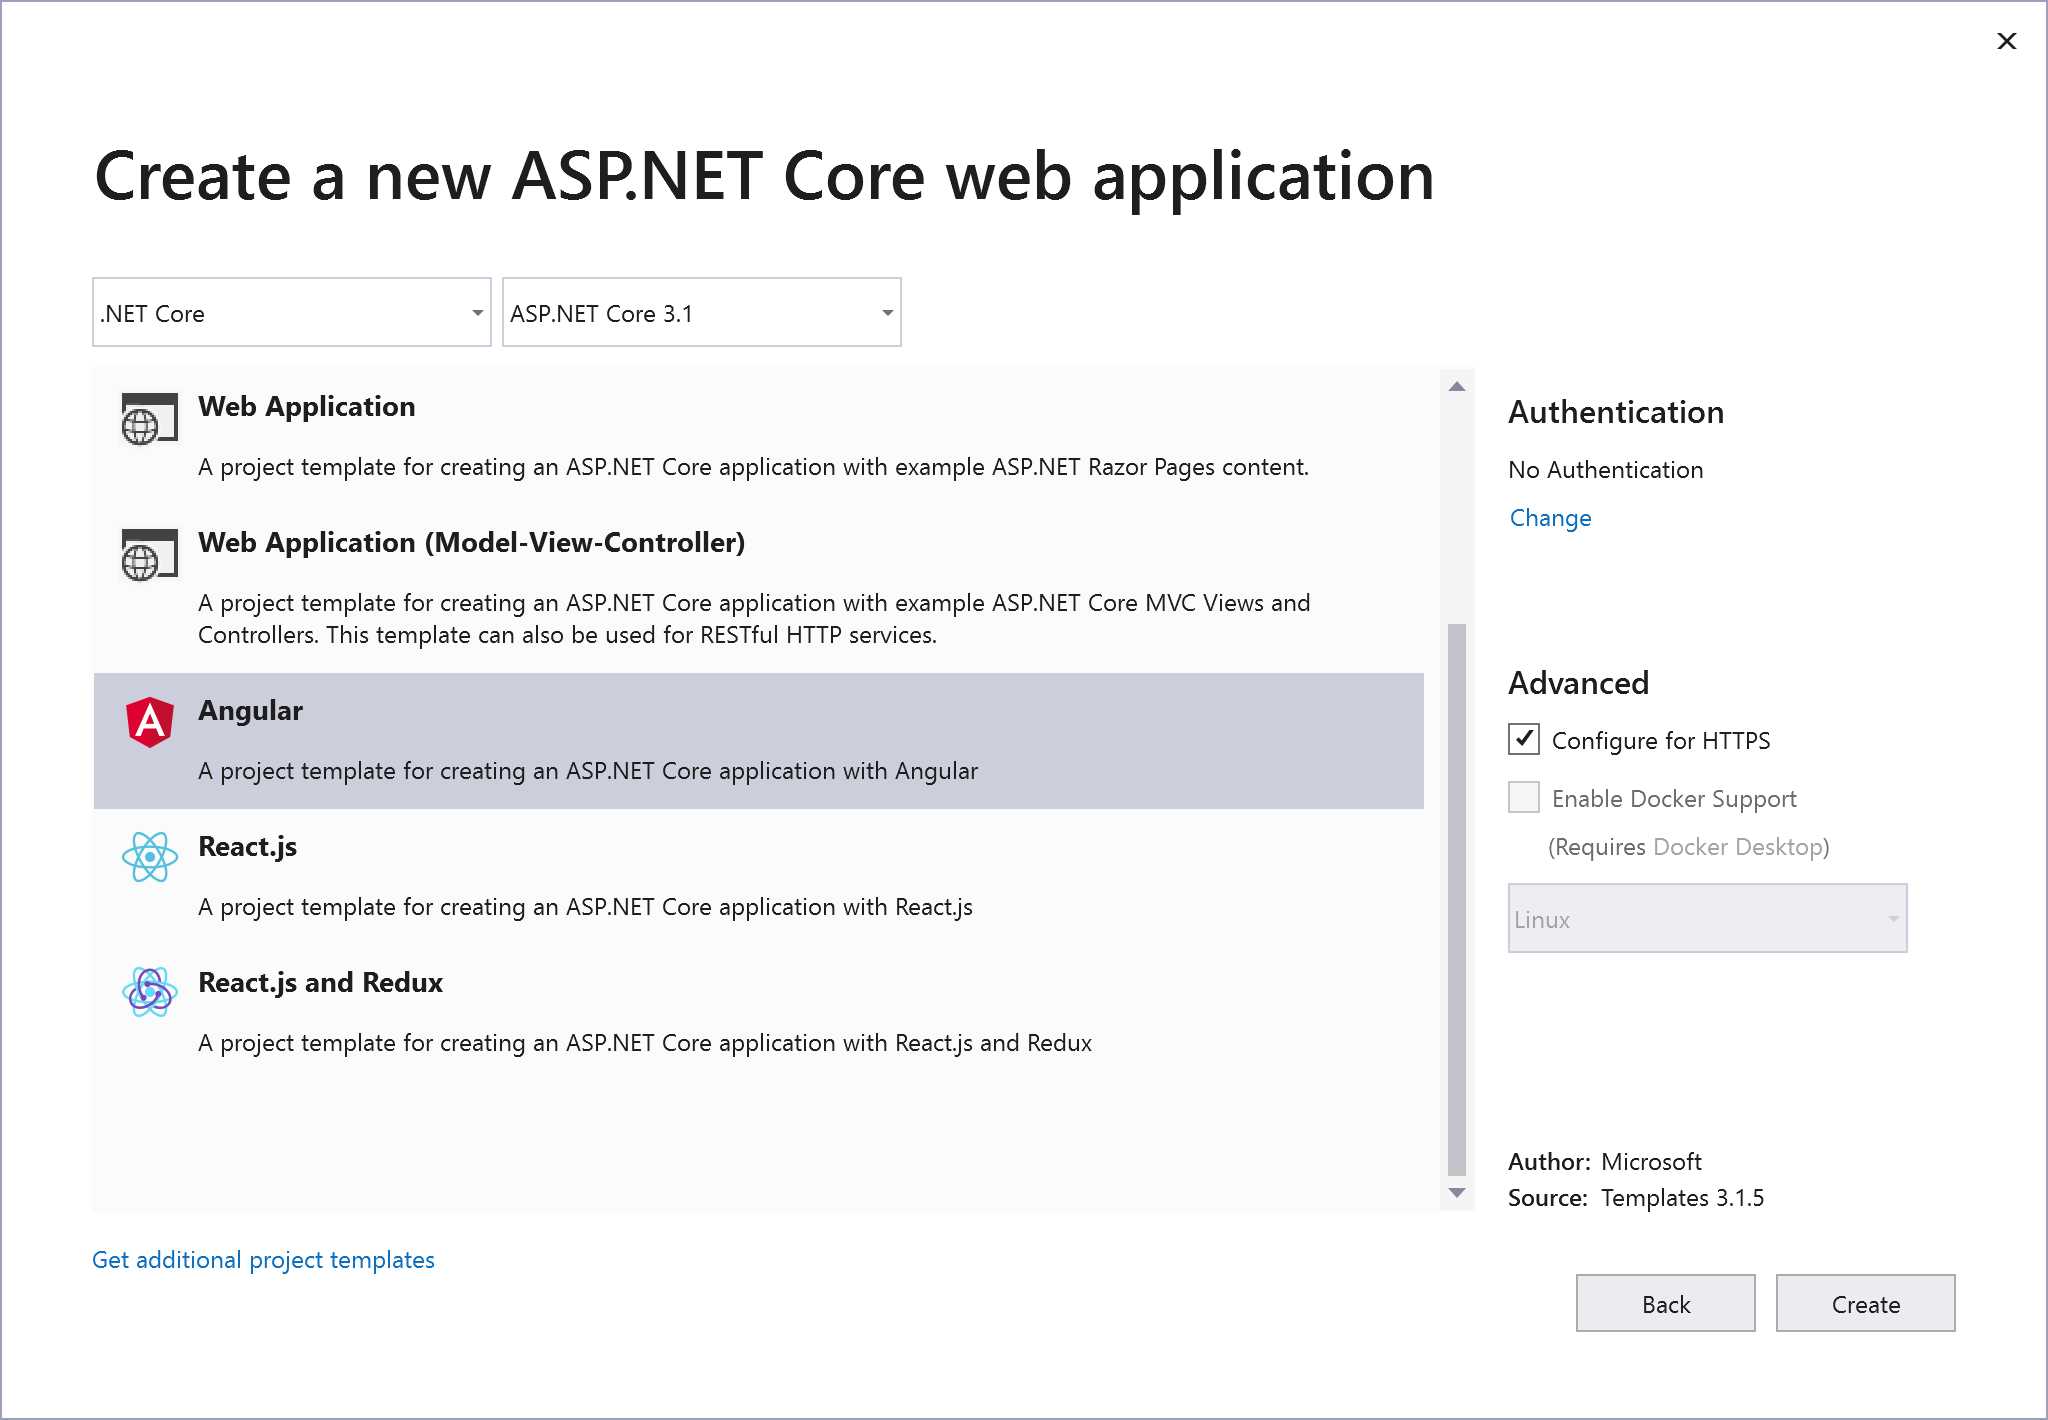
Figure 5-23: New ASP.NET Core Web Application
With the dotnet CLI, you can create an SPA by choosing one of the SPA templates:
- angular
- react
- reactredux
Whichever method of creation you choose, you get an application that uses a feature called JavaScriptServices.
JavaScriptServices
JavaScriptServices is a set of features that helps use client-side technologies within ASP.NET Core applications. For example, it can be used, among other things, to run JavaScript on the server interoperating with Node.js, to automatically build client-side assets using Webpack, and to simplify the usage of various SPA frameworks (like Angular and React).
The Angular application template
By choosing the Angular template, you get a sample application with a few pages, tied together with Angular routing, one of which connects to a Web API. Figure 5-24 shows the structure of the application.
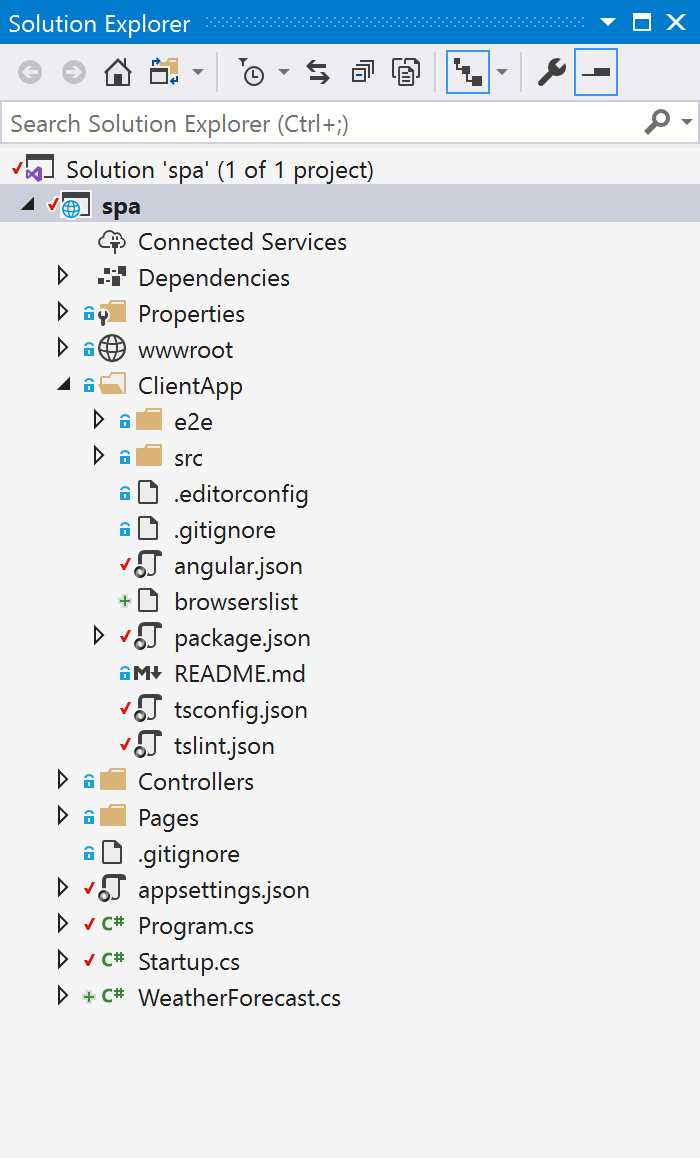
Figure 5-24: SPA with Angular and ASP.NET Core
The ClientApp folder contains the whole Angular application, created using the Angular CLI. This way, you can work on Angular as if you were using a normal client-only Angular application, even without using Visual Studio. And if you are used to building Angular applications using the CLI, you can still do it. In debug mode, the application is even served using the ng serve command of the Angular CLI, so that changes to the Angular files are automatically processed and updated on the client application.
The Controllers folder contains the controllers, like any other Web API application.
The Pages folder contains the few server-side pages that might be needed, like, in the sample, the Error page. They are just Razor Pages because such a simple page doesn’t require the full MVC structure to be created.
With the structure set up like this, now you can start easily developing your SPA, as the ASP.NET part is just like any other ASP.NET Web API.
SignalR
Sitting next to SPAs, there is another class of applications, called real-time applications, where data is pushed from the server to the browser without any operation performed by the user.
This kind of interaction is possible thanks to a feature of HTML5, implemented nowadays in all modern browsers, called a WebSocket, which allows a full duplex connection between server and client.
ASP.NET Core has a framework that helps you build these kinds of applications in an easy and reliable way. This framework is called SignalR Core. Unfortunately, real-time applications are pretty complicated, and even a simple introduction would fill half of this book. However, you can find more information on SignalR in the official ASP.NET Core documentation.
Blazor server and Razor components
With .NET 3.x, Microsoft released a new framework for developing client-side interaction directly in C# and .NET Core, without the need to know JavaScript. This new framework is called Blazor.
Blazor can run directly in the browser, thanks to the fairly new web standard called WebAssembly, and can also run on the server.
Yes, you read correctly: Blazor allows you to write an application in C# with .NET Core that, while running on the server, can interact with the browser like any SPA can do.
But it is not as crazy as it sounds. It is actually a pretty clever solution.
Blazor server hosting
Before explaining how the Blazor server works, it is important to understand how all client-side, JavaScript component-based frameworks, like Angular or React, work.
The components are rendered into an in-memory representation of the browser’s DOM (document object model), called the render tree. Whenever something changes in the application, like a button is pressed or some new data arrives, this in-memory representation changes. It is compared against the current document model by a rendering engine, which updates only the parts of the tree that have actually changed. This is done to make the update faster and keep the UI responsive. As you can see, there are two subprocesses in these client-side frameworks: one that takes care of updating the components (the actual application), and one that works behind the scenes and just updates the UI.
Blazor took this concept and enhanced it by splitting the rendering engine into two additional parts: one that takes care of creating the rendering tree and computing which parts have to be updated, and one that applies these changes to the DOM.
In the client version of Blazor, both parts of the rendering engine are part of the .NET Core-based Blazor runtime running inside the WebAssembly, effectively behaving like the other JavaScript libraries.
In the server version, the part of the rendering engine that computes the tree and its changes runs in .NET Core, on the server. The changes are pushed to a small JavaScript library running inside the browser, whose role is just updating the DOM based on the information it receives from the server, via SignalR. And this same channel is also used by the client to pump the events (button clicked, text changed, and so on) to the server.
This separation is what makes it possible to write a Blazor application and later decide to move it between client and server.
Blazor server app
Now that you have a basic understanding of how Blazor works, let’s explore how a Blazor server application is made by creating it with Visual Studio.
Blazor is a very wide topic, and as done for SignalR, the next section is just a basic introduction. If you are interested and want to learn more, I recommend you read the book Blazor Succinctly, also published by Syncfusion.
Blazor applications can be created both using Visual Studio and via the dotnet CLI. In Visual Studio, you start from the New Project menu item. Unlike all the other projects in this book that started from the ASP.NET Core Web Application template, for Blazor you need to select the specific Blazor App template.

Figure 5-25: New Project Dialog
Once you’ve specified name and location for the new app, you have to choose between client and server app.
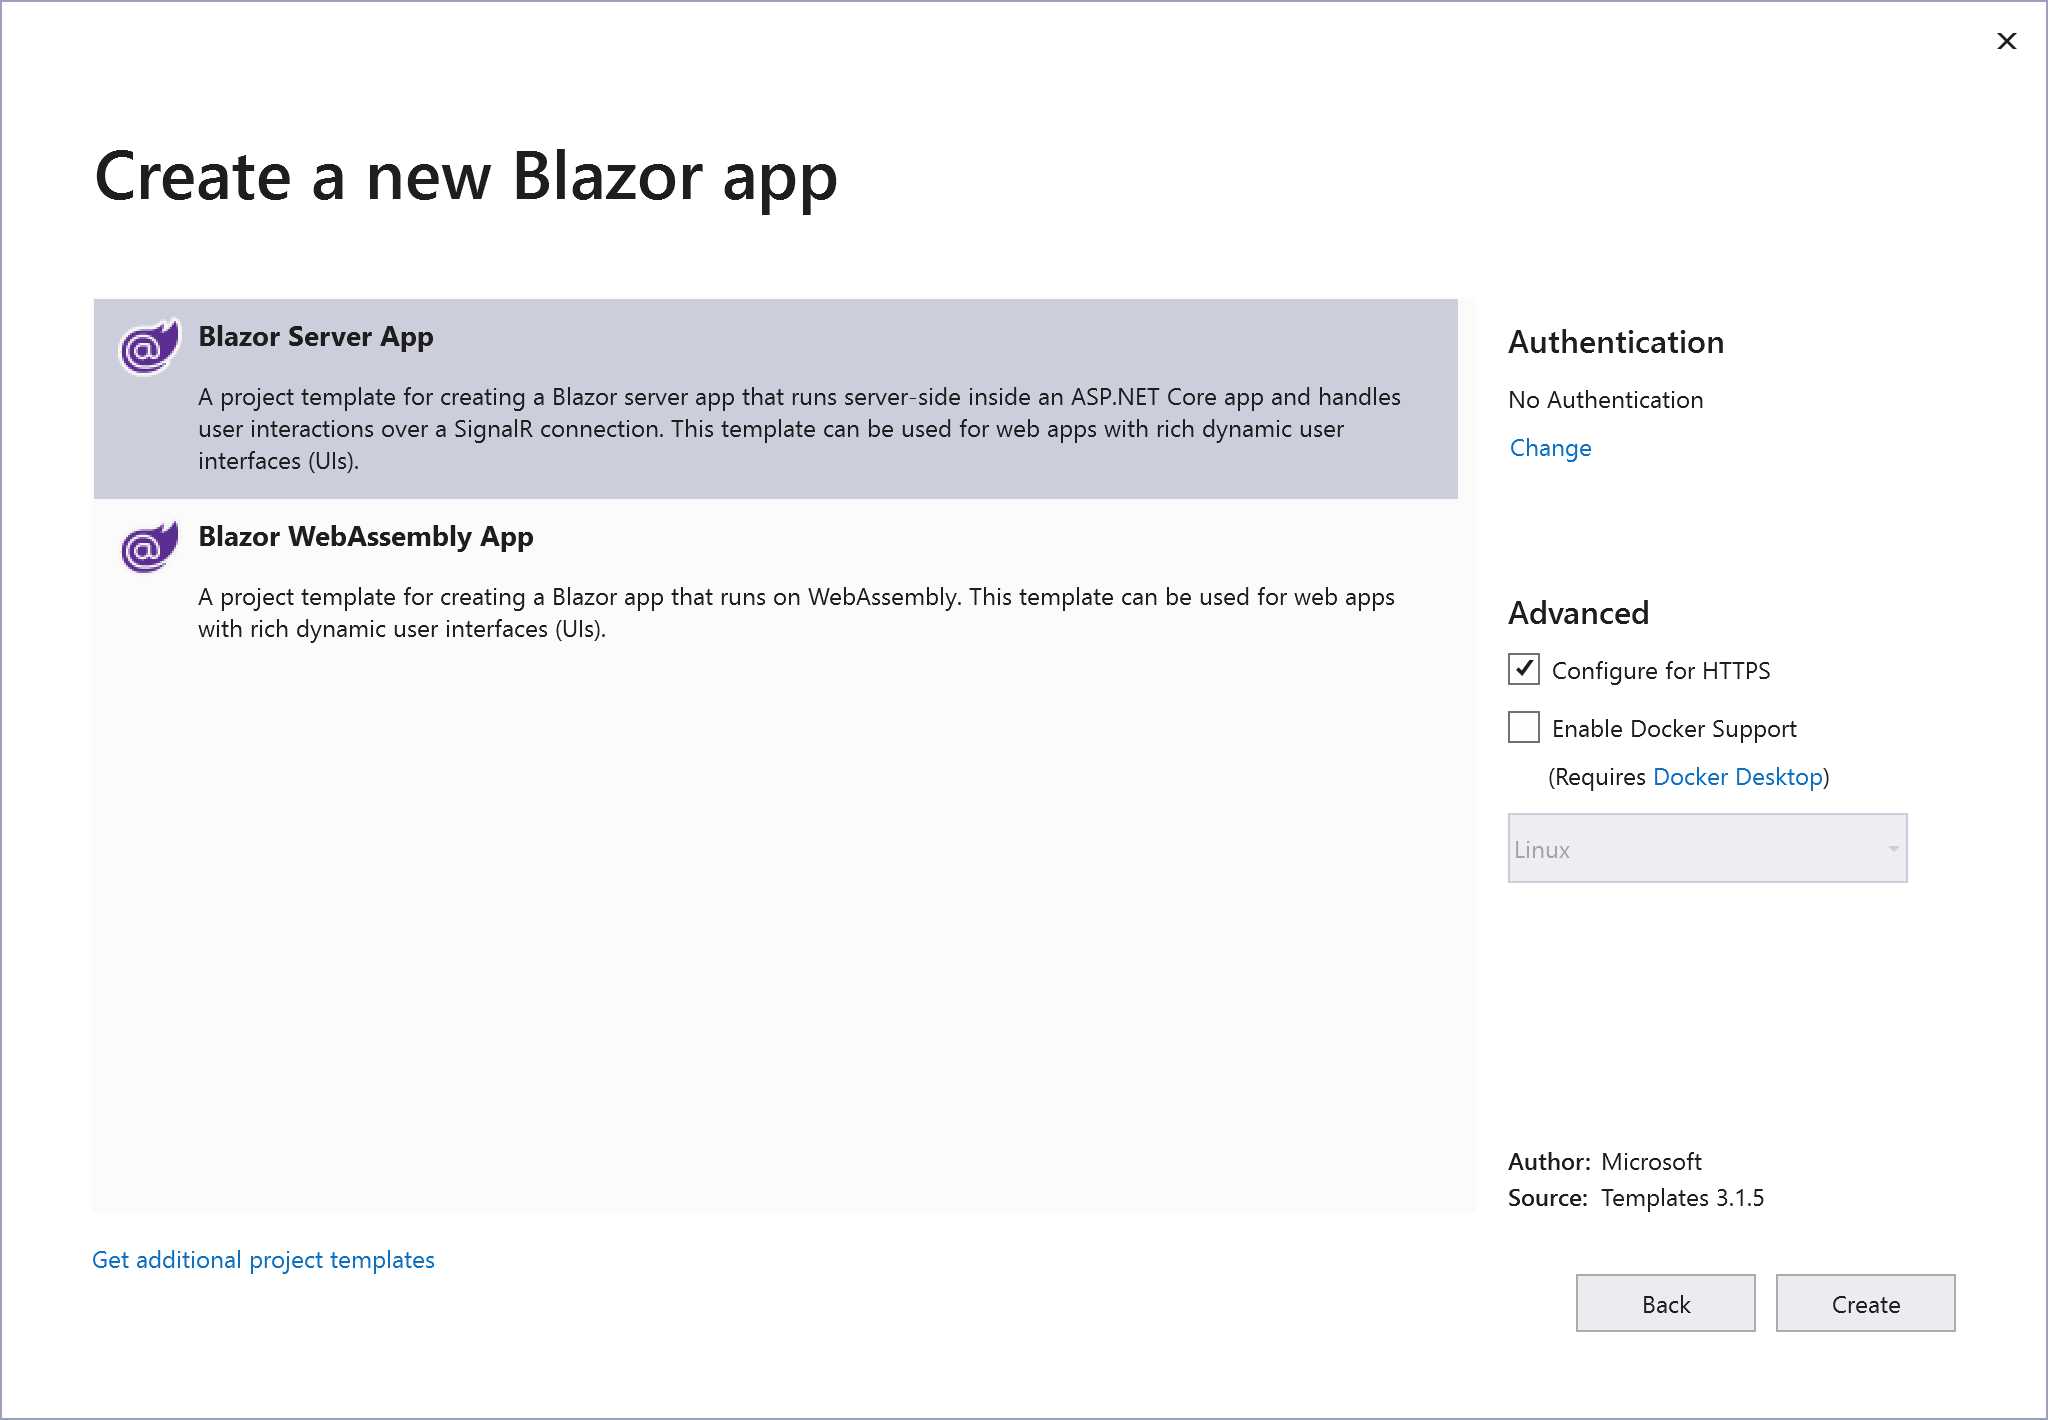
Figure 5-26: New Blazor Template Dialog
The project generated from the template is similar to the one of the Angular template: a simple SPA with navigation, a simple counter, and a fake weather information page.
The structure of the project is also similar.
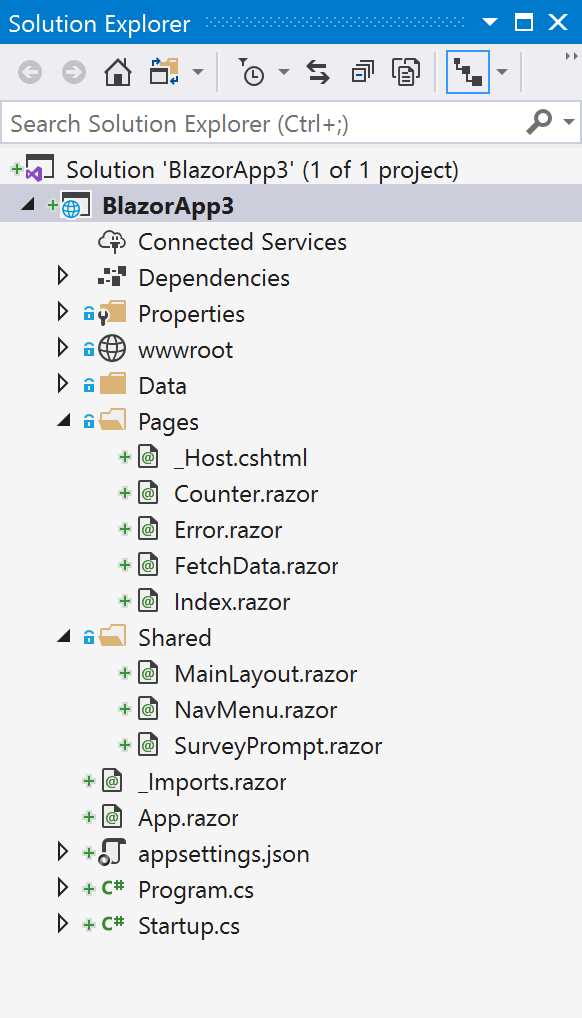
Figure 5-27: Blazor App Project Structure
Let’s explore each of the elements of the application.
The first step is to instruct the runtime that this is a Blazor app. This is done by adding a few lines of code in the Startup class.
First, add the Blazor service in the ConfigureServices method and then configure the SignalR Hub used by Blazor to communicate with the client. This is inside the endpoint configuration lambda in the Configure method.
Code Listing 5-32
public void ConfigureServices(IServiceCollection services) { services.AddRazorPages(); services.AddServerSideBlazor(); } public void Configure(IApplicationBuilder app, IWebHostEnvironment env) { ... app.UseEndpoints(endpoints => { endpoints.MapBlazorHub(); endpoints.MapFallbackToPage("/_Host"); }); } |
The next step is specifying inside the _Host.cshtml file, the name of the Razor application to execute.
Code Listing 5-334
<app> <component type="typeof(App)" render-mode="ServerPrerendered" /> </app> |
This instructs the runtime to execute the root component called App. It is defined in the App.razor file. Notice the .razor extension: this is what defines our Razor component.
Code Listing 5-34
<Router AppAssembly="@typeof(Program).Assembly"> <Found Context="routeData"> <RouteView RouteData="@routeData" DefaultLayout="@typeof(MainLayout)" /> </Found> <NotFound> <LayoutView Layout="@typeof(MainLayout)"> <p>Sorry, there's nothing at this address.</p> </LayoutView> </NotFound> </Router> |
The root component defines, among other things, the routing of the application and the default master layout view used by all components that do not define one explicitly.
As soon as the application is requested via the browser, the Index component gets rendered, inside the default layout.
Code Listing 5-35
@page "/" <h1>Hello, world!</h1> Welcome to your new app. <SurveyPrompt Title="How is Blazor working for you?" /> |
The first line is what defines the route to which the component responds, in this case /.
You’ll also notice, at the bottom of the file, that the component includes another component, called SurveyPrompt, with a Title parameter.
Razor component
After the overview of the sample application provided by Visual Studio, let’s see in detail how a Razor component is done.
Razor components are very similar to the Razor views used in ASP.NET MVC or Razor Pages, and they obviously use the Razor syntax. In addition, they can also contain a @code block that can contain fields, properties (used as input parameter), and functions (that also act as event handlers).
The following example is an enhanced version of the counter component, where the increment can be passed as parameter and the initial value is a random number.
To create the Razor component, use the Add > Razor Component menu item, as shown in Figure 5-28.
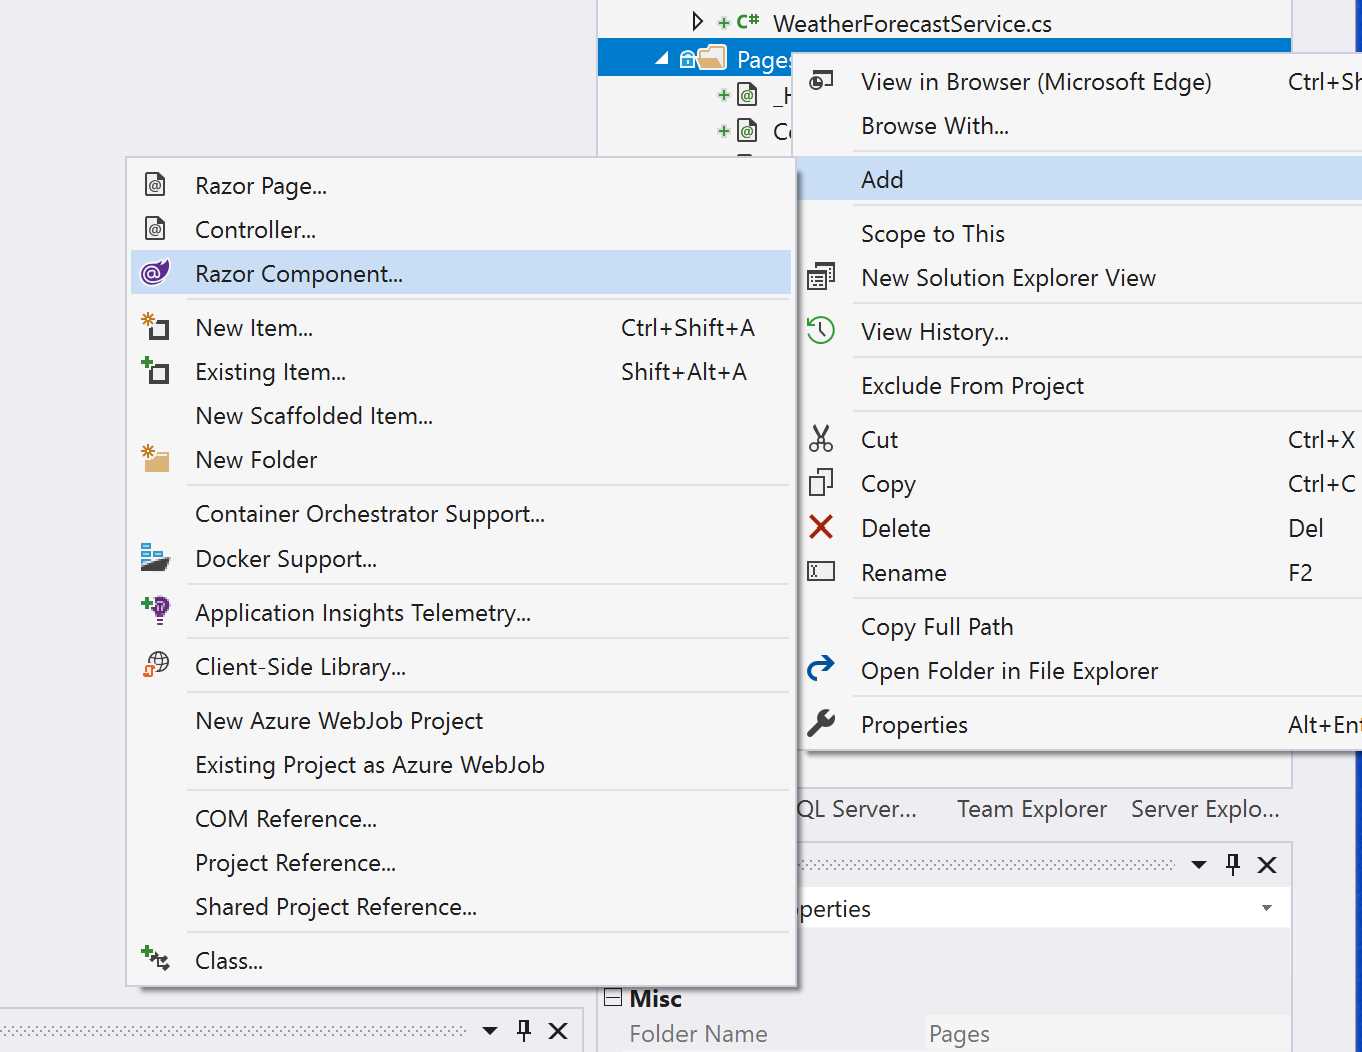
Figure 5-28: New Razor Component
The following listing shows the complete code of the component.
Code Listing 5-36
@using System.Security.Cryptography <h1>Counter</h1> <p>Current count: @currentCount</p> <button class="btn btn-primary" @onclick="IncrementCount">Click me</button> @code { private int currentCount = 0; private void IncrementCount() { currentCount += IncrementAmount; } protected override void OnInitialized() { currentCount = RandomNumberGenerator.GetInt32(0, 10); } [Parameter] public int IncrementAmount { get; set; } = 1; } |
From top to bottom, we can see:
- @using: Define the using statement, like any Razor-based file.
- @onclick=”IncrementCount”: This registers the function IncrementCount as handler for the onclick event.
- IncrementCount: The event handler that was registered previously.
- OnInitialized: The event handler for one of the application lifecycle events.
- [Parameter]: Defines a parameter that can be passed when the component is included in the parent.
Finally, you can include this component in any page by simply using its file name.
Code Listing 5-37
<RandomCounter IncrementAmount="3" /> |
Now, browsing to the app, the counter will start from a random value between 0 and 10, and every time you click the button, it will increment the value by 3.
Worker service
All the projects created so far are responding to user interaction and work only when someone requests them. With ASP.NET Core, you can also create background tasks that run indefinitely by implementing a hosted service.
At its core, a worker service is simply a class that implements IHostedService interface, with just two methods: StartAsync, which is used to start the background task; and StopAsync, to gracefully terminate and dispose of all resources in case of a normal termination of the process.
To simplify the most common start and stop behavior, the framework provides the BackgroundService base class. This class only has one method to override, ExecuteAsync, which should contain a never-ending loop with the task to execute and a call to an async method (like IO operations or simply a delay) to allow other services to run.
A service worker application can be created, as usual, both via a project template in Visual Studio and via the dotnet CLI.
In Visual Studio, you have to look for the Worker Service project template, and with the dotnet CLI, you need to run dotnet new worker.
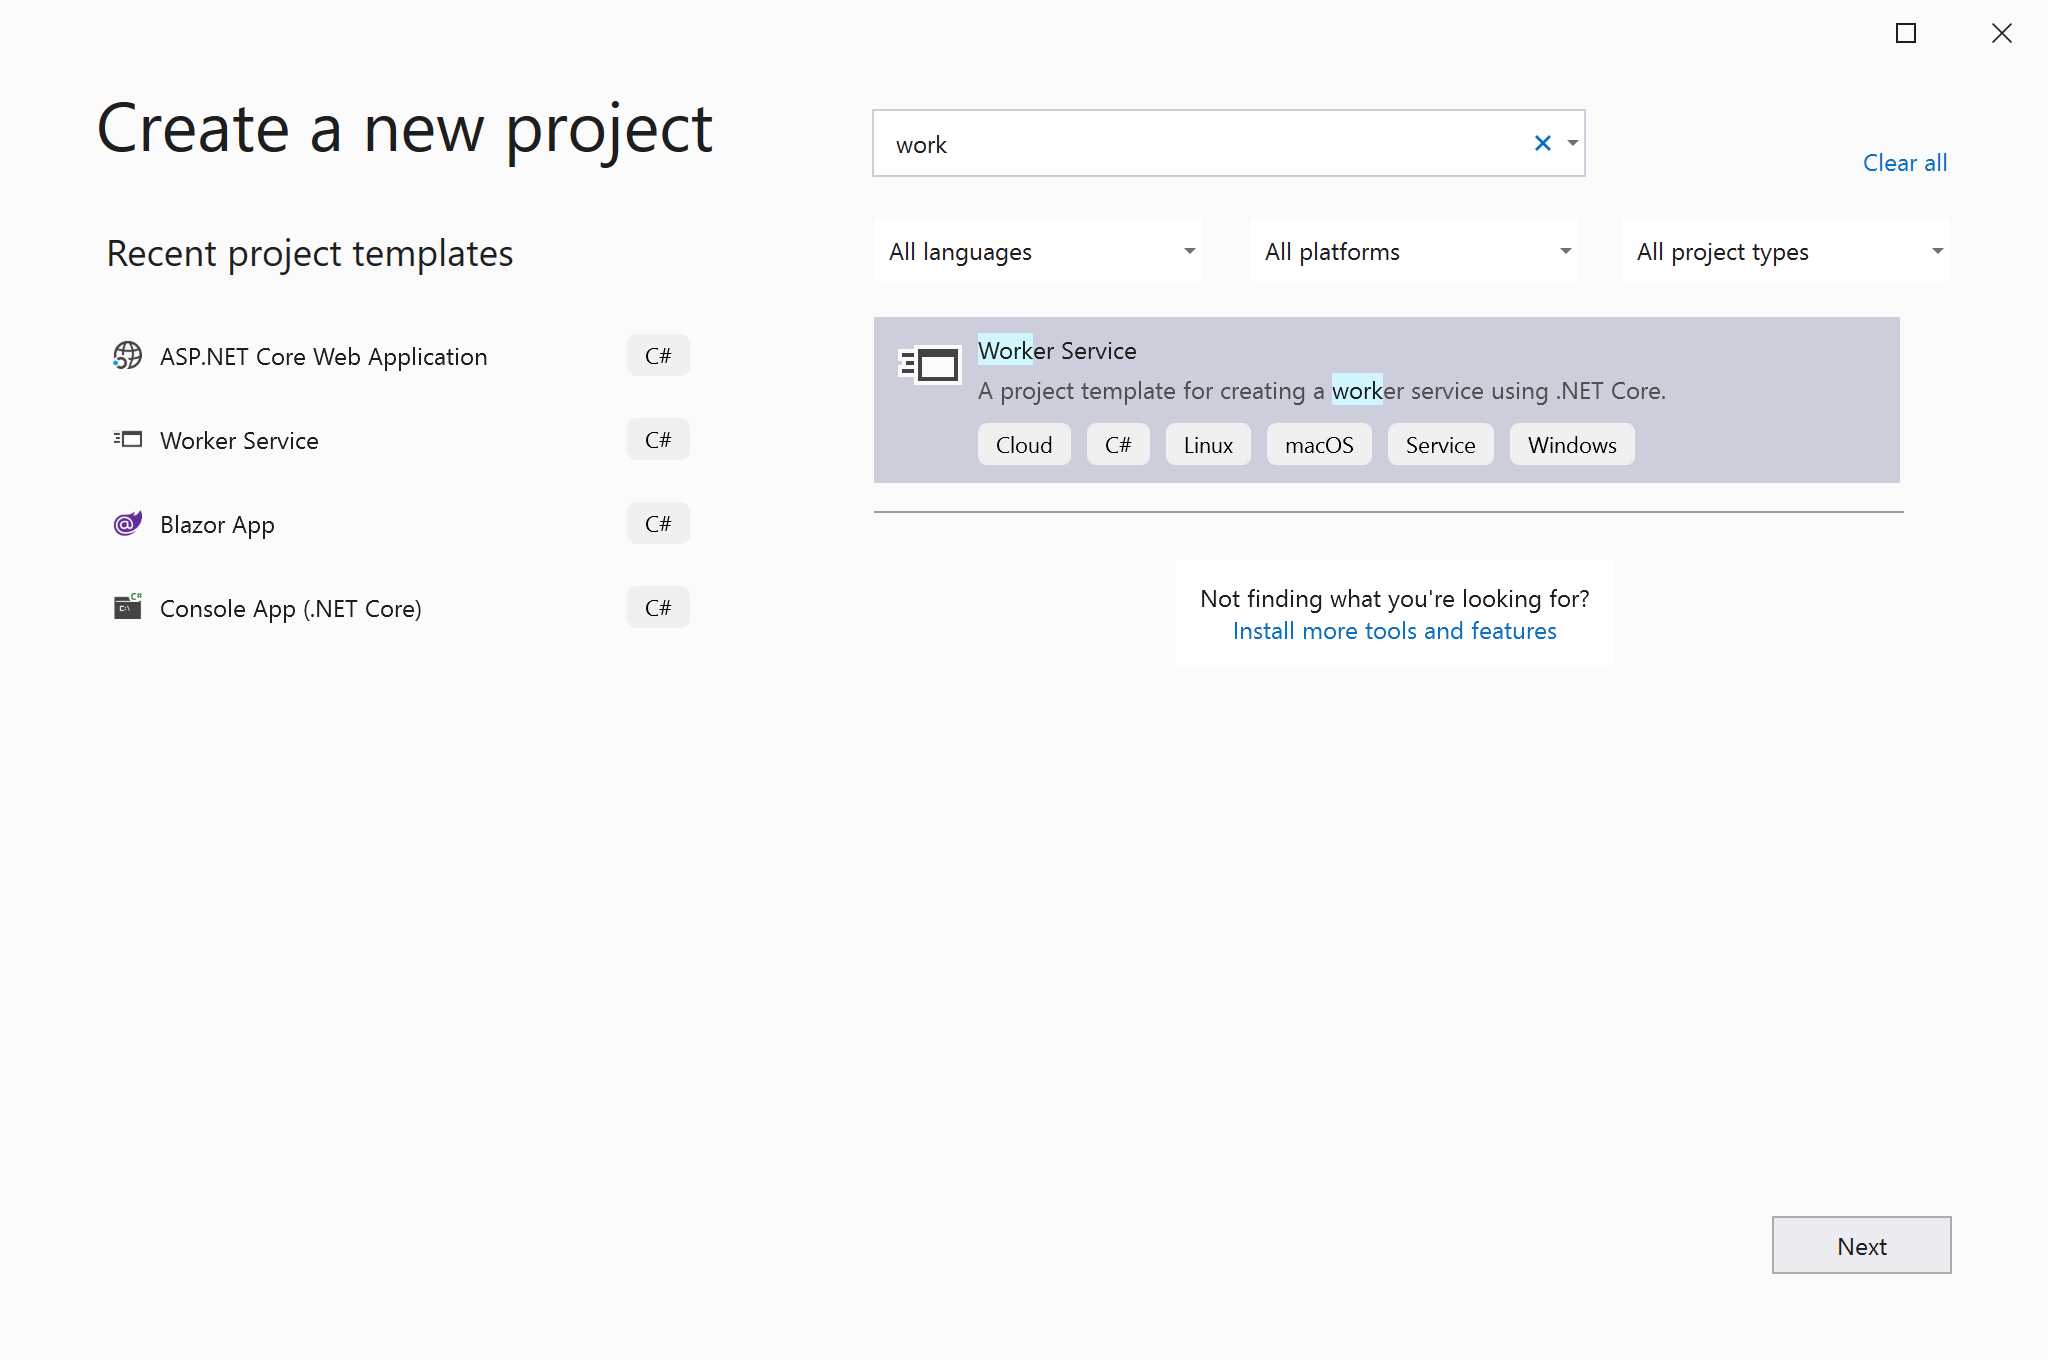
Figure 5-29: Worker Service Project Template
Once its created, the project contains just two files, and, unlike all other web projects, which are based on the Microsoft.NET.Sdk.Web SDK, it is based on Microsoft.NET.Sdk.Worker, which has a reduced footprint.
The first file is Program.cs, which contains the registration of the hosted service.
Code Listing 5-38
public static IHostBuilder CreateHostBuilder(string[] args) => Host.CreateDefaultBuilder(args) .ConfigureServices((hostContext, services) => { services.AddHostedService<Worker>(); }); |
The second file, Worker.cs, contains a background service implement using the BackgroundService base class.
Code Listing 5-39
public class Worker : BackgroundService { private readonly ILogger<Worker> _logger; public Worker(ILogger<Worker> logger) { _logger = logger; } protected override async Task ExecuteAsync(CancellationToken stoppingToken) { while (!stoppingToken.IsCancellationRequested) { _logger.LogInformation("Worker running at: {time}", DateTimeOffset.Now); await Task.Delay(1000, stoppingToken); } } } |
The whole logic is implemented in the ExecuteAsync method inside an infinite loop that is only terminated when a cancellation is requested. In addition, if you look at the constructor, you can see that DI is used also with this type of service.
You can also use a service worker inside a normal web application. Nothing changes in the way you develop either application. The only additional step is to register the hosted service inside the ConfigureServices method in the Startup class of the web application, after having registered your controllers and other services.
Code Listing 5-40
public void ConfigureServices(IServiceCollection services) { services.AddControllers(); services.AddHostedService<Worker>(); } |
Conclusion
ASP.NET Core comes with a rewritten MVC framework, improved from the previous version and aimed at being the unified programming model for any kind of web-based interaction.
You’ve seen the cool new features introduced for simplifying the development of views. This is the last chapter that explains coding. The next two chapters are more about tooling and will demonstrate how to deploy apps and develop on Mac without Visual Studio.
- 80+ high-performance ASP.NET Core controls, including DataGrid, Charts, and Scheduler.
- Lightweight and responsive.
- Modular and touch-friendly.
- Built-in themes.