
ASP.NET Core 3.1 Succinctly®

CHAPTER 4
ASP.NET Core Basics
In this chapter, you are going to learn about the main innovations of the latest version of ASP.NET that have dramatically changed from the versions based on ASP.NET 4 and ASP.NET Core 2.x.
In particular, you are going to see why ASP.NET Core is defined as a lean framework, and how to manage static files, different hosting environments, exceptions, dependency injection, and all the other significant features of the latest release.
Web App startup
You can better understand how to use .NET Core by first creating a new empty application with Visual Studio 2019. If you prefer the lightweight Visual Studio Code instead of Visual Studio, you must use the command line to create an empty template. When creating a new ASP.NET Core template from Visual Studio, you have different options. To better understand the flow and all the components you need for a web application, the empty template is the best choice.
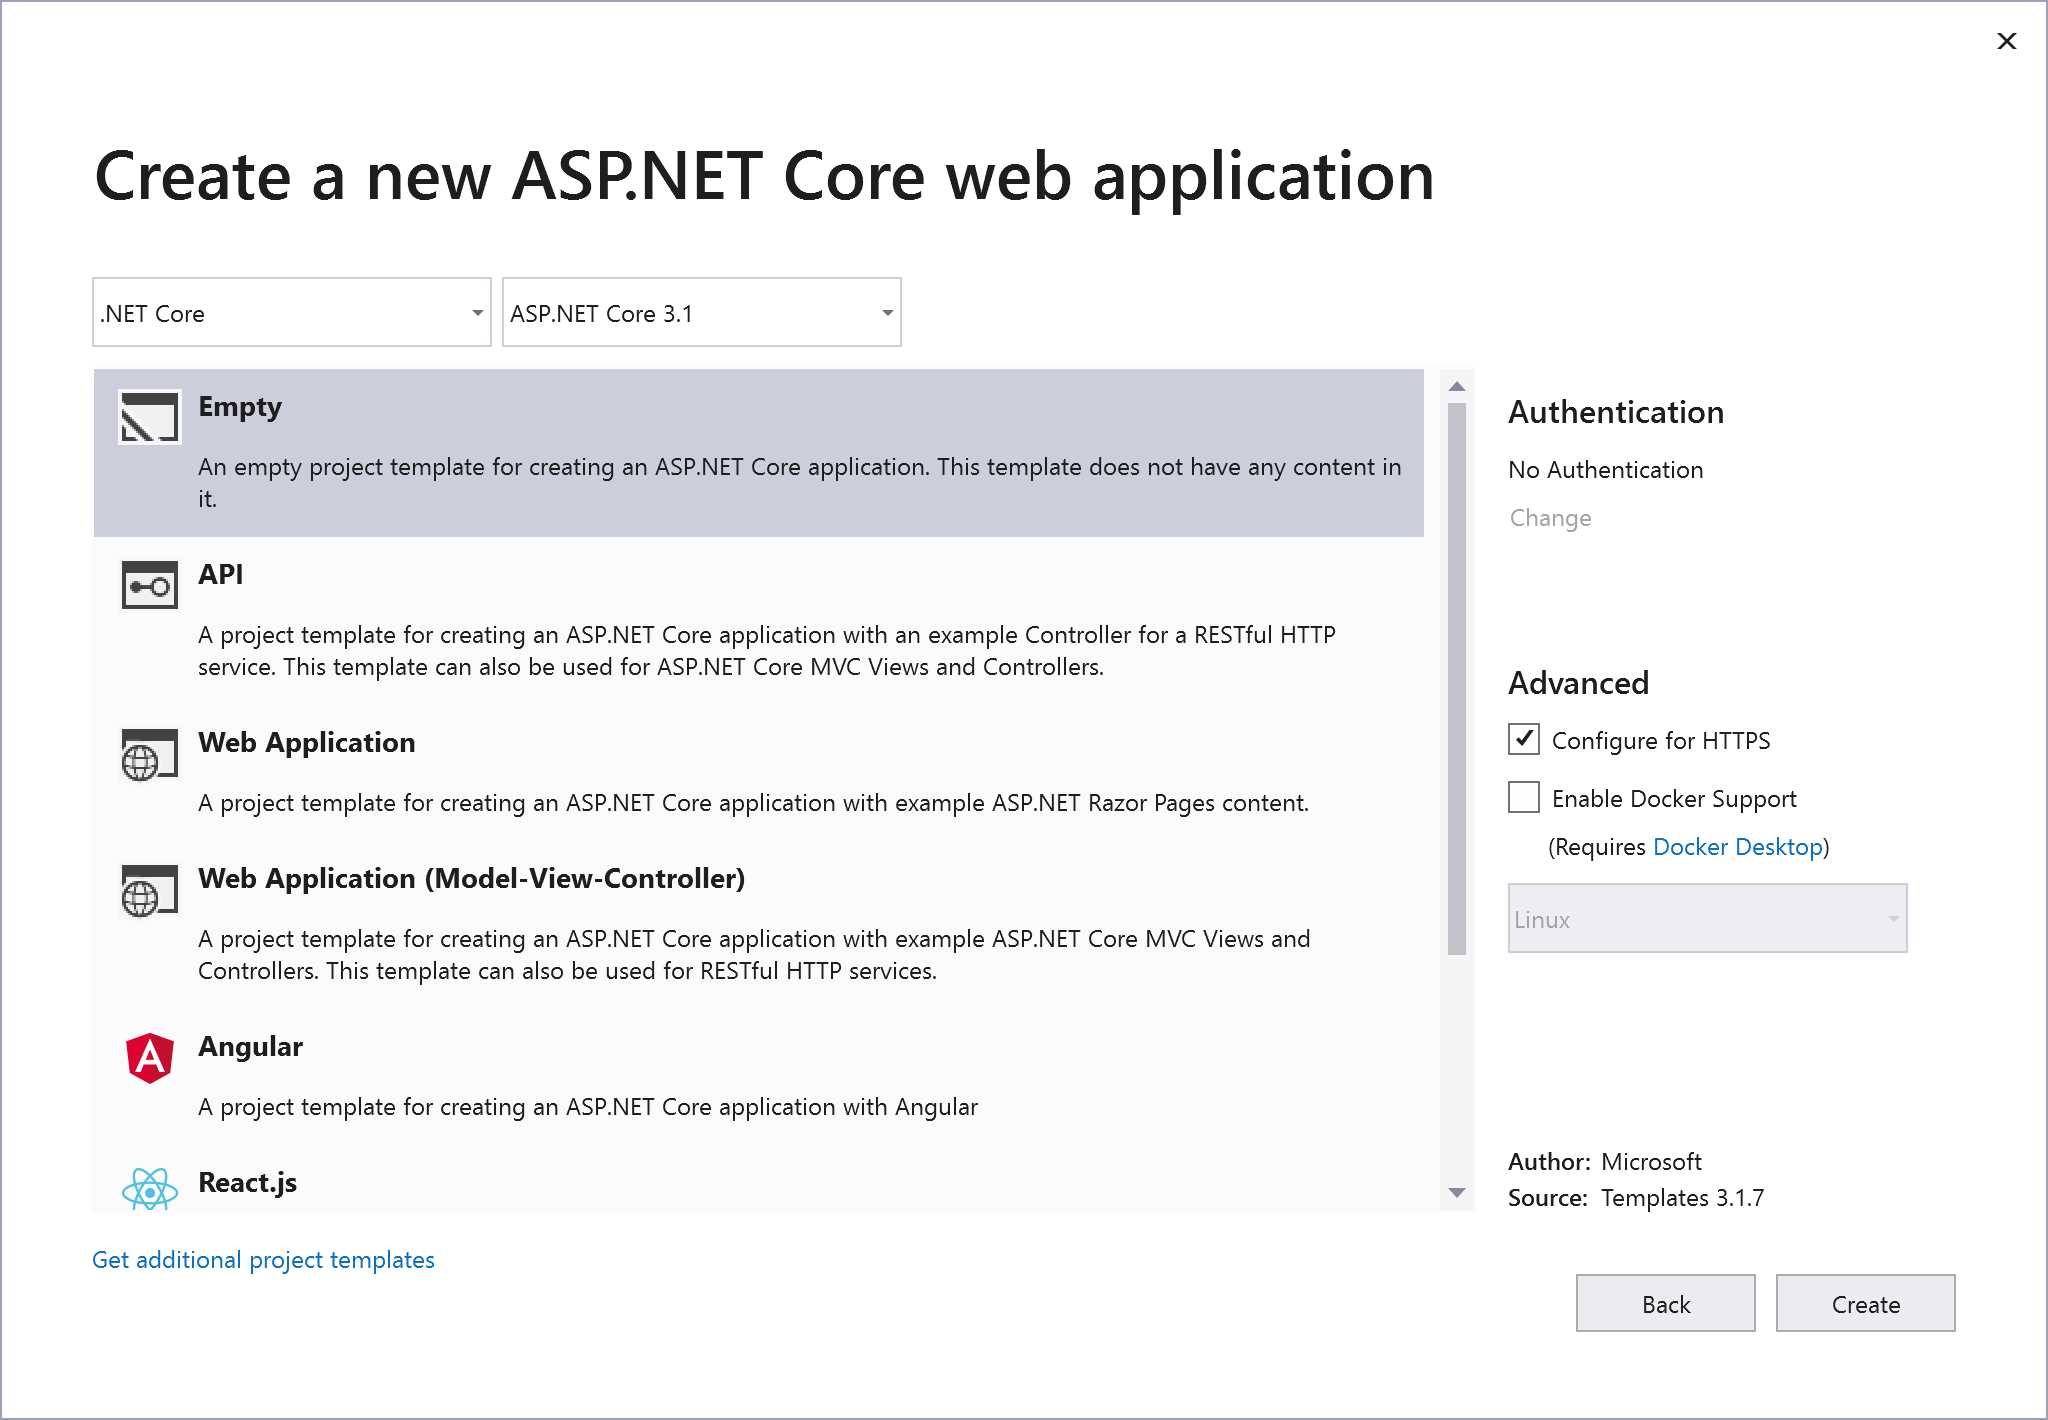
Figure 4-1: New Web Application Using Visual Studio 2019
Looking at the Solution Explorer, notice that the folder structure and files are very different from the previous version of ASP.NET. First of all, there is a wwwroot folder that contains all the static files. In a different section, we will explain how to use the wwwroot folder and the reason why you need it.
All files in the root of the project are either new additions or they changed their role:
- Program.cs is the entry point for the web application; everything starts from here. As we mentioned in the previous chapters, the .NET Core host can only run console applications. So, the web app is a console application, too.
- project.csproj, where project is the name you provided in the creation wizard, is an XML-based project configuration file. It contains all our package references and some build configuration.
- Startup.cs is not exactly new. If you already used OWIN, you probably know the role of this class, but we can definitely say if the Program.cs is the entry point of the .NET Core app, Startup.cs is the entry point of the ASP.NET Core application (previously we were using the global.asax file).
The project.csproj file is not visible in the Visual Studio Solution Explorer window, but you can easily see what’s inside by right-clicking on the project and selecting Edit project.csproj.
Program.cs
As mentioned before, this class is the entry point of the .NET Core application, and its role is to create the host for the web application. Since we can host our web application on different web servers with .NET Core, this is the right place to configure everything.
Code Listing 4-1
using System; using System.Collections.Generic; using System.IO; using System.Linq; using System.Threading.Tasks; using Microsoft.AspNetCore; using Microsoft.AspNetCore.Hosting; using Microsoft.Extensions.Configuration; using Microsoft.Extensions.Logging; namespace Syncfusion.Asp.Net.Core.Succinctly.WebAppStartup { public class Program { public static void Main(string[] args) { CreateHostBuilder(args).Build().Run(); } public static IHostBuilder CreateHostBuilder(string[] args) => Host.CreateDefaultBuilder(args) .ConfigureWebHostDefaults(webBuilder => { webBuilder.UseStartup<Startup>(); }); }} |
As you can see, this class is simple, as the only important method is CreateDefaultBuilder, which configures all the needed services for you.
If you are already using previous versions of ASP.NET Core (or you read the previous edition of this book), you’ll notice that this class has changed significantly. Especially from v2 to v3, the WebHostBuilder has been deprecated in favor of the more generic HostBuilder.
Startup.cs
The ASP.NET Core pipeline starts here and, as you can see from the following code, almost nothing comes with the template.
Code Listing 4-2
using System; using System.Collections.Generic; using System.Linq; using System.Threading.Tasks; using Microsoft.AspNetCore.Builder; using Microsoft.AspNetCore.Hosting; using Microsoft.AspNetCore.Http; using Microsoft.Extensions.DependencyInjection; namespace Syncfusion.Asp.Net.Core.Succinctly.WebAppStartup { public class Startup { // This method gets called by the runtime. Use this method to add services to the container. // For more information on how to configure your application, visit https://go.microsoft.com/fwlink/?LinkID=398940 public void ConfigureServices(IServiceCollection services) { } // This method gets called by the runtime. Use this method to configure the HTTP request pipeline. public void Configure(IApplicationBuilder app, IWebHostEnvironment env) { if (env.IsDevelopment()) { app.UseDeveloperExceptionPage(); } app.UseRouting(); app.UseEndpoints(endpoints => { endpoints.MapGet("/", async context => { await context.Response.WriteAsync("Hello World!"); }); }); } } } |
What’s important here are the methods ConfigureServices, where dependency injection is configured (we’ll talk about this later in the chapter), and Configure, where all needed middleware components are registered and configured.
Tip: We already wrote a book about OWIN, so if you don't know what a middleware component is or how to use it, we suggest you read the free book OWIN Succinctly, available from Syncfusion.
The last lines of the listing are registering a request delegate (responding with the text string Hello World!) for a GET request on the root of the site (/). This is done via the endpoint routing middleware.
Dependency injection
One of the biggest new features of ASP.NET Core is the inclusion of a way to handle dependencies directly inside the base library. This has three major benefits:
- Developers no longer have an excuse not to use it, whereas before it was basically left to their judgment.
- You don't need to use third-party libraries.
- All the application frameworks and middleware components rely on this central configuration, so there is no need to configure dependency injection in different places and different ways, as was needed before.
What is dependency injection?
Before looking at how to use dependency injection inside ASP.NET Core applications, let's see what it is and why it is important.
In order to be easy to maintain, systems are usually made of many classes, each of them with very specific responsibilities. For example, if you want to build a system that sends emails, you might have the main entry point of the system, one class that is responsible for formatting text, and another that is responsible for actually sending the email.
The problem with this approach is that if references to these additional classes are kept directly inside the entry point, it becomes impossible to change the implementation of the helper class without touching the main class.
This is where dependency injection, usually referred to as DI, comes into play. Instead of directly instantiating the lower-level classes, the high-level modules receive the instances from the outside, typically as parameters of their constructors.
Described more formally by Robert C. “Uncle Bob” Martin, systems built this way adhere to one of the five SOLID principles, the dependency inversion principle:
- High-level modules should not depend on low-level modules. Both should depend on abstractions.
- Abstractions should not depend on details. Details should depend on abstractions.
While manually creating and injecting objects can work in small systems, those objects can become unmanageable when systems grow in size and hundreds or thousands of classes are needed. To solve this problem, another class is required: a factory that takes over the creation of all objects in the system, injecting the right dependencies. This class is called the container.
The container, called an Inversion of Control (IoC) container, keeps a list of all the interfaces needed and the concrete class that implements them. When asked for an instance of any class, it looks at the dependencies it needs and passes them based on the list it keeps. This way, very complex graphs of objects can be easily created with a few lines of code.
In addition to managing dependencies, these IoC containers also manage the lifetime of the objects they create. They know whether they can reuse an instance or need to create a new one.
This is a very short introduction to a very important and complicated topic related to the quality of software. Countless articles and books have been written about dependency injection and SOLID principles in general. A good starting point are the articles by Robert C. "Uncle Bob" Martin or Martin Fowler.
Configuring dependency injection in ASP.NET Core
Now that you understand the importance of using DI in applications, you might wonder how to configure them. It is actually easy. It all happens in the ConfigureServices method.
Code Listing 4-2
public void ConfigureServices(IServiceCollection services) { // Here goes the configuration. } |
The parameter that the method accepts is of the type IServiceCollection. This is the list used by the container to keep track of all the dependencies needed by the application, so it is to this collection that you add your classes.
There are two types of dependencies that can be added to the services list.
First, there are the ones needed by the frameworks to work, and they are usually configured using extension methods like AddServiceName. For example, if you want to use ASP.NET Core MVC, you need to write services.AddMvc() so that all the controllers and filters are automatically added to the list. Also, if you want to use Entity Framework, you need to add DBContext with services.AddDbContext<ExampleDbContext>(...).
Then there are the dependencies specific to your application; they must be added individually by specifying the concrete class and the interface it implements. Since you are adding them yourself, you can also specify the lifetime of the service. Three kinds of lifecycles are available in the ASP.NET Core IoC container, and each of them has to be added using a different method.
The first is Transient. This lifecycle is used for lightweight services that do not hold any state and are fast to instantiate. They are added using the method services.AddTransient<IClock,Clock>(), and a new instance of the class is created every time it is needed.
The second lifecycle is Scoped. This is typically used for services that contain a state that is valid only for the current request, like repositories and data access classes. Services registered as scoped will be created at the beginning of the request, and the same instance will be reused every time the class is needed within the same request. They are added using the method services.AddScoped<IRepository, Repository>().
The last lifecycle is called Singleton, and as the name implies, services registered this way will act like singletons. They are created the first time they are needed and are reused throughout the rest of the application. Such services typically hold an application state like an in-memory cache. They are added via the method services.AddSingleton<IApplicationCache, ApplicationCache>().
Using dependency injection
Let's see an example of how DI is used in an ASP.NET MVC application. ASP.NET MVC is covered in detail in a later chapter, so don't worry if something looks unfamiliar—just focus on how dependencies are configured and reused.
To use dependency injection, you need four classes:
- The class that needs to use an external service, also called the consumer class. In our example, it’s an ASP.NET MVC controller.
- The interface that defines what the external service does, which in our example is just giving the time of the day.
- The class that actually implements the interface.
- The Startup.cs file where the configuration will be saved.
The interface
First, you have to define the interface of the service, which is the only thing the consumer depends on.
Code Listing 4-3
public interface IClock { DateTime GetTime(); } |
Concrete implementation
Once the interface is defined, you need to implement the concrete class that does the actual work.
Code Listing 4-4
public class Clock: IClock { public DateTime GetTime() { return DateTime.Now; } } |
Consumer controllers
For the sake of this example, you are going to slightly modify the HomeController that comes with the default project template. The most important change is the addition of a new parameter to the constructor and a private variable to hold the reference of the external dependency.
Code Listing 4-5
private readonly ILogger<HomeController> _logger; private readonly IClock _clock; public HomeController(ILogger<HomeController> logger, IClock clock) { _logger = logger; _clock = clock; } |
Obviously, you also have to use the dependency somehow. For this example, just write the current time in the home page by modifying the Index method.
Code Listing 4-6
public IActionResult Index() { ViewData["Message"] = $"It is {_clock.GetTime().ToString("T")}"; return View(); } |
You also have to change the view Home/Index to display the value.
Code Listing 4-7
<div class="text-center"> <h1 class="display-4">Welcome</h1> <p>@ViewData["Message"]</p> <p>Learn about <a href="https://...">building Web apps with ASP.NET Core</a>.</p> </div> |
The complete file for the HomeController is provided in the following listing.
Code Listing 4-8
public class HomeController : Controller { private readonly ILogger<HomeController> _logger; private readonly IClock _clock; public HomeController(ILogger<HomeController> logger, IClock clock) { _logger = logger; _clock = clock; } public IActionResult Index() { ViewData["Message"] = $"It is {_clock.GetTime().ToString("T")}"; return View(); } ...
} |
Tying it all together via the configuration
If you run the project now, you will get the following error: Unable to resolve service for type 'Services.IClock' while attempting to activate 'Controllers.HomeController'.
This is because you haven't configured the IoC container yet. It needs to be configured so that it injects the right class (Clock) in all objects that declare a dependency of type IClock as a parameter of the constructor. You’ve already seen how this has to be done via the ConfigureServices method.
Code Listing 4-9
public void ConfigureServices(IServiceCollection services) { // Add framework services. services.AddControllersWithViews(); // Add application services. services.AddTransient<IClock, Clock>(); } |
The first line configures the application to use ASP.NET Core MVC, and the second one adds our simple clock service. We've shown how to use dependency injection in an ASP.NET application using a very simple external service that just gives the time, but the main elements needed are all there:
- A consumer class that declares its dependencies via parameters in the constructor (by referencing their interfaces).
- The interface of the service.
- The concrete implementation of the interface.
- The configuration that binds the interface and implementation together and informs the container of their existence.
Environments
Most applications we deploy need to handle at least two or more environments. For example, in a small application, we have the development environment (also known as dev), the production environment, and in some cases, the staging environment.
More complex projects need to manage several environments, like quality assurance (QA), user acceptance test (UAT), pre-production, and so on. In this book, we are showing only what comes out of the box with ASP.NET Core, but you will see how to easily add new environments.
One of my favorite features of ASP.NET Core, which is included with the framework, is called hosting environment management. It allows you to work with multiple environments with no friction. But before diving deeper into this feature, you have to understand what the developer needs are.
Old approach
A good developer should never work on a production database, production storage, a production machine, and so on. Usually, in a .NET application, a developer manages this problem using the applicationSettings section in the web.config file, combined with config transformation syntax (more info at MSDN) and preprocessor directives.
This approach is tricky, and it requires you to build the application differently for each environment because the config transformation and the preprocessor directives are applied at compile time. Further, this approach makes your code hard to read and maintain.
As you may have noticed in the previous chapters, the web.config file is used only to configure the AspNetCoreModule in case our application must be hosted on internet information services (IIS); otherwise, it is useless.
For this reason, don’t use the config transformation approach—use something cooler.
New approach
ASP.NET Core offers an interface named IHostingEnvironment that has been available since the first run of our application. This means we can easily use it in our Startup.cs file if we need it.
To detect that the application is running, the implementation of IHostingEnvironment reads a specific environment variable called ASPNETCORE_ENVIRONMENT and checks its value. If it is Development, it means you are running the application in development mode. If it is Staging, you are running the application in a staging mode, and so on for all the environments you need to manage.
Because this approach is based on an environment variable, the switch between the configuration files happens at runtime, and not at compile time like the old ASP.NET.
Visual Studio
Visual Studio has a Run button, which is pretty awesome for developers because it runs the application, attaching the debugger. But what environment will be used by Visual Studio when you click the Run button?
By default, Visual Studio uses development mode, but if you want to change it or configure a new environment, you can do so easily by looking at the file launchSettings.json, available in the Properties folder of your application.
If you open it, you should have something like this.
Code Listing 4-10
{ "iisSettings": { "windowsAuthentication": false, "anonymousAuthentication": true, "iisExpress": { "applicationUrl": "http://localhost:50071", "sslPort": 44323 } }, "profiles": { "IIS Express": { "commandName": "IISExpress", "launchBrowser": true, "environmentVariables": { "ASPNETCORE_ENVIRONMENT": "Development" } }, "Syncfusion.Asp.Net.Core.Succinctly.WebAppStartup": { "commandName": "Project", "launchBrowser": true, "applicationUrl": "https://localhost:5001;http://localhost:5000", "environmentVariables": { "ASPNETCORE_ENVIRONMENT": "Development" } } } } |
The iisSettings section contains all the settings related to IISExpress, while the profiles section contains the Kestrel configurations. If you are familiar with the JSON format, you can edit all these values in Visual Studio by following the steps depicted in Figures 4-2 and 4-3.
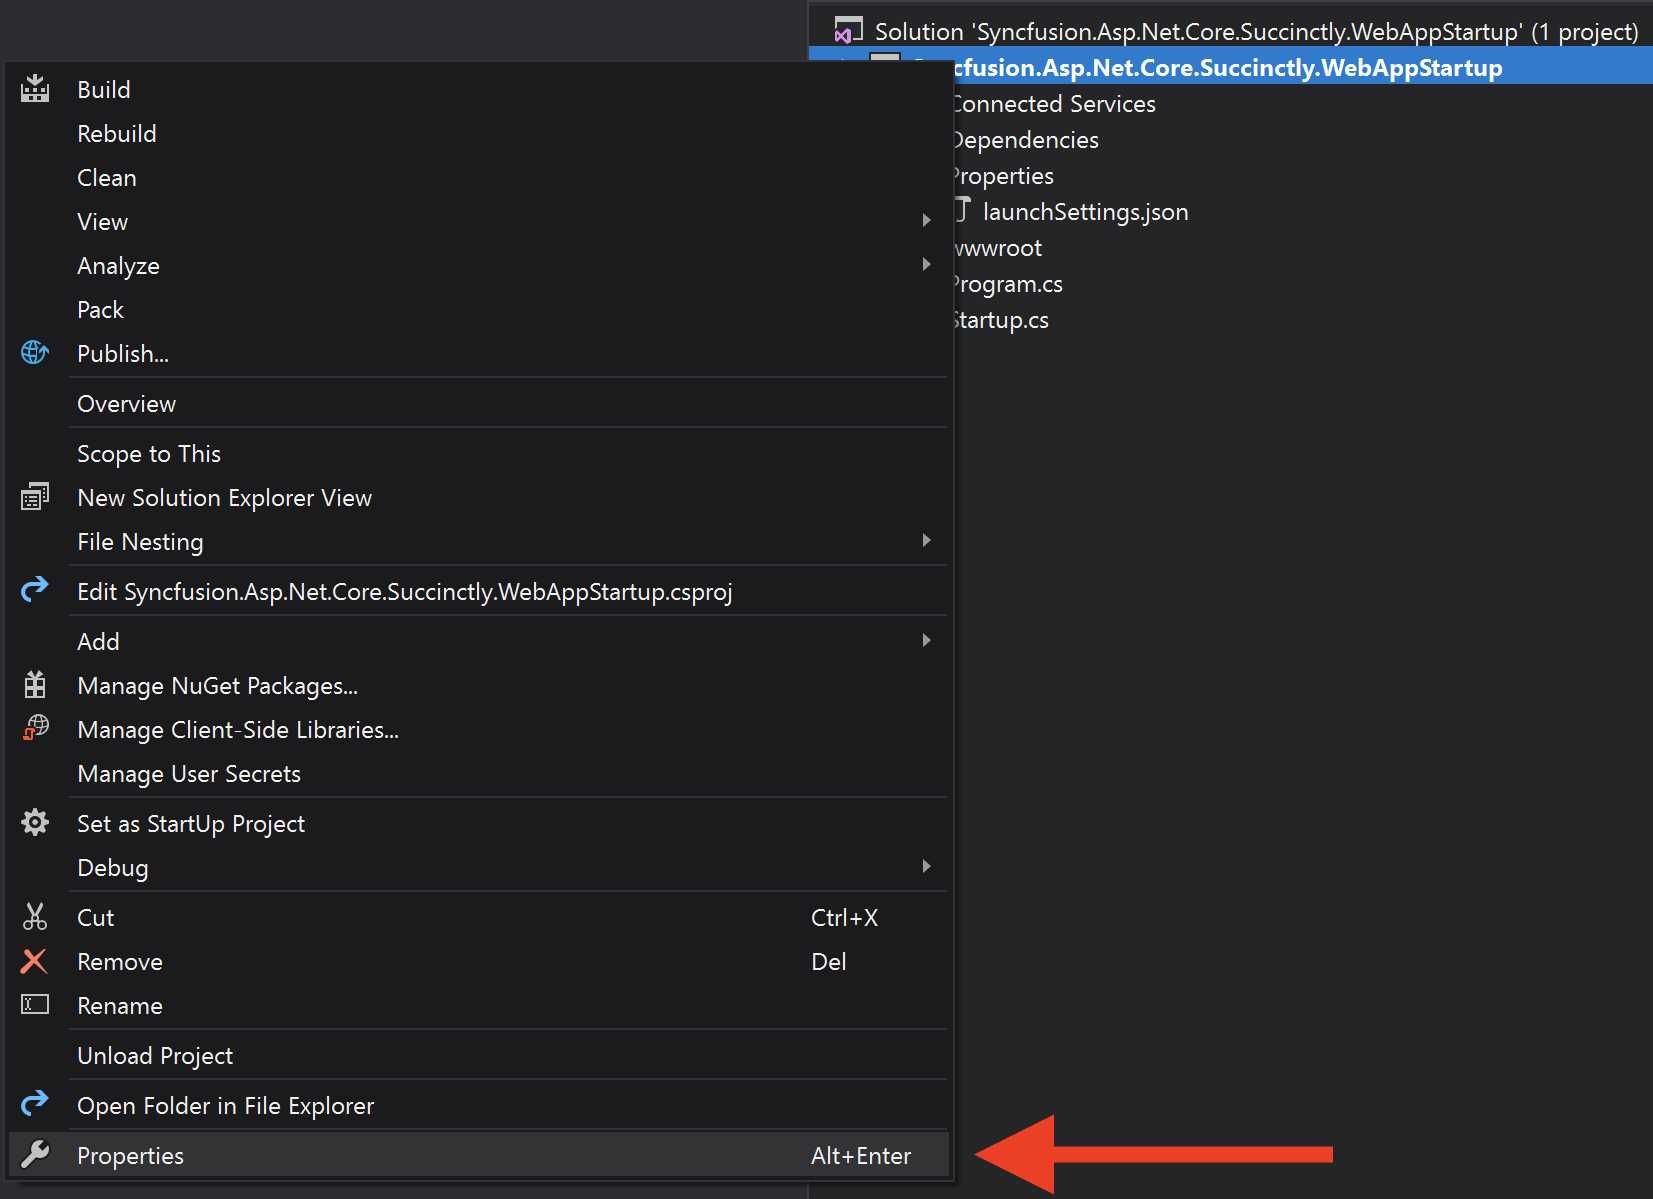
Figure 4-2: Changing IIS Express Settings, Step 1
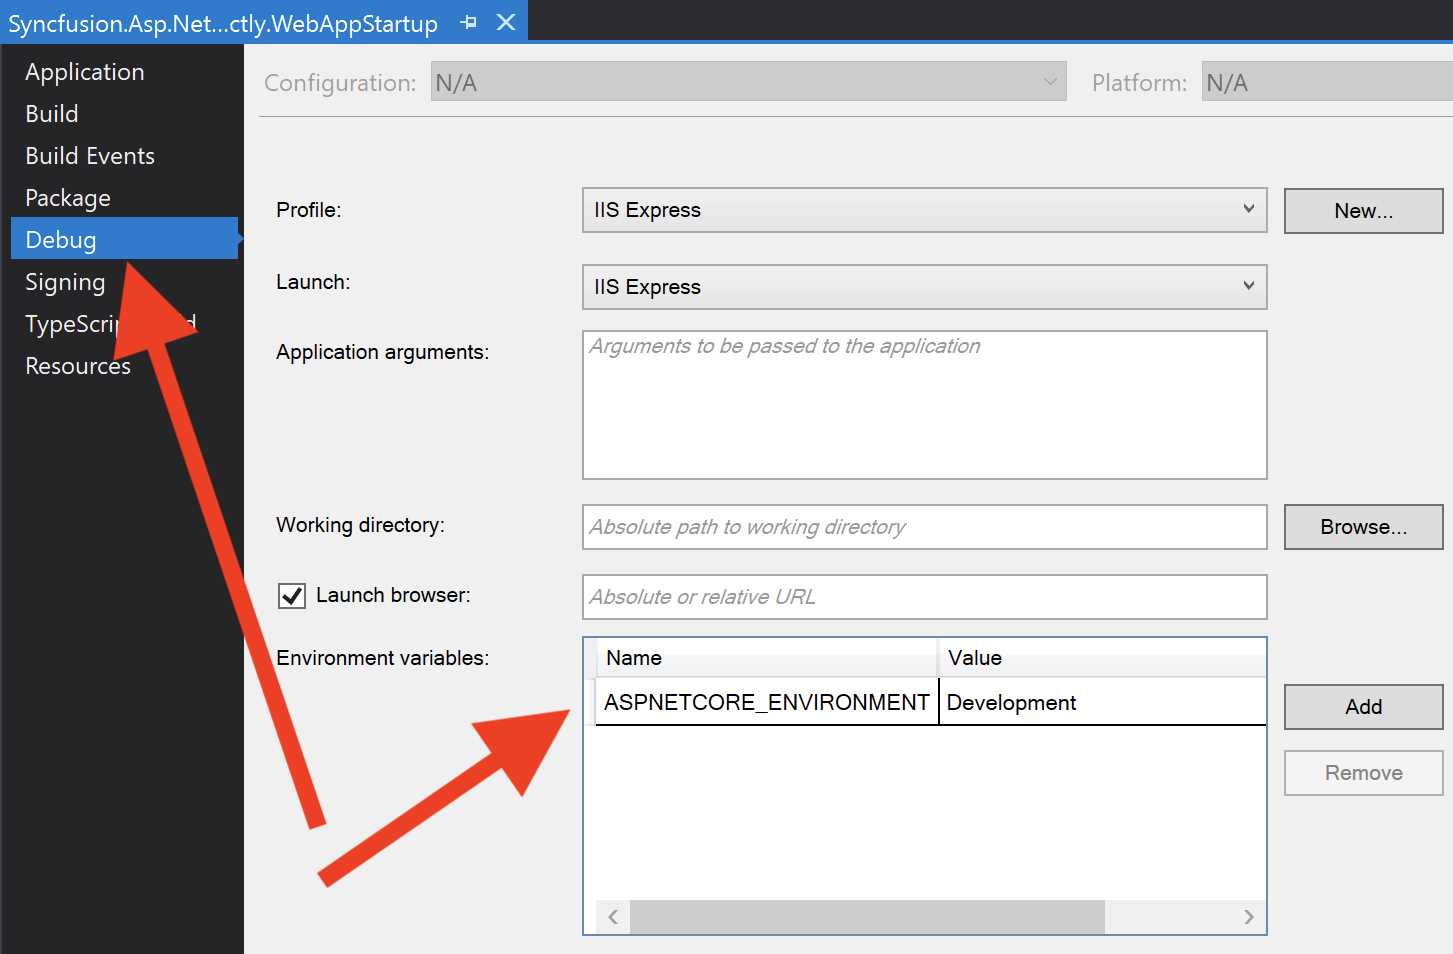
Figure 4-3: Changing IIS Express Settings, Step 2
From here, you can also change the settings in the case of Kestrel by using the drop-down menu at the top. If you prefer to work directly with JSON and want to change the environment, change the value for ASPNETCORE_ENVIRONMENT, and then save the file or add a new item in the profiles section with our settings.
If you want to run your project outside of Visual Studio (by using the command line) and you want to force a specific profile defined in launchSettings.json, you can do this using a specific argument (dotnet run --launch-profile Development).
IHostingEnvironment
Sometimes a web application needs something more than switching the connection string from a developer database to a production database. For example, you may need to see the stack trace of an error if you are running the app on a local machine, or you may need to show an error page to the end user in the production version.
There are several ways to do that. The most common is undoubtedly to inject the IHostingEnvironment interface into the Configure method and use it to change the behavior of your app. This is already done for you by using the ASP.NET Core project template.
Code Listing 4-11
using System; using System.Collections.Generic; using System.Linq; using System.Threading.Tasks; using Microsoft.AspNetCore.Builder; using Microsoft.AspNetCore.Hosting; using Microsoft.AspNetCore.Http; using Microsoft.Extensions.DependencyInjection; namespace Syncfusion.Asp.Net.Core.Succinctly.WebAppStartup { public class Startup { public void ConfigureServices(IServiceCollection services) { } public void Configure(IApplicationBuilder app, IWebHostEnvironment env) { if (env.IsDevelopment()) { app.UseDeveloperExceptionPage(); } ... } } } |
In this example, the DeveloperExceptionPage middleware is used only if our application is running in development mode, which is exactly what we want.
What we did in this class can be repeated in any part of your code as a controller, a service, or whatever needs to be different among the environments.
Startup class
The Startup class is absolutely the most important class in your application because it defines the pipeline of your web application and registers all the needed middleware components. Because of this, it might be very complex with lots of lines of code. If you add checking for the environment, everything could be even more complicated and difficult to read and maintain.
For this reason, ASP.NET Core allows you to use different startup classes: one for each environment you want to manage, and one for different "configure" methods.
Let's look at the Program.cs file.
Code Listing 4-12
public class Program { public static void Main(string[] args) { CreateHostBuilder(args).Build().Run(); } public static IHostBuilder CreateHostBuilder(string[] args) => Host.CreateDefaultBuilder(args) .ConfigureWebHostDefaults(webBuilder => { webBuilder.UseStartup<Startup>(); }); } |
The method .UseStartup<Startup>() is very clever. It can switch between different classes automatically if you are following the right convention (method name + environment name).
For example, if you duplicate the Startup class and rename it StartupDevelopment, the extension method will automatically use the new one in the development environment.
You can use the same convention for the Startup class methods. So, duplicate the Configure method of the Startup.cs file, call it ConfigureDevelopment, and it will be called instead of the original one only in the development environment.
Create your own environment
We already mentioned environments like user acceptance test (UAT) or quality assurance (QA), but the IHostingEnvironments interface doesn't offer the methods IsUAT() or IsQualityAssurance. So how can you create one?
If you think about it, the answer is pretty easy. You assign a new value to the ASPNETCORE_ENVIRONMENT variable using a set command in a command shell (QualityAssurance) and create an extension method, like this.
Code Listing 4-13
using Microsoft.AspNetCore.Hosting; namespace Syncfusion.Asp.Net.Core.Succinctly.Environments.Extensions { public static class HostingEnvironmentExtensions { public static bool IsQualityAssurance(this IHostingEnvironment hostingEnvironment) { return hostingEnvironment.EnvironmentName == "QualityAssurance"; } } } |
Now, keeping with the previous example, we can use the extension method like this.
Code Listing 4-14
using System; using System.Collections.Generic; using System.Linq; using System.Threading.Tasks; using Microsoft.AspNetCore.Builder; using Microsoft.AspNetCore.Hosting; using Microsoft.AspNetCore.Http; using Microsoft.Extensions.DependencyInjection; using Syncfusion.Asp.Net.Core.Succinctly.Environments.Extensions; namespace Syncfusion.Asp.Net.Core.Succinctly.WebAppStartup { public class Startup { public void ConfigureServices(IServiceCollection services) { } public void Configure(IApplicationBuilder app, IWebHostEnvironment env) { if (env.IsDevelopment() || env.IsQualityAssurance()) { app.UseDeveloperExceptionPage(); } app.Run(async (context) => { await context.Response.WriteAsync("Hello World!"); }); } } } |
In subsequent chapters, you will see how to use IHostingEnvironments in views or configuration files.
Static files
One of the main features of ASP.NET Core is that it can be as lean as you like. This means you are responsible for what you’re going to put into the application, but it also means you can make the application very simple and fast.
In fact, if you start your project from an empty ASP.NET Core web application template, the application will not be able to serve static files. If you want to do it, you have to use a specific middleware.
A common question is: “Why doesn't it support static files by default if all websites need static files?" The truth is that not all websites need to serve static files, especially on high-traffic applications. In this case, the static files should be hosted by a content delivery network (CDN). Moreover, your web application could be an API application that usually serves data using JSON or XML format instead of images, stylesheets, and JavaScript.
Configure static files
As you’ll see by reading this book, most of the configurations are managed by middleware components available on NuGet, but thanks to the new metapackage called Microsoft.AspNetCore.App, you don't need to install them each time you need one. The metapackage already includes all the most-needed packages for a web application, including Microsoft.AspNetCore.StaticFiles.
Now that you know this, you can edit the Startup.cs file to add the specific middleware, UseStaticFiles.
Code Listing 4-15
using System; using System.Collections.Generic; using System.Linq; using System.Threading.Tasks; using Microsoft.AspNetCore.Builder; using Microsoft.AspNetCore.Hosting; using Microsoft.AspNetCore.Http; using Microsoft.Extensions.DependencyInjection; using Syncfusion.Asp.Net.Core.Succinctly.Environments.Extensions; namespace Syncfusion.Asp.Net.Core.Succinctly.WebAppStartup { public class Startup { public void ConfigureServices(IServiceCollection services) { } public void Configure(IApplicationBuilder app, IWebHostEnvironment env) { if (env.IsDevelopment() || env.IsQualityAssurance()) { app.UseDeveloperExceptionPage(); } app.UseStaticFiles(); app.Run(async (context) => { await context.Response.WriteAsync("Hello World!"); }); } } } |
You are almost ready. The last, but still important, thing to know is that static files are served from a special folder called wwwroot.
If you created the project via the Empty template, you have to create it by yourself; otherwise it will already be there.
If you want to serve a file called image1.jpg for the request http://localhost:5000/image1.jpg, you have to put it into the root of the wwwroot folder, not in the root of the project folder like you were doing with the previous version of ASP.NET.
Single-page application
Another scenario where the static-file middleware component combined with an ASP.NET Core application could be very useful is a web app that is a single-page application (SPA).
Here is Wikipedia's definition of an SPA:
A single-page application (SPA) is a web application or website that interacts with the web browser by dynamically rewriting the current web page with new data from the web server, instead of the default method of the browser loading entire new pages.
Basically, most of the business logic is present on the client. The server doesn't need to render different views; it just exposes the data to the client. This is available thanks to JavaScript (combined with modern frameworks like Angular, React, and Vue) and a set of APIs (in our case, developed with ASP.NET MVC Core).
If there is no server-side rendering, the web server must return a static file when the root domain is called by the browser (http://www.mysite.com). To do that, you have to configure the default documents in the Configure method of your Startup class.
If you’re okay with the default documents being preconfigured (default.htm, default.html, index.htm, and index.html), it is enough to add UseFileServer.
Code Listing 4-16
using System; using System.Collections.Generic; using System.Linq; using System.Threading.Tasks; using Microsoft.AspNetCore.Builder; using Microsoft.AspNetCore.Hosting; using Microsoft.AspNetCore.Http; using Microsoft.Extensions.DependencyInjection; using Syncfusion.Asp.Net.Core.Succinctly.Environments.Extensions; namespace Syncfusion.Asp.Net.Core.Succinctly.WebAppStartup { public class Startup { public void ConfigureServices(IServiceCollection services) { } public void Configure(IApplicationBuilder app, IWebHostEnvironment env) { if (env.IsDevelopment() || env.IsQualityAssurance()) { app.UseDeveloperExceptionPage(); } app.UseFileServer(); app.Run(async (context) => { await context.Response.WriteAsync("Hello World!"); }); } } } |
Otherwise, if you need to use a specific file with a different name, you can override the default configuration and specify your favorite files as default documents.
Code Listing 4-17
using System; using System.Collections.Generic; using System.Linq; using System.Threading.Tasks; using Microsoft.AspNetCore.Builder; using Microsoft.AspNetCore.Hosting; using Microsoft.AspNetCore.Http; using Microsoft.Extensions.DependencyInjection; using Syncfusion.Asp.Net.Core.Succinctly.Environments.Extensions; namespace Syncfusion.Asp.Net.Core.Succinctly.WebAppStartup { public class Startup { public void ConfigureServices(IServiceCollection services) { } public void Configure(IApplicationBuilder app, IWebHostEnvironment env) { if (env.IsDevelopment() || env.IsQualityAssurance()) { app.UseDeveloperExceptionPage(); } var options = new DefaultFilesOptions(); options.DefaultFileNames.Clear(); options.DefaultFileNames.Add("mydefault.html"); app.UseDefaultFiles(options); app.UseFileServer(); app.Run(async (context) => { await context.Response.WriteAsync("Hello World!"); }); } } } |
Error handling and exception pages
You can write the best code in the world, but you must accept the fact that errors exist and are part of life. From a certain point of view, you could say that a good application is one that can identify an error in the shortest possible amount of time and return the best possible feedback to the user.
To achieve this goal, you need to deal with different components, like logging frameworks, exception handling, and custom error pages.
We have dedicated a section later in this chapter to logging frameworks, so we are not showing how to configure the logging output here. For now, it is enough to know that, out of the box, ASP.NET Core logs all the exceptions, so you don't need to create an exception middleware component of specific code to log unhandled exceptions.
Of course, if you don't like what comes with the framework, you still have the opportunity to write your own exception handler. The first thing to do is throw an exception into your empty application.
Code Listing 4-18
using System; using Microsoft.AspNetCore.Builder; using Microsoft.AspNetCore.Hosting; using Microsoft.AspNetCore.Http; using Microsoft.Extensions.DependencyInjection; namespace Syncfusion.Asp.Net.Core.Succinctly.WebAppStartup { public class Startup { public void ConfigureServices(IServiceCollection services) { } public void Configure(IApplicationBuilder app) { app.Run(async context => { if (context.Request.Query.ContainsKey("throw")) { throw new Exception("Exception triggered!"); } await context.Response.WriteAsync("Hello World!"); }); } } } |
If you run the application in Code Listing 4-18 and add the variable called throw to the query string like this— http://localhost:5000/?throw (in this case, the application is running using Kestrel with the default configuration)—you should receive an output as follows (although the output page could be different for each browser).
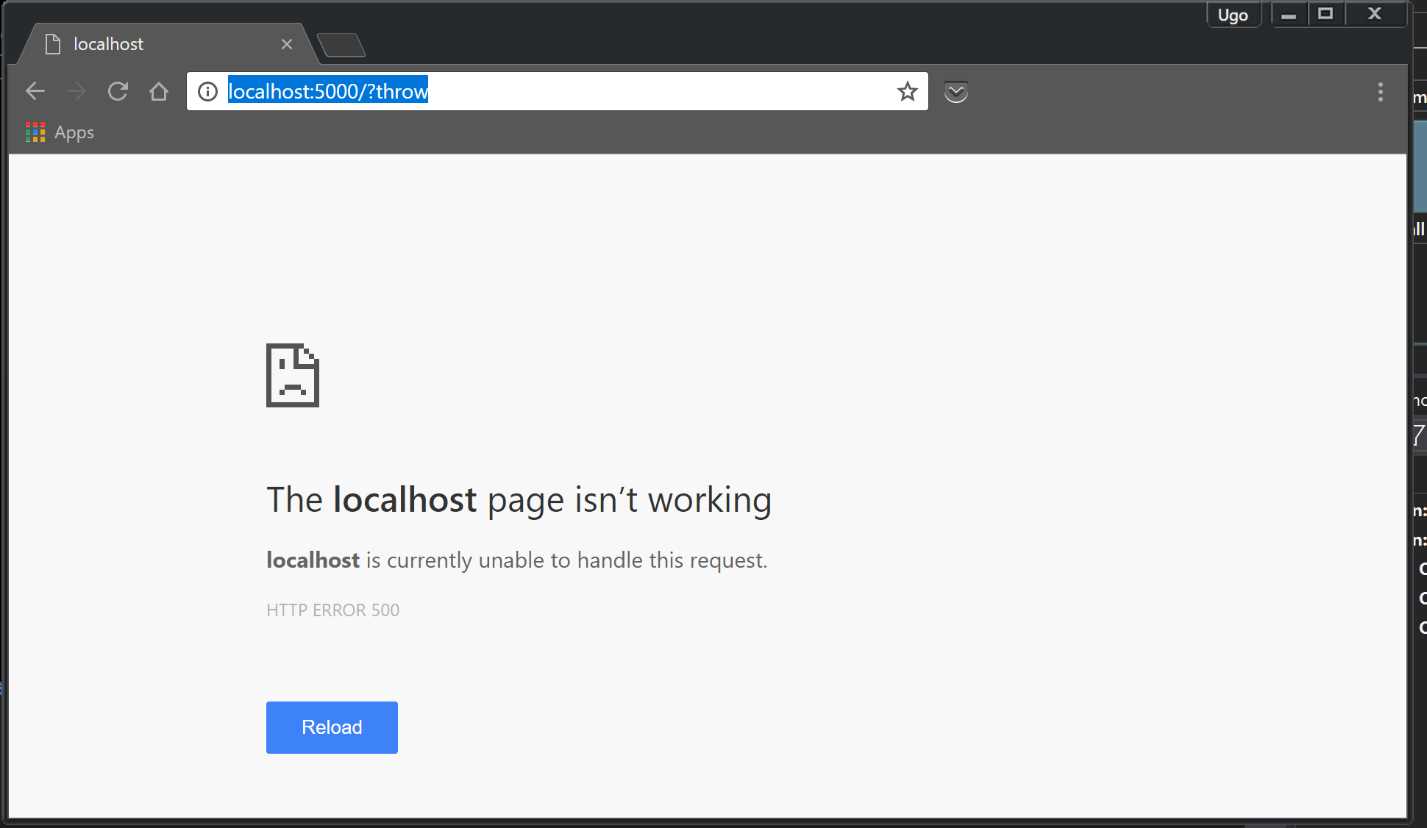
Figure 4-4: Default 500 Error
Developer exception page
As you can see, there isn’t useful information, and the feedback isn’t user-friendly. This is because ASP.NET, for security reasons, doesn't show the stack trace of the exception by default; the end user should never see this error from the server. This rule is almost always valid, except when the user is a developer creating the application. In that case, it is important to show the error.
As demonstrated in the section on environment, it's easy to add this only for a development environment. Fortunately, ASP.NET Core has a better error page than the old YSOD (“yellow screen of death”) generated by the previous version of ASP.NET. To use the new, fancy error page, thanks to the metapackage Microsoft.AspNetCore.App already mentioned, it is enough to add just one line of code into your Startup.cs file.
Code Listing 4-19
public void Configure(IApplicationBuilder app) { app.UseDeveloperExceptionPage();
//..... other code here } |
Restart the web server from Visual Studio and refresh the page; the output should contain more useful information.
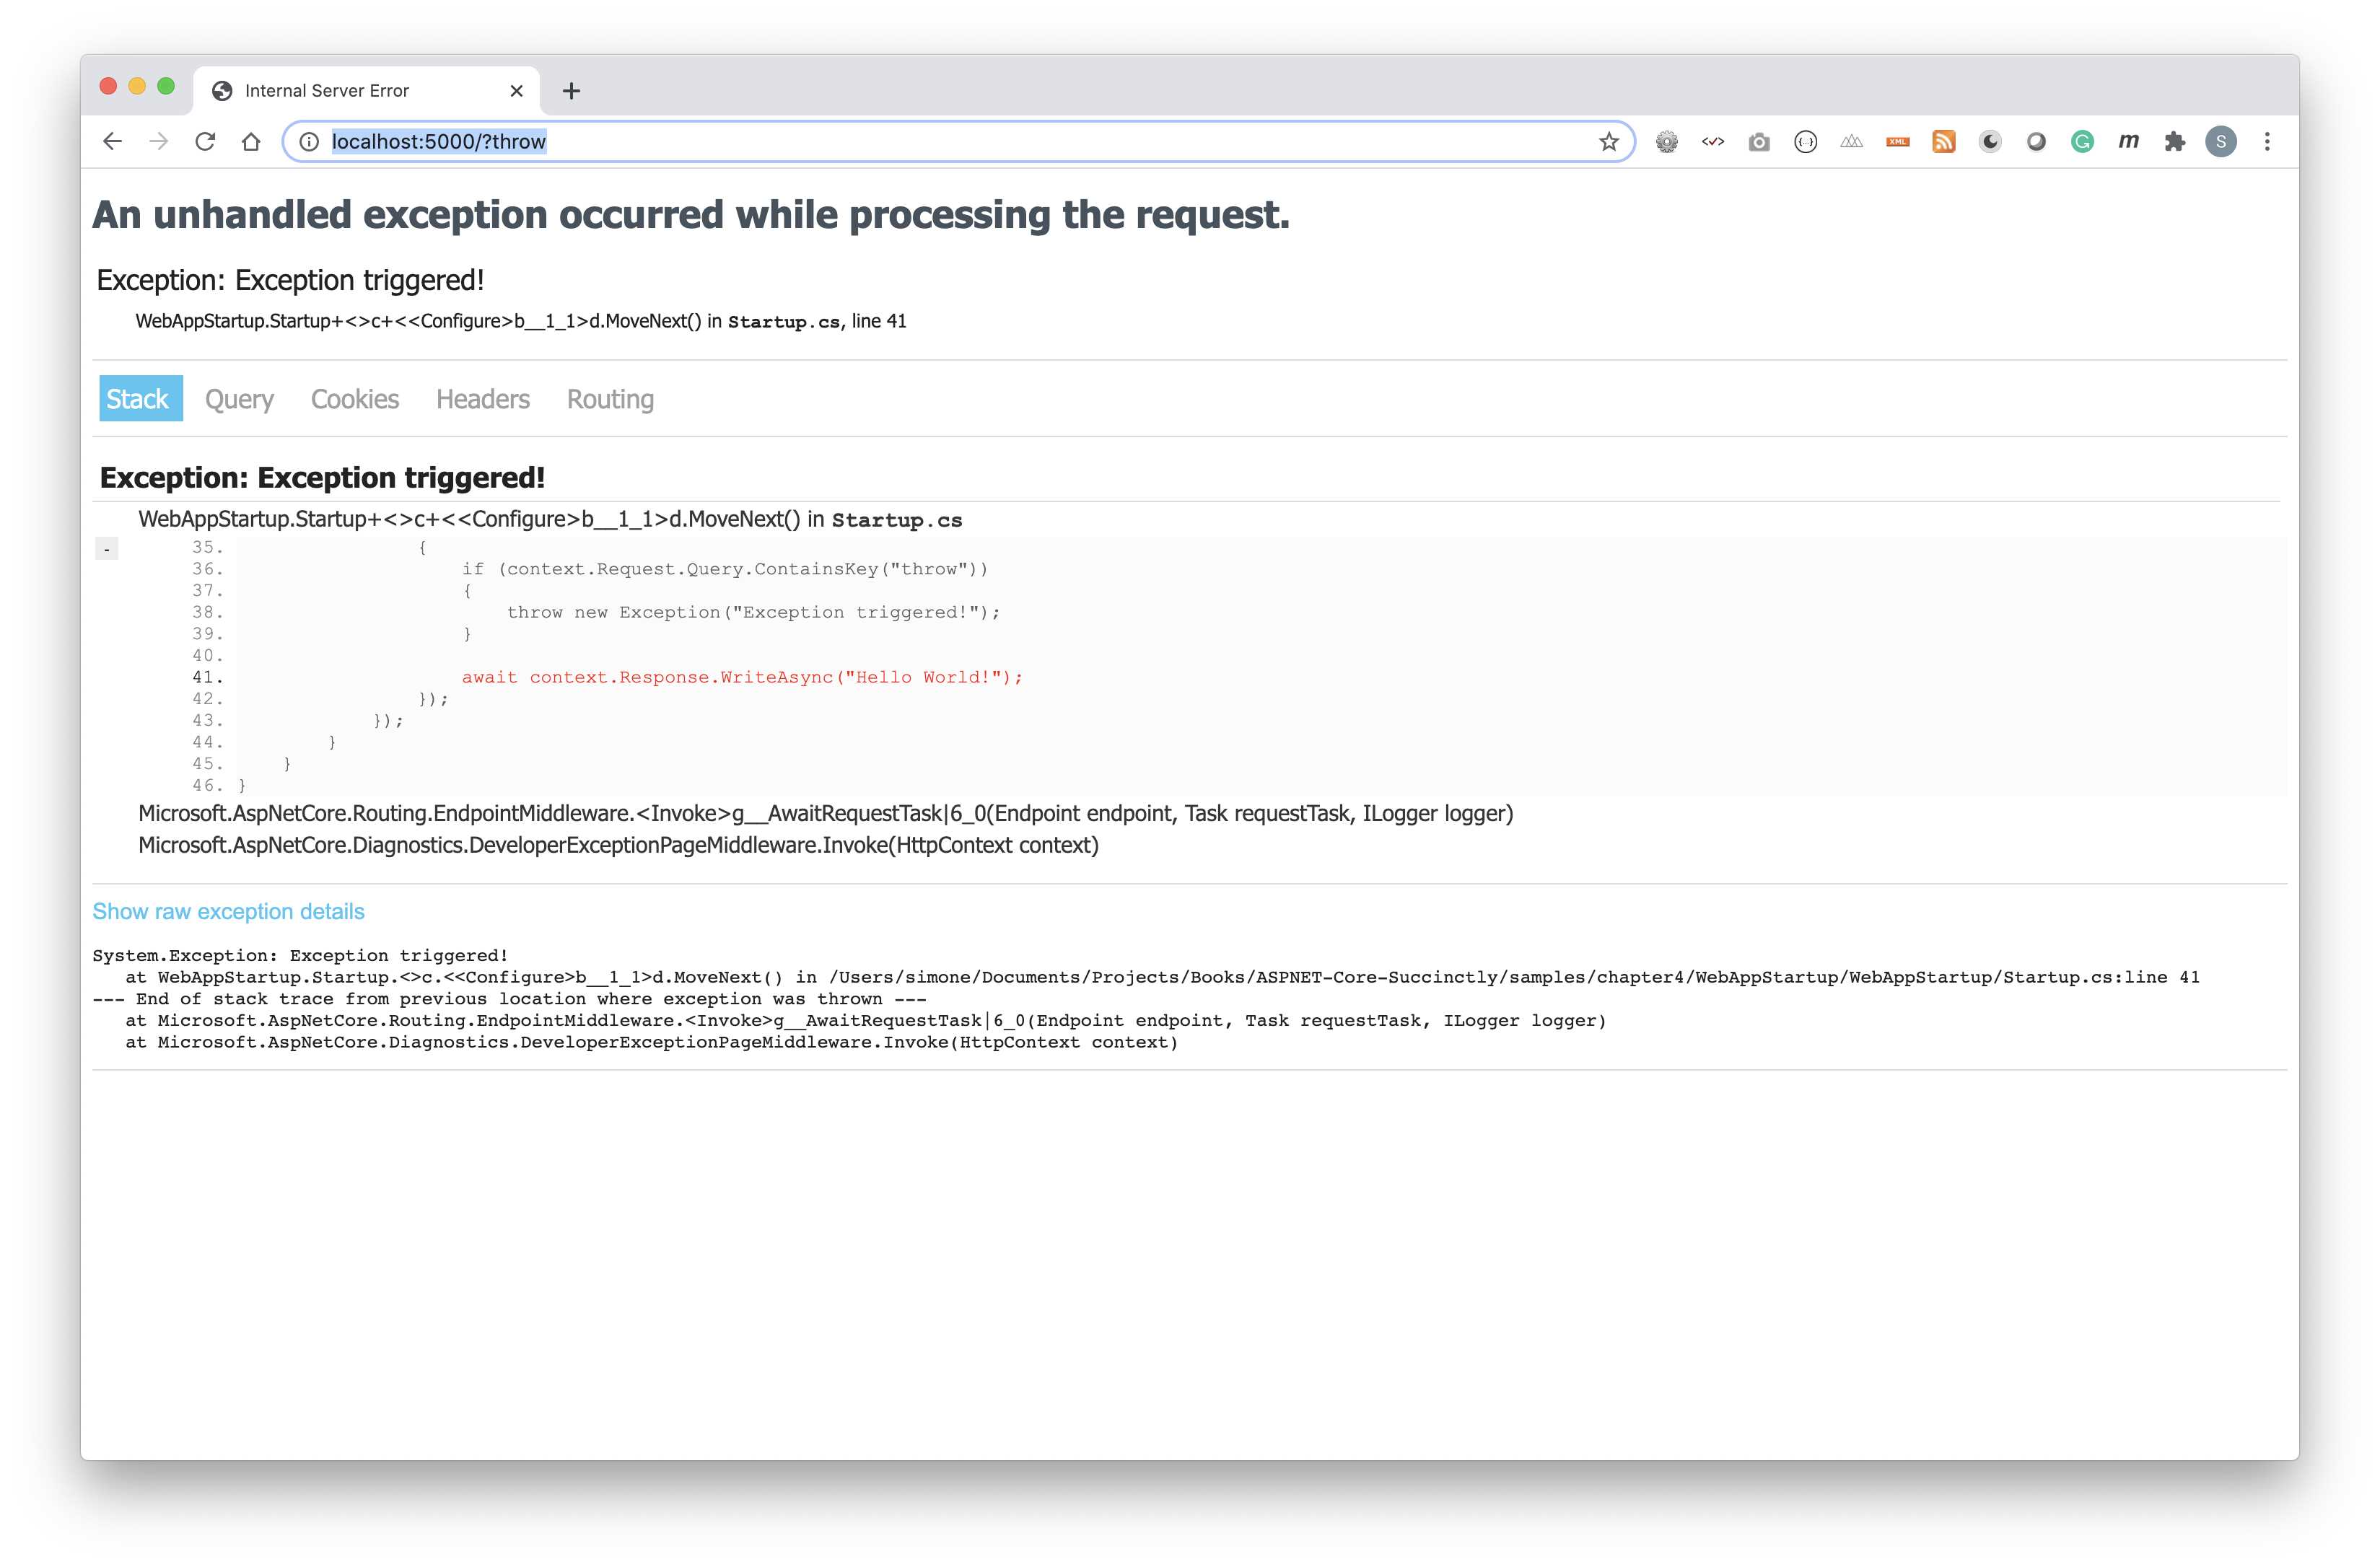
Figure 4-5: Developer Exception Page
On this page, there are four important tabs:
- Stack: Contains the stack information (line of code and callstack).
- Query: Contains all the variables coming from the query string of the request (in this case, there is only one).
- Cookies: Contains all the application cookies with their values.
- Headers: Contains the HTTP headers of the current request.
- Routing: Contains information on the current route.
User-friendly error page
For reasons already explained, you can't show the error information in a production environment, so you have to choose between two possible ways:
- Redirect the user to a specific error page, passing the status code as part of the URL.
- Re-execute the request from a new path.
Let's see the first option.
Code Listing 4-20
app.UseStatusCodePagesWithRedirects("~/errors/{0}.html"); |
In this case, you should create one page for each status code you want to manage and put it in a folder called errors in the wwwroot folder (combined with the UseStaticFiles middleware component, of course).
If you can't use static files, it is enough to remove .html from the string passing through the method and add a specific route on MVC. If you prefer the second option, using another middleware component will suffice.
Code Listing 4-21
app.UseStatusCodePagesWithReExecute("~/errors/{0}"); |
Finally, your error management could be like this.
Code Listing 4-22
if (env.IsDevelopment()) { app.UseDeveloperExceptionPage(); } else { app.UseStatusCodePagesWithRedirects("~/errors/{0}.html"); } |
Configuration files
The way ASP.NET Core handles configuration files changed significantly with the new version. Before ASP.NET Core, you used the AppSettings section of the web.config file, but since the first version of ASP.NET Core, web.config is not needed anymore, unless you are hosting your application on internet information services (IIS).
If the AppSettings section is not needed anymore, how can you store your information? The answer is simple. You use external files (you can have more than one). Fortunately, there is a set of classes that helps manage that. And although it may seem more uncomfortable, it isn’t.
First, choose the file format you prefer. The most common format is JSON, but if you are more familiar with XML, use it.
JSON format
Let's suppose we have an appSettings.json file like this.
Code Listing 4-23
{ "database": { "databaseName": "my-db-name", "serverHost": "mySqlHost", "port": 1433, "username": "username", "password": "password" }, "facebook": { "appId": "app-id", "appSecret": "app-secret" }, "smtp": { "host": "mysuperhost.mysuperdomain.com", "username": "[email protected]", "password": "my-super-secret-password", "enableSsl": true, "port": 587 } } |
The more comfortable way to have all this information in a C# application is by using a class with a set of properties. In a perfect world, it would be a class with the same structure of JSON, like this.
Code Listing 4-24
namespace Syncfusion.Asp.Net.Core.Succinctly.Environments { public class Configuration { public DatabaseConfiguration Database { get; set; } public FacebookConfiguration Facebook { get; set; } public SmtpConfiguration SmtpConfiguration { get; set; } } public class DatabaseConfiguration { public string DatabaseName { get; set; } public string ServerHost { get; set; } public int Port { get; set; } public string Username { get; set; } public string Password { get; set; } public string ConnectionString => $"Server=tcp:{ServerHost},{Port};Database={DatabaseName};User ID={Username};Password={Password};Encrypt=True;TrustServerCertificate=False;Connection Timeout=30;"; } public class FacebookConfiguration { public string AppId { get; set; } public string AppSecret { get; set; } } public class SmtpConfiguration { public string Host { get; set; } public string Username { get; set; } public string Password { get; set; } public bool EnableSsl { get; set; } public int Port { get; set; } } } |
At this point, it remains to hydrate the C# classes with the values from the JSON file. If you called your configuration file, appSettings.json, it comes out of the box (thanks to the new WebHostBuilder), and you can skip this code block.
Otherwise, you have to modify the Program.cs file in order to specify your configurations (you could have more than one), like this.
Code Listing 4-25
using Microsoft.AspNetCore; using Microsoft.AspNetCore.Hosting; using Microsoft.Extensions.Configuration; namespace Syncfusion.Asp.Net.Core.Succinctly.WebAppStartup { public class Program { public static void Main(string[] args) { CreateHostBuilder(args).Build().Run(); } public static IHostBuilder CreateHostBuilder(string[] args) => Host.CreateDefaultBuilder(args) .ConfigureWebHostDefaults(webBuilder => { webBuilder.UseStartup<Startup>(); webBuilder.ConfigureAppConfiguration((builderContext, config) => { config.AddJsonFile("mySettingsFile.json", optional: false, reloadOnChange: true); }); }); } } |
Now you have to move into the Startup class in order to read the configuration, and this is possible by requiring the IConfiguration interface from the constructor.
Code Listing 4-26
using Microsoft.AspNetCore.Builder; using Microsoft.AspNetCore.Hosting; using Microsoft.Extensions.Configuration; using Microsoft.Extensions.DependencyInjection; using Syncfusion.Asp.Net.Core.Succinctly.Environments; namespace Syncfusion.Asp.Net.Core.Succinctly.WebAppStartup { public class Startup { private readonly Configuration _myConfiguration; public Startup(IConfiguration configuration) { _myConfiguration = new Configuration(); configuration.Bind(_myConfiguration); } public void ConfigureServices(IServiceCollection services) { services.AddMvc(); } public void Configure(IApplicationBuilder app, IWebHostEnvironment env) { if (env.IsDevelopment()) { app.UseDeveloperExceptionPage(); } else { app.UseStatusCodePagesWithRedirects("~/errors/{0}.html"); } app.UseMvcWithDefaultRoute(); } } } |
Manage different environments
We already explained the importance of having different environments and how to manage them using C#. The same applies to the configuration. More than ever, you now need different configuration files—one for each environment. Thanks to ASP.NET Core, this is easy to manage. To take advantage of what the framework offers, you have to follow a few rules. The first one is related to configuring file names.
For different files, having one for each environment allows you to add the environment name into the file name. For example, appSettings.json for the development environment must be called appSettings.Development.json, and appSettings.Production.json would be used for a production environment.
The second rule is related to the differences among the files. You don't need to have the complete JSON copied in each configuration file because ASP.NET Core will merge the files, overriding only what is specified in the environment configuration file.
To understand what this means, imagine you have the same database instance, but a different database name. You can log into the database server using the same credentials, but the same server hosts both from production to development; it just switches the database.
To cover this scenario and keep using the appSettings.json file you used before, look at the appSettings.Development.json file.
Code Listing 4-27
{ "database": { "databaseName": "my-development-db-name" } } |
And look at appSettings.Production.json.
Code Listing 4-28
{ "database": { "databaseName": "my-production-db-name" } } |
This is awesome because you can keep the configuration files very lean, but now you need to educate ASP.NET Core on how to handle multiple configuration files. To do that, change the code you wrote previously to this.
Code Listing 4-29
using Microsoft.AspNetCore; using Microsoft.AspNetCore.Hosting; using Microsoft.Extensions.Configuration; namespace Syncfusion.Asp.Net.Core.Succinctly.WebAppStartup { public class Program { public static void Main(string[] args) { CreateHostBuilder(args).Build().Run(); } public static IHostBuilder CreateHostBuilder(string[] args) => Host.CreateDefaultBuilder(args) .ConfigureWebHostDefaults(webBuilder => { webBuilder.UseStartup<Startup>(); webBuilder.ConfigureAppConfiguration((builderContext, config) => { IWebHostEnvironment env = builderContext.HostingEnvironment; config .AddJsonFile("mySettingsFile.json", optional: false, reloadOnChange: true) .AddJsonFile($"mySettingsFile.{env.EnvironmentName}.json", optional: true, reloadOnChange: true); }); }); } } |
Now, for a development environment, you will get my-development-db-name as the database name; otherwise, it will be named my-production-db-name. Remember to keep the same JSON structure in your environment configuration files.
Dependency injection
This last part is related to the use of the configuration values across the application, such as the controller, services, and whatever else needs to read the configuration values.
Register the instance of the configuration class you created earlier to the ASP.NET Core dependency injection container. As usual, go into the Startup.cs class and register the instance.
Code Listing 4-30
public void ConfigureServices(IServiceCollection services) { services.AddSingleton(_myConfiguration); } |
For configuration scenarios, the Singleton lifecycle is the best option. To get the values into the services, inject the instance on the constructor.
Code Listing 4-31
namespace Syncfusion.Asp.Net.Core.Succinctly.Environments { public class MySimpleService { private readonly Configuration configuration; public MySimpleService(Configuration configuration) { this.configuration = configuration; } } } |
Logging
Logging is very important in a web application, and it is very difficult to implement. This is why so many logging frameworks are available. Search the term "logging" on nuget.org, and you’ll see there are more than 4,300 packages.
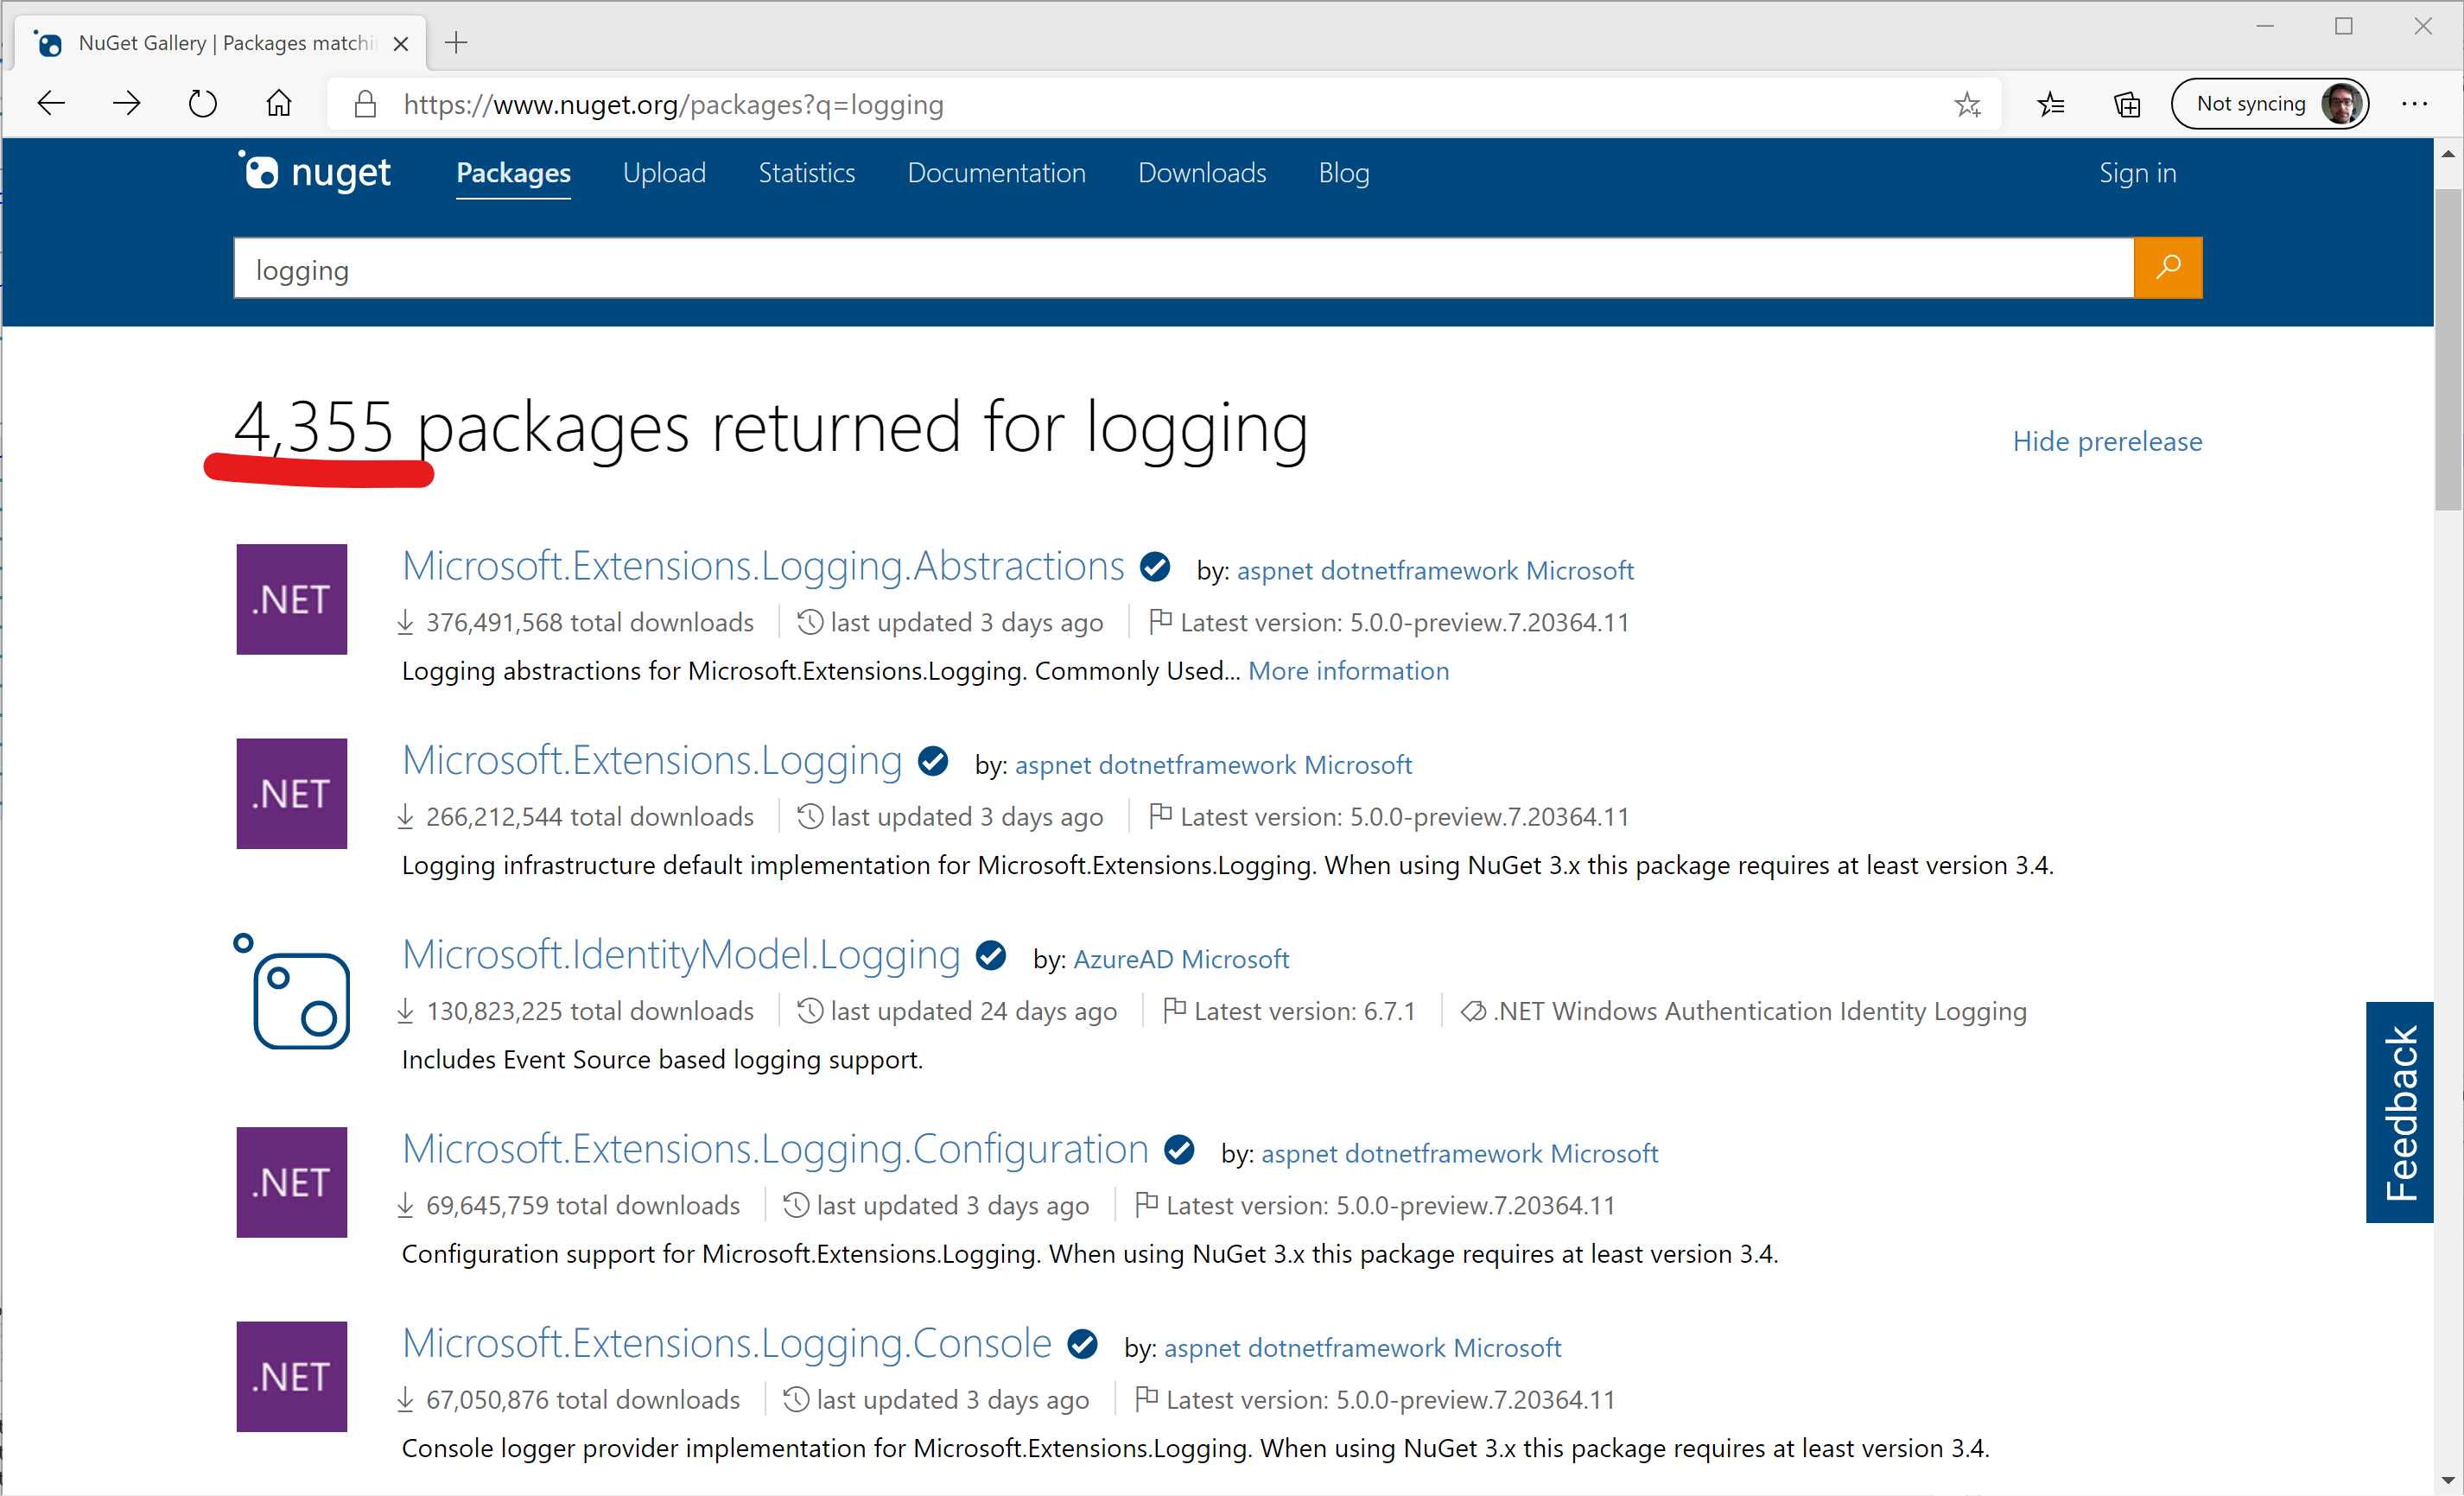
Figure 4-6: NuGet Logging Packages
Of course, not all of the packages are logging frameworks, but almost all are related to logging. Logging is very individualized; it is related to the particular environment or application you are working on.
Modern applications are composed of several packages. The combination of several logging frameworks and several packages makes the logging ecosystem very complicated. What happens if each package uses its own logging framework, or one that is different from the one used in your application?
It would be a complicated mess to configure each one for each environment. You’d probably spend a lot of time configuring logging instead of writing good code.
To solve this problem, before ASP.NET Core, there was a library called Common.Logging .NET (the official repository is on GitHub) that provided a simple logging abstraction to switch between different logging implementations, like log4net, NLog, and Serilog.
It would be pretty cool if all packages used this, because you could configure the logging once in a single place. Unfortunately, this doesn't allow you to log the code that comes from the .NET Framework, because it doesn't have dependencies as opposed to external libraries.
With ASP.NET Core, this problem is completely solved. You don't have to use the Common.Logging .NET library because the framework offers something similar out of the box, and it is integrated with all the packages.
Configuring logging
First of all, you have to choose the output of the log you want—for example, console application, TraceSource, or EventLog.
Kestrel could be very helpful to use the console output, but thanks to the metapackage Microsoft.AspNetCore.App, you are ready to use the following providers:
- Console: The output will be printed into the console application (useful for Kestrel).
- Debug: The output will be printed into the debug windows in Visual Studio.
- EventSource: Useful if you like to analyze your logs using PerfView.
- TraceSource: This one is useful if you are running on .NET Framework instead of .NET Core. You can learn more about it here.
The logging output can be configured in the Program.cs file.
Visual Studio (and Visual Studio Code) offers an incredible feature called IntelliSense, so it suggests all the available options to us.
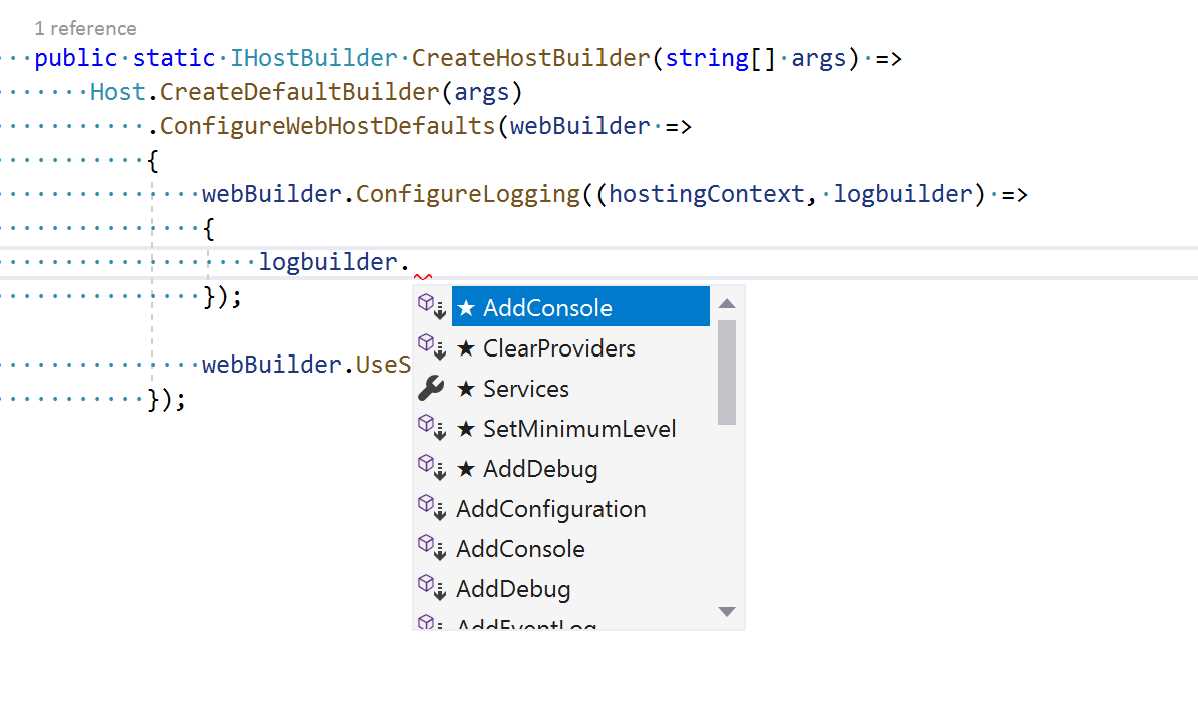
Figure 4-7: Configuring Logging
Let's see the Program.cs file.
Code Listing 4-32
using System; using System.Collections.Generic; using System.IO; using System.Linq; using System.Threading.Tasks; using Microsoft.AspNetCore; using Microsoft.AspNetCore.Hosting; using Microsoft.Extensions.Configuration; using Microsoft.Extensions.Logging; namespace Syncfusion.Asp.Net.Core.Succinctly.WebAppStartup { public class Program { public static void Main(string[] args) { CreateHostBuilder(args).Build().Run(); } public static IWebHostBuilder CreateHostBuilder(string[] args) => Host.CreateDefaultBuilder(args) .ConfigureLogging((hostingContext, logbuilder) => { logbuilder.AddConsole(); logbuilder.AddDebug(); }) .UseStartup<Startup>(); } } |
You didn’t really have to add those lines since, by default, an ASP.NET Core application already has Console, Debug, EventSource, and EventLog (on Windows only) enabled. But that’s what you would need to do to add other logging providers.
Testing logging
The best part of this logging system is that it is natively used by the ASP.NET Core framework. When running the application, you should see the following output.
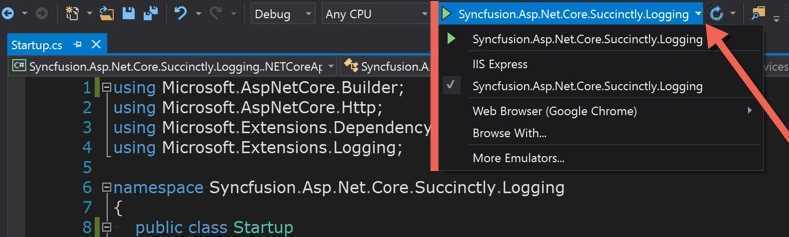
Figure 4-8: Running a Web Application Using Kestrel
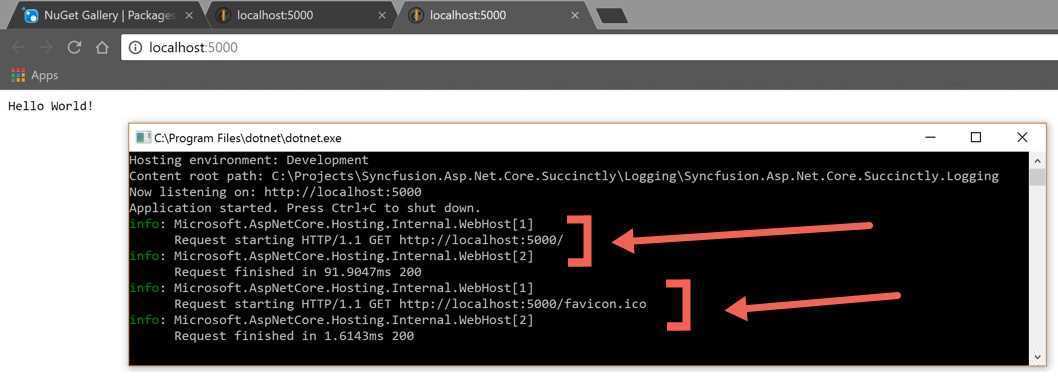
Figure 4-9: Web Application Console Output
Each request is logged twice: first when the server receives the request, and second when the server completes the request. In the figure, there are four logs in two groups: the first when the browser requests the page, and the second when it requests the favicon.
Change log verbosity
Without tuning the configuration, the log implementations write all information into the output. To restrict large amounts of data in the log output, you can configure it to log only information starting from a specific level. ASP.NET Core logging has six levels:
- Trace = 0
- Debug = 1
- Information = 2
- Warning = 3
- Error = 4
- Critical = 5
In a production environment, you probably want to log starting from the Warning or Error level.
You can do it using the ILogBuilder interface, as shown in the following code.
Code Listing 4-33
using System; using System.Collections.Generic; using System.IO; using System.Linq; using System.Threading.Tasks; using Microsoft.AspNetCore; using Microsoft.AspNetCore.Hosting; using Microsoft.Extensions.Configuration; using Microsoft.Extensions.Logging; using Microsoft.Extensions.Logging.Console; namespace Syncfusion.Asp.Net.Core.Succinctly.WebAppStartup { public class Program { public static void Main(string[] args) { CreateHostBuilder(args).Build().Run(); } public static IHostBuilder CreateHostBuilder(string[] args) => Host.CreateDefaultBuilder(args) .ConfigureWebHostDefaults(webBuilder => { webBuilder.ConfigureLogging((hostingContext, logbuilder) => { if (hostingContext.HostingEnvironment.IsProduction()) { logbuilder.SetMinimumLevel(LogLevel.Warning); } else { logbuilder.SetMinimumLevel(LogLevel.Debug); } logbuilder.AddConsole(); logbuilder.AddDebug(); }); webBuilder.UseStartup<Startup>(); }); } } |
Personally, I don't like this code, because you have to use an if statement to change the logging configuration. Fortunately, ILogBuilder offers another way to change the logging behavior via the configuration file.
Code Listing 4-34
webBuilder.ConfigureLogging((hostingContext, logbuilder) => { logbuilder.AddConfiguration(hostingContext.Configuration.GetSection("Logging")) logbuilder.AddConsole(); logbuilder.AddDebug(); }); |
In this way, it is enough to specify the correct logging configuration into your configuration file.
Code Listing 4-35
{ "Logging": { "LogLevel": { "Default": "Debug", "System": "Information", "Microsoft": "Information" }, "Console": { "IncludeScopes": true } } } |
More information about logging with ASP.NET Core 3.x is available here.
Add the log to your application
You’ve seen how to configure the log and its output with the .NET Core Framework, but you didn't see how to use it in classes. Thanks to dependency injection, it is very easy: just inject the logger instance into the constructor and use it.
The class to inject is ILogger<T>, where T is the class that needs to be logged.
Code Listing 4-36
using Microsoft.Extensions.Logging; namespace Syncfusion.Asp.Net.Core.Succinctly.Logging { public class MyService { private readonly ILogger<MyService> _logger; public MyService(ILogger<MyService> logger) { _logger = logger; } public void DoSomething() { _logger.LogInformation("Doing something ..."); //.... do something } } } |
Create a custom logger
We are not going to explain how to create your own custom logger, but there are several repositories where you can see how to do that. Here is a short list:
Health checks
Health checks are a new feature introduced with ASP.NET Core 2.2 that allows an ASP.NET Core application to report its own health status over an HTTP endpoint. These endpoints can be used by networking or orchestration infrastructure to decide whether to direct traffic to the application.
For example, a load balancer might decide to take the application out of the pool if it becomes unhealthy, and wait till it becomes healthy again before re-including it. Also, health monitoring tools can check and report the status of applications.
Basic checks
By default, ASP.NET Core provides only a basic health check, which tells whether the app is running or not. But more advanced probes can be developed to check, for example, memory or disk usage, and even dependencies such as database connections or external services.
Let's see how to configure the basic health check. All that is needed is to add two lines of code, one in the ConfigureServices, and one in the Configure methods.
Code Listing 4-37
public void ConfigureServices(IServiceCollection services) { ... services.AddHealthChecks(); ... } public void Configure(IApplicationBuilder app, IWebHostEnvironment env) { ... app.UseEndpoints(endpoints => { ... endpoints.MapHealthChecks("/health"); ... }); ... } |
The first configures the service to register different health checks, and the second registers the middleware to respond on the endpoint /health.
Database checks
This basic probe does nothing more than return Healthy if the application is running. But more sophisticated probes can be added from ASP.NET Core directly or by either writing your own (by implementing the IHealthCheck interface) or using some contributed by the community, like the AspNetCore.Diagnostics.HealthChecks package. This way you can provide health checks for database engines, queues, caches, and so on.
To add the SQL Server check, modify the call to AddHealthChecks by specifying the additional check you want to run.
Code Listing 4-38
services.AddHealthChecks() .AddSqlServer(Configuration["ConnectionStrings:DefaultConnection"]); |
Since this is a community feature, you need to install the NuGet package AspNetCore.HealthChecks.SqlServer.
This just checks that your app can connect to the database server and can run a simple query (the check in this package executes SELECT 1), but doesn't say anything about your specific database. If you use Entity Framework to connect to your database, you can also check that the database has been correctly created with all tables needed.
Code Listing 4-39
services.AddHealthChecks() .AddDbContextCheck<MyAppDbContext>(); |
Also this health check needs an additional nuget package, this time from Microsoft: Microsoft.Extensions.Diagnostics.HealthChecks.EntityFrameworkCore.
Application readiness and liveness
In some cases, an application might be functioning, but not be ready to respond to requests. This could be an application with a long startup time, for example initializing a cache, or similar long operations. In this case, we can differentiate two type of states:
- Readiness: Indicates when an app can respond to requests.
- Liveness: Indicates when the app is functional.
Normally the readiness check is only performed when an application has just been started, to make sure the load balancer or orchestrator can start directing traffic. After the application becomes "ready," only the liveness check is performed.
Typically, while a Liveness probe would return Healthy or Unhealthy, the readiness probe could return Degraded if the application is not ready to process requests yet.
Additional customization
The health check system is widely customizable. You can specify to run the health endpoint on a separate port by passing its value in the call to the MapHealthChecks function.
Code Listing 4-40
endpoints.MapHealthChecks("/health", port: 5002); |
Another behavior you can change is the output format. The default behavior is to return Unhealthy if one of the checks fails, and Healthy if all the checks succeed. However, you might want to also see the details of all checks, or have your custom output for a specific load balancer or monitoring software. You can do this by specifying the custom response writer.
The following code listing shows how to code a simple writer that returns the status of each individual check.
Code Listing 4-41
endpoints.MapHealthChecks("/health", new HealthCheckOptions() { ResponseWriter = WriteResponse }); ... private static Task WriteResponse(HttpContext httpContext, HealthReport result) { var sb = new StringBuilder(); sb.Append($"Overall status: {result.Status}"+Environment.NewLine); foreach (var entry in result.Entries) { sb.Append($" - {entry.Key} : {entry.Value.Status}" + Environment.NewLine); } return httpContext.Response.WriteAsync(sb.ToString()); } |
Conclusion
In this chapter, you learned how to use middleware components to implement features needed by web applications, such as static files, exception handling, dependency injection, hosting, and environment.
Other cool features are also available, like data protection and caching. To find out more, go to www.asp.net.
- 80+ high-performance ASP.NET Core controls, including DataGrid, Charts, and Scheduler.
- Lightweight and responsive.
- Modular and touch-friendly.
- Built-in themes.